Table of Contents >> Show >> Hide
- Before You Start: Gather the Right Tools
- 11 Pro Tips for How To Paint Trim
- 1. Clean the Trim Like You Mean It
- 2. Sand and Dull the Old Finish
- 3. Fill Holes and Caulk Gaps Before You Paint
- 4. Prime for a Smooth, Long-Lasting Finish
- 5. Choose the Right Sheen and Type of Trim Paint
- 6. Decide: Tape or No Tape (and Use It Smartly)
- 7. Load Your Brush Correctly (and Don’t Overwork the Paint)
- 8. Paint in the Right Order
- 9. Sand Lightly Between Coats for a “Factory” Finish
- 10. Time Your Tape Removal and Drying Carefully
- 11. Avoid the Most Common Trim-Painting Mistakes
- Extra Tips for a Professional Look
- Real-World Experiences: What You Learn After Painting Miles of Trim
If you’ve ever stepped back from a freshly painted room and thought, “Hmm… something still looks off,”
chances are it’s the trim. Crisp, clean baseboards, door casings, and window trim are what make a paint
job look professional instead of “weekend experiment.” The good news? With the right prep, tools, and
habits, you can paint trim like a proeven if your day job has nothing to do with a paintbrush.
Below are 11 pro-level tips for how to paint trim that’s smooth, durable, and sharp enough to make your
walls look like they came out of a magazine shoot.
Before You Start: Gather the Right Tools
Pro trim painters are picky about tools, and for good reason. At minimum, you’ll want:
- High-quality 2–2.5 inch angled sash brush
- Painter’s tape (delicate or standard, depending on surfaces)
- Sandpaper (80–120 grit for rough spots, 180–220 for smoothing)
- Wood filler or spackling and a putty knife
- Paintable latex caulk and caulk gun
- Tack cloth or microfiber cloth
- Primer and trim paint (semi-gloss or satin enamel)
11 Pro Tips for How To Paint Trim
-
1. Clean the Trim Like You Mean It
The first step to great trim isn’t paintit’s cleaning. Trim collects dust, pet hair, fingerprints,
and mystery smudges that you don’t notice until your brush drags them through fresh paint.Vacuum along baseboards with a brush attachment, then wipe everything down with a damp cloth and a
gentle cleaner. In high-traffic or greasy areas (kitchens, mudrooms), use a degreasing cleaner or a
trisodium phosphate (TSP) substitute to make sure the paint can actually grab onto the surface.It’s a little tedious, yes. But skipping this step is like putting makeup over sunscreen and sweat
you’re not getting that smooth, polished finish you’re dreaming about. -
2. Sand and Dull the Old Finish
Shiny old trim is your new paint’s worst enemy. A quick sanding scuffs the surface so primer and
paint can grip properly and smooths out old brush marks or drips.Here’s a simple sanding sequence:
- If the trim is in rough shape, start with 80–100 grit to knock down chips and ridges.
- Follow with 120–150 grit to blend repairs.
- Finish with 180–220 grit for a silky-smooth feel.
Wipe away dust with a damp cloth or tack cloth afterward. If your home was built before the late
1970s, check local guidelines for lead paint before sandingsafety first, new color second. -
3. Fill Holes and Caulk Gaps Before You Paint
Nothing ruins a gorgeous trim color like nail holes and gaps that suddenly pop out once the paint
dries. Pros treat filling and caulking as non-negotiable, not “optional if you have time.”Use wood filler (not just lightweight spackle) to fill nail holes, dents, and deeper dings. Press it
in with a putty knife, let it dry, then sand smooth so you can’t feel the patch with your fingertips.Next, run a thin bead of paintable latex caulk along gaps where trim meets the wall or where two
pieces of trim join. Smooth it immediately with a damp finger or caulk tool. You’re not building a
caulk mountain; aim for a slim, neat line that just closes the gap. Let it dry fully before priming. -
4. Prime for a Smooth, Long-Lasting Finish
Primer does more than “add an extra step.” It helps block stains, evens out color, and gives your
trim paint a uniform surface to grab. This matters especially if:- You’re going from dark trim to white.
- You’re painting over oil-based paint with water-based paint.
- The trim has knots or discoloration.
Use a high-quality bonding or stain-blocking primer designed for trim and doors. Apply it in thin,
even coats with your angled brush, and lightly sand with fine-grit sandpaper after it dries. That
light sanding between coats is one of the secrets behind that “how is this so smooth?” finish. -
5. Choose the Right Sheen and Type of Trim Paint
Here’s where many DIYers freeze: satin or semi-gloss? Latex or oil? Enamel or regular interior
paint?For most modern homes, a water-based enamel in a semi-gloss or
satin finish is the sweet spot. It levels well, is easier to clean than flat or eggshell,
and holds up to scuffs from vacuum cleaners, shoes, and kids on scooters who apparently can’t see
walls.- Semi-gloss: Classic, crisp, reflective. Great for detailed trim, doors, and
high-traffic areas where you want durability and a bit of shine. - Satin: Softer, more velvety sheen. Ideal if you want a more modern, understated
look or if your trim isn’t flawless and you don’t want to highlight every bump.
The key is choosing a product labeled specifically for trim, doors, or woodworkthese paints are
formulated to harden and resist wear better than standard wall paints. - Semi-gloss: Classic, crisp, reflective. Great for detailed trim, doors, and
-
6. Decide: Tape or No Tape (and Use It Smartly)
Professional painters are divided into two camps: Team Tape and Team Steady Hand.
If you’re newer to painting trim, painter’s tape is your friend. Run long, continuous strips along
the wall just above the baseboard or along the floor, pressing the edge firmly with a putty knife or
your fingernail to seal it. This helps prevent paint bleed and gives you a crisp line when you peel
it off.If you skip tape, invest in a truly good angled brush and take your time “cutting in” by hand. Load
the brush lightly, press it so the bristles fan slightly, and let just the tip create the edge. You
can absolutely get pro-looking results this waybut it requires patience and practice.Hybrid approach: tape floors and sensitive surfaces, hand-cut along walls. It saves tape and time
while keeping your sanity intact. -
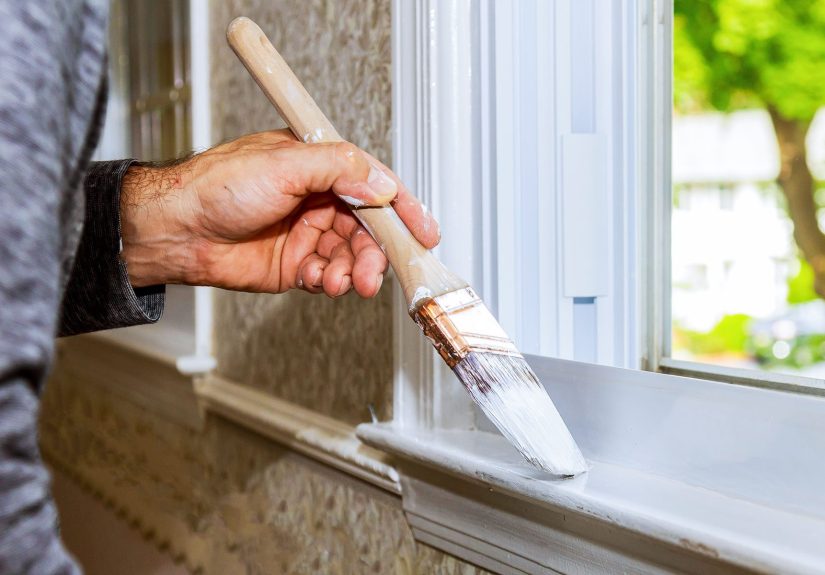
7. Load Your Brush Correctly (and Don’t Overwork the Paint)
The way you load your brush matters as much as the paint itself. Dunking the whole brush into the
can is a one-way ticket to drips and thick, uneven coats.Instead:
- Dip the bristles about one-third of the way into the paint.
- Tap (don’t scrape) the brush against the inside of the can or tray.
- Apply paint in long, smooth strokes with the direction of the trim.
Work in manageable sections, then leave it alone. Constantly going back over areas that are already
starting to dry leads to visible brush marks and a patchy finish. Lay it off once, then move on. -
8. Paint in the Right Order
If you’re painting a whole room, order matters. A common pro sequence goes like this:
- Do all your patching, sanding, and caulking for walls and trim.
- Prime trim and walls as needed.
- Paint the ceiling first.
- Paint the trim next (baseboards, casings, crown).
- Finish by painting the walls.
Why paint trim before walls? If you get trim paint on the wall, you can easily cover it with the
wall color afterward. It’s much harder to cut a perfect trim line along a freshly finished wall
without touching it.Think of trim as the frame and the wall as the artwork. Frame first, then fill in the picture.
-
9. Sand Lightly Between Coats for a “Factory” Finish
One of the biggest differences between “looks fine” and “did a pro do this?” is what happens between
coats. A quick scuff-sand between coats of primer and paint knocks down dust nibs, tiny drips, and
raised grain.Use 220-grit or finer sandpaper or a sanding sponge. You’re not trying to remove the paintjust
smoothing the surface. Wipe away the dust afterward and apply your next coat. Most trim looks best
with two coats of paint, sometimes three if you’re making a big color change.The payoff is huge: smoother feel, less visible brush strokes, and a finish that looks more like it
rolled out of a factory spray booth than a weekend project. -
10. Time Your Tape Removal and Drying Carefully
If you’re using tape, timing is everything. Pull it too soon and you risk smudging. Wait too long
and the paint film can tear, leaving jagged edges.A good rule of thumb: remove painter’s tape while the paint is dry to the touch but not fully cured,
usually within an hour or so of finishing your last coat (check your product label). Pull the tape
back on itself at a 45-degree angle. If you see the paint wanting to peel, score along the edge with
a sharp utility knife first.Then, let the trim cure fully. Even if it feels dry in a few hours, it may take several days to
reach full hardnessespecially with water-based enamels. Avoid aggressive cleaning or bumping it
with furniture until it’s cured. -
11. Avoid the Most Common Trim-Painting Mistakes
Even pros make mistakes, but they make them less often because they know what to watch for. Keep an
eye out for these:- Skipping prep: Painting over dust, glossy finishes, or gaps and holes will come
back to haunt you. - Using the wrong sheen: Flat trim looks dull and scuffs easily; super high-gloss
shows every flaw. - Overloading the brush: Thick coats lead to drips, sags, and extended drying
times. - Too few coats: One coat on old dark trim almost always looks patchy. Don’t be
afraid of a second (or third) coat. - Ignoring lighting: Strong natural or overhead light will exaggerate brush marks
and flaws, so smoothing and sanding matter even more in bright rooms.
Treat trim painting like a sequence instead of a single step, and suddenly it feels less like a
gamble and more like a system you can rely on. - Skipping prep: Painting over dust, glossy finishes, or gaps and holes will come
Extra Tips for a Professional Look
- Work from top to bottom: crown molding, window and door trim, then baseboards.
-
Keep a damp rag handy to wipe accidental drips on floors or walls before they setit’s much easier
than scraping later. -
Use good lighting. A work light or flashlight held at an angle reveals imperfections, drips, or missed
spots while you can still fix them. -
Label your paint cans with room names and dates. Future-you will be very grateful when it’s touch-up
time.
Real-World Experiences: What You Learn After Painting Miles of Trim
After you’ve painted trim in more than one room (or more than one house), a few truths become very
clearusually somewhere between the second coat of semi-gloss and the moment you realize you now
recognize brands of painter’s tape on sight.
First, prep is never wasted. The temptation to “just get some paint on it” is strong, especially when
you’ve already patched walls, moved furniture, and taped off half the room. But every time someone
rushes and paints over dust or skips caulking, they almost always circle back later wishing they’d spent
an extra hour at the beginning instead of staring at visible nail holes for the next five years.
Second, brush quality really does matter. Most people learn this the hard way, starting with a bargain
brush that sheds bristles like a shedding cat and leaves streaks behind. Then they finally splurge on a
high-quality angled brush, and suddenly cutting in a straight line doesn’t feel like an Olympic sport.
It’s not that you “can’t paint”it’s that your tools were fighting you.
Third, painting trim teaches you patience and pacing. Trim doesn’t reward rushing. If you try to coat
everything in one heavy pass, you’ll be chasing drips and sanding ridges later. When you slow down, use
thinner coats, and accept that two or three thoughtful passes are part of the plan, the work actually
feels calmerand the results are dramatically better. There’s something oddly satisfying about seeing
that second coat level out into a glossy, even surface.
Another lesson that shows up over time is how much lighting changes everything. That baseboard you
thought looked “good enough” under warm lamplight may suddenly show every brush mark in the morning sun.
This is why pros often use work lights or check their trim from different angles. Once you build that
habit, you’ll catch issues before the paint dries instead of discovering them when you’re moving the
sofa back.
You also get a feel for where to spend your effort. For example, the back of a closet door does not need
the same level of perfection as the trim around your living room picture window. High-visibility areas,
especially those near seating, deserve your best prep and smoothest finish. Low-traffic or hidden areas
are perfect places to practice new techniques, like switching from tape to cutting in by hand.
Over time, you’ll develop your personal preferences, too. Some DIYers fall in love with the crisp,
almost reflective look of semi-gloss trim. Others lean toward satin for a softer, more modern vibe that
doesn’t highlight every little imperfection. You’ll also figure out your favorite brand, brush, and
primer combinationyour “house standard” that you can duplicate room after room without second-guessing
yourself.
Finally, painting trim changes how you see a space. Once you’ve watched dingy, scuffed baseboards turn
fresh and bright, you notice how much they anchor a room. Even if you don’t change the wall color, clean
and freshly painted trim makes everything feel upgraded, like your home just had a quiet little “glow
up.” And the best part? It’s one of the more budget-friendly, sweat-equity projects you can tackleno
contractor required, just time, patience, and a willingness to tape, sand, and brush your way to a
professional-looking finish.
So the next time you look around and feel like your room is a little tired, don’t just think about
changing the wall color. Look down at those baseboards and across that door trim. Armed with these 11
pro tips and a bit of practice, you’ll be amazed at just how much impact a few coats of well-applied
trim paint can have.