Table of Contents >> Show >> Hide
- How to Build a Kid-Proof Halloween Snack Spread
- The 13 Halloween Snacks
- 1) Crescent Mummy Dogs (The “Bandage-Wrapped” Classic)
- 2) Ghost Mozzarella Sticks (No-Cook, Classroom-Friendly)
- 3) Clementine Jack-O’-Lanterns (Tiny Pumpkins, Big Energy)
- 4) Monster Apple Mouths (Teeth You’re Happy to See)
- 5) Banana Ghost Pops (Boo-nanas That Vanish Fast)
- 6) String Cheese Witch Broomsticks (Three Ingredients, Maximum Wow)
- 7) Oreo Spider Cookies (Creepy-Cute, No-Bake)
- 8) Slime Popcorn (Green, Gooey, and Gloriously Messy)
- 9) Spider Rice Cereal Treats (Pretzel Legs Included)
- 10) Halloween Chex Party Mix (Sweet-Salty Crunch Magic)
- 11) Graveyard Pudding Cups (Dirt Never Looked So Delicious)
- 12) Deviled Egg Eyeballs (Spooky Protein That Adults Also Steal)
- 13) “Monster Mash” Yogurt Parfaits (Spooky, Not Sugary)
- Make-Ahead & Storage Cheatsheet (Because Halloween Is Already Busy)
- Real-World Halloween Snack Wins (and Lessons You’ll Be Glad You Learned)
- Conclusion
Halloween snacks for kids have one job: be spooky enough to earn a dramatic “Ewww!” and delicious enough to disappear before you finish saying “Who wants napkins?” The good news: you don’t need fancy molds, a culinary degree, or a cauldron that actually bubbles. With a few smart shortcuts and a little edible mischief, you can turn everyday groceries into fright-and-delight treats that work for class parties, pre–trick-or-treat fuel, and movie-night munching.
Below are 13 easy Halloween treats (sweet, savory, and “secretly kind of healthy”) designed for real families: quick assembly, kid-friendly flavors, and just enough drama to make carrots feel like a costume. Let’s build a snack table that’s spooky, silly, and blessedly low-stress.
How to Build a Kid-Proof Halloween Snack Spread
Think “mix and match,” not “masterpiece.” Aim for three lanes: savory (so kids don’t become 90% frosting), fruity (because someone will ask for “something not candy” and you’ll want to look like you planned it), and sweet (it’s Halloweenlet’s not pretend).
Keep portions small and grab-and-go. Mini cups, skewers, parchment squares, and cupcake liners are your best friends. Bonus: fewer sticky fingerprints on your furniture, which is the real horror story.
Safety note: If you’re serving young kids, be mindful of choking hazards and prep foods appropriately (cut grapes, avoid certain hard/round foods for toddlers, and supervise). If snacks are going to a classroom, always check allergy policies and consider non-food or clearly labeled options.
The 13 Halloween Snacks
1) Crescent Mummy Dogs (The “Bandage-Wrapped” Classic)
These are the Halloween party MVPs: warm, savory, and instantly recognizable. They also buy you a few peaceful minutes because kids will actually sit down to eat them.
What you need: Hot dogs, refrigerated crescent dough, sliced cheese (optional), mustard or ketchup for “eyes.”
How to make it: Cut crescent dough into thin strips and wrap around hot dogs like mummy bandages, leaving a small “face” gap. Bake until golden. Add tiny dots of mustard for eyes right before serving.
Make it easier: Use cocktail sausages for mini mummies. Serve with ketchup “blood” and mustard “slime.”
2) Ghost Mozzarella Sticks (No-Cook, Classroom-Friendly)
Individually wrapped cheese sticks are basically blank canvaseslike little dairy ghosts waiting for a personality.
What you need: Individually wrapped mozzarella sticks, a food-safe marker (or a black permanent marker used on the wrapper only).
How to make it: Draw ghost faces directly on the plastic wrappersilly, spooky, or “I haven’t had coffee” expressions all work. Chill until party time.
Serve with: Whole-grain crackers so it feels like a mini meal, not a dairy jump-scare.
3) Clementine Jack-O’-Lanterns (Tiny Pumpkins, Big Energy)
These are bright, hydrating, and the easiest way to make fruit feel festive. They’re also mercifully low-mess compared to… everything else on Halloween.
What you need: Clementines (or mandarins), food-safe marker.
How to make it: Draw jack-o’-lantern faces on the peel. That’s it. You’re done. Accept your applause.
Optional upgrade: Add a tiny celery “stem” if you’re building a snack board.
4) Monster Apple Mouths (Teeth You’re Happy to See)
A snack that looks like it might bite you backwithout the sugar crash. Crunchy apples + creamy filling = kid-approved.
What you need: Apple slices, nut or seed butter, mini marshmallows (teeth).
How to make it: Spread nut/seed butter between two apple slices. Press mini marshmallows into the butter for teeth. Add a strawberry slice “tongue” if you’re feeling extra.
Allergy swap: Use sunflower seed butter for nut-free classrooms.
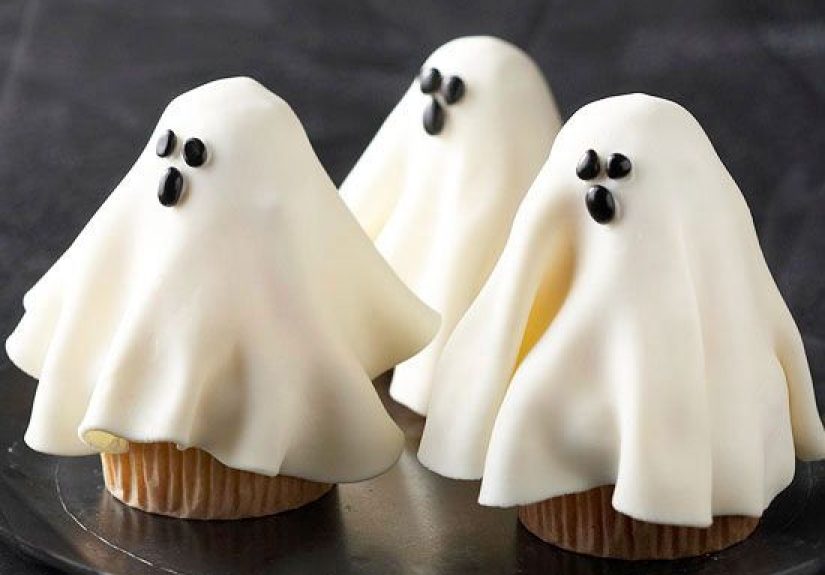
5) Banana Ghost Pops (Boo-nanas That Vanish Fast)
Bananas dressed as ghosts are the rare treat that’s cute, funny, and genuinely refreshing after too much candy.
What you need: Bananas (halved), popsicle sticks, melted white chocolate or yogurt coating, mini chocolate chips (eyes).
How to make it: Insert sticks into banana halves and freeze until firm. Dip in melted white chocolate (or spoon on yogurt coating), then add chocolate-chip eyes and a tiny mouth. Freeze again to set.
Pro tip: Work in batches so the coating doesn’t slide off like a ghost who heard footsteps.
6) String Cheese Witch Broomsticks (Three Ingredients, Maximum Wow)
This one is part snack, part craftperfect for kids who want to “help” (and by help, they mean touch everything).
What you need: String cheese, pretzel sticks, chives (or a thin strip of green onion).
How to make it: Cut one end of the cheese into thin “fringe” strips to make broom bristles. Insert a pretzel stick into the other end. Tie a chive around the top of the fringe.
Shortcut: If chives won’t behave, use a thin strip of fruit leather as a “broom tie.”
7) Oreo Spider Cookies (Creepy-Cute, No-Bake)
Spiders are scary. Cookies are comforting. Put them together and suddenly everyone’s brave.
What you need: Oreo cookies, pretzel sticks (legs), candy eyes, melted chocolate or frosting (glue).
How to make it: Break pretzels into short “legs.” Gently press four legs into each side of an Oreo’s filling. Dot melted chocolate/frosting on top and stick on candy eyes.
Nut-free note: Skip peanut butter “glue” for school settings; use melted chocolate instead.
8) Slime Popcorn (Green, Gooey, and Gloriously Messy)
This is for the kids who believe Halloween should be a little gross (compliment). It’s sweet, sticky popcorn with monster vibes.
What you need: Popcorn, mini marshmallows, butter, green food coloring, candy eyes.
How to make it: Make a quick marshmallow coating on the stove (butter + marshmallows), tint it green, toss with popcorn, and sprinkle candy eyes on top before it sets.
Reality check: Serve in cupcake liners. Otherwise you’ll be finding “slime” in couch cushions until Thanksgiving.
9) Spider Rice Cereal Treats (Pretzel Legs Included)
Classic rice cereal treats, but make them eight-legged. Great for parties because they’re handheld and don’t require plateskids’ favorite form of dining.
What you need: Rice cereal treats (homemade or store-bought), pretzels, candy eyes, a little melted chocolate if needed.
How to make it: Roll treats into balls (lightly butter hands). Press in candy eyes. Break pretzels into curved “legs” and poke them into the sides.
Fun twist: Use cocoa cereal treats for a darker “spider” look.
10) Halloween Chex Party Mix (Sweet-Salty Crunch Magic)
Party mix is the snack-table glue: it fills bowls, satisfies picky eaters, and somehow disappears even when nobody admits eating it.
What you need: Chex cereal, pretzels, candy corn, raisins or dried fruit, sprinkles, and a white-chocolate coating (optional).
How to make it: Toss your crunchy ingredients together. For a sweeter version, coat lightly with melted white chocolate and add festive sprinkles. Let it set, then break apart into munchable clusters.
Make-ahead win: Store in an airtight container and it stays party-ready for days.
11) Graveyard Pudding Cups (Dirt Never Looked So Delicious)
Chocolate pudding + cookie “dirt” is a timeless combo. Add a few spooky details and you’ve got a dessert that looks hauntedin a cute way.
What you need: Chocolate pudding cups, crushed chocolate sandwich cookies, gummy worms, optional “tombstones” (rectangle cookies).
How to make it: Sprinkle cookie crumbs over pudding to make “dirt.” Add gummy worms crawling out. Stick in a cookie “tombstone” if you want extra graveyard drama.
Tip: Assemble close to serving so the “dirt” stays crumbly, not swampy.
12) Deviled Egg Eyeballs (Spooky Protein That Adults Also Steal)
These look wildly creepy and taste completely normalwhich is exactly the Halloween personality we’re going for.
What you need: Hard-boiled eggs, mayo, mustard, salt/pepper, sliced olives (or olives with pimento).
How to make it: Make classic deviled eggs. Top each with an olive slice for the iris. If you want “bloodshot,” add a tiny streak of hot sauce or paprika dusting.
Make-ahead: Prep filling and whites in advance; assemble right before serving for the freshest look.
13) “Monster Mash” Yogurt Parfaits (Spooky, Not Sugary)
A lighter option that still feels festivebecause yogurt in a costume is way more exciting than plain yogurt in a cup.
What you need: Vanilla or Greek yogurt, orange-tinted yogurt (food coloring optional), granola, berries, candy eyes (optional).
How to make it: Layer yogurt and granola in clear cups. Add berries for “monster bites.” Stick candy eyes on the inside of the cup (a little yogurt works like glue) so your parfait looks back at you.
Shortcut: Use pumpkin-flavored yogurt if you want fall flavor without extra steps.
Make-Ahead & Storage Cheatsheet (Because Halloween Is Already Busy)
Want your future self to high-five your past self? Here’s what holds up best:
Make 1–3 days ahead: Halloween Chex mix, Oreo spiders (store cool and dry), graveyard “dirt” crumbs (keep separate), deviled egg filling (sealed).
Make the morning of: Clementine jack-o’-lanterns, ghost cheese sticks, monster apple mouths (assemble close to serving to reduce browning).
Make right before serving: Mummy dogs (best warm), slime popcorn (best fresh), parfait cups (granola stays crunchy).
Real-World Halloween Snack Wins (and Lessons You’ll Be Glad You Learned)
Halloween snack planning looks adorable on social mediauntil you’re assembling spider legs at 10:47 p.m. while someone in your house asks, “Do we have any more tape?” (Why do they always need tape?) The real trick to Halloween snacks for kids isn’t perfectionit’s knowing what actually works in real life: school rules, allergy notes, kid preferences, and the very real limit of how many dishes you’re willing to wash.
First, kids love foods they can identify. A mummy dog is still a hot dog. A ghost cheese stick is still cheese. That familiarity matters, especially at parties where excitement is already running high. If you try something too unfamiliarsay, a “matcha swamp mousse”you may end up with a table full of brave-looking children politely refusing your culinary creativity. Halloween is not the day to introduce “subtle notes of earthiness.” Save that for adults who own tiny spoons.
Second, the best snacks double as an activity. Witch broomsticks, Oreo spiders, and parfait cups are basically edible crafts. When kids help assemble, they’re far more likely to eat what they madeyes, even fruit. If you’re hosting, set up a “decorate your own” station: one tray of cookie legs and eyes, one tray of cups and toppings, and one very clear rule about sticky fingers staying away from your phone. This turns snack time into entertainment, which is the parenting version of finding a coupon on the floor.
Third, classrooms have their own laws of physics. Teachers appreciate treats that are portioned, not messy, and not designed to launch frosting across the room. Individually wrapped items (like ghost cheese sticks) and simple fruit (like clementine jack-o’-lanterns) tend to get the warmest reception. If homemade snacks are allowed, keep them sturdy: cereal-treat spiders travel better than gooey brownies. And if the class has allergy restrictions, the most popular “treat” might be the one everyone can safely enjoysometimes that’s as simple as a nut-free mix, clearly labeled, served in small cups.
Fourth, allergy inclusivity is part of the fun. Halloween can be stressful for families managing food allergies, so offering a couple of obvious “safe picks” can make a big difference. That might mean having a nut-free option (like clementines, cheese, or yogurt cups), using sunflower seed butter in monster apple mouths, or including non-food treats on the side. If you’re handing out snacks at an event, consider labeling a platter or keeping ingredient cards nearbynothing fancy, just enough to help parents make quick decisions without turning your snack table into a courtroom drama.
Finally, make peace with “cute enough.” Your mummy dogs don’t need identical bandage spacing. Your spiders can have uneven legs. In fact, slightly wonky snacks are often funnierand Halloween is the one holiday where “a little creepy” is the goal. If a candy eye is crooked, congratulations: you made it more realistic. If your ghost looks mildly judgmental, even better. That’s not a mistake; that’s character.
The biggest win is when kids feel included, fed, and excitedwithout the snack prep hijacking your entire day. Choose a few showstoppers, pad the table with easy staples, and let Halloween be what it’s supposed to be: playful, a little spooky, and mostly delicious.
Conclusion
The best Halloween snacks for kids aren’t the ones that take hoursthey’re the ones that make kids laugh, nibble, and come back for “just one more.” Mix savory crowd-pleasers (mummy dogs), quick no-cook wins (ghost cheese sticks, clementines), and a couple of delightfully spooky sweets (Oreo spiders, graveyard cups). Keep it safe, keep it inclusive, and remember: if the snack looks slightly chaotic, you’ve captured the spirit of Halloween perfectly.