Table of Contents >> Show >> Hide
- Before You Start: The 3-Minute Prep Checklist
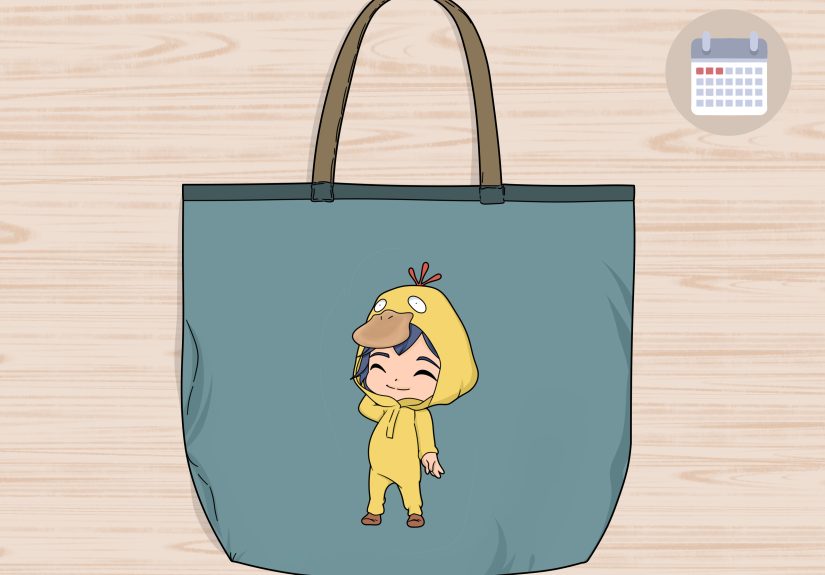
- Method 1: Iron-On Transfer Paper (Fastest for T-Shirts & Tote Bags)
- Method 2: Print Directly on Fabric with Freezer Paper (Home-Printer Hack)
- Method 3: Gel Medium / Mod Podge Photo Transfer (For That Vintage, “Embedded” Look)
- Quick Comparison: Which Method Should You Pick?
- Care & Washing: How to Make Transfers Last
- of “Real Life” Experiences (a.k.a. Lessons People Learn the Hard Way)
- Conclusion
You don’t need a fancy studio, a mysterious “craft degree,” or a heat press the size of a refrigerator to
put images on fabric. With a home printer, a household iron, and a little patience (plus the bravery to
sacrifice one practice shirt), you can transfer prints to fabric that look surprisingly legit.
Below are three beginner-friendly methods that cover the most common goalscustom tees, printable fabric
for sewing projects, and that artsy “vintage transfer” look that makes everything feel like it belongs in a
cozy cottage… even if you live in a studio apartment with a folding chair.
Before You Start: The 3-Minute Prep Checklist
Most transfer disasters happen before the iron turns on. Do these quick checks and you’ll avoid 90%
of the “why does this look like a haunted sticker?” moments.
- Pick the right fabric. Smooth, tightly woven cotton (or cotton blends) gives cleaner edges.
Textured knits and fuzzy fleece are adorable… and also terrible for crisp detail. - Pre-wash if you plan to wash later. Factory sizing and softeners can interfere with ink or
adhesives. Wash and dry fabric first (skip fabric softener). - Iron it flat. Wrinkles become permanent “special effects” once you press a design on top.
- Use high-contrast art. Transfers love bold shapes and clear contrast. If it’s a pale photo
of a pale dog on pale sand… the transfer will respectfully disappear. - Do a test print on plain paper. Confirm size, placement, and color before you print onto
anything expensive. - Remember the mirror rule. Some methods need mirrored (flipped) art so text reads correctly
after transfer. When in doubt, check the product instructions.
Method 1: Iron-On Transfer Paper (Fastest for T-Shirts & Tote Bags)
If your goal is “I want this image on a shirt by tonight,” iron-on transfer paper is your best friend.
You print your design onto special transfer paper, then use heat and pressure to bond it to fabric.
It’s simple, widely available, and perfect for gifts, events, and last-minute costume glory.
Best for
- Graphic tees, team shirts, tote bags, pillow covers (decor use), aprons
- Short runs (one to a few items), custom one-offs, and quick prototypes
What you’ll need
- Iron-on transfer paper that matches your fabric color (light vs. dark)
- Inkjet printer (or as required by the specific transfer paper)
- Household iron or heat press
- Hard, heat-safe surface (avoid squishy ironing board pads if possible)
- Scissors/craft knife, parchment paper or the included protective sheet
Step-by-step
- Choose the right paper type. “Light fabric” and “dark fabric” transfer papers behave
differently. Light-fabric papers often require a mirrored print; dark-fabric papers frequently do not. - Print your design. Use the recommended printer settings. If your design has text, pay
attention to whether you need to mirror it. - Trim the transfer. For light-fabric transfers, trimming close reduces the visible “film”
edge. For dark-fabric transfers, follow the instructionssome are meant to be cut out like a decal. - Prep the fabric. Iron the fabric flat and place it on a hard surface. (A cutting board on
a table can work better than a padded ironing board.) - Press with heat + pressure. Use a hot, dry iron (no steam). Press firmly and evenly,
lifting and repositioning rather than sliding back and forth. - Peel as instructed. Some transfers peel “hot,” others “cool.” This matters more than you
think, like seasoning a cast-iron pan. - Let it cure. Give it time before washing (even if you’re excited). Your transfer needs
that bonding moment.
Pro tips for better results
- Pressure beats “more heat.” Many cracked transfers come from uneven pressure. Press hard,
don’t wiggle, and make sure you hit the edges. - Mind the texture. Ribbed knits and seams create gaps. If you must press near seams, use a
pressing pillow or fold the garment so the seam hangs off the edge. - Expect a feel. Transfer paper usually adds a thin “hand” (a layer you can feel). If you
want a truly dyed-into-the-fabric look, skip to Method 2 or 3.
Method 2: Print Directly on Fabric with Freezer Paper (Home-Printer Hack)
This method is a favorite for sewing projects because you’re printing directly onto fabricno plastic film
layer, no peel timing drama. The trick is stabilizing the fabric so your printer can feed it like a sheet of
paper. Freezer paper (shiny side) temporarily fuses to the back of fabric when ironed, creating a printer-friendly
“fabric sandwich.”
Best for
- Quilt labels, sewn patches, fabric collage, small art blocks, embroidery patterns, applique prints
- Projects where you’ll sew the printed piece into something (pillows, quilts, wall hangings)
What you’ll need
- Inkjet printer (recommended for most home setups)
- Freezer paper (or pre-made printable fabric sheets)
- Light-colored, tightly woven cotton (muslin and quilting cotton are common picks)
- Iron (dry), ruler, scissors or rotary cutter, and a lint roller (optional but helpful)
Step-by-step (freezer paper method)
- Cut fabric slightly larger than printer paper. Iron it smooth and remove lint.
- Cut freezer paper to letter size (8.5″ x 11″). Place the shiny side against the back
of the fabric. - Fuse with a hot, dry iron. Press until it sticks smoothlyno bubbles, no loose edges.
- Trim perfectly to 8.5″ x 11″. This part matters. Frayed edges or fabric hanging past the paper
can snag and jam your printer. - Test feed direction. Every printer loads differently. Do a plain-paper test so you know which
side prints. - Print (best quality). Use higher quality settings for richer color, but watch for oversaturation
that can bleed on fabric. - Dry thoroughly. Let the ink dry completely, then carefully peel away the freezer paper backing.
- Heat-set (optional but smart). Some crafters heat-set with an iron to improve durability before
the printed piece gets sewn and handled.
Alternative: Printable fabric sheets (even simpler)
If you want the “no-jam, no-trim panic” version, buy paper-backed printable fabric sheets. They feed through an inkjet
printer like paper, then you peel the backing and sew or fuse the fabric into your project. They cost more per sheet,
but they’re delightfully low-stresslike buying pre-chopped onions.
What to expect (and how to make it look better)
- Color will look softer than glossy photo paper. Fabric absorbs ink, so designs often look more
matte and slightly muted. Choose bold images and increase contrast a touch. - Small text can blur. Stick to thicker fonts and avoid tiny details unless you’ve tested your
printer/fabric combo. - Washability varies. If the printed fabric will be washed, test first. Some projects are meant
for quilting/decor and gentle care rather than constant laundering.
Method 3: Gel Medium / Mod Podge Photo Transfer (For That Vintage, “Embedded” Look)
This technique gives you an artsy, slightly weathered transfer that looks like the image lives in the fibers.
You coat a printed image with transfer medium, press it onto fabric, let it dry, then rub away the paper backing
with water. What remains is the ink/toner bonded to the surface.
It’s not the fastest method, but it’s extremely satisfyinglike peeling sunburn skin, except you’re creating
art and not making questionable life choices at the beach.
Best for
- Decor pillows, wall art, canvas totes, fabric panels, mixed-media projects
- Graphics and photos where a slightly distressed finish is a feature, not a bug
What you’ll need
- Gel medium or a photo transfer medium (Mod Podge Photo Transfer Medium is common)
- Laser print or dry-toner photocopy of the image (recommended for reliability)
- Brush, squeegee/old gift card, wax paper or a non-stick surface
- Water + sponge/cloth for rubbing off paper fibers
Step-by-step
- Prepare the image. If your design has text, mirror it before printing so it reads correctly after transfer.
Trim away excess paper where possible. - Apply a solid coat of medium. Brush an even layer over the printed side of the papergenerous, but not puddled.
Thin spots create missing patches in the transfer. - Press onto fabric, image-side down. Smooth firmly to remove bubbles. This is where you earn your keep.
- Let it dry fully. Many crafters wait overnight or about a day. If it’s not fully dry, you’ll rub off the image
instead of the paper. That’s a sadness you can avoid. - Wet the back and rub gently. Dampen the paper backing and rub away the paper fibers in small circles.
Go slow. If you rub like you’re sanding a deck, you’ll remove the transfer too. - Dry and seal if desired. Once dry, you can add a thin protective coat on top for durability (especially for decor items).
Pro tips (so the transfer doesn’t ghost you)
- Laser/dry toner tends to transfer more reliably than many inkjet prints. If your ink smears or fades,
switch print sources. - Expect a “handmade” finish. Tiny bits of paper fiber haze are normal; some people love it.
If you want ultra-crisp perfection, use Method 1. - Choose fabric strategically. Smooth cotton gives clearer transfers than heavily textured fabric.
Quick Comparison: Which Method Should You Pick?
| Method | Best Use | Look & Feel | Difficulty |
|---|---|---|---|
| Iron-on transfer paper | Shirts, totes, fast gifts | Vivid, slightly “film” feel | Easy |
| Freezer paper + direct printing | Sewing projects, labels, fabric panels | Matte, printed-into-fabric vibe | Easy–Medium (trimming matters) |
| Gel medium / photo transfer | Decor, art panels, vintage graphics | Distressed, embedded, artsy | Medium (patience required) |
Care & Washing: How to Make Transfers Last
“Last” depends on the method. Iron-on transfers can hold up well if you treat them kindly; direct-printed fabric
varies by ink and fabric; gel transfers are often best for decor or gentle washing. Regardless, these habits help:
- Let it cure. Waiting before washing is not just politeit’s functional.
- Wash inside out. Reduces friction directly on the image.
- Use cold water and mild detergent. Heat and harsh detergents are transfer enemies.
- Skip bleach. Bleach doesn’t “clean” transfers; it “erases” transfers.
- Dry low or hang dry. High heat can crack or lift transfer layers.
- Don’t iron directly on the image. If you must, place a protective layer between iron and design.
of “Real Life” Experiences (a.k.a. Lessons People Learn the Hard Way)
If you read enough craft forums, comments, and tutorials, you start to notice a comforting pattern: almost
everyone “messes up” their first transfer. The good news is that the mistakes are predictable, fixable, and
rarely fatal (to anything other than one sacrificial T-shirt).
One of the most common first-timer surprises is how much pressure matters. People tend to focus on heat
cranking the iron hotter and hotterwhen the real culprit is uneven pressing. A soft ironing board, a seam under
the design, or a lazy “glide the iron around” habit can leave parts of the transfer under-bonded. The result shows
up later as cracking after the first wash, or edges that peel like a stubborn sticker. Crafters who switch to a
firmer surface (a tabletop with a thin towel) and press in placelift, move, pressoften see a big improvement.
Another classic experience: forgetting to mirror the image. It’s almost a rite of passage to end up with a shirt
that says “EFFICOC” instead of “COFFICE” (which, honestly, might still be wearable). The fix is simple: know your
paper type. Light-fabric transfer sheets often want mirrored prints so the ink lands correctly when flipped onto the
fabric. Dark-fabric sheets sometimes behave more like a decal and don’t require mirroring. When people build a
habit of doing a quick plain-paper test first, this mistake practically vanishes.
The freezer paper method comes with its own “aha” moments. New users sometimes skip the perfectionist trimming step,
and the printer responds by eating the fabric like it’s a delicacy. Experienced makers get almost comically strict:
no frayed edges, no fabric hanging past the paper backing, and no curled corners. They also learn that printing on
fabric isn’t the same as printing a glossy photo. The image will be more matte and slightly softer, which is great
for a vintage look but can disappoint anyone expecting photo-lab sharpness. A simple tweakboosting contrast and
avoiding tiny textusually gets results back into the “wow, I made this?” zone.
Gel medium transfers can feel magical… until the rubbing stage. People often rub too aggressively and lift the image,
or they don’t let the piece dry long enough and everything slides into a blurry mess. The crafters who get the cleanest
transfers are boring in the best way: they wait overnight, wet the backing slowly, and rub in gentle passes. They
accept that a little haze is part of the aesthetic and use it deliberatelychoosing botanical prints, vintage labels,
or black-and-white portraits that look better with a slightly distressed finish.
The most universal “experience tip” is also the least exciting: make a test scrap. A 3″ x 3″ sample can save a
whole shirt, a whole tote bag, and your whole mood. Once people do one test run per method (and keep notes on printer
settings and peeling time), fabric transfers stop being scary and start being addictive.
Conclusion
The best method to transfer prints to fabric depends on your goal:
use iron-on transfer paper for fast, vibrant apparel; use freezer paper printing for sew-friendly
fabric pieces; and use gel medium/photo transfer for that artsy, vintage finish that makes a basic pillow feel
curated. Pick one method, do a small test, and you’ll be making custom fabric projects that look store-bought
(or at least “store-bought after a charming afternoon in a craft town”).