Table of Contents >> Show >> Hide
- Why Needle Marks Happen in the First Place
- 1. Use Steam and Gentle Finger Pressure to Coax the Fibers Back
- 2. Mist the Area and Press from the Wrong Side
- 3. Re-Wet or Launder the Fabric So the Weave Can Reset
- When Needle Marks May Be Permanent
- How to Prevent Needle Marks Next Time
- Which Method Should You Try First?
- Real-World Sewing Experiences with Needle Marks on Fabric
- Final Thoughts
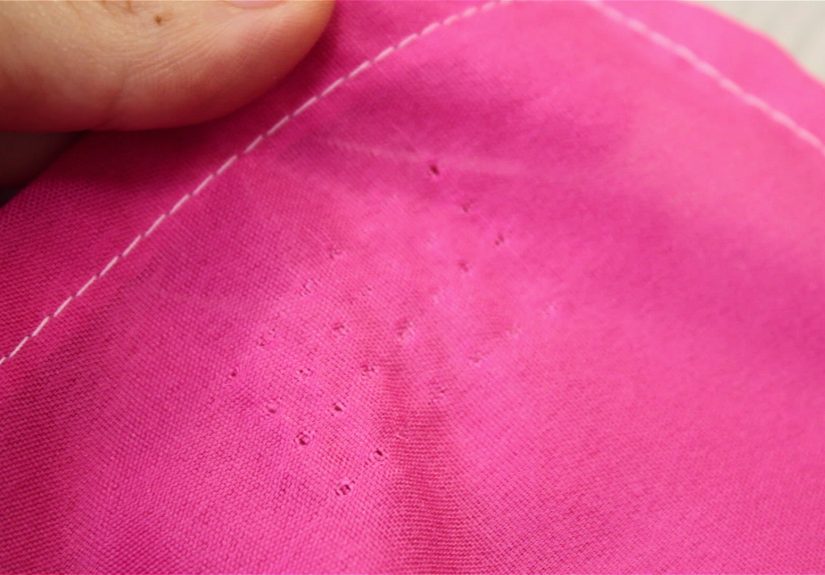
Needle marks on fabric are one of those tiny sewing problems that somehow feel wildly dramatic. One minute you are happily pinning a hem or ripping out one crooked seam. The next minute you are staring at a row of little holes like the fabric has decided to tattle on you. The good news is that in many cases, those marks are not permanent. The even better news is that you do not need a magical potion, a full moon, or a degree in textile science to improve them.
If you are wondering how to remove needle marks from fabric, the answer usually comes down to three simple approaches: relaxing the fibers with steam, rehydrating and pressing the area correctly, or washing the fabric so the weave can settle back into place. Which method works best depends on the fabric type, the size of the hole, the needle or pin you used, and whether the material is forgiving like cotton or a diva like satin.
In this guide, you will learn three practical ways to remove needle holes from fabric, when to leave well enough alone, and how to prevent the problem next time. We will also talk about the fabrics that forgive your mistakes and the ones that absolutely hold grudges.
Why Needle Marks Happen in the First Place
Fabric is made from threads that are woven, knitted, or otherwise structured into a surface. When a needle or pin goes through that surface, it pushes fibers apart. In many fabrics, those fibers can shift back into place with a little moisture, heat, or gentle handling. In other fabrics, especially tightly woven, coated, delicate, or leather-like materials, the puncture can stay visible much longer or even become permanent.
That is why a cotton shirt may bounce back after pressing, while satin can look personally offended for the rest of the week. It is also why the same sewing habit can be harmless on quilting cotton and disastrous on faux suede, vinyl, chiffon, or a slinky formal fabric.
Before You Try Anything
Before you jump in with an iron and the confidence of a home-improvement show host, pause for a quick fabric check:
- Test your method on a hidden area first, especially on silk, rayon, satin, velvet, acetate, faux suede, vinyl, coated fabrics, and blends.
- Check whether the fabric reacts badly to heat, water, or pressure.
- Look at the mark in natural light. Sometimes what looks like a hole is just a temporary disruption in the weave.
- If the fabric is delicate, use the gentlest method first and work up slowly.
Now let us get into the three main ways to fix the problem.
1. Use Steam and Gentle Finger Pressure to Coax the Fibers Back
This is the first method to try because it is simple, effective, and surprisingly good at rescuing ordinary woven fabrics. Steam helps relax the fibers, and light manipulation encourages them to slide back into their original position. Think of it as couples therapy for the threads.
Best For
Cotton, linen, cotton blends, many wool fabrics, and medium-weight woven materials that are not easily damaged by moisture or heat.
How to Do It
- Lay the fabric flat on an ironing board or pressing surface.
- Set your iron to the correct temperature for the fabric.
- Hold the iron just above the marked area and apply steam, or lightly steam through a pressing cloth.
- While the fabric is still warm and slightly damp, use your fingertip or fingernail to gently rub across the mark, not down into it.
- Work from several directions so the fibers ease back into place.
- Let the fabric cool completely before deciding whether the mark is gone. Warm fabric can be misleading.
Why This Works
Needle holes often remain visible because the fibers are still displaced. Steam softens and relaxes the structure of the weave. Gentle rubbing helps close that gap without stretching the fabric out of shape. If you have recently removed a seam and can still see the line of stitching, this method often makes the biggest difference.
Example
Imagine you ripped out a topstitched pocket placement on a cotton shirtdress and now the old stitch line is staring back at you. A little steam and some careful fingertip work can soften that line enough that it nearly disappears once the garment is pressed and worn.
Common Mistakes to Avoid
- Do not drag the iron aggressively over the surface.
- Do not use high heat just because you are impatient.
- Do not scrub the fabric like you are trying to erase a permanent marker from a desk in detention.
2. Mist the Area and Press from the Wrong Side
If steam alone does not solve the issue, the next step is controlled moisture plus pressing from the wrong side of the fabric. This is especially helpful when the mark is shallow but stubborn, or when the right side of the fabric is textured, shiny, or easy to bruise.
Best For
Shirting, lightweight cotton, some blends, linen, dress fabrics that tolerate moisture, and situations where you want a cleaner finish without flattening the face of the fabric.
How to Do It
- Turn the fabric to the wrong side.
- Lightly mist the marked area with clean water. Do not soak it.
- Place a pressing cloth over the area if the fabric is delicate.
- Press gently with a dry iron at the correct setting for the fabric.
- Lift and press rather than sliding the iron around.
- Allow the fabric to dry and cool flat.
- Check the right side. Repeat once if needed.
Why This Works
Misting adds a little more moisture than steam alone, which can help the weave relax and redistribute. Pressing from the wrong side reduces the chance of shine, flattening, or visible press marks on the right side. It also lets you target the disturbed fibers more directly without overworking the face of the material.
When to Use a Pressing Cloth
Use one whenever the fabric has shine, nap, texture, embroidery, or a reputation for being difficult. Silk organza pressing cloths are especially useful because you can see through them while still protecting the fabric. A clean cotton cloth also works well for many home sewing situations.
Example
Let us say you pinned a linen curtain hem a bit too enthusiastically and now the line of holes catches the light. Turning the panel over, misting the area lightly, and pressing from the wrong side can help those fibers settle down so the damage is much less visible.
What Not to Do
- Do not flood the area with water.
- Do not press shiny fabric directly from the right side unless you enjoy accidental gloss effects.
- Do not keep pressing over and over without letting the fabric cool between passes.
3. Re-Wet or Launder the Fabric So the Weave Can Reset
Some needle marks need more than a quick spot fix. If the fabric is washable, a full wash or a thorough re-wetting of the area can help the fibers return more naturally to their original position. This method is often underrated because it sounds too easy, but washable fabrics frequently respond well once they are allowed to relax fully.
Best For
Washable cotton, linen, denim, stable blends, quilting fabrics, and everyday garments or home textiles that can safely be laundered.
How to Do It
- If the mark is local, dampen the area thoroughly with water and let it rest for a few minutes.
- Smooth the fabric gently with your fingers.
- Let it air-dry partially, then press if needed.
- For washable items, launder according to the care instructions.
- After washing, reshape the fabric and press it once it is slightly damp or fully dry, depending on the fabric type.
Why This Works
Washing relaxes the entire fabric structure instead of just one tiny area. If the weave was distorted by stitching, pinning, or ripping out a seam, water can help redistribute tension across the cloth. In plain English, the fabric gets a chance to stop overreacting.
Example
A cotton tote bag that shows stitch-removal marks may still look rough right after you re-sew it. But after one normal wash and press, those tiny holes often soften dramatically. This is why experienced sewists sometimes wait before panicking. The laundry basket has saved more projects than it gets credit for.
Important Caution
Do not use this method blindly on dry-clean-only fabrics, unstable rayon, tailored garments with structure, or anything that might shrink, water spot, or distort. If the fabric hates water, believe it the first time.
When Needle Marks May Be Permanent
Now for the slightly less cheerful truth: not every fabric recovers. Some materials are more likely to show permanent pin holes or needle marks, especially when punctured with a needle that is too large, too dull, or used repeatedly in the same place.
Be extra cautious with these fabrics:
- Satin and charmeuse
- Chiffon and sheer fabrics
- Leather, pleather, and vinyl
- Faux suede and napped synthetics
- Tightly woven microfiber
- Coated or laminated fabrics
- Very lightweight specialty fabrics
In these cases, the goal may be to minimize the appearance rather than erase it completely. Sometimes the best solution is strategic re-stitching, a design adjustment, or accepting that your project now has “character,” which is the crafting version of a diplomatic statement.
How to Prevent Needle Marks Next Time
The easiest needle marks to remove are the ones you never make. Prevention matters, especially when working with delicate or expensive fabric.
Use the Right Needle Size
A needle that is too large can leave bigger holes in lightweight woven fabrics. Match the needle size and type to the fabric. Finer fabrics usually need finer, sharper needles.
Choose Fine Pins or Skip Pins Altogether
Fine silk pins, satin pins, bridal and lace pins, or other extra-fine options are gentler on delicate textiles. For some fabrics, pattern weights, clips, or hand basting are safer than pinning through the fabric face.
Keep Pins in the Seam Allowance
If a fabric is prone to visible pin holes, place pins only where the marks will be hidden in the seam allowance. This single habit can save a lot of frustration later.
Try Clips for Problem Fabrics
For leather-like materials, vinyl, laminated fabrics, and some delicate textiles, clips are often better than pins. They hold layers together without puncturing the surface.
Do Not Overhandle the Fabric
Pulling, stretching, or repeatedly re-pinning the same area can make holes more obvious. Mark carefully, stitch accurately, and minimize unnecessary do-overs when possible.
Which Method Should You Try First?
If you want the short answer, here is the practical order:
- Start with steam and gentle finger pressure.
- Move to misting and pressing from the wrong side.
- Finish with re-wetting or laundering if the fabric is washable.
That order is safe, logical, and friendly to most fabrics. It also keeps you from going straight to the most invasive method when the simplest fix might already do the job.
Real-World Sewing Experiences with Needle Marks on Fabric
If you sew often, you eventually collect stories about needle marks the way cooks collect stories about burned onions. Nobody plans for them, but almost everyone meets them. One common experience happens with cotton garments. A sewist removes a crooked seam, sees a dotted line of holes, panics for a full thirty seconds, then presses with steam and rubs the area lightly with a fingernail. Ten minutes later, the fabric looks almost normal again. Cotton is forgiving like that. It scolds you, then moves on.
Linen is a little moodier. It usually responds well to moisture and pressing, but it likes to show every decision you have made in the past hour. Many people notice that pin marks on linen hems or curtain panels look dramatic under bright light. Then, after a gentle mist from the wrong side and a careful press, the marks soften enough that only the person who made them can still find them. That, by the way, is a universal sewing truth: the maker sees everything, while everyone else sees a lovely finished project.
Then there is satin, which behaves like it is starring in its own period drama. A tiny hole can look enormous. People working on prom dresses, bridal accents, or decorative pillows often learn quickly that satin does not appreciate heavy pins, large needles, or indecision. Some marks improve with steam and a pressing cloth, but others remain faintly visible. The real lesson from satin is prevention. Use fine tools, test first, and avoid treating it like sturdy everyday cotton.
Quilters often report a different kind of experience. Needle marks from seam ripping on quilting cotton usually improve after the quilt top is pressed, layered, quilted, and sometimes even washed. Because quilting cotton is stable and generally washable, it tends to bounce back better than fancy apparel fabric. It is one of the reasons quilting can feel so encouraging. The fabric is basically saying, “That was not ideal, but we can recover.”
On the opposite end of the spectrum are faux suede, vinyl, and leather-like fabrics. Many sewists remember the first time they pinned one of these and instantly regretted it. The holes do not politely fade. They stay. They linger. They build a tiny real estate development where your seam line used to be. In these cases, clips, careful planning, and stitching once with confidence are far more helpful than any rescue technique afterward.
Another frequent experience comes from beginners sewing chiffon or other sheer materials. They use whatever pins are closest, then wonder why the fabric looks snagged and offended. Once they switch to finer pins, pattern weights, or hand basting, the difference is dramatic. The project becomes calmer, the seam lines become cleaner, and the number of whispered apologies to the fabric decreases significantly.
The big takeaway from all these experiences is simple: most needle marks are manageable, some are preventable, and a few are permanent teachers. The trick is knowing which kind you are dealing with before you declare your project ruined and dramatically question every creative choice you have made since middle school.
Final Thoughts
Removing needle marks from fabric is usually less about a miracle cure and more about understanding how fabric behaves. Steam can relax fibers. Moisture and careful pressing can help the weave settle down. Washing can reset washable fabrics more effectively than people expect. And when a fabric is prone to permanent holes, prevention becomes the smartest strategy of all.
So the next time you spot a row of tiny punctures after ripping out a seam or moving a pin line, do not assume the project is doomed. Start gently, work methodically, and let the fabric tell you what it can handle. Sewing may test your patience, but at least it gives you endless opportunities to become suspiciously good at fixing tiny mistakes.