Table of Contents >> Show >> Hide
- Before You Start: Know Your Intermatic Timer
- How to Set a Mechanical Intermatic Plug-In Timer (12 Steps)
- Step 1: Reset and inspect the timer
- Step 2: Learn the dial and symbols
- Step 3: Set the current time on the dial
- Step 4: Decide your ON and OFF times
- Step 5: Insert the ON trippers
- Step 6: Insert the OFF trippers
- Step 7: Add more ON/OFF cycles (optional)
- Step 8: Plug the timer into the outlet
- Step 9: Plug your device into the timer
- Step 10: Set the manual override to “Timer” or “Auto”
- Step 11: Test the schedule by rotating the dial
- Step 12: Let it run and fine-tune as needed
- Quick Guide: Programming a Digital Intermatic Timer
- Benefits of Using an Intermatic Timer
- Troubleshooting Common Intermatic Timer Issues
- Real-World Experiences and Extra Tips for Using Intermatic Timers
- Use timers for more than just lights
- Build a “vacation schedule” for security
- Label your timers and circuits
- Adjust for seasons and daylight changes
- Keep spare trippers and a tiny screwdriver handy
- Don’t forget about power outages
- Use timers as “training wheels” for new habits
- Know when to “upgrade” your timer
- Conclusion: A Small Device with Big Impact
If you’re tired of playing “light switch DJ” every evening, an Intermatic timer is basically a tiny butler that never forgets the schedule. Whether you want your porch lights to click on at sunset, your pool pump to run on a timer, or your holiday décor to sparkle only during reasonable hours, learning how to set an Intermatic timer is a quick skill that pays you back in saved energy, lower bills, and pure convenience.
This guide walks you through how to set a common Intermatic mechanical plug-in timer (like the TN311 or TN111 series) and gives a quick overview of digital Intermatic timers, too. We’ll cover 12 clear steps, safety basics, troubleshooting, and some real-world tips from people who live with these little gadgets every day.
Before You Start: Know Your Intermatic Timer
1. Identify the type of Intermatic timer you have
Intermatic makes several types of timers, but the two big categories you’ll see at home are:
- Mechanical plug-in timers – Small cubes or rectangular units that plug into a wall outlet and use a rotating dial and trippers (little tabs) to turn devices on and off. Common models: TN311, TN111.
- Mechanical in-wall timers – Often found on pool equipment or outdoor lighting (T100/T104 series). They have a large metal or plastic enclosure with a big dial and colored ON/OFF trippers.
- Digital timers – Look like small digital clocks with buttons and an LCD display (DT121, DT122, DT27, EI500, ST01, etc.).
This tutorial’s main 12-step walkthrough focuses on a mechanical plug-in timer because that’s what most people use for lamps and holiday lights. If yours is digital or in-wall, don’t panicwe’ll cover those briefly later.
2. Safety first (especially for in-wall timers)
If you’re only using a plug-in timer, there’s very little risk: you’re basically working with a glorified power strip that plugs into a standard outlet. Still, make sure the device you’re plugging in doesn’t exceed the timer’s maximum amps and watts (listed on the timer label or product page).
For in-wall Intermatic timers that control pool pumps or outdoor circuits, follow these basics:
- Turn off the breaker feeding the timer before touching any wiring.
- Don’t stand on wet ground and avoid touching metal around the panel.
- If you’re not comfortable with electrical panels, call a licensed electrician.
3. Gather what you need
For a mechanical plug-in timer, you’ll typically need:
- Your Intermatic timer (plus any included ON/OFF trippers).
- The lamp, holiday lights, fan, or small appliance you want to control.
- A simple schedule in mind (for example, ON at 6:00 p.m., OFF at 11:00 p.m.).
If you’re missing a tripper, you can often buy replacement Intermatic trippers as small packs.
How to Set a Mechanical Intermatic Plug-In Timer (12 Steps)
These steps apply to common 24-hour plug-in models like the TN311 and TN111. They use a rotating dial that represents the clock and small removable trippers to set ON and OFF times.
Step 1: Reset and inspect the timer
Unplug the timer (if it’s been used before) and remove any trippers already installed on the dial so you’re starting from a clean slate. Check that the dial turns smoothly and that the outlet on the timer isn’t cracked or damaged.
Picture idea: Close-up of a timer dial with no trippers installed yet.
Step 2: Learn the dial and symbols
Look closely at the timer’s face. You’ll see:
- A circular dial with numbers 1–24 or 1–12 with AM/PM markings.
- Small slots or ridges around the edge where the trippers attach.
- An arrow or pointer that marks the current time.
- Possibly a manual switch labeled ON / TIMER / OFF or similar.
Understanding these markings now will make every step after this much easier.
Step 3: Set the current time on the dial
Rotate the entire dial in the direction of the arrow (usually clockwise) until the current time of day lines up with the fixed pointer or arrow on the timer body.
Be careful with AM and PM if your timer uses a 12-hour format. For example, if it’s 6 p.m., you want the “6” in the evening half of the dial, not the morning half.
Picture idea: Arrow pointing to 6 p.m. on the timer dial with “Now” label.
Step 4: Decide your ON and OFF times
Before you start snapping trippers into place, decide on your schedule. A few common examples:
- Porch light: ON at 6:00 p.m., OFF at 11:00 p.m.
- Fish tank light: ON at 9:00 a.m., OFF at 9:00 p.m.
- Holiday lights: ON at 5:00 p.m., OFF at midnight.
Mechanical plug-in timers usually allow at least 2–3 ON/OFF cycles per day, depending on the model and how many trippers you have.
Step 5: Insert the ON trippers
Take an ON tripper (often marked or colored differently from OFF trippers) and place it at the time on the dial when you want the power to turn on.
- Align the tripper with the exact time mark.
- Push it firmly into the slot until it grabs the dial and doesn’t wobble.
For Intermatic pool and T100 series timers, official instructions emphasize making sure the trippers are securely tightened so they don’t slip and cause the timing to drift.
Picture idea: A red ON tripper being snapped onto the dial at 6:00 p.m.
Step 6: Insert the OFF trippers
Now place the OFF tripper at the time when you want the power to shut off. ON and OFF trippers are not interchangeable in many Intermatic models; they’re shaped differently so they push the switch in opposite directions.
For example, if your ON tripper is at 6:00 p.m., you might place your OFF tripper at 11:00 p.m. to turn your lights off at that time.
Picture idea: A gray OFF tripper installed at 11:00 p.m. on the dial.
Step 7: Add more ON/OFF cycles (optional)
If your timer came with extra trippers, you can create additional ON/OFF periods. For instance, you could have your lights:
- ON at 6:00 a.m. and OFF at 8:00 a.m., then
- ON at 6:00 p.m. and OFF at 11:00 p.m.
Just remember each ON needs a matching OFF that comes later in the direction the dial rotates.
Step 8: Plug the timer into the outlet
Once your trippers are set, plug the timer into the wall outlet you plan to use. Make sure it sits firmly and doesn’t wigglea loose connection can cause inconsistent operation.
If you’re using it outdoors, check whether your timer is rated for outdoor use and keep it protected from direct rain and snow, per manufacturer instructions.
Step 9: Plug your device into the timer
Now plug your lamp, string lights, or other load into the timer’s outlet.
- Turn the device’s own power switch to the ON position.
- Leave it ONafter this, the timer will handle when it actually receives power.
For example, with a lamp, leave the lamp switch ON and use the timer as the “main controller.”
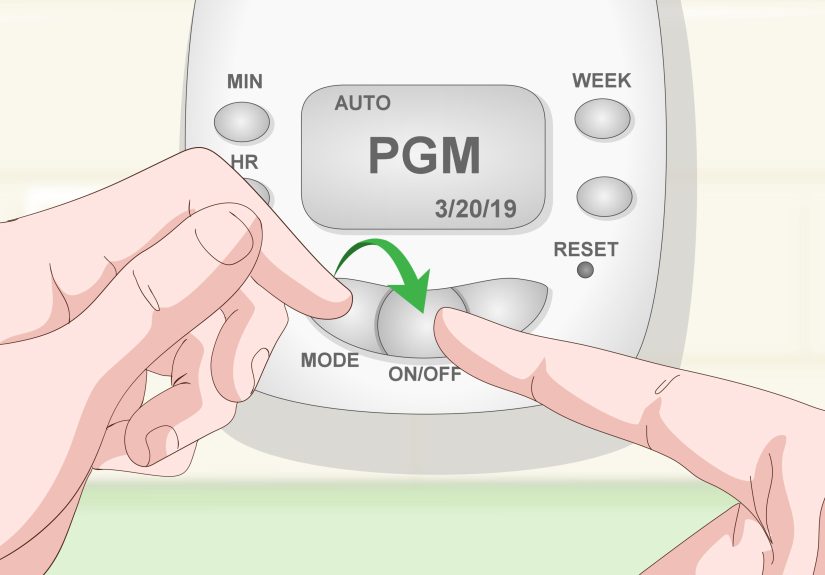
Step 10: Set the manual override to “Timer” or “Auto”
Most Intermatic timers have a small manual switch that lets you override the schedule. Modes commonly include:
- ON – Power stays on constantly.
- OFF – Power stays off.
- AUTO / TIMER – Follows your programmed schedule.
Move the switch to AUTO or TIMER so your ON/OFF trippers do their job.
Step 11: Test the schedule by rotating the dial
To test without waiting hours:
- Slowly turn the dial manually in the direction of the arrow.
- Watch and listen as the ON tripper hits the internal switch; your device should turn on with a click.
- Keep turning until the OFF tripper hits; the device should turn off with another click.
If the device doesn’t react, check that it’s turned on, properly plugged in, and that the timer is in AUTO/TIMER mode.
Step 12: Let it run and fine-tune as needed
Now let the timer run for a day or two. If you discover the lights are turning on too early or staying on too late, simply:
- Unplug the timer (for safety and convenience).
- Move the trippers to new time positions.
- Plug it back in and reset the dial to the correct current time.
After a couple of minor adjustments, most people forget they even own the timerwhich is exactly what you want from automation.
Quick Guide: Programming a Digital Intermatic Timer
Digital Intermatic timers (like DT121/DT122, DT27, EI500, or ST01) use buttons and an LCD display instead of a mechanical dial. While each model differs slightly, their core steps are very similar.
1. Set the current time and day
Most digital models use a CLOCK or TIME button plus HOUR, MIN, and DAY buttons:
- Press and hold CLOCK.
- Use the other buttons to set the correct day and time.
- Release CLOCK to save.
2. Enter programming mode
Press the PROG (Program) button to enter the schedule setup. You’ll typically see “ON 1”, “OFF 1”, “ON 2”, etc., representing events.
3. Set ON and OFF events
For each event:
- Select the days you want the timer to operate (all days, weekdays, weekends, or specific days).
- Set the ON time for that event.
- Advance to the OFF setting and do the same.
4. Choose the operating mode
Digital Intermatic timers usually offer modes such as:
- AUTO – Follows the programmed schedule.
- RANDOM – Slightly varies the times to make your home look occupied (security feature).
- MANUAL – Acts like a simple on/off switch with no automatic schedule.
Set it to AUTO for normal daily use.
Benefits of Using an Intermatic Timer
Save energy and money
One of the big reasons people learn how to set an Intermatic timer is to avoid leaving lights and devices on all day. Properly setting a timer can significantly cut down on wasted electricity, especially for things like outdoor lights, decorative lighting, and pool pumps.
Improve security
Intermatic timers can be a simple home security upgrade. Lights that come on automatically in the eveningeven when you’re on vacationcan make your home look occupied and less appealing to would-be intruders.
Increase convenience and comfort
Timers can automate bathroom fans, exhaust fans, or lamps so they turn on when needed and off when forgotten. Instead of remembering to flip a switch, you just come home to a well-lit, comfortable house.
Troubleshooting Common Intermatic Timer Issues
Timer doesn’t turn on the device
If your lights never come on:
- Check that the device itself is turned ON.
- Confirm the timer is in AUTO/TIMER mode, not OFF.
- Make sure the current time on the dial or display is set correctly.
- Inspect trippers (mechanical) to ensure they’re tight and not loose or missing.
Timer doesn’t turn off
If the lights come on but never turn off:
- Verify that an OFF tripper is actually installed after the ON tripper.
- Make sure the OFF tripper is firmly attached and not slipping past the switch.
- On digital timers, confirm that both ON and OFF events are programmed correctly.
Time drifts or looks wrong
Mechanical timers rely on a small clock motor, and a power outage can throw the time off. If power blinks off, your timer’s “current time” may no longer match reality:
- Reset the dial or digital clock to the correct time.
- Consider a digital model with battery backup if your power is unreliable.
Load is too heavy
Intermatic timers have clear maximum ratings (amps and watts). If you’re trying to control heavy loads like large space heaters or big pumps, you may exceed those ratings, which can damage the timer or create a hazard.
Always compare the device’s label to the timer’s ratingfor example, many plug-in timers are rated around 15A at 125V. If in doubt, use a heavy-duty controller or talk with an electrician.
Real-World Experiences and Extra Tips for Using Intermatic Timers
Once you’ve learned how to set an Intermatic timer, it becomes one of those “why didn’t I do this years ago?” upgrades. Here are some practical experiences, tips, and small “lessons learned” that can help you get the most from your timer.
Use timers for more than just lights
Most people start with porch or holiday lights, but timers shine (literally and figuratively) in other places:
- Aquariums: Fish and plants benefit from consistent light cycles. A timer ensures the tank gets, say, 10–12 hours of light every day without you needing to remember it.
- Bathroom fans: A timer can keep the fan running for 20–30 minutes after a shower, preventing mold without running all day.
- Decorative lighting: Accent lights or cabinet lighting can turn on at evening hours only, making your space cozy without wasting energy at noon.
Build a “vacation schedule” for security
Many homeowners set up Intermatic timers strictly for travel. A simple vacation schedule might be:
- Living room lamp ON at 6:30 p.m., OFF at 11:00 p.m.
- Bedroom lamp ON at 7:00 p.m., OFF at 10:30 p.m.
If you have a digital timer with a RANDOM mode or astronomic function (which tracks sunrise/sunset), you can create even more realistic patterns that shift slightly each day.
Label your timers and circuits
Once you have more than one timer, they all start to look the same. A tiny piece of masking tape with “Porch,” “Pool,” or “Tank” written on it saves you from guessing later, especially if you change schedules seasonally.
Adjust for seasons and daylight changes
Mechanical timers don’t know when the days are getting longer or shorter. As seasons change, you may want to tweak your ON/OFF times so the lights align better with dusk and bedtime:
- In winter, set outdoor lights to come on earlier.
- In summer, you may push them later to avoid lights turning on in broad daylight.
A quick five-minute adjustment every couple of months keeps your schedule feeling “smart” without any fancy smart-home gear.
Keep spare trippers and a tiny screwdriver handy
With mechanical Intermatic timers, trippers are small and occasionally get lostespecially during deep cleaning or when someone “borrows” one for another timer. Keeping a spare pack of ON/OFF trippers in a drawer means you’re never stuck waiting on parts when you want to change your schedule.
For in-wall mechanical timers, a tiny flat screwdriver can help tighten trippers and the manual lever as needed.
Don’t forget about power outages
Here’s a classic real-world scenario: your power goes out for three hours at 2:00 a.m. Everything comes back on, you go about your day, and that night you notice the porch light timer is off by exactly three hours. Mechanical timers don’t auto-correct after outages, so it’s good to get into the habit of:
- Checking the timer’s time after a known outage.
- Choosing a digital timer with battery backup for critical lighting if outages happen often.
Use timers as “training wheels” for new habits
Timers can also help you build good routines. For example:
- Automatically turn off your TV corner lamps at midnight so you’re nudged to go to bed.
- Turn on a soft lamp at 6:00 a.m. if you’re trying to become more of a morning person.
- Limit how long a heated blanket stays on for safety and energy savings (as long as the blanket’s wattage is within the timer’s rating).
Know when to “upgrade” your timer
If you find yourself constantly changing times, juggling multiple ON/OFF periods, or needing sunrise/sunset tracking, that’s a sign you might want an astronomic digital Intermatic timer. These can automatically adjust for seasons and even daylight saving time, so you set a schedule once and barely touch it again.
Conclusion: A Small Device with Big Impact
Learning how to set an Intermatic timer isn’t complicatedyou’re essentially telling a miniature clock when to send power to your devices and when to hold it back. In about a dozen steps, you’ve gone from twisting a dial and snapping in trippers to having a fully automated light or appliance schedule.
Whether you’re using a simple mechanical plug-in timer or a more advanced digital model, the principles are the same: set the current time, define clear ON/OFF periods, and let the timer quietly run your routine. The result is a home that feels smarter, uses less energy, and looks occupied even when you’re awayall thanks to one small, hardworking gadget.