Table of Contents >> Show >> Hide
- What Actually Changes in a Great Before-and-After
- 33 Before-and-After Kitchen Makeovers
- Layout Wins (When the Room Itself Was the Problem)
- Cabinet Glow-Ups (The “Same Boxes, New Personality” Trick)
- Countertops + Backsplashes (Big Visual Impact Per Square Foot)
- Lighting + Hardware (The “Why Does This Look So Different?” Category)
- Small Kitchens + Rental-Friendly Wins (Because Not Everyone Can Move Plumbing)
- Flooring + Color Swaps (The Silent Game-Changers)
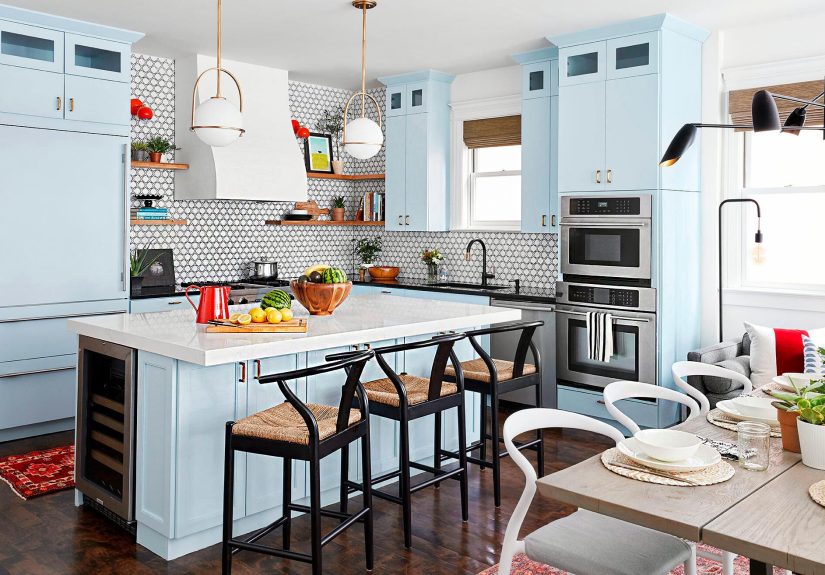
- “Statement” Makeovers (When You Want the After to Be a Whole New Personality)
- How to Turn These Ideas Into Your Own Before-and-After
- High-Impact Upgrades That Don’t Require a Full Tear-Out
- Renovation Experiences: What People Learn the Hard Way (So You Don’t Have To)
A good kitchen makeover doesn’t just “look nicer.” It behaves better. Drawers glide instead of groan, the lights stop casting
“mystery shadows,” and the layout stops treating you like an obstacle course contestant. The best before-and-afters all share
one secret: the “after” isn’t a random shopping spreeit’s a targeted fix for real-life annoyances.
Below are 33 makeover scenarios (big renovations and smaller glow-ups) that reflect what homeowners and designers consistently
do to turn tired kitchens into bright, functional spaces. Use them like a menu: pick the moves that match your kitchen’s
biggest pain points, then skip the rest with zero guilt.
What Actually Changes in a Great Before-and-After
1) The kitchen gets a “job description”
Before: a pretty room that makes cooking harder. After: clear zones for prep, cooking, cleanup, coffee, and storageso you’re
not chopping onions on the only square inch of counter left.
2) Light stops being an afterthought
Layered lighting (ceiling + under-cabinet + task/pendants) makes most kitchens feel newer even before you touch a cabinet.
If your kitchen currently feels like a cave, congratulations: you’ve found a high-impact upgrade.
3) Storage becomes intentional
The “after” usually adds drawers, pull-outs, pantry organization, and landing space near appliances. Translation: fewer
countertop piles and less “Where did the blender go?” theater.
4) Surfaces get simplified
Many great makeovers reduce visual noise: fewer competing patterns, more consistent finishes, and cleaner lines. That’s why a
new countertop + backsplash combo can feel like a total remodel even when the footprint stays put.
5) Personality arriveson purpose
The best “after” kitchens aren’t sterile. They add warmth with wood tones, a color moment on an island, mixed metals, or
vintage toucheswithout turning the room into a theme park.
33 Before-and-After Kitchen Makeovers
Layout Wins (When the Room Itself Was the Problem)
-
Before: A closed-off kitchen that cut the cook off from everyone else.
After: A widened opening or partial wall removal created sightlines and breathing room.
Steal this: If full open concept isn’t possible, try a larger doorway and consistent flooring to visually connect spaces. -
Before: A cramped galley where two people couldn’t pass without negotiating a peace treaty.
After: One side swapped uppers for open shelving (or slimmer cabinets), making the aisle feel wider.
Steal this: Use fewer, lighter upper elements on the “traffic side.” Keep closed storage on the working side. -
Before: The fridge door blocked the main walkway every time it opened.
After: A new fridge location (or counter-depth model) restored flow and reduced daily collisions.
Steal this: Map door swings and walking paths before buying appliancesyour knees will thank you. -
Before: No landing space near the stove or microwave (hot pan panic ensued).
After: A small run of counter was added beside key appliances for safe set-down zones.
Steal this: Even 12–18 inches of landing space can transform usability. -
Before: A dining table crammed into the kitchen doubled as prep space and paperwork storage.
After: A slim island or peninsula created dedicated prep seating and storage.
Steal this: Consider a narrow island (think 24–30 inches deep) if you’re tight on clearance. -
Before: The sink faced a blank wall (staring contest with drywall).
After: The sink shifted under a window or toward the room for a more social setup.
Steal this: If moving plumbing is too much, “fake the upgrade” with better lighting and a standout faucet.
Cabinet Glow-Ups (The “Same Boxes, New Personality” Trick)
-
Before: Honey-oak cabinets that screamed “1997 called.”
After: Painted cabinets in warm white, greige, or muted green modernized everything instantly.
Steal this: Pair a softer cabinet color with simple hardware for a clean, current look. -
Before: Dark uppers made the kitchen feel like it was wearing sunglasses indoors.
After: Uppers repainted lighter while lowers stayed darker for contrast and stability.
Steal this: Two-tone cabinets look intentional when you repeat the darker color somewhere else (like stools or lighting). -
Before: Flat cabinet fronts looked tired and builder-basic.
After: New doors (Shaker-style) on existing boxes delivered a semi-custom feel without full replacement.
Steal this: Cabinet refacing works best when the boxes are solid and the layout already functions. -
Before: Upper cabinets crowded the room and stole light.
After: A few uppers removed and replaced with open shelves for airiness.
Steal this: Keep open shelves to one “feature” area and store daily items thereno one wants to dust your decorative pasta jars. -
Before: Cabinets stopped short of the ceiling, collecting dust and regret.
After: Added crown molding or stacked uppers made the kitchen look taller and more finished.
Steal this: If full-height cabinets aren’t possible, use a soffit treatment that reads as intentional (not accidental). -
Before: The “junk drawer” had its own ecosystem.
After: More deep drawers and dividers created controlled storage zones.
Steal this: Prioritize drawers for pots, pans, and dishespeople love them because they work.
Countertops + Backsplashes (Big Visual Impact Per Square Foot)
-
Before: Speckled laminate that fought with every other pattern in the room.
After: Cleaner-looking counters (often quartz-style or a calm stone look) simplified the whole space.
Steal this: When in doubt, choose a countertop with a quieter pattern and let other finishes shine. -
Before: A short backsplash that ended awkwardly behind the stove.
After: A full-height backsplash behind the range created a focal point that looked custom.
Steal this: Use a special tile or slab “moment” behind the stove and simpler tile elsewhere. -
Before: A busy tile backsplash with dark grout that highlighted every crumb like a spotlight.
After: A more cohesive backsplash (often lighter, sometimes slab-style) made cleanup and visuals easier.
Steal this: If you love texture, keep grout lines minimal or choose grout that blends. -
Before: A bare wall behind counters that made the kitchen feel unfinished.
After: Classic subway tileor a modern twist like vertical stackingadded polish fast.
Steal this: Change the pattern before you change the tile type; it’s an easy way to feel “new.” -
Before: A dated, glossy 4-inch counter backsplash strip (the mullet of backsplashes).
After: A real backsplash in tile, slab, or panel material looked intentional and high-end.
Steal this: If you’re keeping counters, a new backsplash is still one of the best “wow” upgrades.
Lighting + Hardware (The “Why Does This Look So Different?” Category)
-
Before: One ceiling fixture trying to light an entire kitchen by itself (brave, but doomed).
After: Recessed lights or a brighter central fixture plus under-cabinet lighting improved function and mood.
Steal this: Prioritize task lighting where you chop, cook, and cleanyour eyes do not want to work overtime. -
Before: Pendant lights hung too high, too low, or like they were placed by a dart throw.
After: Pendants centered over an island and sized to the space created designer balance.
Steal this: Match scale to the islandbigger islands usually need larger pendants (or more of them). -
Before: Yellowed cabinet pulls that felt like “free hardware from the builder.”
After: New pulls in matte black, brushed nickel, or warm brass made cabinets feel updated instantly.
Steal this: Hardware is jewelry. Even basic cabinets look better with the right “earrings.” -
Before: Mixed finishes that clashed (chrome faucet, bronze pulls, random gold light).
After: A thoughtful mixlike two finishes repeated across the roomlooked curated, not chaotic.
Steal this: Choose a “main” metal and a “supporting actor” metal, then repeat both at least twice. -
Before: Under-cabinet shadows made cutting boards feel like spooky campfire stories.
After: LED strips or puck lights brightened counters and made the backsplash sparkle.
Steal this: Choose a neutral-white light so food looks appetizing, not like it’s under interrogation.
Small Kitchens + Rental-Friendly Wins (Because Not Everyone Can Move Plumbing)
-
Before: Tiny kitchen with zero personality and zero storage.
After: Peel-and-stick backsplash + removable wallpaper + upgraded lighting gave a major lift without permanent changes.
Steal this: Focus on what renters can change: lighting, hardware (save originals), textiles, and styling. -
Before: Minimal counter space turned cooking into a juggling act.
After: A rolling cart became a mobile prep station and coffee bar.
Steal this: Add storage below and a butcher-block top above for the best of both worlds. -
Before: Open shelving chaoseverything visible, including your “collection” of mismatched mugs.
After: Matching canisters, trays, and a strict “daily items only” rule kept shelves tidy.
Steal this: Open shelves work when you treat them like a display and a toolnot a storage landfill. -
Before: Outdated fluorescent box light that made everyone look tired.
After: A modern flush-mount (plus brighter bulbs) made the whole kitchen feel cleaner and taller.
Steal this: Replace “office lighting” with “home lighting.” Your kitchen is not a cubicle. -
Before: Small kitchen with no pantry meant snacks lived on the counter permanently.
After: A tall cabinet or pantry tower (even a shallow one) corralled dry goods.
Steal this: Pantry towers are space-efficient because they store up, not out.
Flooring + Color Swaps (The Silent Game-Changers)
-
Before: Cracked tile with dark grout lines that highlighted every crumb and chip.
After: New flooring in a lighter tone (or a more forgiving pattern) refreshed the room instantly.
Steal this: If you can’t replace floors yet, a large washable runner can visually “reset” the space. -
Before: Beige walls + beige tile + beige counters = “vanilla without the fun sprinkles.”
After: A warmer wall color and a crisp backsplash added contrast and dimension.
Steal this: If everything blends, add contrast with paint or backsplash firstcheaper than changing cabinets. -
Before: A bold wall color made the kitchen feel smaller (and slightly angry).
After: A softer neutral plus a single accent (island color or tile) kept it bright and intentional.
Steal this: Put “bold” on one feature, not every surface. Let the room breathe.
“Statement” Makeovers (When You Want the After to Be a Whole New Personality)
-
Before: Generic kitchen with no focal pointfine, but forgettable.
After: A dramatic hood (plaster, wood, or metal) became the centerpiece and anchored the room.
Steal this: If budget is tight, a bold hood + simpler cabinets can still look high-end. -
Before: Standard island with plain panels and minimal storage.
After: The island got upgrades: seating, outlets, deeper drawers, and a standout countertop edge.
Steal this: Treat the island like furniturepanels, legs, and lighting make it feel intentional. -
Before: A kitchen that didn’t reflect the home’s character (Craftsman, farmhouse, midcenturypick your vibe).
After: Details aligned with the architecture: Shaker doors, warmer woods, period-friendly lighting, and balanced trim.
Steal this: Let the house “vote” on the design. It usually has strong opinions.
How to Turn These Ideas Into Your Own Before-and-After
Start with pain points, not Pinterest
- Traffic: Where do people bottleneck?
- Storage: What ends up on the counter because it has no home?
- Light: Where do you cook in shadow?
- Workflow: What tasks feel annoyingly far apart (prep → cook → clean)?
Choose your “hero upgrade”
Most successful renovations have one big move that sets the tone: painted cabinets, a new layout, a better island,
upgraded counters, or a pantry solution. Pick one hero and let everything else support it.
Sequence matters (so you don’t redo work twice)
Even a modest remodel runs smoother when you plan the order: demo, rough plumbing/electrical, walls, floors, cabinets,
counters, backsplash, appliances, then lighting/hardware/finishing touches. If you’re doing a full remodel, the active
construction phase commonly takes several weeks, and bigger scope means more time.
Budget like a grown-up (with a little cushion)
Kitchens love surprises. Sometimes they’re fun (you found hardwood under the old vinyl!). Sometimes they’re not
(hello, ancient plumbing). A contingency fund helps you stay calm when the house reveals its secrets.
High-Impact Upgrades That Don’t Require a Full Tear-Out
Paint or reface cabinets
Cabinet updates are the classic before-and-after catalyst. A clean paint job, new doors, or updated hardware can make your
kitchen look dramatically newer without changing the footprint.
Upgrade lighting (seriously, do this)
Add under-cabinet lighting, fix dark corners, and choose bulbs that flatter both the room and the food. This is the kind of
upgrade that makes people walk in and say, “Did you remodel?” when you actually just used electricity wisely.
Swap the faucet and sink
A new faucet is like a handshake: you notice it every day. Pairing a modern faucet with an updated sink (or even just a
new disposal and better accessories) can bring function back fast.
Improve ventilation
A good hood or proper ventilation is the unsung hero of a comfortable kitchen. It keeps odors, grease, and heat from
lingeringplus it can look great as a focal point if you want a statement feature.
Add an organization “reset”
Pull-out trash, drawer dividers, pantry bins, tray storage, and a real spice system can make your kitchen feel renovated
even if the finishes stay the same. Function is a makeover too.
Renovation Experiences: What People Learn the Hard Way (So You Don’t Have To)
Most kitchen makeovers start with excitement and end with reliefplus a new appreciation for the microwave you temporarily
balanced on a folding table for six weeks. Along the way, homeowners tend to collect a very specific set of lessons.
First: you don’t really understand your kitchen until it’s gone. The day you lose your sink, you discover how many daily
routines depend on itcoffee, rinsing produce, filling pots, washing hands, rehydrating that “quick dinner” plan. A
temporary kitchen setup (even a simple one) becomes your sanity anchor: a dish tub, a way to heat food, and a dedicated
spot for essentials. People who plan this ahead of time usually feel in control; everyone else becomes best friends with
takeout menus.
Second: decisions are easy in theory and weirdly emotional in practice. Picking a cabinet color on a screen feels simple
until you realize you’ll see it every morning for the next decade. Many renovators talk about “decision fatigue,” where
even choosing a grout color starts to feel like a personality test you didn’t study for. The best antidote is narrowing your
palette earlytwo or three main finishes, one accent, and a clear direction. When everything coordinates, you can say “yes”
faster and move on with your life.
Third: the “small details” are not small once you live with them. The height of pendants, the swing of appliance doors, the
exact spot of outlets, and the way drawers open around cornersthese are the things that make an after-kitchen feel
effortless. People often wish they’d taped out island size on the floor and rehearsed traffic patterns before committing.
A kitchen that photographs beautifully but pinches walkways will start arguments you didn’t budget for.
Fourth: expectations about timing need a reality filter. Even well-run projects can stretch when materials are delayed,
hidden issues appear, or inspections get scheduled later than hoped. Renovators who build flexibility into the plan (and
keep a cushion in the budget) tend to handle hiccups with far less stress. This is also where communication shines: a
clear scope, written decisions, and consistent check-ins reduce expensive do-overs.
Finally: the best “after” kitchens aren’t always the fanciestthey’re the ones that match the household. Some people love
open shelving because they’re tidy and cook daily; others discover that open shelves are just a front-row seat to clutter.
Some households need a giant island for homework and hosting; others value uninterrupted prep counters and a dedicated
coffee station. The biggest win is when the kitchen stops fighting your routines. When it’s easier to cook, easier to clean,
and easier to gather, the makeover feels like more than a design updateit feels like your home got kinder.