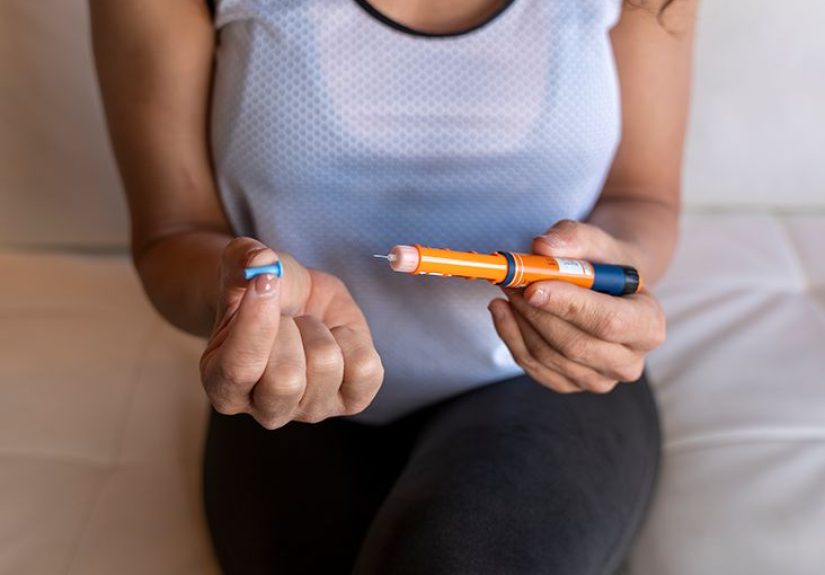
Table of Contents >> Show >> Hide
- What E3D Actually Introduced
- Why Tool Changing Matters (Beyond Printing Cute Two-Color Benchies)
- How E3D’s ToolChanger Mechanism Works (The Secret Sauce Is Precision)
- The Motion System: Built Like a “Don’t Blame the Frame” Platform
- Tools: From “Four Extruders” to “Four Different Jobs”
- Specific, Concrete Use Cases (Where Tool Changing Pays for Itself)
- The Tradeoffs (Because Physics Always Sends an Invoice)
- What Happened After the Introduction
- FAQ: Quick Answers People Actually Search For
- Conclusion: The Big Idea Still Holds
- Experiences Related to E3D’s Tool-Changing Concept (What It’s Like in the Real World)
Multi-material 3D printing has always been the cool kid at the maker partyshowing up in a flashy outfit, doing one neat trick,
then leaving a mountain of wasted filament and a few calibration tears behind. E3D’s answer (unveiled as a tool-changing platform)
was basically: “What if we stop trying to make one nozzle do everything… and instead give the printer a whole toolbox?”
The result was the E3D ToolChanger and Motion System: a machine built around the idea that swapping complete toolheadsrather than
just swapping colors through one nozzlecan make multi-material (and multi-process) printing cleaner, faster, and more flexible.
It’s part engineering flex, part research platform, and part “hold my coffee, I’m about to print with four different hotends.”
What E3D Actually Introduced
In early 2018, E3D publicly showed a tool-changing 3D printer concept at the Midwest RepRap Festival (MRRF), pairing a purpose-built
motion system with a mechanism that could pick up and drop off toolheads during a job. Instead of mounting multiple nozzles on one
carriage (and dealing with oozing “parked” nozzles bumping into prints), the printer physically stores idle tools in docks and only
carries the one it needs at the moment.
Over time, the idea matured into a commercially available system commonly described as a research-grade platform: four swappable tools
in a CoreXY-style machine, designed for experimentation as much as production. Users could run Bowden V6 tools, direct-drive Hemera tools,
or custom tools entirelybecause the whole point wasn’t “four colors,” it was “four capabilities.”
Why Tool Changing Matters (Beyond Printing Cute Two-Color Benchies)
Most hobby-grade multi-material setups fall into a few buckets:
- Two (or more) nozzles on one carriage: faster swaps, but extra weight and the classic “inactive nozzle oozed on my print” problem.
- Multiple filaments through one nozzle: simple hardware, but purging wastes time and filament, and some materials don’t play nicely together.
- IDEX or dual-carriage systems: great for certain use cases, but typically limited to two heads and can reduce printable area.
A tool changer sidesteps a lot of that by giving each material (or process) its own dedicated tool. That means no cross-contamination
inside one melt zone, fewer compromises on nozzle size and hotend setup, and a cleaner path to “serious” applications like soluble support
for complex geometries or pairing a flexible material with a rigid structural polymer.
In plain English: tool changing isn’t just “printing in more colors.” It’s a way to stop asking one hotend to be a superhero and let
it specialize like a good kitchen knife setchef’s knife for chopping, paring knife for detail work, bread knife for… well, bread.
How E3D’s ToolChanger Mechanism Works (The Secret Sauce Is Precision)
Kinematic coupling: repeatability that’s borderline ridiculous
A tool changer only works if the tool comes back to the exact same position every timeotherwise your layers shift, your seams wander,
and your printer starts making abstract art without your permission. E3D leaned on a kinematic coupling approach: a precision locating
system that can repeatedly align the tool with extremely tight tolerance. In their own development write-up, E3D described repeatability
on the order of microns (single-digit microns in ideal tuning), which is the kind of number that makes engineers grin and everyone else ask,
“So… is that good?” (Yes. That’s very good.)
A lightweight actuator and a positive lock
The pickup system was designed to be light enough to keep the moving mass under control (important for speed and print quality),
while still being mechanically secure. The mechanism combined a servo-driven grabber with a cam-lock style engagement so the tool
isn’t just “held,” it’s locked in place with preload. When the tool is dropped off, it returns to a dock where magnets
help retain the parked tool.
Software-driven offsets (including Z): less wrenching, more printing
Traditional multi-nozzle systems often involve tedious “nozzle leveling” so multiple tips sit perfectly relative to each other.
A tool changer approach can lean more heavily on software offsets: each tool has its own calibration values. That doesn’t remove
calibration work entirely (sorry), but it changes it from “tiny screwdriver misery” to a more systematic workflow.
The Motion System: Built Like a “Don’t Blame the Frame” Platform
E3D didn’t treat the tool changer like a bolt-on accessory. They built a motion system meant to reduce variables, because precision
tool pickup is pointless if the motion platform is wobbly. Reviews and E3D’s own design notes highlight a CoreXY architecture, linear
rails, quality belt components, and a structure aimed at stiffness and repeatable motion.
If you’re imagining a cute desktop printer that disappears into the corner, this isn’t that. It’s more “serious machine energy”:
a sizable frame, a semi-enclosed build area in some configurations, and hardware choices intended for accuracy, experimentation,
and reliability over minimal cost.
Specs people actually cared about
- Four tools: a practical upper limit for the stock layout, though the broader concept scales.
- Build volume (reviewed configuration): commonly reported around 300 × 200 × 300 mm.
- Temperature headroom (in reviewed specs): hotend capability described up to 500°C, and heated bed capability noted up to 200°C on certain setups.
- Electronics emphasis: scriptable, tool-change-friendly control was part of the appeal (Duet-based options were frequently associated with the platform).
Translation: this system wasn’t built to win the “cheapest multicolor printer” award. It was built to win the “how many weird,
useful things can we automate on a desktop machine” contest.
Tools: From “Four Extruders” to “Four Different Jobs”
The most interesting part of a tool changer isn’t the swap itselfit’s what you can swap to.
E3D’s ecosystem and community experiments leaned into multi-function tools: not just different extruders/hotends, but different
manufacturing steps.
Example tool stacks that make sense in real life
- Rigid + flexible + soluble support: a classic “why tool changing exists” combo for functional assemblies and complex geometry.
- Abrasive filament tool: a hardened setup for carbon-fiber-filled materials, separate from your “pretty PLA” tool so you don’t grind your favorite nozzle into sadness.
- High-flow tool: a Volcano-style or high-throughput setup for speed and strength on larger parts.
- Inspection tool: cameras or probes for in-process inspection (less “set it and pray,” more “set it and verify”).
ASMBL: when the printer starts acting like a tiny machine shop
One of the headline expansions was E3D’s ASMBL concept (Additive Subtractive Manufacturing By Layer), pairing printing with subtractive
finishing steps so you can improve surface finish, achieve cleaner edges, and reduce post-processing. This is the kind of feature that
makes perfect sense in a tool-changing ecosystem: you can print a layer, then machine or finish something, then continue printing.
The promise is parts that come off the bed closer to “done,” especially where tolerance or finish matters.
Specific, Concrete Use Cases (Where Tool Changing Pays for Itself)
1) Soluble supports that don’t ruin your day
If you’ve ever tried dissolvable supports with a single-nozzle multi-material system, you already know the pain: purging, oozing,
temp compatibility, and the constant question of whether you’re printing a part or a purge tower with a part attached. Tool changing
makes soluble support more straightforward because the support material can live in its own dedicated tool with its own ideal temperature
and nozzle, without contaminating the primary material.
2) Mixed-material functional parts (not just color swaps)
Think of a part that needs a rigid body, a flexible gasket-like section, and maybe a sacrificial interface layer. With dedicated tools,
you can choose hardware and settings that suit each material rather than forcing a compromise.
3) Research-grade multi-material printing
Tool changing isn’t just for hobbyists showing off. Researchers have used tool-changing multi-material systems to build functional devices
that would be painful (or impossible) to assemble by hand. For example, MIT researchers described modifying a multi-material printer setup
to print compact, magnetic-cored solenoids by layering three distinct materials (insulator, conductor, and magnetic core) in a single build.
That kind of work is a strong argument for why platforms like the ToolChanger mattered: they enabled controlled experiments with complex
material stacks and specialized feed mechanisms.
4) Production-ish workflows for small batch parts
“Production” is a loaded word in desktop 3D printing, but tool changing can reduce downtime and rework in small-batch settings by making
multi-material prints less fiddly. Instead of constantly tuning one compromise setup, you can keep multiple known-good tools ready and swap
as needed. It’s the difference between a workshop with one adjustable wrench and a workshop with the right wrench already on the pegboard.
The Tradeoffs (Because Physics Always Sends an Invoice)
Tool-changing systems are powerful, but they’re not magic. Here are the realities that come with the territory:
- Cost: multiple tools means multiple extruders/hotends, plus the changer mechanism and docks. Tool changing can reduce waste, but it’s not the cheapest way to get colorful prints.
- Complexity: you’re managing more hardware, more wiring, more calibration states, and more “what did I do to Tool 3 last week?” moments.
- Maintenance and cleanliness: docks, couplings, and tool interfaces need to stay clean. Small debris can become big alignment problems.
- Slicer and workflow maturity: tool changing demands better planningtool order, purge strategy (even if reduced), temperature management, and tool parking behaviors.
The upside is that these tradeoffs buy you capability. The downside is that capability has a learning curve, and that curve can be steep
enough to qualify as cardio.
What Happened After the Introduction
E3D’s ToolChanger journey didn’t end with a single announcement. The platform grew through beta testing, production deliveries, and a community
of users building custom tools and workflows. Over time, the broader industry also moved: tool-changing became a headline feature in high-end
consumer/prosumer machines, and the conversation shifted from “Does anyone need this?” to “Okay, which flavor of tool changer are you buying?”
In 2023, E3D announced it would discontinue the ToolChanger and Motion System, describing a strategic refocus on its core FDM extrusion expertise.
Importantly, reports emphasized that design files would remain available and that support/spares would continue as inventory allowed, reflecting the
platform’s roots as an open, experimental ecosystem rather than a locked-down appliance.
If that sounds like a sad ending, it’s more like a plot twist. Tool changing didn’t disappearit spread. The ideas that ToolChanger helped popularize
(dedicated toolheads, reduced purge waste, modular tool ecosystems) show up across modern systems and ongoing tool-changer “arms races” in the prosumer
market. In other words: E3D didn’t just build a machine; it helped normalize a category.
FAQ: Quick Answers People Actually Search For
Is a tool-changing printer the best way to print multiple colors?
Not always. If your main goal is decorative multicolor, a single-nozzle system with an automatic material feeder may be simpler and cheaper,
though it can waste more filament on purging. Tool changing shines when you want different materials, different nozzle setups, or even
different processes in one job.
How many tools do you really need?
For many users, two tools already unlock a lot: main material + soluble support, or rigid + flexible. Four tools expands your options dramatically,
especially if one tool is dedicated to abrasive filaments or high-flow printing.
What’s the biggest reason tool changing is hard?
Repeatability. If your system can’t pick up a tool and return it to the same position every time, your print quality suffers fast. That’s why
precision coupling and a robust locking method are such a big deal.
Conclusion: The Big Idea Still Holds
E3D’s tool-changing 3D printer platform was never just a fancy way to swap colors. It was a statement that desktop machines could become modular,
capability-stacking systemswhere you stop forcing one hotend to do every job and instead let tools specialize. That mindset is now visible across
the industry: more toolheads, less waste, more automation, and more ambition in what FDM printers can produce in a single run.
Even with the ToolChanger and Motion System discontinued as a product line, the concept it championed keeps winning: printers that change tools
don’t just print partsthey execute workflows. And once you start thinking that way, it’s hard to go back to watching a single nozzle purge
half a spool into a sad little rainbow brick.
Experiences Related to E3D’s Tool-Changing Concept (What It’s Like in the Real World)
Makers who’ve spent time around tool-changing printers often describe the first week as a mix of excitement and mild disbelieflike getting a
Swiss Army knife and immediately trying to use every attachment at once. The initial thrill comes from watching the machine drive to a dock,
latch onto a tool, and return to the print like nothing happened. The second emotion is usually: “Okay… now I have to keep four tools happy.”
One of the biggest “aha” moments is realizing how much your workflow changes. With a single extruder, you tune one system and live with its
compromises. With tool changing, you stop chasing a mythical universal setup and start building a lineup of specialists. People often dedicate
one tool to everyday PLA/PETG, another to flexibles, a third to abrasive composites, and a fourth to support or experimental materials. Suddenly,
the printer feels less like a gadget and more like a small fabrication cellespecially when you’re swapping nozzle sizes mid-project because the
design demands it, not because you’re feeling adventurous.
The practical experiences are surprisingly down-to-earth. For example, tool docks and coupling surfaces become “keep clean” zones.
In a normal printer, a bit of stray filament might just be an annoyance. In a tool changer, it can turn into a repeatability gremlin:
small debris in the wrong place can cause small misalignments, and small misalignments can become visible artifactsespecially when you’re
switching tools frequently. Many users end up developing simple habits: quick visual checks, wiping areas that accumulate dust, and treating the
docking zone like a precision interface instead of a convenient parking spot.
Another common experience is learning how to think about temperatures and transitions. If each tool is a dedicated setup, you can keep them
optimizedgreat! But you also have to manage warm-up and cool-down cycles intelligently. Users often find that preheating a tool “just in time”
helps avoid stringing, reduces ooze in docks, and keeps swaps faster. Likewise, dedicated tools make it easier to avoid material cross-talk, but
they don’t eliminate all waste: you still plan wipes, small purges, and careful retraction strategies. The win is that you’re wasting far less than
a single-nozzle color swap method, and you’re avoiding the “mystery blend” that happens when incompatible plastics meet in one melt zone.
The most fun stories tend to come from projects that feel impossible on simpler machines. Multi-material assemblies are a big one: rigid hinges
printed alongside flexible interfaces, parts that require both strength and compliance, or designs where soluble support makes a complex internal
channel actually printable. In research and prototyping settings, the tool-changer mindset can be even more transformative: you’re not just printing
a shape, you’re printing a processadding steps, swapping tools, and building functional objects that would otherwise require tedious manual assembly.
That’s where the “tool-changing printer” stops sounding like a luxury and starts sounding like a workflow upgrade.
Perhaps the most consistent experience is this: a tool changer rewards patience. People who enjoy tinkering, experimenting, and refining process
parameters tend to love the platform style. Those who want an appliance may feel overwhelmed by the extra moving piecesliterally and figuratively.
But once you get your tools dialed in, the system can feel almost unfair: you hit print, and the machine handles material changes and specialized
hardware like it’s running a miniature manufacturing line. The best part is that the skill you build transfers. Even if you never touch an E3D
ToolChanger specifically, learning to think in toolsspecialized heads, planned transitions, and modular workflowsmaps perfectly onto where modern
3D printing is headed.
