Table of Contents >> Show >> Hide
- Why the ATtiny1616 Is Worth Learning
- What the ACK1 Actually Gets Right
- Why UPDI Lowers the Barrier to Entry
- The Board Teaches Important Embedded Habits
- Examples of What You Can Learn or Build
- Why This Matters in a World Full of Bigger Boards
- Where the ACK1 Has the Biggest Advantage
- Final Thoughts
- Hands-On Experiences Related to “ACK1 Makes Getting To Know The ATtiny1616 Easy”
- SEO Tags
Note: This article is based on real technical documentation and product information, fully rewritten for publication. No source links or citation artifacts are included in the body content.
Some microcontrollers arrive with a marching band, a parade float, and a thousand tutorials. The ATtiny1616 is not one of them. It is small, capable, modern, and a little underappreciated, which is usually engineer-speak for “great chip, but where do I even start?” That is exactly why the ACK1 is such a smart idea. Instead of asking beginners to juggle a bare surface-mount chip, a programmer, a breadboard, loose LEDs, mystery jumper wires, and the emotional resilience of a saint, the ACK1 turns learning into something far more approachable: plug it in, write code, make lights blink, press buttons, make noise, and slowly realize you are not scared of AVR programming anymore.
At its core, the ACK1 is a purpose-built learning board centered on the ATtiny1616. It was created as a companion to an open course, and that matters more than it might seem. A lot of development boards throw hardware at you and then politely disappear into the bushes. The ACK1 does the opposite. Its layout, features, and teaching materials are aligned so that the board is not just a platform for the chip, but a bridge to understanding the chip. In other words, it is not simply a board you can code. It is a board that gently nudges you into becoming the kind of person who knows why the code works.
Why the ATtiny1616 Is Worth Learning
The ATtiny1616 belongs to Microchip’s tinyAVR 1-series, which is where the old “tiny chip for tiny jobs” story gets a modern rewrite. This device brings 16 KB of Flash, 2 KB of SRAM, and 256 bytes of EEPROM to the table, along with a 20 MHz maximum clock, low-power behavior, and a set of peripherals that make it much more capable than the name “tiny” might suggest. It also adds more sophisticated features such as the Event System and Core Independent Peripherals, which sound like the sort of things you brag about at an embedded conference and then immediately explain with a napkin diagram.
What makes the ATtiny1616 appealing is not just the specifications, but the balance. It is large enough to handle real tasks, yet small enough to force good habits. You do not get lazy and waste resources the way you can on roomier chips. At the same time, you are not squeezed so hard that every project becomes a memory-allocation soap opera. That middle ground makes it ideal for learning bare-metal concepts, timing, I/O, power-conscious design, and direct hardware control.
For beginners moving beyond the classic Arduino comfort zone, the ATtiny1616 is especially interesting because it feels like a serious microcontroller without becoming an intimidating one. You can write simple code to blink an LED in minutes, then gradually step into interrupts, timers, EEPROM storage, serial communication, and more advanced peripheral behavior. It gives you enough headroom to grow, which is exactly what a learning chip should do.
What the ACK1 Actually Gets Right
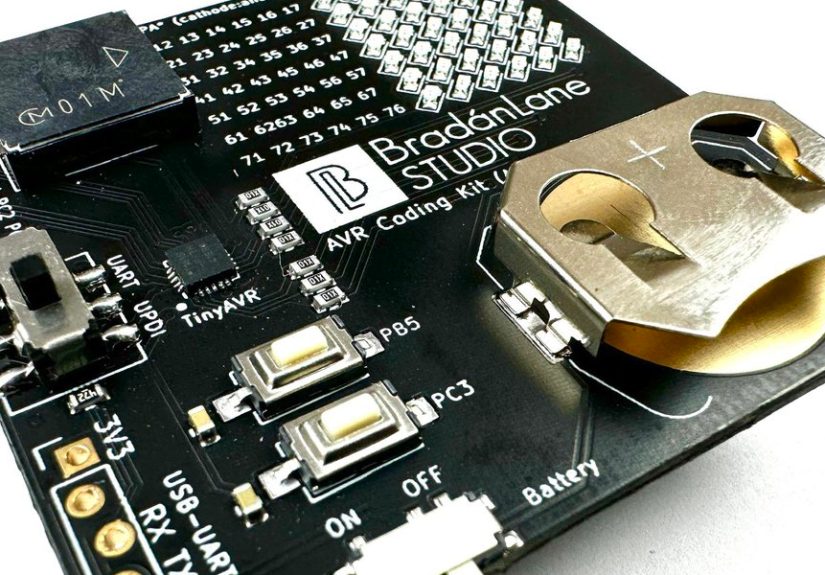
The genius of the ACK1 is that it removes the boring obstacles that normally stand between curiosity and results. The board includes 42 LEDs arranged in a 6-by-7 charlieplexed setup, two buttons, a piezo buzzer, a power switch, battery support via a CR2032 holder, and serial connectivity. That combination is not random decoration. It is a curriculum in hardware form. You can learn output control with LEDs, input handling with buttons, timing and refresh logic with the LED matrix, sound generation with the buzzer, and low-power or portable behavior with battery operation. The board is basically saying, “Here, have several embedded systems lessons at once, but in a fun-sized package.”
Even better, the ACK1 uses a CH340 USB-to-UART adapter that doubles as the UPDI programmer. That is a big deal. UPDI, or Unified Program and Debug Interface, is the one-wire programming and debugging path used on these newer AVR devices. Compared with the older mental model of special programmers and fussy setup rituals, the ACK1 makes the workflow feel dramatically less ceremonial. You are not summoning a microcontroller with ancient tools and a goat sacrifice. You are connecting a practical board and getting on with the job.
This is why the ACK1 makes getting to know the ATtiny1616 easy: it replaces friction with feedback. Every hardware feature on the board gives you something visible, audible, or tactile to test. That matters because microcontroller learning sticks best when you can see your mistakes quickly and celebrate tiny wins just as quickly. A blinking LED is not just a cliché. It is proof that the toolchain works, your code is running, your pin configuration makes sense, and the universe has not collapsed.
Why UPDI Lowers the Barrier to Entry
One of the more practical reasons the ATtiny1616 feels modern is UPDI. Official documentation describes it as a one-wire, half-duplex UART-based interface used for programming and debugging through the device’s UPDI pin. In plain English, this means fewer wires, a simpler workflow, and less time spent wondering whether your programmer, cable, driver, adapter, board setting, moon phase, or personal karma is the problem.
For learners, that simplicity matters as much as raw chip performance. A microcontroller can be brilliant on paper, but if the programming process feels like assembling a submarine hatch with chopsticks, people quit early. The ACK1 avoids that trap by making the programming path part of the learning experience rather than a gatekeeper that blocks it. Once a beginner can reliably upload code, confidence rises fast. That confidence is fuel, and embedded development always needs fuel.
The Board Teaches Important Embedded Habits
There is another reason the ACK1 stands out: it teaches good habits without turning into a lecture. Because the board is purpose-built for structured learning, it encourages you to think in terms of registers, timing, state changes, and hardware constraints instead of hiding everything behind giant abstraction layers. That does not mean it is hostile to beginners. It means it respects them enough to show how the machine works.
Take the LED array, for example. Forty-two LEDs sound delightfully excessive on a compact board, but they are arranged through charlieplexing, which is a clever technique for controlling many LEDs with fewer pins. That means the learner naturally runs into concepts like scanning, refresh timing, persistence of vision, and efficient I/O usage. Suddenly the board is not just blinking lights. It is teaching multiplexing strategy, resource management, and timing control while pretending to be a toy. Honestly, that is excellent educational mischief.
The same goes for buttons and the buzzer. Buttons teach debouncing, polling, interrupts, and user input logic. A buzzer introduces timing relationships, waveform generation, and simple sound feedback. EEPROM storage opens the door to retaining settings or scores. Battery support nudges you toward thinking about power draw and portability. None of these lessons are abstract. They become practical the moment you try to build something that feels complete.
Examples of What You Can Learn or Build
Because the ACK1 bundles useful hardware into a single board, it is ideal for short, confidence-building projects. A beginner can start with the classics: blink a single LED, read a button, make a beep. Then the projects can quickly become more interesting. You can create a scrolling name badge, a tiny reaction game, a menu-driven gadget with button input, or a battery-powered desk toy that plays tones and animates patterns. None of those projects require a drawer full of sensors or a second mortgage for accessories.
More importantly, each project maps neatly onto a skill. A badge teaches display buffering. A reaction game teaches timing and state management. A portable gadget teaches sleep modes and power awareness. A buzzer-based mini instrument teaches timer use and output control. That is the sweet spot of embedded learning: when every fun experiment quietly trains a professional instinct.
The ACK1 also makes the ATtiny1616 feel less like an isolated chip and more like a launch point. Once you understand its I/O, timers, EEPROM, and programming flow on a board designed for learning, you are much better prepared to move on to custom ATtiny1616 hardware, minimal embedded products, or other chips in the broader AVR family. In other words, the ACK1 does not trap you in a starter kit bubble. It sends you onward.
Why This Matters in a World Full of Bigger Boards
It is fair to ask why anyone should care about a modest 8-bit microcontroller when there are faster, flashier boards everywhere. The answer is that not every project needs a dual-core showoff with enough RAM to host a midlife crisis. For many embedded tasks, what matters is predictable behavior, compact design, low power, accessible tooling, and a clean path from idea to implementation. The ATtiny1616 delivers that kind of practicality, and the ACK1 makes it approachable.
There is also educational value in starting small but not too small. A board like this teaches discipline. You learn to think about registers, data flow, timing, and resource limits. Those lessons translate well whether you later move to bigger AVR devices, ARM microcontrollers, or custom boards. If you can solve a problem elegantly on a tinyAVR device, you usually become a better developer everywhere else.
Where the ACK1 Has the Biggest Advantage
The biggest win is not that the ACK1 makes the ATtiny1616 look cool, although it certainly helps that it does. The real win is that it turns “getting started” into a realistic promise. Many learning platforms are either too abstract or too chaotic. They either hide the hardware so much that you learn very little, or they expose every detail at once until the beginner feels like they were tossed into a bin of components and wished good luck.
The ACK1 lands in the middle. It gives enough structure to keep progress moving, yet enough direct hardware interaction to make the learning feel authentic. That is rare. It is why the board deserves attention not merely as a novelty kit, but as a thoughtful example of how embedded education should work.
Final Thoughts
ACK1 makes getting to know the ATtiny1616 easy because it respects both the learner and the hardware. It does not pretend the ATtiny1616 is magic, and it does not bury the chip under layers of fluff. Instead, it gives the microcontroller a friendly stage: LEDs to animate, buttons to read, a buzzer to drive, a battery to power it, and a straightforward UPDI workflow to keep development moving. That combination transforms the ATtiny1616 from a neat spec sheet into a chip you can actually understand.
If you are the kind of person who wants to move past copy-paste beginner tutorials and into real embedded thinking, the ACK1 is a remarkably effective on-ramp. It makes the ATtiny1616 feel less mysterious, more practical, and a lot more fun. And in the world of microcontrollers, that is a pretty good trick for one tiny board.
Hands-On Experiences Related to “ACK1 Makes Getting To Know The ATtiny1616 Easy”
What is especially appealing about the ACK1 learning experience is how quickly it turns uncertainty into momentum. Many people who first encounter the ATtiny1616 are interested in the chip but hesitate because it is not the old-school, breadboard-friendly AVR path they are used to. The ACK1 changes that emotional arc. The first experience is usually relief: the chip is already mounted, the board is ready to interact with, and the hardware gives immediate feedback. That matters because the first hour with a new microcontroller family often decides whether someone keeps exploring or quietly backs away while pretending they were “just researching.”
Another common experience is that the board makes abstract embedded concepts feel concrete much faster than a blank breakout board would. When learners toggle an LED on a general-purpose pin, they understand output. When they move on to a charlieplexed array, they discover that “turning on a light” is suddenly a timing problem, an I/O coordination problem, and a software design problem. That is a huge educational step. Instead of memorizing theory, they feel the difference between simple pin control and coordinated refresh logic. It is the kind of lesson that sticks because the board forces the result to be visible.
The button experience is similarly useful. A newcomer may expect button reading to be trivial, then quickly discover bouncing, repeated presses, state handling, and timing issues. On the ACK1, those lessons do not feel like punishment. They feel like progress. You press a button, something unexpected happens, and now you have a real debugging story. Embedded development is full of those moments, and boards like this let beginners have them in a safe, manageable setting.
Then there is the buzzer, which often becomes the surprise favorite. Sound is one of the fastest ways to make a project feel alive. The moment a learner produces a tone, a chirp, or a tiny melody, the board stops feeling like an electronics exercise and starts feeling like a real device. That emotional shift is more important than it sounds. It gives people ownership. Once someone has made lights animate and sound happen on a battery-powered board they programmed themselves, they stop thinking like a spectator and start thinking like a builder.
Battery operation adds another layer to the experience. Running from a CR2032 cell changes the mindset from “code on a desk” to “object in the world.” Suddenly power matters. Runtime matters. Sleep modes matter. Efficient refresh routines matter. Those are not glamorous topics, but they are real embedded topics. The ACK1 helps learners bump into them naturally rather than through dry theory alone.
Probably the most valuable experience, though, is the gradual reduction of fear. At first, the ATtiny1616 can look like one of those chips you admire from a distance because the datasheet is long and the ecosystem feels less obvious than mainstream beginner platforms. After a few lessons on the ACK1, that intimidation fades. Registers start to make sense. UPDI stops feeling exotic. Timers become tools instead of mysterious acronyms. Even EEPROM begins to look less like wizardry and more like a practical place to store settings or game data.
That is why the ACK1 works so well in practice. It does not just teach the ATtiny1616. It changes the learner’s experience of the ATtiny1616. It turns a modern tinyAVR device from “interesting, but maybe later” into “I can actually build with this right now.” For a teaching board, that is about as strong an endorsement as it gets.