Table of Contents >> Show >> Hide
- Why an All-Butter Pie Crust Is Worth the Hype
- Ingredients for the Best All-Butter Pie Crust
- Tools You’ll Need (No, You Don’t Need a Marble Temple)
- All Butter Pie Crust Recipe: Step-by-Step
- Food Processor Method vs. By Hand
- Blind Baking and Par-Baking (How to Avoid the Soggy Bottom)
- Pro Tips for a Flaky, Tender Butter Pie Crust
- Troubleshooting Common Pie Crust Problems
- Make-Ahead, Storage, and Freezing
- What to Bake With Your All-Butter Pie Crust
- Conclusion
- Extra: Real-World Pie Crust Experiences (The Stuff Recipes Don’t Always Say Out Loud)
If pie crust has ever made you whisper, “I’m not a pastry person,” I’m here to gently slide a stick of butter into your hand and say:
yes you are. An all-butter pie crust is the golden retriever of crustsloyal, lovable, and occasionally a little messy if it gets too warm.
But with the right technique, you’ll get a crust that’s flaky, tender, and so buttery it could win an election in a dairy state.
This guide covers the full all butter pie crust recipe (for single or double crust pies), plus the science behind flakiness, food-processor and by-hand methods,
blind baking tips to prevent soggy bottoms, and troubleshooting so you can fix mistakes like a calm kitchen wizard.
Why an All-Butter Pie Crust Is Worth the Hype
Butter does two big jobs in pie dough: flavor and flake. When cold butter hits a hot oven, the water in the butter turns to steam and lifts the dough into layers.
That’s the flakiness you’re chasingthose crisp, shattering sheets that make people pause mid-bite and stare into the distance like they’ve seen the face of pie truth.
Compared to shortening or lard, butter can be a little fussier (it melts faster), but the payoff is unbeatable taste and gorgeous browning.
If you want a classic homemade pie crust that works for sweet and savory fillings, all-butter is the move.
Ingredients for the Best All-Butter Pie Crust
This makes 2 single crusts (or 1 double crust) for a standard 9-inch pie.
Measurements include both cups and grams because pie crust is dramatic, and accuracy helps.
Core ingredients
- All-purpose flour: 2 1/2 cups (300g)
- Salt: 1 teaspoon (table salt) or 1 1/2 teaspoons Diamond Crystal kosher salt
- Granulated sugar (optional): 1 tablespoon (use less or skip for savory pies)
- Unsalted butter: 16 tablespoons / 2 sticks (227g), cold, cut into cubes or pats
- Ice water: 1/4 to 1/2 cup (60–120ml), added gradually
Optional “level up” add-ins (still very normal, not weird)
- Buttermilk powder (optional): 2 tablespoons, for a subtle tang and improved browning
- Vodka trick (optional): replace up to half of the ice water with cold vodka for easier rolling
- Buttermilk swap (optional): replace some water with cold buttermilk for extra tenderness and color
Tools You’ll Need (No, You Don’t Need a Marble Temple)
- Large mixing bowl
- Pastry cutter or food processor
- Measuring cups/spoons (or a scale if you like living deliciously)
- Rubber spatula
- Rolling pin
- Plastic wrap or reusable wrap
- 9-inch pie plate (glass or metal is especially crust-friendly)
All Butter Pie Crust Recipe: Step-by-Step
1) Keep everything cold
Cold butter is the whole game. If your kitchen runs warm, chill your flour and bowl for 10–15 minutes. Keep a glass of water with ice nearby so your “ice water”
is actually icy and not “tap water wearing a tiny scarf.”
2) Mix the dry ingredients
In a large bowl, whisk together flour, salt, and sugar (if using). If you’re adding buttermilk powder, whisk it in now so it’s evenly distributed.
3) Cut in the butter (leave visible pieces)
Add the cold butter to the flour mixture. Using a pastry cutter (or your fingertips if you work fast), cut the butter into the flour until you see a mix of:
pea-size pieces plus a few larger, flatter shards. Those bigger bits are future flaky layers.
Pro move: occasionally press a few butter pieces between your fingers to flatten them into thin sheets. This “smear + chunk” combo bakes up beautifully.
4) Add ice water gradually (don’t flood it)
Drizzle in ice water 1 tablespoon at a time, tossing with a fork or spatula after each addition. Stop when the dough forms large clumps and holds together
when you squeeze a handful. If it’s sandy and won’t cooperate, add a little more waterslowly.
5) Bring it together (gently)
Dump the mixture onto a clean surface. Press it together into a mound. If it still looks shaggy, that’s normalpressing hydrates flour without overworking gluten.
Divide into two equal pieces (for two crusts). Shape each into a 1-inch-thick disk.
6) Chill the dough (non-negotiable)
Wrap each disk tightly and refrigerate for at least 2 hours (or up to 3 days). This lets the flour hydrate and relax, making rolling easier and helping prevent shrinkage.
7) Roll it out
Lightly flour your surface and rolling pin. Roll from the center outward, rotating the dough as you go, until it’s about 12 inches in diameter for a 9-inch pie plate
(roughly 1/8 inch thick). If the butter starts feeling soft or the dough sticks, pause and chill it 10 minutes.
8) Fit into the pie plate + chill again
Roll the dough around the pin and unroll into the pie plate. Lift and settle it into cornersdon’t stretch it.
Trim with a 1/2-inch overhang, tuck under, and crimp. Then refrigerate the shaped crust for at least 30 minutes before baking or filling.
Food Processor Method vs. By Hand
Both work. Choose based on your personality and whether you like washing extra parts.
Food processor method (fast + consistent)
Pulse flour + salt (+ sugar) to combine. Add butter and pulse in short bursts until you get coarse crumbs with visible butter bits.
Transfer to a bowl and fold in ice water with a spatula (this helps keep the crust flaky). Then chill as usual.
By hand (more “rustic artisan,” fewer appliances)
Use a pastry cutter or two forks. Work quickly. Your goal is butter pieces coated in flournot butter paste.
If you can still see butter, you’re doing it right.
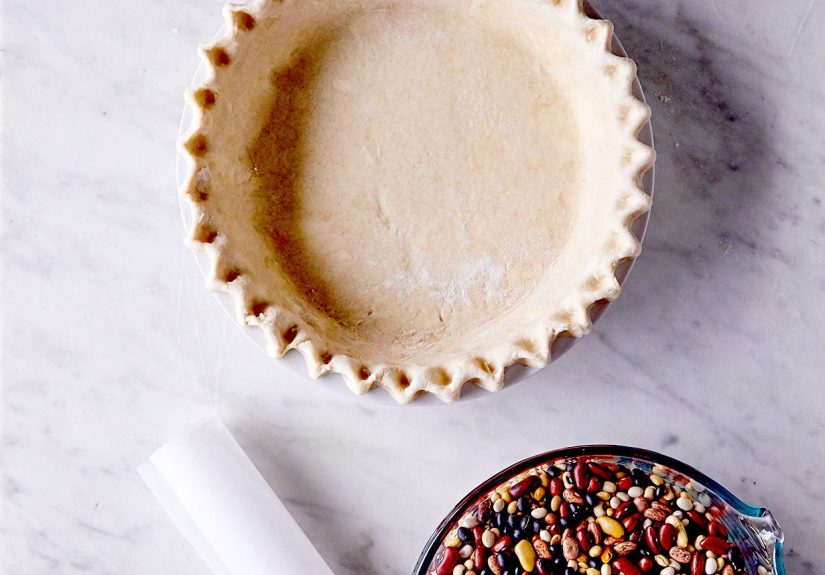
Blind Baking and Par-Baking (How to Avoid the Soggy Bottom)
Here’s the simplest way to remember it:
- Par-bake = partially bake the crust before adding a filling that will bake again (think pumpkin or pecan).
- Blind bake = fully bake the crust for fillings that don’t bake in the oven (think chocolate cream or banana cream).
Classic par-bake method (quick and common)
- Preheat oven to 375°F.
- Line chilled crust with parchment or foil, then fill with pie weights, dried beans, or rice.
- Bake until edges look set and barely golden, about 15–20 minutes.
- Carefully remove weights and liner. Dock the bottom with a fork.
- Return to oven for 5–10 minutes for a par-baked crust (or longer for a fully baked shell).
Low-and-slow blind bake (the “set it and forget it” approach)
If you want a super flat, crisp shell with minimal drama, bake at 350°F for about 60 minutes with weights in the whole time.
Some bakers use plain white sugar as the weight because it molds perfectly to the crust and conducts heat well.
Either way: start with a thoroughly chilled crust, and consider baking on a sheet pan for better bottom browning and easier handling.
Pro Tips for a Flaky, Tender Butter Pie Crust
- Don’t overwork the dough: mixing too much develops gluten and leads to toughness.
- Stop water when it holds together: too much water increases gluten and shrink risk.
- Chill twice: once as disks, once after shaping in the pan. This helps prevent slumping.
- Choose your pie plate wisely: metal or glass often browns bottoms more effectively than thick ceramic.
- Patch with confidence: tears happen. Use scraps like edible spackle and move on with your life.
- Want easier rolling? try the vodka trick or a partial buttermilk swapboth can improve handling.
Troubleshooting Common Pie Crust Problems
“My dough is cracking when I roll it.”
It’s too cold or too dry. Let it sit at room temp for 5–10 minutes, then try again. If it still fractures, mist the edge with a tiny bit of water and press together.
“My crust shrank in the oven.”
Usually from stretching the dough while fitting it, not chilling long enough after shaping, or under-weighting during blind baking.
Next time: lift and settle (don’t tug) and chill the formed shell longer.
“My crust is tough.”
Overmixing or too much water. For future you: stop mixing sooner, add water more slowly, and remember that shaggy is not a crimeit’s a stage of beauty.
“Butter leaked out and my crust fried itself.”
Butter got too warm before baking or you had too few flour-coated butter pieces. Keep everything colder, chill the shaped crust, and bake on a sheet pan
so any drips don’t create a smoky kitchen memoir.
Make-Ahead, Storage, and Freezing
- Refrigerate dough disks: up to 3 days, tightly wrapped.
- Freeze dough disks: up to 3 months. Thaw overnight in the fridge.
- Freeze shaped crust in the pan: wrap well and bake from frozen (add a few extra minutes).
- Fully baked shell: can be baked ahead and stored tightly covered once cooled.
What to Bake With Your All-Butter Pie Crust
This homemade pie dough is a universal adapter. Try it with:
- Fruit pies: apple, cherry, blueberry, peach
- Custard pies: pumpkin, sweet potato, chess pie (often benefits from par-baking)
- Cream pies: chocolate cream, coconut cream (blind bake the shell)
- Savory pies: quiche, pot pie, tomato pie (skip the sugar)
Conclusion
A great all-butter pie crust isn’t about secret ingredients or pastry school credentialsit’s about temperature control, gentle handling, and knowing what “ready”
looks like. Keep the butter cold, add water slowly, chill like you mean it, and bake with intention (especially if you’re blind baking).
Do that, and your crust will be flaky, golden, and confidentkind of like the best version of all of us.
Extra: Real-World Pie Crust Experiences (The Stuff Recipes Don’t Always Say Out Loud)
Let’s talk about what actually happens in real kitchens, where the oven preheats slower than your optimism and the cat is deeply invested in butter-based decisions.
Here are some common, very human experiences that show up when you commit to an all butter pie crust recipeand how to win anyway.
First: your kitchen temperature matters more than your zodiac sign. In a cool house, butter behaves. In a warm house, butter turns into a smug puddle that refuses to
hold a crimp. Many bakers learn (sometimes the hard way) that “chill the dough” really means “chill everything, repeatedly, like you’re auditioning for a role in a
refrigerator commercial.” The good news is that chilling isn’t a punishment; it’s an easy reset button. Dough too soft? Chill. Dough sticking? Chill. You getting
annoyed? Also chill (emotionally, but the fridge works for dough).
Second: pie dough teaches patience in tiny increments. It’s rarely one big mistake; it’s usually a series of small choices: adding water too quickly, rolling too
aggressively, skipping the second chill because “it’ll probably be fine,” and then discovering it was, in fact, not fine. Over time, bakers start to notice
the feel of perfect hydrationwhen the dough holds together without being wet, when it looks shaggy but presses into a cohesive disk. That tactile knowledge is the
difference between “I followed the recipe” and “I understand the recipe.”
Third: patching dough is a rite of passage. The first time a crust tears, some people panic like the pie is now legally invalid. But experienced bakers treat rips
like potholesfill, smooth, proceed. A small tear won’t ruin anything, especially if you press it together gently and chill before baking. In fact, the confidence
to patch and continue is how many home bakers graduate from “pie anxiety” to “pie swagger.”
Fourth: blind baking is where crusts either glow up or give up. People often under-weight the crust, remove weights too soon, or bake at a temperature that browns the
edges before the bottom sets. The “aha” moment usually comes when they finally line the crust properly, use enough weights to reach the sides, and let the shell bake
until it’s actually dry and set. Once you experience a crisp, fully baked bottom on a cream pie, you will never again accept soggy pastry as your destiny.
Fifth: the best pie crust confidence boost is repetition. Make the dough on a random weekend, bake “pie crust cookies” from scraps, and practice crimping when nobody’s
watching. The more you handle pie dough calmly, the more it behaves. And yessometimes the “ugly” pies taste the best. Flakiness doesn’t care if your edges look like a
scalloped doily or a mildly stressed coastline.
Finally, the most relatable experience of all: the moment you pull a pie from the oven and realize you’re about to cut it too soon. Let it cool. Walk away. Make tea.
Take a photo. Resist the impulse. A pie needs time to set, and a crust deserves a fighting chance to stay crisp. When you do slice it and that crust cracks cleanly?
That’s not just baking. That’s personal growth with butter.