Table of Contents >> Show >> Hide
- What Makes These the “Best” Chocolate Peppermint Cookies?
- Ingredients
- How To Make Chocolate Peppermint Cookies (Step-by-Step)
- Pro Tips for Bakery-Level Results
- Easy Variations (Pick Your Peppermint Personality)
- Troubleshooting: Common Cookie Problems (and Fixes)
- Make-Ahead, Storage, and Freezing
- FAQ: Chocolate Peppermint Cookies
- Real-Life Experiences: What I’ve Learned Making These Cookies (and the Mistakes I’ve Made So You Don’t Have To)
- Conclusion
Chocolate and peppermint is the holiday power couple: bold, cool, slightly dramatic, and always photogenic.
When it shows up in cookie form, people magically “just happen” to walk past your kitchen every five minutes.
This recipe delivers deep chocolate flavor, a minty sparkle (without tasting like toothpaste),
and the kind of soft, fudgy centers that make you consider hiding a few “for guests” in a very private drawer.
Below you’ll get the best chocolate peppermint cookies recipe, plus the why behind each step,
troubleshooting help, and variations (crinkle-style, peppermint bark vibes, sandwich-cookie energypick your holiday mood).
What Makes These the “Best” Chocolate Peppermint Cookies?
- Fudgy, brownie-ish texture from cocoa + melted butter + a short chill.
- Balanced peppermint (present, not overpoweringyour taste buds deserve boundaries).
- Smart peppermint topping so candy cane bits don’t melt into sad little puddles.
- Flexible formats: classic drop cookies, crinkles, or peppermint bark-style finish.
Ingredients
Makes: about 22–26 cookies (depending on scoop size)
Dry Ingredients
- 1 1/4 cups (150g) all-purpose flour
- 1/2 cup (45–50g) unsweetened cocoa powder (Dutch-process for darker, richer chocolate flavor)
- 1 teaspoon baking powder
- 1/2 teaspoon baking soda
- 1/2 teaspoon kosher salt (or 1/4 teaspoon fine salt)
- Optional: 1/2 teaspoon espresso powder (makes chocolate taste more chocolate-y, not coffee-y)
Wet Ingredients + Mix-Ins
- 1/2 cup (113g) unsalted butter
- 1/2 cup (100g) granulated sugar
- 1/2 cup (110g) light brown sugar, packed
- 2 large eggs, room temperature
- 2 teaspoons vanilla extract
- 1/2 teaspoon peppermint extract (start here; you can increase next batch if you want more “mint pop”)
- 3/4 cup (130g) semi-sweet chocolate chips or chopped chocolate
- 1/2 cup (85g) white chocolate chunks or chips (optional but highly recommended for peppermint bark vibes)
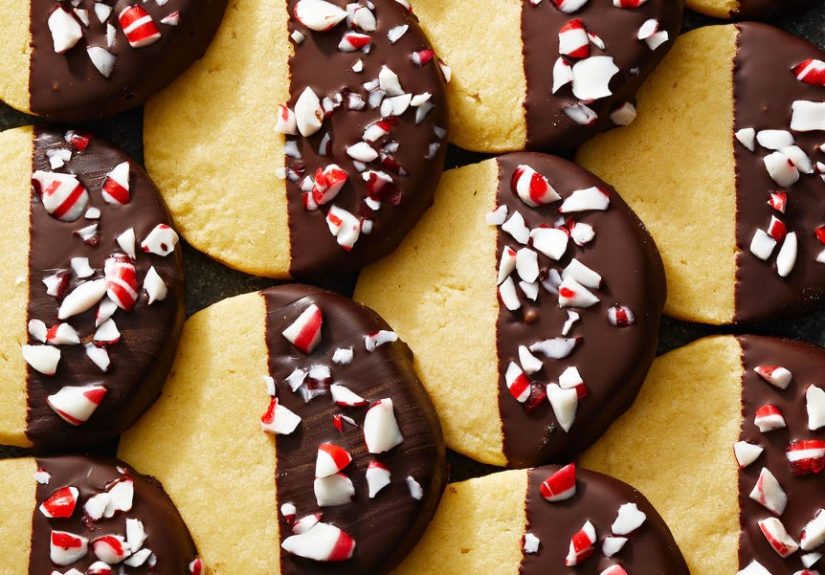
Peppermint Finish (Choose One)
- Option A (Best texture): 1/3 cup crushed candy canes (crush into mostly pea-size pieces, not dust)
- Option B (Peppermint bark style): 1/2 cup chopped peppermint bark, added after baking
- Option C (Crinkle style): 1/3 cup granulated sugar + 1/2 cup powdered sugar for rolling
How To Make Chocolate Peppermint Cookies (Step-by-Step)
1) Prep your pans and oven
Line 2 baking sheets with parchment paper. Preheat oven to 350°F.
(If your oven runs hot, 345°F can be your cookie insurance policy.)
2) Mix dry ingredients
In a medium bowl, whisk together flour, cocoa powder, baking powder, baking soda, salt, and espresso powder (if using).
Set aside.
3) Melt butter, then build the chocolate base
Melt the butter in a microwave-safe bowl (or small saucepan). Let it cool for 2–3 minutes so it’s warm, not screaming hot.
Whisk in granulated sugar and brown sugar until glossy and smooth.
4) Add eggs and extracts
Whisk in eggs one at a time until the batter looks thicker and satiny. Stir in vanilla and peppermint extract.
Important: peppermint extract is powerfulmeasure it like you respect it.
5) Combine wet + dry
Add the dry ingredients to the wet mixture and fold until you see only a few streaks of flour.
Then fold in semi-sweet chocolate and white chocolate (if using).
6) Chill (yes, really)
Cover the bowl and chill for 45–60 minutes.
This helps the dough firm up for thicker cookies and encourages better flavor.
If you’re in a hurry, 25–30 minutes in the freezer worksjust don’t forget it in there until March.
7) Scoop and shape
Scoop dough into 1 1/2 tablespoon portions (a cookie scoop is ideal). Roll into balls.
Place 2 inches apart on prepared sheets.
8) Choose your finish
-
Peppermint topping (recommended): Bake first, then add crushed candy canes/bark while cookies are hot.
This prevents peppermint from melting into a sticky sheet of sadness. -
Crinkle version: Roll dough balls in granulated sugar, then powdered sugar.
(The first sugar layer helps the powdered sugar stay pretty while baking.)
9) Bake
Bake for 10–12 minutes, until edges look set and centers still look slightly soft.
Don’t overbakecookies finish setting as they cool.
10) Add peppermint + cool properly
Immediately after baking, sprinkle with crushed candy cane pieces or press chopped peppermint bark/white chocolate on top.
Let cookies cool on the sheet for 10 minutes, then transfer to a wire rack.
Pro Tips for Bakery-Level Results
Use the right cocoa
Dutch-process cocoa tends to give a darker color and deeper chocolate flavor. Natural cocoa still works,
but your cookies may be lighter in color and slightly sharper in flavor.
Don’t pulverize your candy canes
Peppermint dust melts fast. Aim for mostly small chunksthink “confetti,” not “snowstorm.”
Bigger pieces keep their crunch and look prettier.
Measure flour carefully
Too much flour = dry dough. If you can, weigh it (150g). If you’re using cups, fluff flour, spoon it into the cup,
and level it offno packing.
Chill the dough for thicker cookies
A short chill helps prevent spread and makes scooping easier. You’ll also get richer flavor and better texture.
Stop baking while they still look slightly underdone
Chocolate cookies can trick you because they’re already dark. Pull them when the edges are set and the centers look soft.
Cooling finishes the job.
Easy Variations (Pick Your Peppermint Personality)
1) Peppermint Bark Chocolate Cookies
Skip rolling in sugar. Bake the cookies, then press chopped peppermint bark and/or white chocolate chunks on top while hot.
Finish with chunky crushed candy cane pieces for crunch.
2) Chocolate Peppermint Crinkle Cookies
Roll dough balls in granulated sugar then powdered sugar before baking.
Keep the bake time on the lower end for soft centers.
3) Chocolate Peppermint Sandwich Cookies
Bake cookies slightly smaller and flatter, then sandwich with peppermint buttercream (butter + powdered sugar + vanilla + a tiny bit of peppermint extract).
These feel fancy without requiring a pastry degree.
4) Thin-Mint-Inspired Peppermint Chocolate Snaps
Roll dough thinner, bake a minute longer for crispness, then dip half in melted chocolate.
Freeze briefly to set, then try not to eat six “quality control” cookies in a row.
Troubleshooting: Common Cookie Problems (and Fixes)
My cookies spread too much
- Dough wasn’t chilled long enough. Chill 60 minutes next time.
- Butter was too hot when mixed. Let melted butter cool a few minutes first.
- Your baking sheet was warm from a previous batch. Use a cool sheet each round.
My peppermint topping melted into goo
- Crush candy into larger pieces (avoid peppermint dust).
- Add peppermint after baking, not before.
- Don’t overbakeextra heat = extra melt.
The peppermint flavor is too strong
- Next time use 1/4 teaspoon peppermint extract. It’s intense.
- Add more vanilla to soften the mint edge.
- Lean into mix-ins like chocolate chunks or white chocolate to rebalance.
The peppermint flavor is too subtle
- Increase peppermint extract slightly (try 3/4 teaspoon).
- Add crushed candy cane on top and a bit inside the dough.
Make-Ahead, Storage, and Freezing
How to store
Store in an airtight container at room temperature for 3–5 days.
Peppermint aroma is strong, so keep these cookies separate from delicate-flavored treats (unless you want your sugar cookies to taste like winter).
How to freeze dough
Scoop and roll dough balls. Freeze on a tray until solid, then store in a freezer bag for up to 2–3 months.
Bake from frozen, adding 1–2 minutes to bake time. Add peppermint topping after baking.
How to freeze baked cookies
Freeze fully cooled cookies in a sealed container (layered with parchment) for up to 2–3 months.
Thaw at room temp. If you want extra crunch, refresh in a 300°F oven for 3–4 minutes.
FAQ: Chocolate Peppermint Cookies
Can I use peppermint oil instead of peppermint extract?
Peppermint oil is much stronger and varies by brand. If you do, use a tiny amount and follow the product’s conversion guidance.
When in doubt, stick with extract for predictable results.
Can I make these gluten-free?
Yesuse a 1:1 gluten-free baking flour blend. Expect the texture to be slightly different (often a bit more tender),
but still delicious.
Do I have to use white chocolate?
Nope. White chocolate adds “peppermint bark” vibes, but the cookies stand on their own with semi-sweet chocolate + peppermint.
What’s the best chocolate to use?
Use semi-sweet chocolate chips or chopped baking chocolate. Chopped chocolate tends to melt into larger pockets (very good news).
Real-Life Experiences: What I’ve Learned Making These Cookies (and the Mistakes I’ve Made So You Don’t Have To)
The first time I made chocolate peppermint cookies for a holiday cookie swap, I treated peppermint extract like vanilla:
a confident glug, a casual splash, the vibe of someone who absolutely believes they can eyeball it.
Reader, I could not. The cookies came out tasting like a chocolate bar that fell into a minty medicine cabinet and decided to live there.
Everyone politely said, “Wow, these are… festive,” and then took suspiciously small bites.
That was the day I learned peppermint has the emotional range of a marching band: it’s either quiet or it’s taking over the whole parade.
Batch two was better, but I ran into the classic candy cane problem: I crushed my candy canes into a fine, sparkly dust
and sprinkled it on top before baking like I was seasoning a very fancy steak.
Ten minutes later, the topping had melted into pink puddles that looked like melted ornaments.
The cookies still tasted good, but they lost the holiday “crunch and sparkle” I was going for.
Now I crush candy canes into chunkier bits and add them right after baking, when the cookie top is warm enough to grab on,
but not hot enough to liquefy the whole situation.
Over the years, I’ve also learned that the “perfect bake” for chocolate peppermint cookies is slightly earlier than your instincts suggest.
Chocolate dough hides its doneness. You’ll be tempted to wait until the centers look firm, but that’s how you get cookies that feel a little… earnest.
Pull them when the edges are set and the centers look soft, and let the tray do the final work while everything cools.
The difference is dramatic: fudgy centers, chewy edges, and that bakery-style texture that makes people ask,
“Waitdid you buy these?” (You may accept compliments without correcting them. This is allowed.)
Another oddly specific lesson: peppermint flavor travels.
If you store these cookies in the same container as, say, buttery shortbread,
your shortbread will wake up the next day tasting like it went ice skating.
Airtight containers are great, but separate containers are betterespecially if you’re building a cookie assortment.
The bonus is that it keeps each cookie tasting like itself, which is ideal because variety is basically the whole point of holiday baking.
My favorite “power move” for parties is turning these into peppermint bark cookies without any extra drama:
I bake the cookies, then press a few white chocolate chunks and peppermint bark pieces on top while they’re hot.
It looks intentional and fancy, like you planned it on purpose instead of doing it because you wanted a shortcut.
Add a little crushed candy cane and suddenly you have cookies that look like they belong on a magazine coverexcept you get to eat them.
If you’re gifting, stack them with parchment between layers, toss in a couple extra candy canes for decoration,
and try to ignore the voice in your head suggesting you “taste test” the entire box.
Finally, the biggest secret: these cookies are even better with a beverage plan.
Hot cocoa makes them extra cozy, coffee makes the chocolate taste deeper, and milk is the classic for a reason.
If you’re hosting, put out a mug station and watch these disappear like you hired a cookie magician.
Conclusion
If you want a holiday cookie that’s bold, crowd-pleasing, and easy enough to make on a weeknight,
this chocolate peppermint cookies recipe is the one.
Keep the peppermint measured, chill the dough, don’t overbake, and add the candy topping at the end for maximum crunch and sparkle.
Then enjoy the inevitable complimentsand the suspiciously fast cookie disappearance rate.