Table of Contents >> Show >> Hide
- What Is a Breakout Board (and Why It Matters Here)?
- Why Traditional Prototyping Is So Vision-Dependent
- What “Accessible Breakout Boards” Should Do
- What Exists Today: Real Examples You Can Learn From
- DIY: How to Make Standard Breakout Boards More Accessible
- Teaching and Makerspace Tips That Actually Help
- How to Choose the Right Breakout-Board Path
- Conclusion
- of Experiences Related to Breakout Boards For The Blind
- SEO Tags
Electronics prototyping has a dirty little secret: it’s basically a visual sport. We point at pin labels, we squint at tiny silkscreen text,
we trace breadboard rows with our eyes, and we celebrate when the LED lights up like it’s auditioning for a Broadway role. But if you’re blind or
have low vision, that whole “just look at it” workflow is… not exactly welcoming.
The good news: breakout boards (and the maker world around them) are getting better. Between tactile-first breadboards, braille-labeled kits,
accessible coding tools, and a growing body of practical teaching techniques, building circuits nonvisually is increasingly realisticand honestly,
pretty awesome. This guide breaks down what “breakout boards for the blind” can mean, what designs work, what exists today, and how to make the
stuff you already have more accessible.
What Is a Breakout Board (and Why It Matters Here)?
A breakout board is a small circuit board that “breaks out” a componentlike a sensor, display driver, amplifier, or microcontroller featureinto
something you can wire up easily. Instead of soldering microscopic pins or dealing with fragile packages, you get friendly headers, clear pinouts,
and a format that works with jumper wires, breadboards, and quick prototypes.
In practice, breakout boards are the LEGO bricks of modern electronics. In accessibility terms, they can be either:
(1) the problem (because everything is labeled visually), or (2) the solution (because they’re modular and can be adapted
with tactile cues, consistent connectors, and structured layouts). The difference comes down to design.
Why Traditional Prototyping Is So Vision-Dependent
If you’ve ever plugged a jumper wire into the wrong breadboard rail and spent 20 minutes diagnosing a circuit that was never going to work, you
already understand the core issue: prototyping is full of tiny, easy-to-miss details. Breadboards in particular rely on visual row/column cues,
plus/minus rails, and quick visual checks that a component is seated correctly. That reliance is explicitly called out in discussions of tactile
breadboard redesign for blind makers.
The common barriers tend to look like this:
- Tiny markings: Silkscreen pin labels can be small, low-contrast, or partially covered by headers.
- Ambiguous orientation: “Pin 1” is often identified by a faint dot, bevel, or printed legend.
- Inconsistent layouts: The same sensor can come on different boards with different pin orders.
- Debugging is visual: LEDs, screen messages, and oscilloscope traces often assume sight.
What “Accessible Breakout Boards” Should Do
Accessibility isn’t one magic feature. It’s a stack of small decisions that add up to confidence: “I can tell where I am, what I’m touching, and
what happens when I change something.” Below are design principles that show up repeatedly across accessible physical computing resources and
inclusive STEM kits.
1) Orientation You Can Feel
A board should have an unmissable “top,” “bottom,” and “pin 1.” Tactile cues can be as simple as:
- A notched corner or a distinct raised bump at a reference point
- Different textures for power vs. signal edges
- Keyed connector placement so cables naturally route in one direction
This matters most on breadboards and breakout boards with power railswhere polarity mistakes can feel like the circuit equivalent of putting salt
in your coffee (and then realizing you used sea salt for “extra flavor”). Tactile-first breadboard concepts highlight using touch cues to identify
positive/negative and layout structure.
2) Clear, Consistent Pin Order
Consistency is accessibility’s best friend. If your classroom or makerspace standardizes on:
GND–VCC–SDA–SCL for I²C boards, for example, learners can build muscle memory and troubleshoot faster.
Even when boards differ, adding a tactile overlay (or a braille label strip) can enforce consistency on top of messy reality.
3) Labels That Aren’t Only Visual
Braille labeling is a proven approach in accessible STEM kits, where components are physically marked so learners can identify parts independently.
That’s explicitly how accessible snap-circuit style kits are adapted for blind and low-vision students.
Beyond braille, raised symbols and spacing strategies can help:
- Raised icons: One dot for signal, two dots for power, a line for ground (whatever you standardize)
- Grouping: Leave physical gaps between pin groups (power vs. data) so it’s obvious by touch
- Readable instructions: Provide accessible docs in braille, audio, and screen-reader-friendly formats
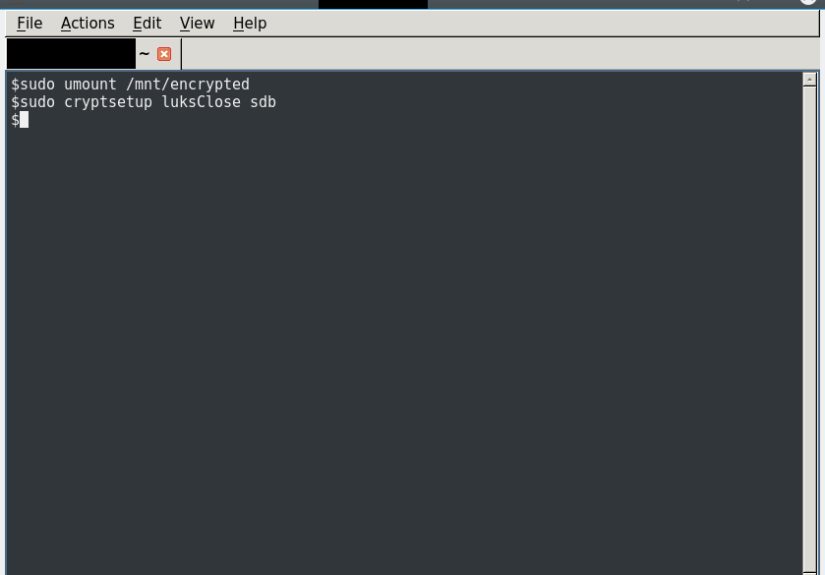
4) Feedback That Doesn’t Require Eyes
Physical computing becomes dramatically more accessible when the system talks backliterally. Some projects route output through:
audio cues, vibration, or braille displays instead of LEDs and tiny screens. There are tutorials specifically aimed at enabling braille output for
coding workflows (for example, getting a programming REPL to display in braille).
What Exists Today: Real Examples You Can Learn From
Tactile-First Breadboards and Board Adaptations
One of the most direct answers to “breakout boards for the blind” is redesigning the breadboard experience itself. A tactile breadboard approach
focuses on replacing purely visual cues (rails, rows, orientation) with tactile markers so a visually impaired builder can identify structure and
polarity by touch.
Another angle is “adaptive add-ons”: components or overlays that make existing prototyping environments more accessible rather than reinventing
everything from scratch. Research and demonstrations in this space describe add-on components designed around blind user needs.
Accessible Snap-Circuit Style Kits (Braille-Labeled Components)
If you want a beginner-friendly on-ramp, accessible snap-circuit kits are a big deal because they reduce “mystery wiring.”
The Snap Circuits Jr. Access Kit (through APH) adapts a commercial kit with braille labels so students can identify parts and build circuits
that light up, make sounds, and teach foundational concepts.
APH also describes building projects on a tactile, grid-style pegboard (“breadboard”) and emphasizes braille-labeled parts plus accessible
project instructionsexactly the kind of scaffolding that makes independent troubleshooting possible.
Snapino Access Kit: Arduino-Style Physical Computing, Made Accessible
Once learners are ready to go beyond snap circuits into sensors and coding, the Snapino Access Kit is designed as an accessible introduction to the
Arduino ecosystem, aimed at students who are blind or visually impaired.
In plain terms, this is where “breakout board life” starts to feel real: you build circuits on a tactile board, then use the Arduino environment
to read sensors and control outputswithout the learning experience being held hostage by tiny print.
Code Jumper: “Programming You Can Touch”
Not every accessible electronics path starts with a breadboard. Code Jumper (originally from Microsoft research and developed with APH) teaches
coding using physical pods and cablesso the structure of a program is tangible and collaborative.
Why mention it in a breakout board article? Because a big part of accessible prototyping is sequencing:
if coding concepts are tactile-first, adding sensors and breakout boards later becomes “just another module,” not a brand-new barrier.
Accessible Output and “Talking” Projects
Many makers build assistive devices using common sensors on breakout boardsdistance sensors, vibration motors, microcontrollersand then design
feedback around touch or sound. For example, DIY builds have used time-of-flight distance sensors on breakout boards paired with vibration feedback
to communicate proximity.
The big takeaway: you don’t need a “special sensor.” You need a workflow where the sensor’s behavior is observable nonvisually.
DIY: How to Make Standard Breakout Boards More Accessible
You don’t have to wait for the entire electronics industry to become enlightened overnight. A lot of accessibility can be added at the bench with
a few practical upgrades.
Use Tactile Labels (Braille Tape, Raised Dots, or Textured Markers)
If a kit can braille-label components for learners, you can absolutely do the same for breakout boardsespecially for “always used” pins like GND
and VCC. Accessible kits demonstrate the value of labeling parts so identification doesn’t depend on color or print.
Create a “Pinout Standard” for Your Workspace
Pick a rule and apply it consistently:
- Always place power on the left edge of a sensor breakout in your projects
- Always route ground wires with a distinct texture (heat-shrink or braided sleeve)
- Use the same connector types for the same functions
This mirrors what accessible physical computing resources emphasize: tools and techniques that build repeatable, reliable workflows.
Prefer Keyed Connectors Where Possible
Loose jumper wires are flexible, but they’re also tiny chaos noodles. If you can switch from individual jumpers to keyed connectors (JST-style,
shrouded headers, or harnesses), you reduce:
- Misalignment
- Wrong-way insertion
- “Is this even seated?” uncertainty
Make Debugging Audible or Haptic
Add a buzzer, a vibration motor, or speech output earlybefore you “need” it. Then use it as a debugging tool:
- A short beep at boot confirms power
- Different tones confirm which sensor path is active
- Vibration patterns confirm threshold crossings
Projects that pair sensor breakouts with nonvisual feedback show how practical this can be.
Teaching and Makerspace Tips That Actually Help
Design the Space, Not Just the Board
Accessibility isn’t only the hardware; it’s the environment: organization, documentation, and norms.
Research and initiatives around accessible makerspaces point out that maker tools and spaces are often vision-oriented, limiting access unless
the space is intentionally designed to be inclusive.
Document in Multiple Formats (and Make It Navigable)
A single PDF with a picture of a wiring diagram is not “documentation,” it’s a scavenger hunt with no clues. Better options:
- Step-by-step text instructions that work with screen readers
- Braille or tactile diagrams for spatial layouts when needed
- Audio checklists (“Touch the top-left corner; confirm the notch; count three pins…”)
Accessible coding and STEM programs emphasize nonvisual tools and techniquesespecially when introducing complex concepts.
Teach “Circuit Confidence,” Not “Circuit Memorization”
The goal isn’t to memorize one wiring pattern. The goal is to be able to reason about a circuit:
power, ground, signal, input, output, and expected behavior. Programs like NFB STEM2U focus on accessible lessons that build independent skills, not
“follow the picture and hope.”
How to Choose the Right Breakout-Board Path
If You’re Starting From Zero
Choose an accessible kit ecosystem firstsomething with braille-labeled components and guided projects. Snap-circuit style access kits are built for
exactly that: hands-on circuits without the immediate complexity of raw breadboards.
If You Want Sensors + Coding (The “Real Breakout Board” Era)
Look for platforms that combine tactile building with Arduino-style programming, and add nonvisual feedback early.
Snapino is explicitly positioned as an accessible bridge into the Arduino environment.
If You’re Building a Classroom or Program
Mix three layers:
- Accessible curriculum: nonvisual techniques, structured troubleshooting, and inclusive group work
- Accessible tools: tactile labeling, consistent connectors, and “talking” debug outputs
- Accessible space: organized storage, clear bench layouts, and makerspace norms that don’t depend on sight
Conclusion
“Breakout boards for the blind” isn’t one productit’s a design philosophy: make orientation tactile, labels readable by touch, workflows consistent,
and feedback observable without vision. The ecosystem already includes tactile-first prototyping ideas, braille-labeled kits, accessible Arduino
pathways, and physical coding systems developed specifically for blind and low-vision learners.
The best part? When you build circuits with clarity for touch and sound, the whole process often becomes better for everyone.
Fewer mystery mistakes. More intentional design. And a lot less “why is this not working” energywhich, to be fair, is the universal language of
electronics.
of Experiences Related to Breakout Boards For The Blind
Ask educators who run accessible STEM workshops and you’ll hear a familiar pattern: the first breakthrough is rarely the “hard” concept like PWM
or I²C. It’s the moment a learner realizes they can verify a circuit independentlywithout needing someone else to describe what’s on the table.
Programs designed for blind youth emphasize nonvisual tools and techniques for exactly this reason: independence changes motivation overnight.
A typical early session often starts with something intentionally satisfying: a circuit that makes a sound. Not because sound is “easier,” but
because it gives instant, unmistakable feedback. When a buzzer chirps at boot, the builder knows power is present and the code is running. When
the pitch changes based on a sensor reading, the circuit becomes a conversationtouch the sensor, hear the change, adjust the wiring, confirm again.
Maker projects that pair common breakout sensors with haptic or audio feedback demonstrate how practical this approach can be in real builds.
Another repeatable experience: the joy of consistency. In many classrooms, sighted students casually “look up the pinout” and move on. Blind
students can do the same with accessible documentation, but the experience improves dramatically when the hardware itself behaves predictably.
That’s why tactile-first prototyping ideas matter so muchif polarity, orientation, and layout are readable by touch, troubleshooting shifts from
guesswork to logic. The tactile breadboard concept highlighted in maker discussions is basically a love letter to this idea: give the builder a
layout they can confidently navigate, and the rest becomes normal engineering.
In more advanced settings, the “aha” moment often comes when coding output becomes accessible. When a programming REPL or debug stream can be read
via braille output, the builder isn’t waiting for someone to interpret a screenthey’re iterating at the same speed as everyone else. Tutorials
that focus on braille-based coding output show how this can be done in practice, and they hint at a bigger truth: accessibility isn’t a side quest.
It’s part of the toolchain.
Finally, there’s the makerspace experience: the bench itself. People often underestimate how much “visual overhead” lives in a roombins with tiny
labels, unlabeled cables, identical black components, and a culture of pointing. Efforts to create accessible makerspaces highlight that the space
must be intentionally designed, because typical maker tools and environments assume vision by default.
When a lab adopts tactile labeling, consistent storage, and clear build routines, blind makers spend less time hunting and more time inventing.
And that’s the whole point, right? The board is just the beginning. The goal is confidence: “I can build this. I can debug this. I can make it mine.”