Table of Contents >> Show >> Hide
- Why You’ll Love These Date Pinwheel Cookies
- Ingredients You’ll Need
- Step-by-Step: How to Make Date Pinwheel Cookies
- Tips for Perfect Date Pinwheel Cookies
- Flavor Variations and Make-Ahead Ideas
- Serving and Storage Suggestions
- Frequently Asked Questions
- My Experiences with Date Pinwheel Cookies (and How to Make Them Your Signature Treat)
- Conclusion
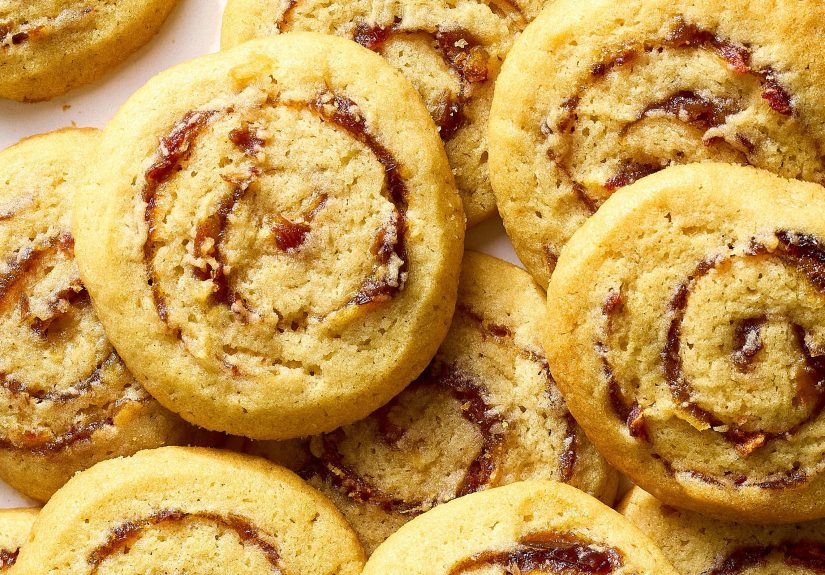
If your holiday cookie platter had a VIP section, these Date Pinwheel Cookies would be living there rent-free.
They’re old-school in the best possible way: buttery brown sugar dough wrapped around a thick, jammy date filling,
sliced into neat spirals, then baked until the edges are just turning golden. They look fancy, taste like your
grandma’s Christmas tin, and secretly aren’t that hard to pull off once you know a few tricks.
This in-depth guide walks you through a reliable, tested Date Pinwheel Cookies recipe plus all the little details
that make the difference between “pretty good” and “can I get that recipe again?” You’ll learn how to keep the
dough from cracking, how to get sharp swirls, and exactly when to stop baking so you don’t end up with rock-hard
cookies. We’ll also talk about make-ahead options, flavor twists, and how to turn this nostalgic cookie into your
new holiday tradition.
Grab your mixing bowl, some soft butter, and a package of datesby the time the dough is chilling, you’ll already
be planning who gets the first batch (and how many you’re keeping for yourself).
Why You’ll Love These Date Pinwheel Cookies
- Beautiful swirls, minimal drama: Slice-and-bake cookies look impressive, but once the log is rolled, the hard part is over.
- Chewy, gooey center: The date filling bakes into a jammy layer that’s sweet without being cloying.
- Perfect for gifting: They pack well, stay tender for days, and look like you spent way more time than you did.
- Make-ahead friendly: The dough log can chill or freeze, so you can bake fresh cookies whenever you need them.
- Customizable: Swap nuts, add citrus, or drizzle with glaze to match any cookie tray vibe.
Ingredients You’ll Need
For the cookie dough
- 1 cup (2 sticks) unsalted butter, softened to room temperature
- 1 cup packed light brown sugar
- 1/2 cup granulated sugar
- 2 large eggs, at room temperature
- 2 teaspoons vanilla extract
- 3 1/2 to 4 cups all-purpose flour (start with 3 1/2; add more only if dough is very sticky)
- 1 teaspoon baking soda
- 1/2 teaspoon fine salt
- 1/2 teaspoon ground cinnamon (optional but gives a warm background flavor)
For the date filling
- 16 ounces pitted dates, chopped
- 2/3 cup water
- 1/2 cup granulated sugar
- 1/2 cup chopped walnuts or pecans (or pistachios for a fancier twist)
- 1 tablespoon fresh orange juice
- 1 teaspoon finely grated orange zest
- Pinch of salt
The ingredient list looks classic because it is. The dough is essentially a brown sugar cookie dough designed to
be rolled out, and the filling is a quick stovetop date “jam” with nuts and citrus to brighten the sweetness.
Step-by-Step: How to Make Date Pinwheel Cookies
1. Make the date filling
- Combine the filling ingredients. In a medium saucepan, stir together the chopped dates, water,
sugar, orange juice, orange zest, and a pinch of salt. - Simmer until thick. Bring to a gentle simmer over medium-low heat, stirring often, until the
dates soften and the mixture becomes thick and spreadable, 8–10 minutes. If it looks dry, splash in a tablespoon
of extra water. - Finish with nuts. Remove from the heat and stir in the chopped nuts. The mixture should be thick
enough to hold its shape on a spoon, not runny. Let it cool completely; a warm filling will melt your dough.
2. Mix the cookie dough
- Cream the butter and sugars. In a large mixing bowl, beat the softened butter, brown sugar, and
granulated sugar until light and fluffy, 2–3 minutes. This step helps give your cookies tender, slightly crisp edges. - Add eggs and vanilla. Beat in the eggs one at a time, scraping down the bowl as needed, then add
the vanilla. - Whisk dry ingredients. In a separate bowl, whisk together 3 1/2 cups of flour, baking soda, salt,
and cinnamon (if using). - Combine. Add the dry ingredients to the wet in two additions, mixing on low just until the dough
comes together. If it’s still very sticky, add the remaining flour a tablespoon at a time. The dough should be
soft but not clingy like glue.
3. Chill and roll the dough
- Divide and chill. Split the dough into two equal portions. Shape each into a rough rectangle,
wrap tightly in plastic, and refrigerate for at least 1 hour, or up to overnight. Chilling makes the dough easier
to roll and helps the cookies keep their shape in the oven. - Roll into rectangles. Working with one piece of dough at a time, place it between two sheets of
parchment paper and roll into a rectangle about 9 x 12 inches and 1/4-inch thick. If the parchment starts to wrinkle,
peel it back and smooth it out as you go. - Spread the filling. Gently spread half of the cooled date filling over the dough, leaving a 1/2-inch
border on one long side to help seal the log.
4. Roll into a log and chill again
- Roll it up tightly. Using the parchment to help you, roll the dough up jelly-roll style from the
long edge opposite the border. Aim for a firm, even log without big air pockets. - Seal and wrap. Pinch the seam gently to seal. If the dough cracks a bit, press it back together
with your fingersit will smooth out as it chills and bakes. Wrap the log tightly in parchment or plastic wrap. - Chill thoroughly. Refrigerate for at least 2 hours, or until very firm. You can chill the logs
up to 2 days or freeze them for up to 2 months. - Repeat. Roll out the second portion of dough and repeat the filling and rolling steps to make a
second log.
5. Slice and bake
- Preheat the oven. Heat your oven to 350°F (175°C). Line baking sheets with parchment paper or
silicone baking mats. - Slice. Using a sharp, thin knife, slice the chilled logs into 1/4-inch to 3/8-inch thick rounds.
If the log flattens as you slice, gently reshape each cookie into a circle with your fingers. - Bake. Arrange the slices 2 inches apart and bake for 10–12 minutes, or until the edges are just
starting to turn golden and the centers look set but not dry. - Cool. Let the cookies cool on the baking sheet for 5 minutes, then transfer them to a wire rack.
They’ll firm up as they cool.
Tips for Perfect Date Pinwheel Cookies
- Keep everything cool. Warm dough is the enemy of clean swirls. If the dough gets soft as you roll,
pop it back in the fridge for 10–15 minutes. - Use fresh, moist dates. If your dates feel tough or dry, soak them in warm water for 10 minutes,
then drain well before chopping and cooking. The filling should be luscious, not gritty. - Don’t skip the chill time. Chilling after rolling into a log is what keeps the pinwheel shape
instead of giving you date “puddles.” It’s worth the wait. - Patch cracks like a pro. If the dough cracks while rolling, press it together and smooth it
with your fingers. A few minor scars are invisible once baked. - Flour lightly, not heavily. Too much flour on the rolling surface can make the dough dry and
crack-prone. Rolling between parchment helps avoid this completely. - Rotate your pan. For even browning, rotate baking sheets halfway through the bake, especially
if your oven has hot spots.
Flavor Variations and Make-Ahead Ideas
Fun twists on the filling
- Date–orange–pistachio: Use pistachios instead of walnuts for a green-and-gold, bakery-level look.
- Spiced date chai: Add a pinch of cardamom, ginger, and extra cinnamon to the filling for cozy chai vibes.
- Cranberry-date swirl: Replace 1/3 of the dates with dried cranberries for a tangier, festive flavor.
Make-ahead game plan
- Chill the logs: Keep tightly wrapped logs in the fridge for up to 48 hours. Slice and bake just before serving.
- Freeze for later: Freeze logs on a tray, then transfer to freezer bags. Slice the frozen log (let it sit 5–10 minutes if rock-hard) and add 1–2 extra minutes of baking time.
- Freeze baked cookies: Once fully cooled, freeze in airtight containers with parchment between layers for up to 2 months.
Serving and Storage Suggestions
These cookies are right at home on any holiday cookie platter, but they’re also excellent with afternoon coffee,
tucked into lunchboxes, or gifted in tins or cellophane bags. They look especially nice mixed with simple butter
cookies and chocolate-dipped treatsthe swirls break up all the “round beige cookie” monotony.
Store Date Pinwheel Cookies in an airtight container at room temperature for up to 5 days. If your kitchen is very
dry, tuck in a small piece of fresh bread for a day to keep them soft (swap it out if it gets stale). For longer
storage, freeze and thaw at room temperature, still in their container, so condensation forms on the outside,
not directly on the cookies.
Frequently Asked Questions
Can I make these without nuts?
Yes. Simply omit the nuts and keep everything else the same. The cookies will be a little less crunchy in the center,
but still delicious. If you want some texture without nuts, stir in a handful of finely chopped dried fruit or
shredded coconut.
My dough keeps cracking when I roll it. What should I do?
Light cracks usually mean the dough is a bit too cold or a little dry. Let it sit at room temperature for a few minutes,
then try rolling again. You can also press the cracks together with your fingers and smooth them out. If the dough
seems crumbly, knead in a teaspoon or two of milk just until it holds together.
Can I bake the cookies straight after rolling without chilling the log?
Technically yes, but they’ll spread more and lose those pretty, sharp swirls. Chilling the log firms the butter and
gives you well-defined layers, so it’s a step worth keeping.
How thin should I slice the cookies?
Around 1/4 inch is the sweet spotthin enough to bake through quickly, but thick enough to hold the swirl and stay
chewy in the center. Thicker cookies (3/8 inch) will be softer; thinner ones will be crisper.
My Experiences with Date Pinwheel Cookies (and How to Make Them Your Signature Treat)
The first time you tackle Date Pinwheel Cookies, it can feel like you’ve signed up for an advanced baking class:
you’re rolling dough, cooking filling, chilling logs, and then somehow those tidy little spirals have to show up
at the end. But once you’ve done it once, the process becomes oddly relaxinglike edible arts and crafts.
One of the biggest mindset shifts is treating this recipe as a two-part project, not a last-minute,
weeknight cookie. On day one, you make the dough and the filling, roll everything into logs, and let the fridge
do its thing. On day two, all you have to do is slice and bake. Spreading the work this way instantly makes the
recipe feel easier and more “holiday hosting” friendly. And if you’re baking with kids, day one is a great time
to let them stir the filling (supervised, of course) and help sprinkle in the nuts.
Another thing you learn quickly: the dough doesn’t have to look perfect to bake perfect. The rolled log
might be a little lumpy, or one side might look thicker than the other. That’s normal. Once you slice the log,
each cookie gets its own little personality. I’ve had batches where the ends looked like abstract art, but the
middle slices were picture-perfect and ideal for gifting. The “ugly” ones never go to wastethey’re baker’s snacks,
quality control samples, or the ones you sneak with coffee when no one is looking.
Over time, you’ll probably start playing with flavor. Maybe you swap in pistachios and add a tiny bit of cardamom
to the filling for a Middle Eastern-inspired twist. Maybe you mix in a handful of chopped dried apricots or
cranberries when you’re feeling extra festive. Because the dough is fairly neutral and the dates are such a sturdy
base, the recipe is surprisingly forgiving. As long as the filling stays thick and spreadablenot wateryyou have
a lot of room to experiment.
From an entertaining standpoint, these cookies are secret workhorses. You can keep a couple of dough logs in the
freezer all season, and whenever you need “something homemade,” you’re only a preheat-and-slice away from a fresh tray.
They’re also great for cookie exchanges because they stand out visually. While everyone else shows up with chocolate
chips (bless them), you arrive with swirled, nutty, jammy cookies that look like you went full pastry-chef mode.
And then there’s the nostalgia factor. Date Pinwheel Cookies feel like a cookie straight out of a vintage community
cookbookone of those recipes that got scribbled onto index cards, then passed down and adapted over decades. When
you bake them, you’re tapping into that tradition, but with enough modern tweaks (citrus zest, parchment tricks,
freezing logs) to make your life easier. After a couple of rounds, you start hearing comments like, “Oh, these are
the date cookies you brought last year, right?” That’s the moment they officially become your cookie.
So don’t be intimidated by the swirl. Once you understand that a little chilling, a little patching, and a sharp
knife are your best friends, Date Pinwheel Cookies turn into a recipe you can rely on for holidays, parties, and
coffee breaks all year long. The combination of tender dough, sweet dates, and nutty crunch is classic for a reason
and before long, you’ll be the one passing the recipe on.
Conclusion
Date Pinwheel Cookies are one of those desserts that look like a bakery project but fit perfectly into a home baker’s
routine. A simple brown sugar dough, a quick stovetop date filling, and some strategic chilling are all it takes to
create gorgeous, swirled cookies that feel special every time you serve them. Whether you stick to the classic version
or start customizing with different nuts and spices, this is the kind of recipe that can easily become a yearly ritual
the one you’re known for.
Below you’ll find SEO-ready metadata in JSON format, so you can drop this recipe straight into your site and let the
search engines fall in love with it almost as fast as your readers will.