Table of Contents >> Show >> Hide
- Why Build a Backyard Ninja Warrior Course?
- Start With the Backyard, Not the Obstacles
- Essential Supplies for a DIY Backyard Ninja Course
- Backyard Ninja Course Layout: A Safe and Fun Example
- Station 1: The Agility Dash
- Station 2: Quad Steps, Backyard Edition
- Station 3: Pool Noodle Hurdle Alley
- Station 4: The Balance Beam Challenge
- Station 5: Spider Web Crawl
- Station 6: Cargo Crawl Tunnel
- Station 7: Grip Zone With Rated Equipment
- Station 8: The Mini Warped Wall Alternative
- Station 9: The Splash Finish
- How to Make the Course Feel Like American Ninja Warrior
- Safety Rules Every Backyard Ninja Course Needs
- DIY Course Themes for Extra Summer Fun
- How to Maintain Your Backyard Ninja Course
- Sample 45-Minute Backyard Ninja Session
- Experience Section: What It Feels Like to Build and Run a Backyard Ninja Course
- Conclusion
Summer has a funny way of turning ordinary backyards into adventure parks. One minute you are watering the tomatoes, and the next minute the kids are asking whether the garden hose can become a “laser trap,” the patio chairs can become “lava islands,” and Dad’s old work gloves can be renamed “elite grip equipment.” That is the magic of a DIY Backyard American Ninja Warrior Course: it takes fresh air, imagination, a few safe materials, and just enough competitive energy to make everyone forget the couch exists.
Inspired by the balance, agility, grip strength, and determination seen on obstacle-course shows, a backyard ninja course does not need to be extreme to be exciting. In fact, the best version for families is low, modular, adjustable, and built around fun rather than fear. Think balance beams close to the ground, pool noodle hurdles, hula-hoop jumps, crawling tunnels, rope mazes, stepping-stone runs, and a dramatic finish line where every competitor gets to celebrate like they just conquered Mount Backyardiyama.
Note: This article is written for general backyard play and family fitness inspiration. Any obstacle that involves climbing, hanging, swinging, elevated platforms, or structural load-bearing should use manufacturer-rated equipment, proper protective surfacing, adult supervision, and professional installation when needed. Safety first, victory pose second.
Why Build a Backyard Ninja Warrior Course?
A backyard obstacle course is more than a fun summer project. It encourages movement, problem-solving, confidence, creativity, and teamwork. Children and teens get to practice coordination, balance, jumping, crawling, climbing motions, and quick decision-making. Adults get a sneaky workout disguised as “just helping set up.” Everyone gets a break from screens without anyone having to announce a dramatic “family wellness initiative.”
Obstacle courses are especially useful because they can be changed every week. A soccer goal can become a tunnel station. Hula hoops can become agility targets. A chalk line can become a balance challenge. A sprinkler can turn the final stretch into a splash-zone sprint. The same backyard can feel like five different courses depending on the layout, theme, and difficulty level.
Start With the Backyard, Not the Obstacles
Before buying rope, cones, mats, or anything that looks heroic in an online shopping cart, walk your yard like a safety inspector with a clipboard and a suspicious eyebrow. Look for level ground, shade, clear pathways, soft landing areas, and enough space between stations. Remove rocks, sharp sticks, garden tools, hoses, toys, and anything that could trip a runner. If your yard has uneven patches, keep fast-running obstacles away from those areas.
Choose a Safe Course Zone
The ideal area is flat, open, and easy to supervise. Grass is better than concrete, but grass alone is not always enough under climbing or jumping areas. For any station where someone might fall, use soft, impact-absorbing protection such as gym mats, playground-rated mats, mulch, sand, wood chips, or another appropriate landing surface. Keep a generous buffer around each obstacle so one person finishing a station does not crash into the next competitor like a very enthusiastic shopping cart.
Design for Ages and Abilities
A backyard ninja course should match the people using it. Younger kids need low, simple challenges with clear rules. Older kids and teens may enjoy timed runs, trickier balance paths, or grip challenges using rated equipment. Adults may want a strength circuit with push-ups, bear crawls, and farmer carries. The secret is to create “levels” instead of one fixed course. Beginner level might mean walking across a ground-level beam. Advanced level might mean carrying a pool noodle “torch” while balancing without dropping it. Dramatic? Yes. Dangerous? Not if designed wisely.
Essential Supplies for a DIY Backyard Ninja Course
You do not need a Hollywood set budget. Many obstacles can be made from items already hiding in the garage, playroom, or shed. The best supplies are lightweight, easy to move, weather-friendly, and forgiving when bumped into.
Budget-Friendly Materials
- Pool noodles for hurdles, arches, markers, and safe bumpers
- Hula hoops for jump targets, crawl-through rings, or agility zones
- Cones, buckets, or plastic cups for zigzag runs
- Sidewalk chalk for start lines, balance paths, arrows, and score zones
- Cardboard boxes for tunnels or “wall crawl” stations
- Gym mats or playground mats for landing areas
- Ground-level wooden balance beams with anti-slip tape
- Agility ladders or chalk-drawn ladder patterns
- Water balloons, sprinklers, or splash pads for summer cooling stations
- Stopwatch, whistle, clipboard, or phone timer for friendly competition
Equipment to Treat Carefully
Ropes, rings, swings, climbing nets, ninja lines, and hanging bars should never be improvised with random hardware. Use products designed and rated for play or fitness, follow the manufacturer’s weight limits, inspect them before each use, and install them exactly as directed. Do not attach hanging obstacles to roofs, fences, weak tree branches, old clotheslines, or mystery beams in the shed. A mystery beam is not a personality test; it is a reason to call a professional.
Backyard Ninja Course Layout: A Safe and Fun Example
Here is a sample course that feels exciting without turning your yard into a stunt show. Set it up in a loop or straight line, depending on your space. Keep water breaks nearby, provide shade, and limit timed runs in hot weather.
Station 1: The Agility Dash
Place cones, buckets, or pool noodles in a zigzag pattern. Competitors weave through them as quickly as they can without knocking them over. For younger kids, spread the markers far apart. For teens and adults, tighten the turns or add a rule: touch every cone with one hand. This station warms up the legs and gets everyone moving without needing complicated equipment.
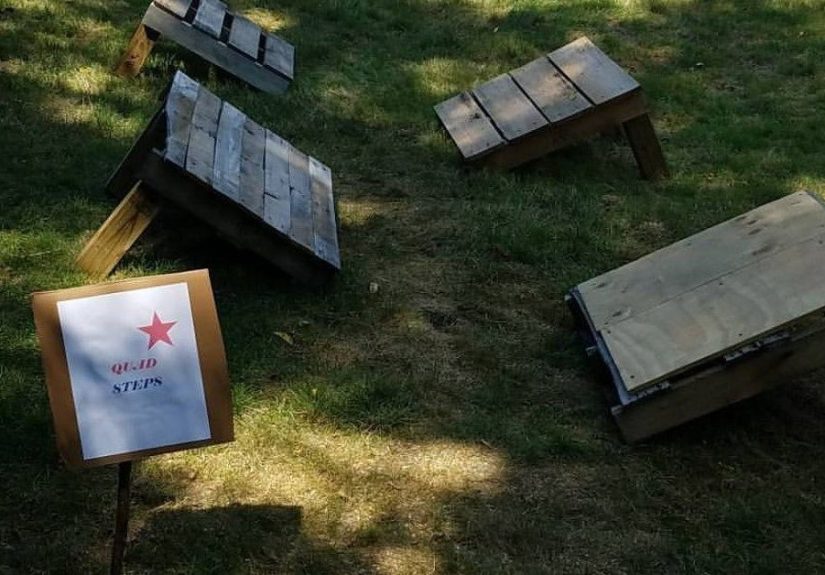
Station 2: Quad Steps, Backyard Edition
Inspired by classic ninja-style jumping obstacles, create “quad steps” using flat, stable stepping targets placed on the ground or very low platforms. Hula hoops, rubber stepping stones, or wide wooden squares with non-slip surfaces can work well. The goal is to step from target to target without touching the “lava.” Because obviously the grass is lava. It has always been lava.
Station 3: Pool Noodle Hurdle Alley
Set pool noodles across low supports, cones, or garden stakes with soft ends. Keep them low enough for safe stepping or small jumps. You can create different lanes: one for stepping over, one for crawling under, and one for side-shuffling around. Pool noodles are excellent because they are colorful, affordable, and emotionally prepared to be knocked over 700 times.
Station 4: The Balance Beam Challenge
A ground-level balance beam is one of the best backyard obstacles because it builds control and focus. Use a smooth beam placed securely on the ground or just slightly raised with stable supports. Add anti-slip tape, inspect it for splinters, and place soft material around it. Challenge ideas include walking forward, walking sideways, carrying a beanbag, or stopping in the middle for a “ninja freeze.”
Station 5: Spider Web Crawl
Create a “spider web” between two safe, stable points using streamers, soft rope, or yarn. The challenge is to move through without touching the web. Keep it low and loose enough that it will break away or move easily if bumped. This station is great for flexibility, patience, and hilarious facial expressions. It also gives slower competitors a place to shine because careful movement matters more than speed.
Station 6: Cargo Crawl Tunnel
Use a play tunnel, cardboard boxes, or a row of chairs covered with a sheet to create a crawling section. Make sure the tunnel is open, breathable, stable, and easy to exit. This obstacle adds variety because competitors must switch from running to crawling, which makes the course feel more like a real challenge.
Station 7: Grip Zone With Rated Equipment
If you already have a properly installed swing set, playground bar, or manufacturer-rated ninja line, you can add a short grip challenge. Examples include hanging for a few seconds, moving from one ring to another with feet close to the ground, or touching a bell before dropping safely onto a mat. Keep the height low, use protective surfacing, and supervise closely. For a no-hang alternative, have competitors carry two small buckets filled with soft balls from one marker to another to build grip strength safely.
Station 8: The Mini Warped Wall Alternative
A full warped wall is not a casual weekend project. For backyard play, make a safer “victory ramp” instead: a low incline ramp or padded hill-style challenge where competitors run up, tap a flag, and come back down under control. Another option is a chalk “wall target” on a fence or board where participants must jump and touch the highest mark they safely can from the ground. The goal is the feeling of triumph without unnecessary height or hard landings.
Station 9: The Splash Finish
End with a sprinkler dash, sponge toss, or water-cup carry. For example, competitors carry a cup of water from one bucket to another, and the person who spills the least earns a bonus point. This cools everyone down and adds summer chaos in the best possible way. Just keep water away from slick surfaces, electrical cords, and any obstacle where slipping could be a problem.
How to Make the Course Feel Like American Ninja Warrior
The fun comes from presentation. Give every obstacle an over-the-top name. Pool noodle hurdles become “The Foam Forest.” The balance beam becomes “The Bridge of Destiny.” The crawl tunnel becomes “The Cave of Questionable Knees.” Use a big poster board for the course map, write the rules clearly, and let each competitor choose a ninja nickname.
Add Timing, But Keep It Friendly
Timed runs are exciting, but not everyone loves racing. Offer different ways to win: fastest time, best balance, most creative style, cleanest run, funniest finish, best teamwork, or most improved. This helps younger kids, cautious kids, and first-timers feel included. A backyard ninja course should build confidence, not create a tiny Olympic committee in your lawn chairs.
Create Levels of Difficulty
Use color-coded levels. Green is beginner, blue is intermediate, and red is advanced. For the balance beam, green means walk across normally, blue means walk sideways, and red means carry a soft object while walking. For the agility dash, green means jog, blue means sprint, and red means weave while holding a pool noodle overhead like a very confused champion.
Safety Rules Every Backyard Ninja Course Needs
Fun and safety are not enemies. They are teammates. Before the first run, explain the rules clearly and repeat them when new people join. Keep the course low, avoid overcrowding, and never allow pushing, racing through occupied obstacles, or using equipment in ways it was not designed for.
Basic Safety Checklist
- Inspect every obstacle before play begins.
- Use soft landing surfaces under jump, balance, and grip areas.
- Keep obstacles spaced apart with clear walking paths.
- Allow only one person on an obstacle at a time.
- Stop play during rain, lightning, extreme heat, or slippery conditions.
- Provide water breaks and shade during summer sessions.
- Make sure shoes fit well and clothing cannot snag on equipment.
- Remove broken, wobbly, sharp, or unstable items immediately.
- Supervise children and adjust obstacles for age and ability.
Heat and Hydration Matter
Summer obstacle courses can turn into sweaty marathons faster than expected. Schedule play in the morning or late afternoon when temperatures are lower. Offer water before, during, and after runs. Use sunscreen, hats, shade tents, and cooling stations. If someone looks dizzy, unusually tired, overheated, or uncomfortable, stop the activity and cool down. Backyard glory is not worth ignoring the weather.
DIY Course Themes for Extra Summer Fun
Once the basic course is built, themes keep it fresh. A good theme can transform the same obstacles into a new adventure without requiring new equipment.
Jungle Ninja Course
Use green streamers, stuffed animals, leafy decorations, and names like “Vine Dash,” “Monkey Bridge,” and “Crocodile Crawl.” Add animal walks between stations: bear crawl, crab walk, frog jump, and flamingo balance. The flamingo balance is especially humbling for adults who thought they still had “great coordination.”
Water Warrior Course
Add sprinklers, sponge relays, water-cup carries, and splash buckets. Keep the wet zones away from balance beams or any obstacle where slipping would be risky. The final station can be a sponge toss at a target or a run through a sprinkler tunnel.
Glow Ninja Evening Course
For older kids or family gatherings, use glow sticks, battery-powered lanterns, and reflective cones for a dusk course. Keep lighting bright enough to see every obstacle clearly. Avoid running in dark areas, and keep the layout simple. The vibe should be “summer party,” not “lost in the wilderness with pool noodles.”
How to Maintain Your Backyard Ninja Course
Outdoor equipment changes with weather, use, and time. Check wood for splinters, mats for tears, ropes for fraying, metal parts for rust, and plastic pieces for cracks. Store lightweight items in a dry place when not in use. After rain, inspect the yard for mud, slippery grass, and hidden puddles. If you use tires, buckets, or containers, empty standing water to avoid mosquitoes.
It is also smart to rotate obstacles. Leaving everything in the yard for weeks can damage materials and make the course feel stale. A modular setup lets you bring out different stations on different days. Monday can be balance day. Wednesday can be agility day. Saturday can be the full “Backyard Finals,” complete with snacks, medals, and one uncle who insists he “almost had it.”
Sample 45-Minute Backyard Ninja Session
A structured session keeps the energy high and the chaos manageable. Start with five minutes of warm-up: jumping jacks, arm circles, light jogging, and easy stretches. Spend ten minutes practicing each station slowly. Then allow two or three full course runs with rest between attempts. Finish with a cool-down walk, water break, and a silly awards ceremony.
Example Schedule
- 5 minutes: Warm-up and safety reminders
- 10 minutes: Practice stations slowly
- 15 minutes: Timed or teamwork course runs
- 10 minutes: Water challenge or relay game
- 5 minutes: Cool down and awards
Experience Section: What It Feels Like to Build and Run a Backyard Ninja Course
The first time you build a DIY backyard ninja course, you may imagine a polished setup with perfect lanes, dramatic music, and children respectfully waiting their turns. Reality usually arrives wearing mismatched socks and carrying a pool noodle sword. And honestly, that is part of the charm.
One of the best experiences is watching how quickly kids start improving the design. Adults may create a neat course with cones, hoops, and a balance beam. Five minutes later, the kids have renamed every obstacle, added a “no touching the blue towel” rule, invented bonus points for style, and decided the dog is the official referee. This kind of creative ownership is what makes the activity last longer than a typical backyard game. When kids help design the course, they care more about running it, fixing it, and challenging themselves.
Another surprise is how different each participant’s strategy becomes. One child may sprint through the agility dash and then slow down like a cautious museum visitor on the balance beam. Another may struggle with speed but master the spider web crawl with ninja-level patience. Adults often discover that “easy-looking” obstacles are not always easy when linked together. A low beam after a sprint feels different from a low beam when you are standing still. A crawl tunnel after jumping through hoops suddenly becomes a full-body reminder that flexibility is not something you can download.
The course also creates natural teamwork. Older kids help younger ones remember the order. Parents adjust obstacles after seeing what is too easy or too tricky. Friends cheer when someone beats a personal time, even if that time is mostly delayed by laughing. The best backyard ninja days are not about who wins; they are about everyone getting another try.
There is also a practical rhythm to learn. Set up takes less time once materials are organized in bins. A “course kit” with chalk, cones, hoops, tape, towels, and a stopwatch makes the whole project easier. Keeping a few laminated station cards can help younger children follow the route without constant reminders. Having water nearby prevents every break from turning into a kitchen migration. And yes, snacks matter. A backyard ninja course without snacks is just cardio with branding.
One of the most rewarding parts is seeing confidence grow. A child who refuses the balance beam at first may cross it by the third round. A teen who thinks the course looks childish may suddenly become very invested in shaving two seconds off their time. A parent who planned to “just supervise” may end up doing the full course while everyone cheers. The backyard becomes a place where effort is visible, progress is measurable, and failure is usually followed by laughter instead of embarrassment.
The best advice from experience is simple: keep it flexible. Do not overbuild the first version. Start with five or six safe stations, test them, and improve from there. Make obstacles adjustable. Leave room for creative rules. Celebrate clean runs, funny runs, slow runs, and comeback runs. A DIY Backyard American Ninja Warrior Course is not about recreating television-level obstacles. It is about bringing the spirit of challenge, movement, and summer fun into a space your family already loves.
Conclusion
A DIY Backyard American Ninja Warrior Course can turn an ordinary summer afternoon into an unforgettable family event. With safe planning, low obstacles, soft landing areas, creative themes, and age-appropriate challenges, your backyard can become a place for fitness, confidence, teamwork, and ridiculous victory dances. Start simple, inspect often, keep everyone hydrated, and let the course evolve as your family gets stronger and more creative.
The real win is not the fastest time. It is the laughter, movement, problem-solving, and “let me try again” attitude that obstacle courses naturally create. Build it safely, name it dramatically, and enjoy the summer fun.