Table of Contents >> Show >> Hide
- Why Birch Trees Work So Well in Bedrooms
- Planning Your Birch Wall Like a Pro (Before You Touch Paint)
- Tools and Materials
- Wall Prep: The Unsexy Step That Makes the Mural Look Expensive
- Design Transfer: How to Get Birch Trees on the Wall Without Freehand Panic
- Painting the Birch Trees: Step-by-Step
- Step 1: Paint the background (if you’re doing one)
- Step 2: Block in the trunks
- Step 3: Add shadow and dimension (the step that makes it look real)
- Step 4: Paint the birch bark markings
- Step 5: Add branches (or keep it trunk-only)
- Step 6: Optional leaves or a “hint of canopy”
- Step 7: Clean up edges and refine
- Painter’s Tape Tips (So You Don’t Peel Off Your Pride)
- Do You Need to Seal a Bedroom Wall Mural?
- Troubleshooting: Common Problems and Fast Fixes
- Cost, Time, and Effort: What to Expect
- Conclusion: Your Bedroom, Now With a Little Forest Magic
- of Real-World DIY Experience (What It’s Actually Like)
A birch tree mural is one of those rare DIY projects that looks “custom designer” while still being totally doable with
a Saturday, a little patience, and the willingness to paint a few wobbly lines that you’ll later insist were
“intentional bark texture.” Birch trees are basically nature’s minimalist art: pale trunks, bold black markings, and
enough contrast to pop behind a bed without turning your bedroom into a theme park.
In this guide, you’ll learn how to plan, sketch, and paint a hand-painted birch tree accent wall in a way that feels
calm and polished (not like a middle-school set design). We’ll cover wall prep, paint choices, scaling your design,
painting techniques that fake “I’m an artist,” and how to avoid the classic mural mishapslike peeling painter’s tape,
streaky trunks, and branches that accidentally look like lightning.
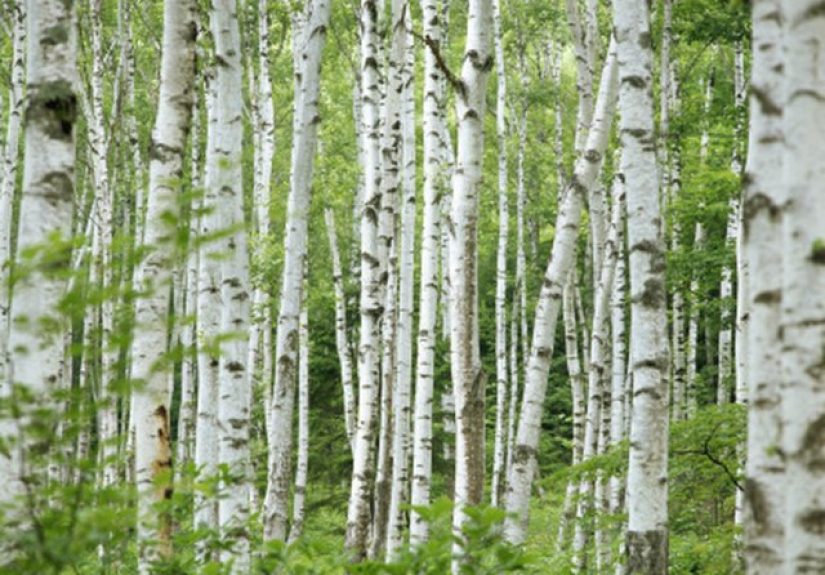
Why Birch Trees Work So Well in Bedrooms
Bedrooms want “restful,” not “busy.” Birch trees deliver a soft, vertical pattern that naturally draws your eye up and
makes the wall feel taller. They also play nicely with almost any style: Scandinavian, modern farmhouse, boho,
traditionalbirch doesn’t judge.
- They’re forgiving: Real birch bark is irregular, so your brushwork can be imperfect and still look authentic.
- They’re adaptable: You can go monochrome, add subtle color, or paint a full birch forest.
- They’re budget-friendly: You don’t need specialty wallpaper, custom decals, or a painter’s invoice that causes emotional damage.
Planning Your Birch Wall Like a Pro (Before You Touch Paint)
1) Pick the right wall
The best birch mural wall is usually the one your bed faces or the wall behind the headboard (the natural “feature wall”).
Avoid walls that get constant scuffslike behind a desk chairunless you’re committed to touch-ups.
2) Choose your birch “vibe”
Decide early whether you want a quiet, minimalist look or a more illustrated forest scene. Here are a few options:
- Minimal grove: 3–5 trunks, no leaves, soft gray shadows. Calm and modern.
- Misty forest: Background gradient + distant trees fading in the back. More depth, more drama.
- Birch + birds: Small silhouettes add charm without clutter.
- Birch + leaves: Keep leaves sparse and airythink suggestion, not jungle.
3) Measure and map the layout
Measure the wall height and width. Then sketch a quick plan (even on notebook paper). A simple rule that helps:
space trunks so they don’t look evenly “stamped” across the wall. Vary widths slightly. Overlap a couple trunks for a
layered look.
Quick example layout: On a standard 10-foot-wide wall, paint 4 trunks: one wide “hero” trunk near center,
two medium trunks offset left and right, and a thinner trunk partially visible at the edge. This feels natural, like
you’re standing in a grove.
Tools and Materials
You don’t need a full art studio. You need a small army of brushes, some paint discipline, and the courage to step back
every 20 minutes and evaluate your life choices (lovingly).
Wall prep + protection
- Drop cloth (canvas or plastic) and/or rosin paper
- Painter’s tape
- Spackle (or patching compound), putty knife
- Sandpaper (fine grit) or sanding sponge
- Cleaning supplies (mild soap + water; microfiber cloth)
- Primer (if needed)
Painting supplies
- Wall paint for the base/background (eggshell or matte is popular for bedrooms)
- Acrylic craft paint or artist acrylics for details (bark marks, shadows, branches)
- Roller and tray (for base/background or large trunk areas)
- Brushes: 2″ angled brush, 1″ flat, small flat, liner/detail brush
- Artist sponge or makeup sponge (optional for texture)
- Chalk pencil or soft pencil for sketching
- Step stool (safely usedthis is art, not a stunt show)
Optional (but very helpful)
- Projector for tracing
- Level or plumb line (helps trunks look vertical)
- Clear topcoat/sealer (only if you want extra protection or a wipeable finish)
Wall Prep: The Unsexy Step That Makes the Mural Look Expensive
If you want your birch wall to look smooth and intentional, prep is non-negotiable. Paint highlights every bump, crumb,
and mystery wall texture from the year 2017.
Step 1: Clear and protect the space
- Move furniture to the center of the room and cover it.
- Lay down drop cloths and tape edges if needed.
- Remove outlet covers (turn off power if you’re working near outlets).
Step 2: Clean the wall
Dust and oils can mess with adhesion. Wipe down the wall with mild soap and water, rinse with a damp cloth, and let it dry.
(Yes, even if the wall “looks fine.” Walls are sneaky.)
Step 3: Patch and sand
Fill nail holes and dents with spackle. Let dry fully. Sand smooth. Wipe off sanding dust.
Step 4: Decide if you need primer
Prime if your wall has stains, glossy paint, dramatic color changes, or patched areas that need a uniform base. If the wall
is already a clean, matte/eggshell neutral and in good condition, you may only need spot priming on repairs.
Step 5: Base coat (recommended)
Even if you’re not changing wall color, a fresh base coat can make your mural cleaner and more consistent. For birch murals,
many people choose a soft warm white, pale greige, or very light graysomething calm that won’t fight your bedding.
Design Transfer: How to Get Birch Trees on the Wall Without Freehand Panic
If you love freehand drawing, go for it. If you’d like your trunks to be vertical and not slowly drift into a leaning
tower situation, use one of these transfer methods.
Option A: Light sketch + plumb line
Mark where each trunk will go with a light pencil or chalk line. Use a level or plumb line to keep the trunks upright.
Then loosely sketch the edges of each trunkdon’t overthink it. Birch trunks aren’t perfect cylinders in real life.
Option B: The grid method
Draw a simple grid on your reference image (paper or tablet). Then lightly mark a proportional grid on the wall. Transfer
the design square by square. This is slower, but extremely reliableespecially for beginners.
Option C: Projector trace
Project your reference onto the wall, adjust size/placement, then trace outlines lightly. This is the fastest way to get
a clean layout. Keep lines faintyour future self will thank you.
Painting the Birch Trees: Step-by-Step
Step 1: Paint the background (if you’re doing one)
If you want a misty forest look, paint a soft gradient background first (very light gray-blue fading to white works well).
Keep it subtlethis is a bedroom, not an aquarium. Let it dry completely.
Step 2: Block in the trunks
Birch trunks look best when they’re not pure white. Use an off-white (think “marshmallow,” not “printer paper”). You can:
- Roller method: Use a small roller for fast coverage, then crisp edges with an angled brush.
- Brush method: Use a wide flat brush and paint vertically to mimic bark direction.
Paint each trunk as a tall vertical shape, slightly tapering as it goes up. Add subtle “bulges” and irregular edges so it
feels organic. Let the trunk layer dry.
Step 3: Add shadow and dimension (the step that makes it look real)
Mix a very light gray (or use a pale gray paint) and add a soft shadow along one side of each trunkpick a consistent
“light source” direction (like light coming from the window side of the room). Blend the shadow inward with a dry brush
or lightly damp sponge so it fades.
Tip: Your shadows should be whisper-soft. If you can see them from space, lighten them.
Step 4: Paint the birch bark markings
This is the fun part: the iconic black and charcoal “eyes” and horizontal marks. Use a small flat brush and a dark gray
(not pure black for every markuse a mix of charcoal, gray, and occasional black for realism).
- Paint thin horizontal dashes, varying length and thickness.
- Add a few oval “knot” shapesthen soften edges with a slightly lighter gray.
- Cluster some marks more heavily near the base and midsection, leaving cleaner areas too.
If a mark looks weird, don’t spiral. Birch bark is basically nature’s permission slip for “happy accidents.”
Step 5: Add branches (or keep it trunk-only)
Trunk-only murals look modern and calm. Branches add storybut also add difficulty. If you add branches:
- Use a liner brush (or a small angled brush) and slightly thinned paint.
- Start thicker near the trunk and taper as the branch extends.
- Paint upward and outward, with gentle curves. Avoid perfect symmetry.
Beginner-friendly branch trick: Paint fewer branches than you think you need. Step back. Then add one or
two more. This prevents “branch overcrowding,” which is a real thing (in art, if not in botany).
Step 6: Optional leaves or a “hint of canopy”
If you want leaves, keep them airy. Use a sponge to dab soft clusters in muted green, sage, or even pale gold. You can
also do a modern take: tiny dots or abstract leaf shapes with lots of negative space.
Step 7: Clean up edges and refine
Walk away for 10 minutes. Come back. You’ll see where you need:
- Sharper trunk edges
- More contrast in a few bark marks
- Softening where a shadow looks too harsh
This “step back and refine” phase is what separates a mural that looks intentional from one that looks like you raced the sunset.
Painter’s Tape Tips (So You Don’t Peel Off Your Pride)
Painter’s tape is your friend, but it can also be the friend who “helps” by deleting your work. For crisp edges:
- Press tape down firmly to prevent bleed.
- Remove tape carefullyslow and steady.
- If paint has dried hard over the tape edge, lightly score along the tape line before pulling.
Do You Need to Seal a Bedroom Wall Mural?
In many bedrooms, a birch mural doesn’t need sealingespecially if it’s on a low-contact wall behind a bed. Standard interior wall paint and acrylic details
can hold up well on their own. That said, consider a clear topcoat if:
- The wall is in a high-touch area (kids’ room, play space, hallway-style traffic).
- You want the mural to be more wipeable.
- You used delicate acrylic layers that might scuff.
If you do seal, choose a clear product intended for painted surfaces and test it in a hidden spot firsttopcoats can change sheen or deepen colors slightly.
Matte or satin clear coats are often used to keep the “painted wall” look.
Troubleshooting: Common Problems and Fast Fixes
My trunks look streaky
Add a second coat of trunk color. If brush marks are heavy, use a roller for the trunk base and save brushes for edges and detail.
My bark marks look too harsh
Glaze them back. Lightly dry-brush trunk color over the harsh mark to soften it, then re-add a smaller, darker mark inside for definition.
My branches look like spooky hands
First: congratulations, you accidentally made Halloween décor. Second: fix by tapering ends more, adding a few thinner offshoots,
and softening with a slightly lighter gray to reduce the “sharp claw” effect.
The mural feels too busy
Simplify. Remove (paint over) some branches or reduce leaf clusters. Birch looks best when it breathes.
Cost, Time, and Effort: What to Expect
- Time: Often 1–2 days for painting (plus drying time), depending on size and detail.
- Cost: Commonly $50–$200 if you already have basic tools (more if you buy everything new).
- Effort: Prep is the most tedious. Detail work is the most satisfying.
Conclusion: Your Bedroom, Now With a Little Forest Magic
A hand-painted birch tree wall is the perfect DIY sweet spot: high impact, low clutter, and flexible enough to match almost any bedroom style.
If you do three thingsprep the wall, keep your trunks slightly off-white, and build bark details in layersyou’ll get a mural that looks custom,
calm, and convincingly “professional,” even if you painted it in sweatpants while whispering “please don’t drip” to your brush.
Take your time, step back often, and remember: birch trees are naturally imperfect. Which is great news for all of us.
of Real-World DIY Experience (What It’s Actually Like)
Even a “simple” birch mural has a personality, and it tends to reveal itself about halfway through the projectusually when you’re
standing on a step stool, holding a brush, wondering why trunks that looked effortless on Pinterest suddenly feel like advanced geometry.
The most common experience people have is that the project starts out deceptively calm. The base coat goes on, the wall looks clean,
and you think, “Wow, I am absolutely the kind of person who paints murals.” Then you sketch the first trunk and realize that vertical lines
are emotionally complicated. Walls aren’t always perfectly flat, ceilings aren’t always level, and your eyes can play tricks on you. That’s why
stepping back every few minutes feels like a cheat code: from up close, you’ll obsess over edges; from across the room, you’ll see that it’s working.
Another very typical moment is the “too white” panic. Freshly painted trunks can look stark at first, especially if your room lighting is warm.
The fix is almost always the same: add gentle gray shading and a few charcoal marks, and suddenly the trunks stop looking like white rectangles
and start looking like birch. People also tend to underestimate how much the bark details matter. It’s not about painting a thousand marks; it’s
about painting the right marks, in layers, with variation. Most DIYers find that once they relax and let the marks be imperfectsome broken lines,
some smudgy edges, some lighter gray mixed inthe mural becomes more realistic.
Tape is another classic storyline. It’s exciting because it promises crisp edges, but it can also be the plot twist. The experience here is:
press tape down well, don’t rush removal, and if the paint film feels like it’s “bridging” over the tape, score the edge first. This one small habit
can save you from pulling up a chunk of trunk you spent an hour perfecting. On the creative side, branches are where confidence grows. The first branch
often looks stiff. The second looks better. By the third, people usually develop a rhythmstart thick, pull the brush outward, taper, breathe, repeat.
The best part is the end: when you clean up edges, unify shadows, and add a few final bark accents, the wall suddenly looks finished. That “before vs after”
moment is why murals are addictive. You go from blank drywall to a calm birch grove that makes the whole bedroom feel styledlike the room got a quiet upgrade,
not a loud makeover.