Table of Contents >> Show >> Hide
- Why Succulents Make Such Great Napkin Rings
- Faux vs. Live: Choose Your Adventure
- Before You Start: A Quick Style Decision
- Supply List
- Step-by-Step: DIY Succulent Napkin Rings
- Design Ideas for Every Season
- Troubleshooting: The Stuff Nobody Warns You About
- Storage & Reuse Tips
- If You Want Live Succulents, Here’s the Practical Way
- FAQ
- Real-World Experiences & Lessons Learned (So You Don’t Learn Them the Hard Way)
There are two kinds of dinner hosts: the ones who fold napkins into swans… and the ones who would rather
wrangle an actual swan than attempt napkin origami. If you’re in Camp “Please Don’t Make Me Fold Things,”
DIY succulent napkin rings are your new best friend. They look like you styled your table with a mood board,
a glue gun, and a whisper of Pinterest magicyet they’re surprisingly quick, budget-friendly, and reusable.
This Hometalk-style project is all about big impact with small effort: a little pop of green, a little texture,
and a lot of “Wait, you made these?” Whether you’re setting a holiday table, prepping for a backyard dinner party,
or putting together rustic wedding details, succulent napkin rings add that modern-natural vibe that works year-round.
(They’re basically the “white sneakers” of tablescapesgo with everything, and everyone compliments them.)
Why Succulents Make Such Great Napkin Rings
Succulents are popular for a reason: they’re sculptural, photogenic, and naturally look “styled” even when they’re
doing absolutely nothing. For table decor, that’s the dream. A single faux rosette on a ring reads as intentional,
modern, and elevatedwithout crowding the plate or blocking anyone’s line of sight to the mashed potatoes.
- They’re a built-in centerpiece for each place settingno fancy napkin folding required.
- They’re reusable (especially faux versions), so the cost per dinner party keeps dropping.
- They photograph beautifully for holidays, showers, and “I totally didn’t panic-clean” gatherings.
- They’re customizable: rustic burlap, sleek satin ribbon, wood rings, mossy garden vibeschoose your aesthetic.
Faux vs. Live: Choose Your Adventure
Option A: Faux Succulents (Recommended for Most People)
Faux succulents are the low-stress choice: no watering, no wilting, no guests accidentally pocketing your plants
“to save them.” They’re ideal for holiday tables, outdoor parties, and any event where you want the look without
the logistics.
Best for: durability, easy storage, kids/pets around, last-minute hosting, humid climates, and people who
have ever killed a cactus (no judgmentthose things are sneaky).
Option B: Live Succulents (Pretty, but Plan Ahead)
Live succulent napkin rings can be gorgeousespecially for weddings or spring/summer tables. But think of them like
a tiny plant “moment,” not a long-term living arrangement. If you want live, use gentle attachment methods (wire/twine,
not molten glue), keep them out of direct sun and heat before dinner, and have a plan for after the meal (pot them up,
gift them, or re-root them).
Best for: special occasions, plant-loving crowds, favors, and hosts who enjoy a little extra prep.
Before You Start: A Quick Style Decision
The easiest way to keep this project fun (instead of “why is moss in my socks?”) is to pick one of these base styles:
- Paper-roll rings wrapped in ribbon (budget-friendly, fast, and surprisingly polished).
- Wood napkin rings with a small succulent cluster (classic, sturdy, more “keepsake”).
- Mini “dish garden” tie-on (wood rounds + moss + succulents; rustic and dramatic).
Supply List
Universal Supplies (No Matter Which Method You Pick)
- Mini faux succulents (or small live rosettes/cuttings)
- Wire cutters or sturdy scissors (for trimming faux stems)
- Hot glue gun + glue sticks (for faux versions)
- Optional: twine, floral wire, or ribbon (for tying and finishing)
Method 1 Supplies: Paper-Roll Rings Wrapped in Ribbon
- Empty paper towel roll (or toilet paper rolls in a pinch)
- Ribbon (satin, burlap, velvetwhatever matches your table)
- Glue dots or a thin line of hot glue (to start/finish ribbon wrap)
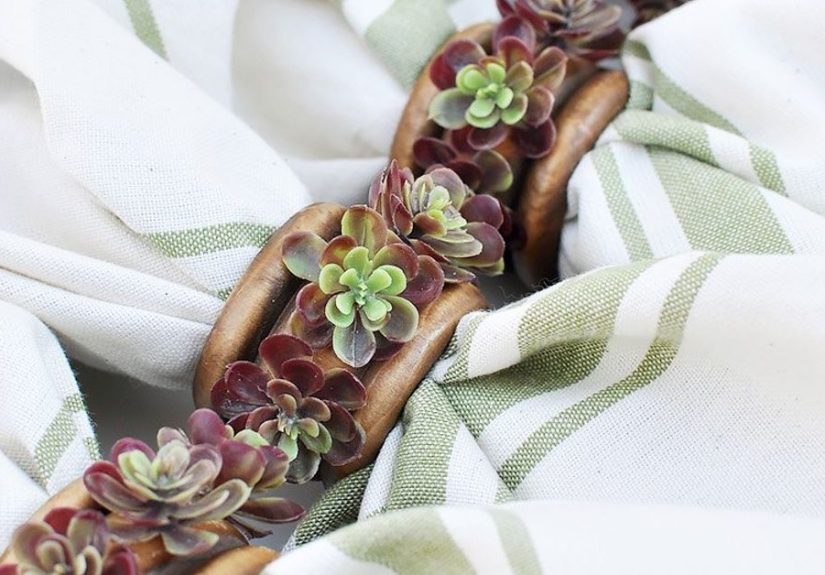
Method 2 Supplies: Wood Napkin Rings + Succulent Cluster
- Plain wooden napkin rings (craft store or thrift find)
- Optional: stain or paint + brush (for a finished look)
- Strong craft glue or hot glue (faux)
Method 3 Supplies: Rustic Mini Dish Garden Tie-On
- Small wood rounds (birch rounds work great)
- Sheet moss
- Ribbon or twine (to tie around the napkin)
Step-by-Step: DIY Succulent Napkin Rings
Pick your favorite method below. Each one gets you to the same destination:
a table setting that looks like you hired a stylist… or at least bribed one with brownies.
Method 1: Dollar-Store Chic Paper-Roll Succulent Rings
-
Cut the ring bases. Cut your paper towel roll into rings about 1/2 inch wide. Aim for consistency so
your set looks cohesive. -
Start the ribbon wrap. Anchor the ribbon inside the ring with a glue dot (or a tiny dab of hot glue).
Leave a short tail inside the ring, then wrap at a slight angle so each turn overlaps the last. -
Finish cleanly. When you’ve covered the ring, tuck the end inside and secure with another glue dot
or dab of glue. Trim any frayed edges. -
Prep the succulents. Snip off faux stems close to the base. If your succulent is too tall, trim the
stem shorter so it sits low and stable. - Attach the succulent. Add hot glue to the base and press onto the ring. Hold for a few seconds so it bonds.
- Do a “plate test.” Place it on a plate. If it tips, shift the succulent slightly off-center or use a smaller plant.
Pro tip: If the succulent is bulky, remove a bottom layer of leaves (on faux pieces, layers often pop off) to reduce height.
It’s like giving your napkin ring a haircuteverything sits better afterward.
Method 2: Classic Wood Ring + Succulent Cluster
-
Finish your rings (optional). If you’re using unfinished wood rings, stain or paint them and let them dry fully.
This one step makes the whole project look more “boutique shop” and less “I just found this in my junk drawer.” - Plan the placement. Arrange 2–4 mini succulents along one side of the ring. Keep part of the ring bare so it sits flat.
- Glue in layers. Attach the largest succulent first, then nest smaller ones beside it to create a balanced cluster.
- Let it set. Give the glue time to cure before you slide in napkins, especially if your napkins are thick linen.
Style idea: For fall, pair walnut-stained rings with cream napkins. For spring, keep the rings natural and add pastel napkins.
You can change the whole mood without remaking the rings.
Method 3: Rustic “Mini Dish Garden” Tie-On (Biggest Wow Factor)
-
Cover the wood round. Cut sheet moss to fit the top of the wood round. Glue it down. Yes, moss will get everywhere.
Accept this now and you’ll be happier later. - Build your succulent cluster. Glue faux succulents on top of the moss, grouping them like a tiny garden.
-
Add the tie. Flip it over and glue a ribbon or twine strip to the back. You’ll tie it around the napkin instead of sliding
the napkin through a rigid ring. - Clean it up. Brush away loose moss bits. If you get glue strings, a quick warm blast from a hair dryer can help remove them.
This style is especially great for rustic weddings and outdoor parties because it looks like it belongs on a magazine cover…
but it’s still basically “glue some pretty things together,” which is the best kind of DIY.
Design Ideas for Every Season
Thanksgiving & Fall
- Burlap ribbon + warm wood tones + deep green succulents
- Add a tiny faux berry pick or mini pinecone (keep it small so it doesn’t crowd the plate)
- Choose rosette-style succulents for a fuller, harvest-table look
Winter & Holidays
- Velvet ribbon (emerald, navy, or cranberry) instantly looks luxurious
- Swap in white/gray “dusty” faux succulents for a frosty vibe
- Keep embellishments minimalsucculents already bring texture
Spring Showers
- Natural wood + light linen napkins + small succulents = airy, fresh, simple
- Add a handwritten name tag tucked into the ring for place cards
Summer Alfresco
- Bright napkins (coral, aqua, sunny yellow) paired with green succulents pop outdoors
- Use tie-on “mini dish garden” style for that backyard-party wow
Troubleshooting: The Stuff Nobody Warns You About
“My napkin ring tips over.”
The succulent is probably too large or too centered on top. Use a smaller faux piece, move it slightly off-center,
or leave more of the ring uncovered so it can rest flat on the plate.
“There are glue strings everywhere.”
Hot glue loves drama. Let it cool a moment before lifting the glue gun away, and remove strings by gently pulling them
off once they cool. A quick warm blow-dry can also help.
“The ribbon keeps slipping.”
Anchor the ribbon inside the ring at the start and end. Glue dots are great for clean wrapping, while a tiny dab of hot glue
gives a stronger hold (just keep it inside the ring so it doesn’t show).
“Moss is everywhere and I am now part-moss.”
Work over kraft paper or a tray. And don’t wear black pants. (Or doif you enjoy living dangerously.)
Storage & Reuse Tips
- Store flat in a shallow box so the succulents don’t get crushed.
- Separate layers with tissue paper if you stacked them.
- Keep away from heat so glue doesn’t soften in storage (especially in garages or attics).
- Refresh fast before using: brush off dust and straighten ribbon tails.
If You Want Live Succulents, Here’s the Practical Way
Live succulent napkin rings are doable, but treat them like a temporary display. Use wire, floral tape, or twineavoid hot glue on living tissue.
Keep them cool, out of harsh sun, and assemble as close to event time as possible. Afterward, remove the plants and pot them in a well-draining
succulent mix, then water only after the soil dries out (succulents dislike staying wet).
If you’re giving them as favors, it helps to set out small pots and soil so guests can take them home and replant immediatelycute and practical.
FAQ
How long does this take?
Once you have supplies laid out, many people can make a set in under an hourespecially with the paper-roll method.
The mini dish garden style takes longer because of moss and drying time.
How much do DIY succulent napkin rings cost?
Faux versions can be very affordable, especially if you shop dollar stores or use craft store coupons. Your cost depends on the base you choose:
paper-roll rings are the cheapest, while wood rings and mossy rounds cost a bit more but look extra “event-ready.”
Will faux succulents look fake?
If you choose realistic mini succulents and keep the design simple, they read as “styled,” not “plastic.”
Scale is the secretsmaller pieces look more believable on place settings.
Real-World Experiences & Lessons Learned (So You Don’t Learn Them the Hard Way)
Here’s what tends to happen when people actually make DIY succulent napkin rings for a real event (aka: when time is short,
the house is loud, and someone keeps asking where the scissors went). First: scale matters more than perfection.
A mini succulent that looks tiny in your hand can look huge on a dinner plate. If you’re unsure, do one “test ring,” place it on
your actual dishes, and step back like you’re judging a cooking show. If it feels tall, bulky, or unstable, go smaller or move the
succulent off-center so the ring sits flatter.
Second: assembly-line crafting saves your sanity. Cut all the ring bases first. Then wrap all the ribbon. Then trim
all succulent stems. Then glue. When you jump between steps, you spend more time hunting for tools and waiting for glue to reheat than
actually crafting. Put everything in little bowls or muffin tinssucculents in one, ribbon pieces in another, glue dots in anotherand
you’ll feel like a calm, organized person even if you’re absolutely not.
Third: hot glue is both your best friend and your clingy enemy. You’ll get glue strings. You’ll wear at least one.
This is normal. The trick is to let the glue cool for a beat before pulling away, and do “string cleanup” at the end instead of trying to
fix every strand mid-project. If you’re using moss, accept that your crafting area will look like a forest floor for a minute. Work over paper,
vacuum afterward, and tell yourself it’s “seasonal ambiance.”
Fourth: napkin thickness changes everything. Thin cotton napkins slip easily through rigid rings, while thick linen or chunky
cloth napkins can feel like you’re trying to wrestle a duvet through a keychain. If you love thick napkins, consider the tie-on style (wood round
“dish garden” with ribbon) because it doesn’t require the napkin to squeeze through a tight loop. Or size your rings slightly larger when cutting
cardboard bases.
Fifth: think about the “after dinner” moment. Faux succulent rings are easy: collect, store, repeat next holiday. Live succulents
need a plansmall pots, well-draining soil, and a place to set them while guests linger. If you’re making live rings for a wedding or shower,
it’s smart to label them as favors and give guests a quick “how to replant” note so they don’t leave your beautiful rosettes abandoned on the table
like tiny green leftovers.
Finally: the simplest designs look the most expensive. One succulent + a clean ribbon wrap often looks more modern than a ring loaded
with extras. If you want embellishment, choose one: a name tag, a sprig of faux berry, or a small pineconenot all three. Let the succulent be the star.
It’s already doing the most just by existing.