Table of Contents >> Show >> Hide
- What a Doorbell Transformer Actually Does
- Safety First: Before You Touch a Single Wire
- How a Doorbell Circuit Works (The Short Version)
- Tools and Materials You’ll Need
- Step-by-Step: How to Wire or Replace a Doorbell Transformer
- Choosing the Right Doorbell Transformer (So You Only Do This Once)
- Common Doorbell Transformer Wiring Problems (and Quick Fixes)
- When to Call an Electrician
- Real-World Experiences with Doorbell Transformer Wiring
If your doorbell has gone mysteriously silent, there’s a good chance the tiny hero behind the scenes – the doorbell
transformer – is tired, underpowered, or wired incorrectly. The good news? Doorbell transformer wiring isn’t as
scary as it sounds. With a little prep (and the breaker turned OFF, seriously), you can safely replace or wire a
doorbell transformer and bring your chime – or smart video doorbell – back to life.
In this guide, we’ll break down what a doorbell transformer does, how to choose the right one, and how to wire or
replace it step by step, using straightforward language and DIY-friendly tips. Think of it as “Doorbell
Transformer Wiring for People Who Don’t Want to Get Zapped.”
What a Doorbell Transformer Actually Does
Your home’s main electrical system runs at about 120 volts in North America. That’s way too much for a simple
doorbell or smart doorbell to handle. A doorbell transformer’s job is to step that voltage down to a much safer
low-voltage range, typically around 10–24 volts AC, depending on the doorbell.
Most traditional wired doorbells use:
- 16V AC as the standard sweet spot for a single chime.
- Sometimes 8V–16V–24V multi-tap transformers for more flexible setups.
Many smart doorbells (like video models) often want something in the 16–24V AC range and a higher
VA (power) rating so the camera and Wi-Fi features stay powered reliably.
Key Specs to Know
- Voltage (V): Commonly 16V; some are 8–16–24V multi-voltage.
- VA Rating: 10VA, 20VA, or 30VA are common. Higher VA means it can power more load (extra chimes or a smart doorbell) without harm.
Using a transformer that’s too weak may cause dim chimes, buzzing, or a smart doorbell that constantly reboots.
Using a voltage too high for your device, on the other hand, can damage it – so always check the doorbell
manufacturer’s recommended range.
Safety First: Before You Touch a Single Wire
Even though the doorbell side is low-voltage, the primary side of the transformer is tied into your 120V
house wiring. That’s the part that absolutely can shock you.
- Turn off the power at the breaker that feeds the transformer’s circuit. When in doubt, switch off the main.
- Verify with a non-contact voltage tester that the wires you’re about to work on are truly dead.
- Follow local codes; some areas require a licensed electrician for this type of work.
- If you feel uneasy at any point, stop and call a pro. No doorbell is worth a hospital visit.
Many manufacturers and safety guidelines explicitly warn to disconnect power at the circuit breaker or fuse box
before you start any wiring work to avoid electrical shock.
How a Doorbell Circuit Works (The Short Version)
A basic wired doorbell system usually looks like this:
- Main power (120V) feeds the primary side of the doorbell transformer.
- The transformer’s low-voltage secondary (e.g., 16V AC) connects to:
- The doorbell button at the front door.
- The chime inside the house.
- When someone presses the button, the low-voltage circuit closes and energizes the chime coil – ding-dong!
Smart doorbells often tap into the same transformer for power, but may bypass the mechanical chime or use extra
accessories or jumper wires, all still powered by that low-voltage transformer.
Tools and Materials You’ll Need
For most doorbell transformer wiring or replacement jobs, gather:
- New doorbell transformer with correct voltage and VA rating
- Non-contact voltage tester
- Flathead and Phillips screwdrivers
- Wire strippers and cutters
- Wire nuts or approved connectors
- Drill and mounting screws (if relocating or adding a transformer)
- Electrical tape and, if needed, a small junction box cover
Step-by-Step: How to Wire or Replace a Doorbell Transformer
1. Locate the Existing Transformer
The hardest part of this whole job is often simply finding the transformer. Common hiding spots include:
- Mounted to the side of your main electrical panel or nearby junction box
- Inside or near the doorbell chime box
- In the basement, garage, attic, or a utility closet
Follow the small low-voltage wires from your chime backward – they usually lead straight to the transformer.
2. Turn Off the Power
At your electrical panel, turn off the breaker feeding that transformer. If you’re not sure which breaker it is,
switch off the main power temporarily while you work. Always confirm with a voltage tester before you touch the
primary wiring.
3. Take a Picture Before You Disconnect Anything
Grab your phone and take clear photos of:
- How the primary (120V) wires are connected
- Where the low-voltage wires land on the transformer terminals
This “before” photo can save you a lot of guessing later, and many installation guides specifically recommend it.
4. Disconnect the Old Transformer
With power verified OFF:
- Loosen the low-voltage screws on the transformer and gently pull off the doorbell/chime wires.
- Open the nearby junction box (if present) and disconnect the transformer’s primary wires from the hot and neutral, usually with wire nuts.
- Remove the transformer from its mounting bracket or knockout on the box.
If the transformer is tapped into a neutral bus or wired in an older, confusing way, treat every conductor with
caution and re-verify with a tester as you work.
5. Mount the New Doorbell Transformer
Mount the new transformer in a code-approved way:
- Thread the transformer’s primary leads through the knockout of a metal or plastic junction box and secure it
using the provided locknut, or - Use the built-in bracket or DIN rail (in some modern transformers) as instructed by the manufacturer.
Make sure the transformer is firmly attached and not dangling by the wires. Loose parts and electrical wiring do
not mix well.
6. Wire the Primary (120V) Side
Inside the junction box (with power still OFF):
-
Connect the transformer’s hot lead to the circuit’s hot (usually a black wire) using an approved
connector. - Connect the transformer’s neutral lead to the neutral (usually white).
-
If your transformer has a ground wire or screw terminal, connect it to the box ground or bare
copper/green ground wire as per local code. - Neatly tuck the wires into the box and reinstall the cover plate.
Do not tie the hot lead to neutral or any random screw terminal; mis-wiring can cause tripping, overheating, or
shock hazards.
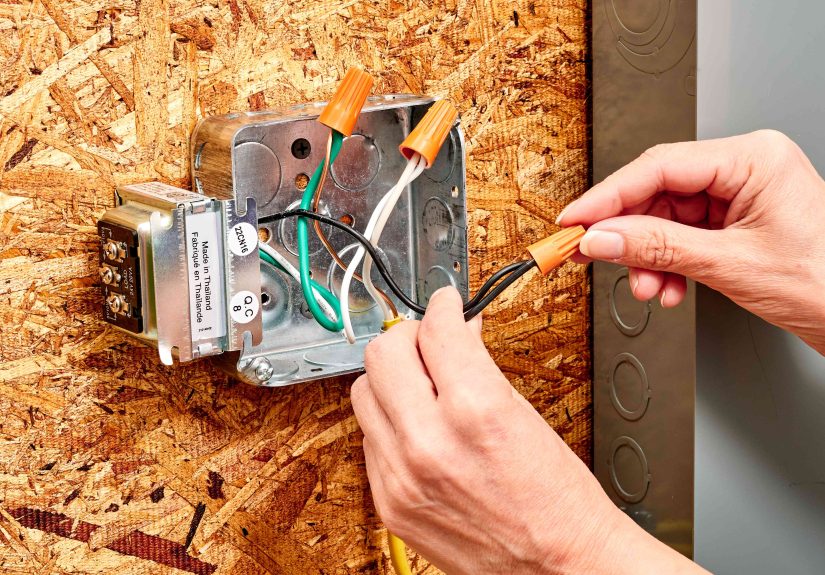
7. Wire the Low-Voltage Side to the Doorbell System
On the low-voltage side of the transformer, you’ll usually see screw terminals or labeled leads (e.g., “16V,”
“COM,” “24V”). Typical setups include:
Single Doorbell, One Chime
- Run one low-voltage wire from the transformer to the TRANS terminal on the chime.
- Run another low-voltage wire from the chime’s FRONT terminal to the doorbell button.
- Connect the remaining doorbell button terminal back to the transformer’s other low-voltage terminal.
The low-voltage terminals are not polarity-sensitive for most mechanical chime systems – either conductor can land
on either screw.
Front and Rear Doorbells
If you have “Front” and “Rear” buttons feeding a multi-tone chime:
- Transformer low-voltage terminals still go to TRANS and the doorbell loop,
- But the chime will have separate FRONT and REAR terminals to trigger
different tones.
Smart Doorbells (Ring, Nest, etc.)
Smart doorbells typically wire like this:
- Both transformer wires connect directly to the smart doorbell or to the existing chime and then on to the
doorbell, depending on the model and diagram. - Some require bypassing the mechanical chime or using a special power kit or jumper cable.
- Voltage and VA must match the manufacturer’s spec (often 16–24V, 10–30VA).
Always follow the wiring diagram for your specific doorbell model. When in doubt, treat the chime as optional and
power the smart doorbell directly from the transformer only if the manufacturer explicitly allows it.
8. Restore Power and Test
Once everything is wired and secured:
- Turn the breaker back on.
- Use a multimeter (if you have one) to check the low-voltage terminals – you should see something close to the transformer’s rating (e.g., around 16V AC).
- Press the doorbell button and listen for the chime or confirm your smart doorbell powers up.
If nothing happens, double-check all your low-voltage connections and verify the breaker is on and not tripped.
Choosing the Right Doorbell Transformer (So You Only Do This Once)
Before you even start wiring, make sure you have the right transformer for the job:
- Match or meet the manufacturer’s voltage range. Traditional chimes usually use 16V; many smart doorbells want 16–24V.
- Look at the VA rating. Smart doorbells and multi-chime systems benefit from 20–30VA instead of tiny 10VA units.
- Multi-tap transformers (8–16–24V) give you more flexibility if you might upgrade later.
- If your old transformer is decades old, upgrading is often wise – new smart doorbells can overload tired old hardware.
When upgrading to a smart doorbell from a basic chime, it’s very common to replace the transformer at the same time
to avoid voltage drop and nuisance issues.
Common Doorbell Transformer Wiring Problems (and Quick Fixes)
Doorbell Is Silent
- Breaker may be off or tripped.
- Loose low-voltage connections at the transformer, chime, or button.
- Transformer failed and is no longer outputting voltage.
Chime Buzzes or Is Very Weak
- Transformer voltage or VA rating may be too low for the load.
- Corroded or loose contacts at the chime or button.
- Too much wire length or too small wire gauge in long runs.
Smart Doorbell Keeps Rebooting or Shows “Low Power”
- Transformer VA is too low (e.g., 10VA) for a modern video doorbell that needs 16–24V at higher current.
- Incorrect wiring through the chime instead of directly, where the manufacturer requires a bypass.
- Old transformer can’t keep up and should be replaced with a 16–24V, 20–30VA model designed for smart doorbells.
In all of these cases, a quick voltage check with a multimeter at the transformer and at the doorbell usually points
you in the right direction.
When to Call an Electrician
Wiring a doorbell transformer is considered basic electrical work, but it still involves live circuits and local
code requirements. Call a licensed electrician if:
- You can’t tell which breaker controls the transformer, or the panel is confusing.
- The transformer appears tied into multiple circuits or strange neutral connections.
- Your home has old or aluminum wiring, or you see signs of overheating or damage.
- Your local code requires a pro for low-voltage transformer installation.
Sometimes paying for one professional visit is cheaper than replacing a fried smart doorbell – or dealing with a
safety issue later.
Real-World Experiences with Doorbell Transformer Wiring
Theory is great, but doorbell transformer wiring becomes much clearer once you hear how it plays out in real homes.
Here are some practical lessons and “I won’t do that again” moments that can help you avoid common mistakes.
Experience #1: The Mystery of the Randomly Rebooting Smart Doorbell
Picture this: a homeowner installs a brand-new video doorbell on a house built in the 1980s. The installation goes
smoothly, everything looks tidy, and the doorbell powers on. Success! Then, a day later, the video feed drops, the
doorbell reboots, and notifications become spotty. Classic case of “it kind of works, but not really.”
After some troubleshooting, they discover the original transformer was a tiny 10VA model designed for an old
mechanical chime. It could technically power the new device, but under load it sagged, causing the doorbell’s
electronics to reset. Upgrading to a 16–24V transformer with a higher VA rating solved the problem instantly. The
lesson: when adding a smart doorbell, don’t just check the voltage – check the VA rating, too.
Experience #2: The Case of the “Shockingly” Live Neutral
In another home, a DIYer assumed the neutral bus in the electrical panel was “safe” because it was labeled
“neutral.” When they touched a transformer lead near that bus without shutting off the main breaker, they got a
small but memorable surprise. Neutrals can and do carry return current, and under certain conditions they can bite
just like a hot wire.
Proper procedure would have been to shut off the main breaker, verify no voltage, and then carefully disconnect the
transformer’s primary wires. That experience reinforced a rule: treat every conductor as potentially live until
your tester proves otherwise, and always respect the primary side of a doorbell transformer.
Experience #3: The Hidden Transformer in the Attic
In older houses, it’s not uncommon to find the doorbell transformer tucked in a place no one thinks to look –
sometimes attached to a junction box buried under insulation in the attic. One homeowner spent hours searching
around the electrical panel and chime, only to finally follow the small low-voltage wires up a wall cavity into the
attic. There, half-buried in insulation, was a rusty transformer barely hanging onto a metal box.
Once they relocated the transformer to a more accessible spot along the same circuit – and mounted it properly –
future troubleshooting became much easier. The takeaway: be patient when tracking low-voltage wiring, and plan to
mount your new transformer somewhere accessible and visible. Future you (or the next owner) will be grateful.
Experience #4: The “Why Won’t My Chime Work?” Wiring Mix-Up
A classic beginner mistake is mixing up the transformer terminals and chime connections. One DIYer landed both
transformer wires on the chime’s FRONT and REAR terminals, leaving the TRANS terminal unused. The transformer
measured the right voltage, but the chime never sounded because the circuit path through the button and coil wasn’t
complete.
After revisiting a basic wiring diagram, they realized that one low-voltage transformer wire should land on TRANS,
while the other goes through the doorbell button and then back to the chime terminal (FRONT or REAR). As soon as the
wires were moved to the correct spots, the chime worked perfectly. Moral of the story: if your doorbell is silent
but the transformer output looks fine, double-check that your low-voltage path actually forms a loop.
Experience #5: Planning Ahead for Future Upgrades
Some homeowners take a “do it once, do it right” approach. When they replace an old transformer, they deliberately
choose a slightly higher VA model and a multi-tap design (such as 8–16–24V). Even if their current system only uses
a 16V mechanical chime, they know a future owneror their future selfmay want to upgrade to a smart doorbell or add
an extra chime.
By spending a little more upfront and labeling the wires and transformer clearly, they future-proof the system and
avoid having to re-open walls or junction boxes later. If you’re already doing the work, it’s smart to think beyond
“what works today” and pick a transformer that can comfortably handle tomorrow’s gadgets.
Taken together, these experiences highlight a few themes: respect the primary side, don’t cheap out on the
transformer, label everything, and never underestimate the power of a simple wiring diagram. Follow those principles
and doorbell transformer wiring really does become “the easy way.”