Table of Contents >> Show >> Hide
- Why Bother Covering Your Headboard?
- Types of Easy Headboard Covers
- What You’ll Need for an Easy Headboard Cover
- Step-by-Step: How to Make a Simple Headboard Slipcover
- No-Sew Headboard Cover Ideas
- Fabric & Style Ideas for Your Headboard Cover
- Care, Cleaning, and Safety Tips
- Common Mistakes (So You Can Skip Them)
- 500-Word Experience: Living with an Easy Headboard Cover
- Conclusion: Ready for Your Headboard Glow-Up?
If your headboard has seen better days, you have two choices: buy a brand-new bed
(and donate a kidney to pay for it) or give the one you already own a clever glow-up.
An easy headboard cover is the happy middle groundbudget-friendly, renter-friendly,
and totally reversible if you change your mind next season.
Inspired by the spirit of Hometalk-style DIY projects, this guide walks you through
how to make a simple DIY headboard cover using basic supplies, with both sew
and no-sew options. We’ll talk fabrics, measurements, style ideas, and all the little
tricks that keep your cover from looking like a sheet you panic-tucked over the bed
five minutes before guests arrived.
Why Bother Covering Your Headboard?
Before we pick up fabric scissors, let’s talk about why a headboard slipcover is such
a smart project:
- Instant refresh: Change the color, pattern, and style of your bed in one afternoon.
- Budget-friendly: Covers are cheaper than replacing a full bed frame or headboard.
- Renter-approved: You don’t have to paint walls or install anything permanent.
- Protective: A cover shields your headboard from hair products, body oils, and kids’ sticky fingers.
- Seasonal style: Swap covers for cozy winter textures or breezy summer patterns.
In short, an easy headboard cover gives you a custom designer look without
the designer invoice. It’s basically a fitted outfit for your bed.
Types of Easy Headboard Covers
There isn’t just one “right” way to cover a headboard. The best method depends on
your skills, your tools, and how much effort you want to put in during your weekend.
1. Classic Slipcover (Pillowcase Style)
This is the approach most DIYers love: you create a fabric “pillowcase” that slides
over the top of the headboard and hangs down the back. It’s neat, tailored, and easy
to remove for washing.
- Great for upholstered or flat headboards.
- Ideal if you can sew a straight line (or are willing to learn).
- Looks polished, like a store-bought headboard cover.
2. Quick Drape Cover (No-Sew Friendly)
If sewing machines make you nervous, the quick drape method is your new best friend.
You use a large piece of fabric, quilt, tablecloth, or even a duvet cover, and
carefully wrap and tuck it around the headboard.
- No sewing required.
- Fast to change out if you like to rotate patterns often.
- Perfect for renters or dorm rooms where you want zero commitment.
3. Full Upholstered Cover (Foam + Fabric)
This is the most involved option but gives that high-end, plush,
hotel-suite energy. You add foam and batting to the front of the headboard
and then wrap everything in fabric, securing it to the back.
- Best if your existing headboard is hard, cold, or just uncomfortable.
- Great for readers who like to sit up in bed with pillows.
- Still budget-friendly compared with buying a brand-new upholstered headboard.
For this Hometalk-style project, we’ll focus on the simplest, most versatile option:
a slipcover-style headboard cover you can sew or adapt as a no-sew version.
What You’ll Need for an Easy Headboard Cover
You don’t need a fancy workshop or professional tools. Most supplies are basic
home-decor or beginner sewing items.
- Existing headboard: Flat or slightly padded works best.
- Fabric: Upholstery fabric, heavy cotton, linen, canvas, denim, or a spare duvet cover.
- Measuring tape: The hero of this entire DIY.
- Fabric marker or chalk: To outline your pattern.
- Sewing machine and thread (or fabric glue/iron-on tape for no-sew).
- Fabric scissors or rotary cutter: Sharp enough to cut clean edges.
- Pins or clips: To hold seams before sewing or gluing.
- Optional: Velcro, ribbon ties, or decorative piping for extra detail.
If you’re going ultra-budget, you can absolutely shop your house: a pretty
tablecloth or curtain panel can become a gorgeous DIY headboard cover.
Step-by-Step: How to Make a Simple Headboard Slipcover
This method gives you that clean, custom look while staying very forgivingeven
if your last sewing project was a slightly lopsided pillow in middle school.
Step 1: Measure Like a Pro
Grab your measuring tape and record:
- Width: From one edge of the headboard to the other.
- Height: From the top to the bottom where the mattress meets it.
- Depth: The thickness from front to back.
For your fabric piece, you’ll need:
- Headboard width + 2 to 4 inches for seam allowances.
- (Headboard height × 2) + depth + 4 to 6 inches for seam allowances and a bit of wiggle room.
When in doubt, cut a little extra. You can always trim; adding fabric back on
is… not a thing.
Step 2: Cut the Fabric Panels
For a classic slipcover, you’ll usually cut:
- Front panel: The exact width and height of the headboard plus seam allowances.
- Back panel: The same width, but a bit longer to hang down behind the headboard.
- Side strips: Narrow pieces to cover the thickness of the headboard (depth + seam allowances).
Lay your fabric on a flat surface, folded if needed, and mark everything carefully
with chalk before cutting. Treat this step like a tattoo: measure twice, commit once.
Step 3: Pin and Sew (or Glue) the Pieces Together
Place the front and back panels right sides together, then attach the side strips
along the top and sides, creating a big rectangular “tube” that matches the shape of
your headboard.
- Sew straight seams around the top and sides, leaving the bottom open.
- Clip the corners to reduce bulk, but don’t cut through your stitches.
- Flip the cover right side out and slip it over the headboard to test fit.
No sewing machine? Use strong fabric glue, iron-on hem tape, or fusible webbing
instead. Press seams firmly and allow everything to cure fully before tugging the
cover over the headboard.
Step 4: Finish the Bottom Edge
Once you’re happy with the fit, hem the bottom edge so it looks neat even if
the back of your headboard is visible from the doorway.
- Turn the raw edge under about 1/2–1 inch, then again to hide the raw fabric.
- Sew (or glue/press) the hem all the way across.
- Optionally add Velcro tabs or ties to hold the cover snug around the legs or back.
Now gently slide the cover onto the headboard, smooth out any wrinkles, and step back
to admire your handiwork. Your bed just went from “fine” to “Pinterest board”.
No-Sew Headboard Cover Ideas
If your motto is “I don’t sew, I just hot glue,” here are a few
no-sew headboard cover ideas that still look intentional and stylish.
1. Tablecloth or Quilt Wrap
A large tablecloth, quilt, or throw can become an instant headboard cover:
- Drape the fabric over the front of the headboard.
- Pull it snug and fold the corners like a wrapped gift.
- Tuck the extra fabric behind the headboard or secure with safety pins.
This trick works especially well if your bed is tight against the wall, since it
helps hold the fabric in place. Add a few discreet pins at the back if your headboard
likes to wiggle.
2. Duvet Cover Hack
Got an old duvet cover you still love? Turn it into a removable slipcover:
- Slide the headboard inside like a giant pillow.
- Use the buttons or zipper at the bottom to close it.
- Pin any extra fabric tightly around the back.
This is a brilliant way to coordinate your headboard with your bedding without
buying anything new.
3. Curtain Panel Cover
A long curtain panel in a fabric you love is basically a headboard cover waiting to
happen. Wrap it tightly around the headboard and secure at the back with pins, clips,
or sticky-back Velcro strips.
Because curtain panels are usually lined and hemmed, they hang smoothly and look
clean and finished from the start.
Fabric & Style Ideas for Your Headboard Cover
Choosing the right fabric turns your easy project into a real statement piece.
Here are some ideas to get you inspired:
- Neutral linen or canvas: Timeless, airy, and plays well with
any bedding you already own. - Bold prints: Oversized florals, stripes, checks, or geometrics
that make your bed the star of the room. - Cozy textures: Velvet, chenille, or boucle for a plush,
upholstered headboard vibe. - Pattern play: Use the same print as your shams to create a
“hotel collection” look, or mix patterns within the same color family. - Trim and piping: Add contrasting piping along the edges or sew
on ribbon trim for a custom, designer feel.
Remember that your headboard sits close to your face, so choose fabrics that are
soft enough to lean on and not scratchy or irritating.
Care, Cleaning, and Safety Tips
A removable headboard cover is only truly easy if it’s easy to maintain.
Before you cut anything:
- Check the fabric label: Make sure it’s machine washable or easy to spot clean.
- Prewash the fabric: Wash and dry it before sewing to avoid surprise shrinking later.
- Avoid highly flammable materials: Especially if you use candles or string lights around the bed.
- Secure pins and fasteners: Place them out of reach of kids and pets and keep anything sharp at the back.
If you use foam and batting for extra padding, choose upholstery-appropriate materials
and follow manufacturer safety guidelines.
Common Mistakes (So You Can Skip Them)
- Not adding enough ease: Making the cover too tight can cause
weird pulling and wrinkles. Give yourself at least 1–2 inches of wiggle room. - Skipping prewashing: Fabric that shrinks after the first wash
can suddenly turn your chic slipcover into a headboard corset. - Choosing the wrong fabric weight: Fabric that’s too thin will
show the old headboard pattern underneath; fabric that’s too stiff won’t drape nicely. - Ignoring the back view: Even if the back of your headboard faces
the wall, make sure things are at least neatly tucked and not a chaotic knot of fabric.
500-Word Experience: Living with an Easy Headboard Cover
It’s one thing to see a perfect headboard cover in a styled photo, but what is it
actually like to live with one? Let’s talk real-world experience, the kind you
only get after a few months of leaning, lounging, and occasionally eating snacks
in bed even though you promised yourself you wouldn’t.
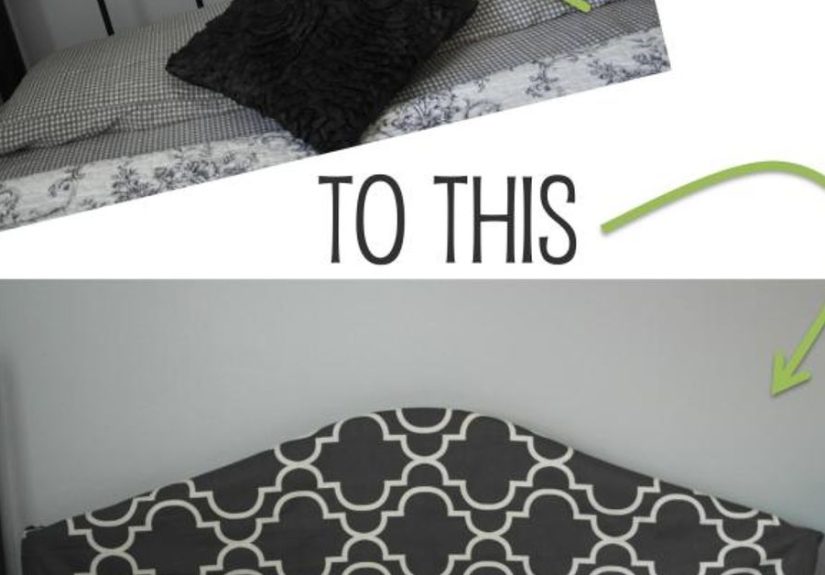
The first thing people usually notice is how dramatically a headboard cover changes
the mood of the room. A dark wood or metal headboard can feel heavy, especially in
a small bedroom. Swap in a light, linen-look slipcover and suddenly the space feels
brighter and more relaxed. Many DIYers report that even without changing paint
color or bedding, their bedrooms look “redesigned” once the headboard has a new
outfit.
Day to day, the biggest perk is comfort. A padded or upholstered-style cover means
you can sit up and read, scroll, or work on your laptop without stacking a fortress
of pillows behind you. If you choose a fabric with a little softnesslike cotton
canvas, brushed twill, or velvetyou get that cozy, cushioned feel every time you
lean back. People who previously avoided reading in bed often find they suddenly
use their bedroom more intentionally, treating it more like a calm retreat instead
of just a place to crash at midnight.
Cleaning is another area where experience really proves the value of a removable
headboard cover. Hair products, skincare, and everyday skin oils all leave a subtle
film over time, especially along the top edge where your head and shoulders rest.
With a fixed upholstered headboard, that buildup can be tricky (and annoying) to
clean. With a slipcover, you just unzip, untie, or slide it off, toss it in the
wash on gentle, and put it back on fresh. If you’re someone who battles allergies,
being able to wash the fabric that close to your face can make the room feel cleaner
and more breathable.
The flexibility is surprisingly addictive. Once you’ve made one DIY headboard slipcover,
you start eyeing every clearance-bin fabric as “potential headboard material.”
A moody floral for fall, crisp stripes for summer, and a cozy textured neutral for
wintersuddenly your headboard has more outfit changes than you do. Because the
pattern pieces are simple once you’ve dialed in your measurements, sewing a second
or third cover goes much faster. Many people find it becomes an easy weekend
project whenever they get the itch to redecorate without repainting walls.
There are a few small realities worth knowing in advance. Slipcovers can shift
a little with heavy use, especially if the fit is too loose or the headboard is
very slick (like faux leather). Adding a couple of Velcro strips, non-slip shelf
liner behind the headboard, or ties at the legs usually solves this. Thicker
fabrics can also be warm in hot climates, so if your bedroom runs hot in summer,
you might want a lighter cotton cover for the warmer months and save the heavy
textures for cooler seasons.
Overall, people who’ve lived with an easy headboard cover tend to say the same
thing: the project is small, but the impact is big. It’s one of those rare DIYs
that looks impressive, feels luxurious, and quietly makes your everyday routine
more comfortable. Once you try it, it’s hard to imagine going back to a bare,
unpadded headboard again.
Conclusion: Ready for Your Headboard Glow-Up?
An easy headboard cover is the kind of project Hometalk fans love for good reason:
it’s simple, customizable, and wildly satisfying. With a few basic measurements,
some fabric, and either a sewing machine or a strong no-sew game, you can transform
your bed in an afternoonand keep transforming it every time your style evolves.
Whether you go for a sleek upholstered look, a relaxed draped cover, or a collection
of seasonal slipcovers, your headboard becomes a flexible design tool instead of a
fixed piece of furniture. So grab that fabric you’ve been saving “for something
special” and let your headboard be the star of your next bedroom makeover.