Table of Contents >> Show >> Hide
- Why a Garden Bench Makes a Surprisingly Great Planter
- Pick Your Path: Convert a Bench or Build a Planter Bench
- Materials and Tools (No Fancy Workshop Required)
- Step-by-Step: Turn a Garden Bench Into a Planter (Upcycle Method)
- 1) Check structure first (soil is heavy and unforgiving)
- 2) Remove the seat and use the frame as your template
- 3) Build the planter box to fit the opening
- 4) Add a bottom that drains properly
- 5) Attach the planter box to the bench frame
- 6) Weather-proof the wood (because water always shows up uninvited)
- 7) Line the planter with a breathable barrier
- 8) Fill with potting mix, not garden soil
- 9) Plant it like you hired a designer (even if you didn’t)
- Design Upgrades That Make It Look Custom
- Wood Choice and Safety Notes (Especially for Edibles)
- Maintenance and Troubleshooting
- DIYer Experiences: Real-World Lessons From Bench-to-Planter Projects
Old garden benches have a predictable life story: they start as “charming patio seating,” then slowly become “where the hose nozzle lives,” and eventually end up in the yard like a forgotten prop from a play called We Swear We’ll Fix It This Weekend.
A bench-to-planter makeover is the DIY plot twist that rescues that bench from the curb and turns it into something genuinely useful. It’s upcycling (yay, planet), it’s practical (hello, easy seasonal color), and it’s the kind of project that makes neighbors lean in and ask, “Wait… that used to be a bench?”
This guide takes the classic Hometalk-style idearemove the seat, build a planter box that fits the existing frame, line it correctly, and plant it like you meant to do it all alongand turns it into an in-depth, step-by-step plan with real-world tips so your bench planter looks intentional and holds up outside.
Why a Garden Bench Makes a Surprisingly Great Planter
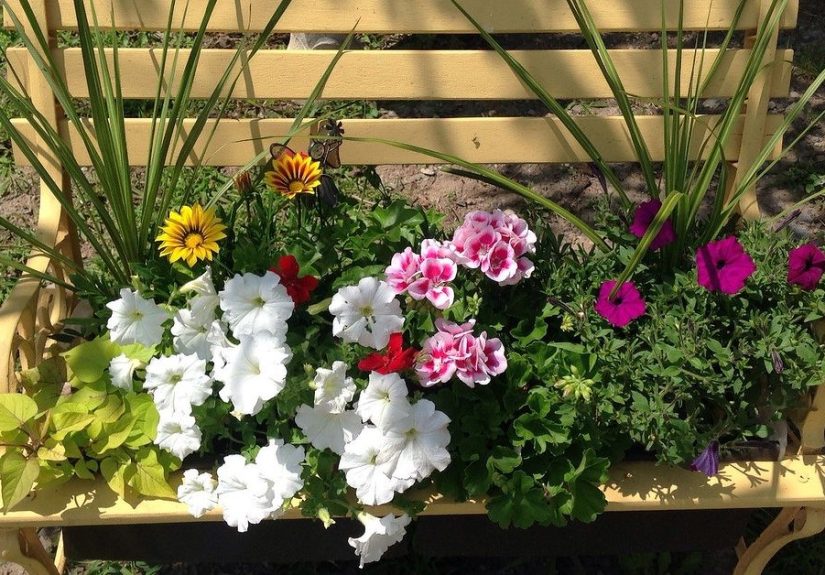
Benches already have what many planters need: a stable footprint, legs that lift the planting area off damp ground, and a shape that reads like outdoor décor instead of “random container.” Adding a planter gives you instant height and structureperfect for entryways, fence lines, patios, and small spaces where you want impact without building a full garden bed.
- Upcycling win: You reuse the frame and replace only what’s failing.
- Better visibility: Mid-height planting shows off color and texture without bending over.
- Seasonal flexibility: Swap plants without redesigning the yard.
- Small-space friendly: One piece can create a “garden moment” anywhere.
Pick Your Path: Convert a Bench or Build a Planter Bench
Option A: Convert an Existing Bench (Upcycle Method)
This is the classic transformation: keep the bench frame, remove the seat, and build a planter box sized to the seat opening or seat support. It’s perfect when the bench is sturdy enough to exist, but not cute enough to sit on.
Option B: Build a Planter Bench From Scratch
If the bench is too far goneor you want symmetrical planters on both ends with a true seating section in the middlebuild a planter bench. This style often distributes weight closer to the legs and can look more “store-bought,” in a good way.
Materials and Tools (No Fancy Workshop Required)
Materials
- A bench: wood bench or metal frame with removable wood slats
- Lumber: cedar/redwood, exterior-rated boards, or salvaged deck/fence boards in good condition
- Fasteners: exterior/deck screws (plus pocket-hole screws if using a jig)
- Optional: exterior wood glue for stronger joints
- Breathable liner: landscape fabric (or similar porous liner)
- Finish: exterior paint or stain + outdoor sealer
- Potting mix: container mix (not in-ground garden soil)
Tools
- Drill/driver + bits
- Measuring tape + square
- Saw (handsaw, circular saw, or miter saw)
- Sander or sanding block
- Clamps (helpful, not mandatory)
- Staple gun (for the liner)
Step-by-Step: Turn a Garden Bench Into a Planter (Upcycle Method)
1) Check structure first (soil is heavy and unforgiving)
Tighten every screw and bolt. If joints are loose, fix them nowwood glue and clamps, corner braces, or fresh hardware can make a “wobbly but fine” bench genuinely stable.
Reality check: If you wouldn’t trust the bench to support an adult, don’t ask it to support a wet container garden.
2) Remove the seat and use the frame as your template
Flip the bench over and unscrew the seat slats. Many successful conversions remove the seat support too, then use that support as the measuring template for the planter box. It’s a smart shortcut: you’re building a box that fits the space you already have.
3) Build the planter box to fit the opening
Cut the front and back boards to match the length of the seat support. Cut the end boards to fit between them. Dry-fit before fastening so you can adjust for outdoor wood that isn’t perfectly straight (because it never is).
Pocket holes make clean, strong joints, but standard pre-drilled screws work fine. Use exterior-rated screws so the first rainstorm doesn’t turn your project into a rust museum.
4) Add a bottom that drains properly
You have two reliable drainage-friendly approaches:
- Slatted bottom: attach slats with small gaps between them so water can escape. This is common in bench conversions because it’s simple and strong.
- Solid bottom + holes: install an exterior-rated bottom (like plywood), then drill multiple drainage holes.
Skip the rock-layer myth. Adding a thick layer of rocks or gravel to “improve drainage” can actually keep roots sitting in a saturated zone. Better drainage comes from actual exit holes, breathable lining, and the right potting mixnot a rock collection.
5) Attach the planter box to the bench frame
Center the box where the seat used to be. Fasten through the seat support into the planter box with exterior screws. If you’re screwing through thick bench rails or legs, pre-drill to avoid splitting.
6) Weather-proof the wood (because water always shows up uninvited)
Sand rough edges and seal exposed cut ends (end grain is like a strawwater loves it). Then paint or stain with an exterior-rated finish. For extra durability, apply a clear outdoor sealer after paint/stain cures.
7) Line the planter with a breathable barrier
Staple porous landscape fabric inside the planter. This keeps wet soil from sitting directly against the wood while still letting water drain out. It also keeps potting mix from escaping through gaps or holes.
8) Fill with potting mix, not garden soil
Potting mix is formulated for containers: it’s lighter, drains better, and stays airier than in-ground soil. Garden soil compacts in containers and can hold moisture too longbad for roots and bad for the wood.
9) Plant it like you hired a designer (even if you didn’t)
A bench planter sits at a great viewing height, so use a simple strategy: thriller, filler, spiller.
- Bright porch combo: dwarf canna (thriller) + calibrachoa (filler) + sweet potato vine (spiller)
- Pollinator combo: salvia (thriller) + zinnias (filler) + alyssum (spiller)
- Herb combo: rosemary (thriller) + basil and thyme (fillers) + trailing oregano (spiller)
Design Upgrades That Make It Look Custom
Use removable pots inside the bench planter
Instead of filling the box with soil, place nursery pots inside. This makes seasonal swaps dramatically easier and reduces constant moisture against the wood. Add an internal slat “shelf” if you need a level base for the pots.
Add trim for a finished look
A simple top cap (like 1×2 trim) hides liner staples and gives clean edges. Decorative trim (like an X pattern) can help the planter match porch railings or fence details.
Consider a self-watering upgrade
If the bench sits in full sun, a self-watering reservoir setup can stretch time between waterings. Just include an overflow hole so the reservoir never becomes standing water.
Wood Choice and Safety Notes (Especially for Edibles)
For flowers, choose what’s durable and budget-friendly: cedar and redwood naturally resist decay, while exterior lumber can perform well when sealed and lined.
For herbs or vegetables, pressure-treated wood is a common question. Modern residential pressure-treated lumber is typically copper-based, and extension resources note research showing minimal copper transfer into vegetables in raised beds. Still, avoid unknown reclaimed wood (especially older treated lumber), and use a liner if you want extra separation between soil and wood.
Maintenance and Troubleshooting
Watering
Water until you see drainage, then stop. Containers dry faster than beds, but they also drown faster when drainage is blocked.
Seasonal refresh
Bench planters are made for seasonal swaps: pansies in spring, petunias in summer, mums in fall, and evergreen cuttings or hardy herbs for winter.
Quick fixes
- Soggy soil: add drainage holes, switch to lighter potting mix, remove anything blocking the bottom
- Wood stays damp: re-seal cut ends, improve airflow, confirm liner isn’t trapping water
- Bench feels unstable: add braces, move weight toward legs, or use removable pots to reduce soil volume
- Plants struggle: check sun exposure, fertilize lightly, and don’t overcrowd
DIYer Experiences: Real-World Lessons From Bench-to-Planter Projects
Bench-to-planter conversions look delightfully simple in photos: unscrew a seat, build a box, paint it cute, add flowers, become the main character of your block. In real life, DIYers tend to bump into the same “surprises,” and learning them up front is the difference between a charming feature and a wooden sponge with commitment issues.
Experience #1: Soil weight is no jokeespecially when it’s wet. A bench that felt “fine” as seating can feel completely different once it’s carrying a planter full of damp potting mix. That’s why many successful makeovers start with tightening hardware and repairing joints before the planter goes on. DIYers often mention that adding a simple cross brace between legs, using metal corner brackets, or replacing a few stripped screws can turn a wobbly bench into a solid foundation. The goal is boring stability. Boring is good here.
Experience #2: Drainage is the plot. The most common “my plants died” story is actually “my water had nowhere to go.” When people forget to leave gaps between slats, skip drainage holes, or line the entire box with plastic like they’re waterproofing a canoe, the planter becomes a slow-motion swamp. The best real-world fix is always the same: give water a clear exit and keep the liner breathable. A porous fabric barrier holds soil in place without turning the bottom into a sealed tub.
Experience #3: The rock-layer myth refuses to retire. Plenty of DIYers were taught to put rocks or gravel at the bottom of containers “for drainage.” Then they notice the soil above stays wet longer than expected, especially in deeper planters. Many end up removing the gravel later and switching to better soil structurelighter potting mix, sometimes extra perliteand relying on actual drainage holes. If the real concern is soil escaping, DIYers report that fabric, mesh, or even a simple filter over the holes works far better than a pile of rocks that doesn’t solve the underlying physics.
Experience #4: Paint is a makeover; sealing is a maintenance plan. A fresh paint job delivers instant satisfactionlike a reality show reveal. But outdoors, water will find every cut edge and screw hole. DIYers who get multiple seasons out of their bench planters tend to seal exposed end grain, touch up chips quickly, and accept that outdoor projects need occasional care. Think of it as sunscreen: you don’t apply once in May and call it a decade.
Experience #5: Potting mix choice quietly changes everything. DIYers who used garden soil often describe compacted mix, slow drainage, fungus issues, and plants that never really take off. When they switch to a container mix, the planter becomes lighter, drains better, and roots get more oxygenbetter for plants and easier on the bench frame. This matters more in bench planters than in ground beds because you’re managing both plant health and structural load.
Experience #6: Removable pots can save your sanity. Bench planters practically beg for seasonal styling, but scooping out an entire box of soil every few months gets old fast. DIYers who place nursery pots inside the bench planter say it’s easier to rotate color, easier to control watering, and easier to protect the wood from constant wetness. It also makes winterizing simpler: you can lift pots out without relocating the whole bench.
Experience #7: Placement is half the project. A bench planter under roof runoff can become soggy no matter how well you built it. Put it against a south-facing wall and reflected heat can dry it out twice as fast. DIYers often move their bench after the first season once they realize how wind, shade patterns, and nearby surfaces affect moisture. The sweet spot is predictable sun, no surprise water dumping, and easy hose accessbecause a project you can water easily is a project that survives.
If you take one thing from the collective DIY experience, take this: build for drainage, plan for weight, and finish for weather. Do that, and your “retired” bench becomes a hardworking garden feature that earns compliments instead of spiders.