Table of Contents >> Show >> Hide
- Why a Headboard Is Worth the Effort
- Before You Build: Get Off the Bench With a Quick Game Plan
- Project 1: The No-Sew Upholstered Headboard (Beginner-Friendly, High Impact)
- Project 2: Board-and-Batten “Headboard Wall” (Painted, Architectural, Surprisingly Doable)
- Project 3: Rustic Reclaimed Wood Headboard (Warm, Textural, Full of Personality)
- Project 4: Modern Slat or Woven Headboard (Simple Geometry, Big Design Energy)
- Project 5: The Floating Shelf Headboard (Storage + Style + “Where Did You Buy That?”)
- Project 6: The “Bench-to-Headboard” Flip (Because the Title Demands It)
- Finishing Touches That Make Any Headboard Look “Done”
- Common Headboard Mistakes (and How to Fix Them)
- Conclusion: Build the Headboard, Win the Bedroom
- Experience Add-On: of Real-Life “Headboard Lessons”
If your bedroom feels like it’s missing “something,” there’s a strong chance that something is a headboard. Not because a headboard is required (beds work fine without one), but because it’s the easiest way to make a room look finishedlike it graduated from “temporary mattress situation” to “adult human habitat.”
And here’s the fun part: headboards are one of the most forgiving DIY upgrades you can tackle. You can build one with wood, fabric, paint, a shelf, a few screws, or even a rescued bench that’s been waiting in the garage like a retired athlete. This guide rounds up multiple DIY headboard projectsfrom beginner-friendly upholstered builds to statement-making wood designsplus practical tips so your results look intentional (not “I tried my best at 11:47 p.m.”).
Why a Headboard Is Worth the Effort
A good headboard does three jobs at once:
- Visually anchors the bed so the whole room looks designed, not assembled.
- Protects your wall from pillow smudges, scuffs, and the mysterious marks that appear when you swear you never touch the wall.
- Adds comfort if you like sitting up to read, scroll, journal, or pretend you’re going to sleep early.
Before You Build: Get Off the Bench With a Quick Game Plan
Most DIY headboard “fails” aren’t caused by bad tastethey’re caused by skipping three minutes of planning. Here’s the short checklist that saves hours later.
1) Pick Your Headboard Type: Wall-Mounted or Bed-Mounted?
- Wall-mounted looks sleek, can be taller, and won’t wobble when the bed shifts. It does require finding studs or using the correct anchors.
- Bed-mounted attaches to the frame (or sits on legs behind it). This is great for renters or people who don’t want to mount anything heavy on the wall.
Pro tip: If you want a thick upholstered headboard, wall-mounting often looks more “custom,” while a simple wood plank headboard can go either way.
2) Size Cheat Sheet: How Wide Should It Be?
In general, you have two flattering options:
- Flush width: Same width as the mattress for a clean, modern look.
- Overhang: 2–6 inches wider per side for a more luxe, framed-in vibe.
Height is personal. A shorter headboard (18–30 inches above the mattress) feels minimal. A taller one (40+ inches above the mattress) brings dramalike your bed has a stage name.
3) Safety and Sanity Basics
- Use eye protection when cutting or drilling. Wood chips have zero respect for your corneas.
- If you’re mounting to the wall, locate studs and avoid drilling where wiring might be (around outlets/switches).
- Sand sharp edges and corners. Your shins will eventually find them.
Project 1: The No-Sew Upholstered Headboard (Beginner-Friendly, High Impact)
If you want the “boutique hotel” look without paying boutique hotel prices, start here. Upholstered headboards are mostly cutting, wrapping, and staplingno sewing required (unless you choose fancy details).
Materials
- Plywood (commonly 1/2″ to 3/4″) cut to your desired size
- Upholstery foam (about 3/4″ to 2″ thick)
- Quilt batting (softens edges and hides foam seams)
- Fabric (durable upholstery fabric, canvas, or heavy linen blends work well)
- Spray adhesive (optional but helpful)
- Staple gun + staples
- Hanging method: heavy-duty D-rings, Z-clips, or a French cleat
Steps
- Cut and prep the base. Round corners if you want a softer silhouette. Lightly sand edges.
- Attach foam. Cut foam to match the plywood. Use spray adhesive or a few staples around the perimeter to keep it from shifting.
- Add batting. Lay batting over the foam and wrap it around the back. Staple every few inches, pulling snug but not so tight you dent the foam.
- Wrap with fabric. Iron/steam the fabric first (wrinkles will haunt you). Center the board face-down on the fabric, wrap to the back, and staple. Work from the middle outward: top, bottom, then sides.
- Make crisp corners. Fold like a present: smooth, flat, and not bulky. If it’s bulky, trim excess batting/fabric before stapling.
- Mount securely. Wall-mounting gives a clean look. If you bed-mount, add legs or attach brackets to the frame.
Style upgrades (still easy): Add nailhead trim along the border, use a patterned fabric, or make it extra-tall by extending it higher behind the bed for a dramatic focal point.
Project 2: Board-and-Batten “Headboard Wall” (Painted, Architectural, Surprisingly Doable)
This is the project that makes people say, “Wait… that’s DIY?” It’s basically trim boards arranged in a simple grid or vertical pattern, creating an accent wall that functions like a built-in headboard.
Why it works
- It’s mostly measuring, cutting, and nailing (or using construction adhesive in some setups).
- It looks custom even in small rooms.
- It can span wider than the bed, making the whole space feel bigger.
Design tip
A common visual spacing for battens is around 16–18 inches between vertical pieces, but you can adjust based on wall width and how many panels you want.
Basic steps
- Plan the layout. Mark where your bed sits and decide how wide the “headboard wall” should be (bed width, or wider for a grand look).
- Attach a top rail (optional). A horizontal rail gives a finished frame effect.
- Install vertical battens. Use a level. Keep spacing consistent. If you’re nailing, hit studs where possible; if you’re using adhesive, follow product cure times.
- Fill, sand, and caulk. This step is what makes it look professional. Don’t skip it unless you enjoy “visible DIY evidence.”
- Paint. Satin or eggshell is durable. A bold color behind the bed can look incredible.
Fun twist: Add a picture ledge or slim shelf inside the “frame” area for art, plants, or small décor (just keep it shallow so pillows don’t constantly bonk into it).
Project 3: Rustic Reclaimed Wood Headboard (Warm, Textural, Full of Personality)
This one is for anyone who loves a cozy, layered lookfarmhouse, cabin, modern rustic, even boho. You’re essentially creating a wood “panel” that sits behind the bed, using planks or reclaimed boards for character.
What you’ll need
- Plywood backer (often 1/2″)
- Planks (new boards, fence pickets, or reclaimed lumber)
- Wood glue + brad nails or screws
- Sander + finish (stain, paint, or clear coat)
Build approach
- Cut your plywood backer. This sets the final size and keeps the build sturdy and flat.
- Lay out your boards. Mix tones and grain direction for a natural, “collected” lookor keep it uniform for a cleaner style.
- Attach boards. Use glue and nails/screws. Stagger seams so it looks intentional, not like a wood jigsaw puzzle you gave up on.
- Finish it. Sand splinters and seal the surface. If you want a lighter look, consider a wash-style stain or a matte clear coat.
Important safety note: If you’re using reclaimed material, make sure it’s clean, dry, and stable. Avoid wood with mystery chemicals, heavy odors, or flaky finishes.
Project 4: Modern Slat or Woven Headboard (Simple Geometry, Big Design Energy)
Slat headboards are the sweet spot between “I built this” and “I bought this from a modern furniture studio.” They’re also flexible: vertical slats feel taller, horizontal slats feel wider, and angled patterns add movement.
Two easy variations
- Vertical slats: Attach evenly spaced slats over a backer board. Great for a mid-century vibe.
- Woven wood strips: Use thin plywood strips woven over/under for a textured pattern that looks high-end.
Success tips
- Use spacers (scrap wood) to keep gaps consistent.
- Pre-finish boards before assembly to avoid awkward brush strokes in tiny crevices.
- Choose a finish that matches other wood tones in the room (nightstands, floors, dresser).
Project 5: The Floating Shelf Headboard (Storage + Style + “Where Did You Buy That?”)
If your nightstand is always doing the mostphone, water, book, charger, lip balm, and the random hair tie you swear you didn’t put therea shelf headboard can calm the chaos. This design can be as simple as a sturdy ledge or as advanced as built-ins with lights.
Smart features you can add
- Integrated reading lights (mounted above or on the shelf)
- Hidden cable management (leave a channel behind the shelf or drill a neat pass-through)
- LED strip lighting for a soft glow
Mounting guidance
A French cleat or similar cleat system is a strong option for wall-mounted builds because it distributes weight and allows a secure “hang and lock” fit. For heavier headboards, attach to studs whenever possible.
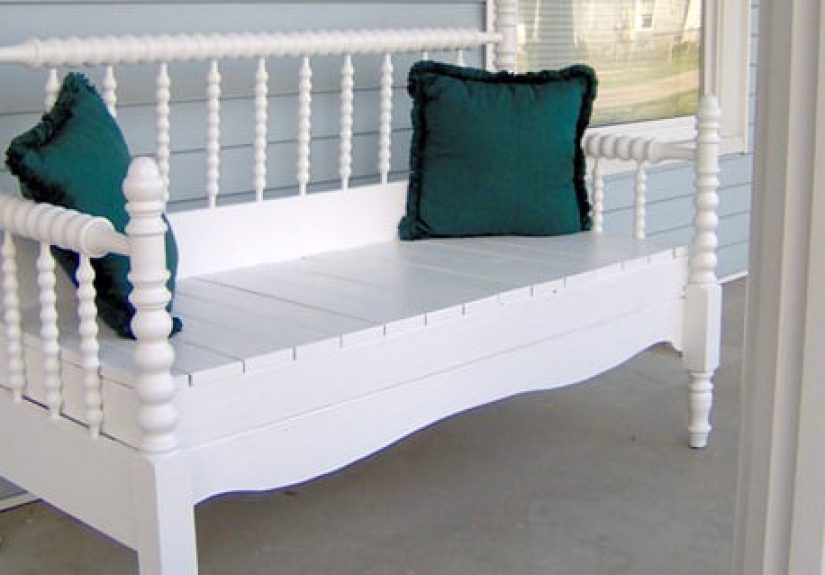
Project 6: The “Bench-to-Headboard” Flip (Because the Title Demands It)
Okay, let’s talk about the bench. If you’ve got an old bench, pew, or even a sturdy bench backrest (thrifted, inherited, or curb-saved), you can turn it into a one-of-a-kind headboard that looks collected and charminglike your bedroom has stories.
How it works
- Option A: Use the bench back as the headboard. Remove it from the base if possible, sand it, refinish it, and mount it to the wall or attach it behind the bed frame.
- Option B: Use the full bench as a headboard shelf. Place it behind the bed (if space allows) so the bench acts like a shallow console for pillows and décor. This is best in larger rooms.
What to watch for
- Check stability. If it wobbles, reinforce joints before it goes anywhere near your pillow zone.
- Sand and seal. Old finishes can flake, and splinters are not a bedroom accessory.
- Mind the depth. Keep it shallow enough so your bed can sit comfortably without awkward gaps.
Bonus style idea: Paint the bench/headboard a bold color and keep surrounding bedding neutral. That contrast looks designer without the designer invoice.
Finishing Touches That Make Any Headboard Look “Done”
- Trim and edging: Wood trim can hide plywood edges and instantly elevate the look.
- Nailhead trim: Adds a tailored vibe to upholstered builds with minimal effort.
- Protective topcoat: Especially for wood headboardskeeps surfaces easier to clean and prevents stains.
- Symmetry helpers: Matching sconces, art, or pillows can make even a simple headboard look intentional.
Common Headboard Mistakes (and How to Fix Them)
Mistake: The headboard looks “too small”
Fix: Go wider (a few inches per side) or add vertical height. If rebuilding isn’t an option, frame it with wall sconces or art to visually expand the zone.
Mistake: Upholstered fabric looks wavy
Fix: Re-staple from the center outward, pulling evenly. Steam the fabric lightly if the material allows.
Mistake: Wall-mounted headboard isn’t level
Fix: Mark a level line first, then mount cleats or brackets to that line. Tiny misalignments look huge behind a bedbecause beds are basically symmetry spotlights.
Mistake: The wood headboard feels rough or “unfinished”
Fix: Sand more than you think you need, then seal. A matte clear coat can keep the natural look while making it feel smooth and intentional.
Conclusion: Build the Headboard, Win the Bedroom
Headboard projects hit the DIY sweet spot: they’re noticeable, customizable, and achievable without turning your home into a month-long construction zone. Whether you go upholstered and cozy, board-and-batten and architectural, reclaimed wood and rustic, or shelf-style and practical, the best headboard is the one that fits your space and how you actually live.
So yesget off the bench. Your bedroom is ready for its glow-up. And your wall is ready to stop being a pillow’s sworn enemy.
Experience Add-On: of Real-Life “Headboard Lessons”
The first time I tackled headboard projects, I learned something important: a headboard is basically a giant confidence test disguised as décor. You start off thinking, “This is simple. It’s just a rectangle.” Then, 30 minutes later, you’re staring at fabric like it personally betrayed you, wondering why corners are shaped like corners.
Lesson one: steam your fabric. I once thought, “Eh, the wrinkles will relax.” Spoiler: they didn’t. They stayed there like they were paying rent. The second I finally steamed the fabric before stapling, everything looked ten times more polished. It’s not the glamorous part of DIY, but neither is explaining to visitors why your headboard looks like it slept in its clothes.
Lesson two: work from the center outward. When wrapping batting and fabric, it’s tempting to just start stapling wherever your hands land. That’s how you get lopsided tension and waves across the front. The moment I started stapling the middle of the top edge, then the middle of the bottom edge, and working outward in small steps, the fabric suddenly behaved. Not perfectlyfabric is still fabricbut enough that I stopped negotiating with it like it was a wild animal.
Lesson three: your wall will reveal your math skills. If you mount a headboard even slightly off-level, your eyes will notice every single time you walk into the room. I’ve seen tiny crookedness turn a beautiful headboard into a permanent optical illusion. Now I always mark a level line first, measure from multiple points (because floors and baseboards can lie), and do a quick “step back and squint” check before drilling anything. It’s the DIY equivalent of proofreading: mildly annoying, incredibly necessary.
Then there’s the “bench” momentrepurposing something old. Flipping a bench back into a headboard taught me the best design trick of all: character beats perfection. A few dents, interesting grain, or a slightly worn edge can make a room feel warmer and more personal than a flawless, factory-new piece. Of course, I still sanded it (splinters are not charming), but I didn’t try to erase every sign of age. The result looked collected, not cookie-cutter.
Finally, the biggest takeaway: headboards are forgiving. If you mess up a cut, you can trim it. If the stain looks weird, you can sand and recoat. If the fabric pattern is off, you can re-staple and try again. Headboard projects are a perfect place to build DIY confidencebecause even when you learn the hard way, you still end up with a bedroom that looks better than when you started. And honestly? That’s a win worth getting off the bench for.