Table of Contents >> Show >> Hide
- Why Build a Loft Bed in the First Place?
- Before You Build: The Non-Glamorous but Very Important Planning Stage
- Materials and Design Choices That Actually Matter
- How to Build a Loft Bed: 10 Smart Steps
- Safety Rules You Should Treat Like Actual Rules
- Good Design Ideas for the Space Underneath
- Common Mistakes That Ruin an Otherwise Great Loft Bed
- How Much Does It Cost to Build a Loft Bed?
- Final Thoughts
- Extra Experience-Based Tips: What Real Loft Bed Builds Teach You
- SEO Tags
If your bedroom feels like it’s being held hostage by a regular bed, a loft bed can be the jailbreak plan. Raise the mattress, reclaim the floor, and suddenly that tiny room has space for a desk, dresser, reading nook, gaming setup, or the laundry basket you keep pretending is “temporary.” A well-built loft bed is practical, stylish, and surprisingly satisfying to create. It also demands careful planning, solid materials, and a healthy respect for gravity, because this is one DIY project where “close enough” is a phrase best left in the junk drawer.
This guide walks through how to build a loft bed in a way that looks good, works hard, and stays safe. You’ll learn how to choose the right size, design a sturdy frame, add guardrails and a ladder, anchor the structure properly, and avoid the little mistakes that turn a smart space-saving bed into a wobbly regret machine. For younger users, this is an adult-level project and should be built by a capable adult, not by a kid with ambition and a drill bit.
Why Build a Loft Bed in the First Place?
A DIY loft bed makes sense when you need more function from the same square footage. In a child’s room, the space underneath can become a study area, toy storage zone, or cozy reading cave. In a teen room, it can fit a desk, clothing rack, or compact lounge setup. In a studio apartment or guest room, a wood loft bed can turn vertical space into usable living space without asking your walls to perform miracles.
The biggest advantage is flexibility. Store-bought loft beds often force you into one layout, one ladder position, one height, and one style. Building your own means you can match the mattress size, ceiling height, room footprint, and storage needs. In other words, you stop shopping around for a bed that sort of works and start building one that actually does.
Before You Build: The Non-Glamorous but Very Important Planning Stage
Measure the room like your future comfort depends on it
Because it does.
Start with ceiling height, wall placement, doors, windows, vents, light fixtures, ceiling fans, and outlets. A loft bed that looks amazing in your sketch can become ridiculous in real life if the sleeper sits up and bonks the ceiling every morning like it’s part of the wake-up routine. You want enough clearance above the mattress for sitting up comfortably, changing sheets without acrobatics, and getting in and out of bed without becoming a case study in poor planning.
Then map the floor below. Decide what will live under the bed: a desk, dresser, open storage, play zone, beanbag kingdom, or all of the above. This step helps determine the bed height, ladder position, and whether you should build a straight ladder, angled ladder, or compact stair unit.
Choose the mattress size first
Don’t design the frame and then “see what mattress fits.” That’s how people end up rage-measuring at 10 p.m.
For most loft bed plans, a twin mattress is the easiest starting point. It works well in children’s rooms, narrow bedrooms, and compact layouts. A twin XL is useful for taller sleepers, while a full-size mattress gives more sleeping room and works better for teens, adults, or guest rooms. The tradeoff is simple: more mattress means more frame width, more lumber, more weight, and less open space below.
If you’re building for an upper sleeping platform, keep mattress profile in mind too. A thinner mattress usually works better in a loft or bunk-style setup because it leaves more visible guardrail above the top edge of the mattress.
Decide who will use the bed
This question affects nearly every design choice. A loft bed for a small child should prioritize lower height, easy climbing, generous guardrails, and softer surrounding finishes. A loft bed with desk for a teen may need more headroom below, more weight capacity, and a sturdier ladder. An adult loft bed often benefits from thicker framing, additional bracing, and a simpler, more architectural look.
Materials and Design Choices That Actually Matter
Use quality lumber
A loft bed is furniture, not temporary framing. Choose straight boards with minimal twisting, fewer knots, and no major cracks. This is not the time to bring home bargain-bin boards that look like they spent the weekend wrestling. Better lumber makes the build stronger, the assembly easier, and the final bed less likely to wobble or squeak.
Most DIY builders use a combination of dimensional lumber and plywood. Common choices include 2x4s for legs or support structure, 2x6s for side rails, 2×2 cleats for slat support, and plywood for platforms, desk surfaces, or stair carcasses. If you want a cleaner finish, you can also trim visible edges with sanded boards or hardwood facing.
Pick your support style
There are three common approaches:
- Freestanding loft bed: Easiest to understand structurally and best when you cannot rely on walls for support everywhere.
- Wall-attached loft bed: Great for tight rooms and often feels sturdier because one side and sometimes one end are secured into studs.
- Hybrid design: Part freestanding, part wall-supported, which is often the smartest solution for bedrooms.
For many rooms, a wall-attached or hybrid setup is the sweet spot. It reduces sway and makes the loft bed feel built-in rather than dropped in from another dimension.
Don’t forget lateral bracing
Vertical strength is only half the story. A loft bed can be made from thick lumber and still feel shaky if it lacks diagonal support, rigid corner connections, or a well-secured wall attachment. Cross braces, plywood panels, stretcher rails, and tight joinery all help resist side-to-side movement. That is the difference between “solid” and “why is the bed doing jazz hands?”
How to Build a Loft Bed: 10 Smart Steps
1. Create a scaled plan
Sketch the loft bed from the front, side, and top. Mark mattress dimensions, post placement, ladder location, rail height, and the footprint below. Also decide whether you want the ladder at the short end or long side. This drawing does not need to look like it belongs in an architecture museum, but it should be clear enough that you can make a cut list from it.
2. Build the main bed frame
The frame is the rectangle that holds the mattress and transfers weight to the supports. Use sturdy side rails and end rails, and confirm the inside dimensions match your mattress with a little tolerance for bedding. Too tight and the mattress fights you. Too loose and it shifts around like it pays no rent.
Joinery can include structural screws, lag screws, bolts, pocket-hole joinery backed by glue, or a combination depending on your design. The goal is a square, rigid frame with no twist.
3. Add cleats and mattress support
Install 2×2 cleats or ledgers along the inside of the long rails. These will support the slats or platform deck. Then add evenly spaced wood slats or a properly supported plywood deck. Good support matters more than people realize. A mattress should not sag between gaps, and the support system should be fastened well enough that it cannot shift or drop.
4. Construct the legs or wall supports
For a freestanding loft bed, build strong corner legs and connect them to the frame with secure fasteners. For a wall-supported build, attach ledger boards or rails into studs using appropriate structural hardware. If the room has concrete or masonry walls, use anchors designed for that material. This is one of those moments where guessing is not a strategy.
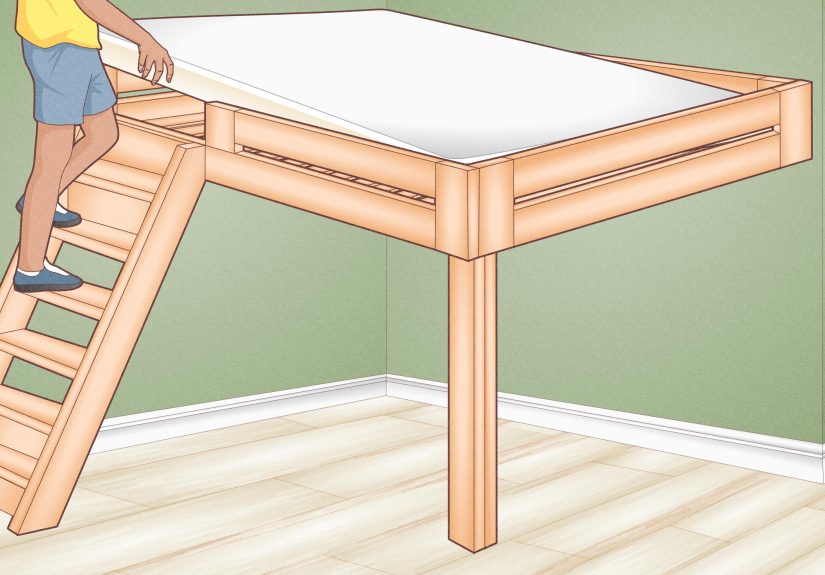
5. Lift and assemble the platform
This is not a one-person magic trick. Get help. Position the frame at the planned height, attach it to the legs or wall supports, and keep checking for level and square during assembly. If the platform is slightly off now, it will not politely correct itself later.
6. Install guardrails
Guardrails are non-negotiable on a raised sleeping platform. Add rails along the exposed sides and any opening where a sleeper could roll or shift out. The rail design should prevent large gaps and should rise clearly above the mattress top. If the bed is for a child, take this part especially seriously. Loft bed safety is not a decorative accessory.
7. Build the ladder or stairs
A straight ladder saves space and works well for older kids, teens, and adults. Angled ladders are easier to climb but need more floor area. Stairs are the most comfortable option and can double as storage, but they add bulk and weight. Whichever route you choose, make sure the climb feels natural, the handhold points are obvious, and the attachment is firm.
Comfort matters here. If the ladder hurts to climb, people will avoid using it carefully. Rounded edges, consistent rung spacing, and a stable landing point all improve daily use.
8. Sand everything thoroughly
Every edge that touches hands, feet, knees, or sleepy foreheads should be smoothed. Sand visible surfaces, ladder rungs, guardrails, and corners. This step improves both safety and appearance. A great loft bed should not feel like it was assembled from leftover splinters and optimism.
9. Finish the wood
Paint, stain, or clear-coat the loft bed depending on the room style. A clear finish highlights solid wood and looks timeless. Paint works well in kids’ rooms and modern spaces. Stain can give the build a warmer, furniture-grade look. Let the finish cure fully before adding bedding and daily use items.
10. Test, tighten, and live with it for a day
Before anyone sleeps up there, check every fastener, every anchor point, every slat, and every rail. Give the bed a controlled shake. Climb up and down. Sit, shift, and move around on the platform. If you hear squeaks, feel sway, or notice even mild flexing, fix it now. The bed should feel boringly stable. That’s the dream.
Safety Rules You Should Treat Like Actual Rules
Because loft beds work like bunk-style upper sleep spaces, many of the same safety lessons apply. If the loft bed is for a child, younger children should not use the upper sleeping surface. The mattress should fit properly, guardrails should remain effective above the mattress line, and the support underneath the mattress should be strong and secured. Place the bed away from ceiling fans, use a night-light near the ladder if needed, and discourage climbing games, jumping, or “look what I can do” performances.
Also, be realistic about the user. A loft bed is a smart space-saving bed, but it is not the right solution for every person. Sleepwalkers, people with mobility limitations, or anyone likely to get up half-awake and disoriented may be better served by a lower bed.
Good Design Ideas for the Space Underneath
Loft bed with desk
This is the classic move and for good reason. A desk below the bed turns vertical space into a real workstation. Add task lighting, cable management, a shelf above the desk surface, and maybe one drawer for the mysterious objects that multiply near homework.
Storage zone
Dressers, cubbies, wardrobes, and rolling bins all work well below a custom loft bed. This approach is ideal when closet space is limited. Leave enough clearance so drawers can fully open without starting a turf war with the ladder.
Lounge or reading nook
In a teen room or guest room, the open space below can hold a compact loveseat, floor cushions, book ledges, or a small media setup. This gives the room a built-in look without actually rebuilding the whole room.
Common Mistakes That Ruin an Otherwise Great Loft Bed
- Building too high: More height sounds exciting until bed-making feels like mountaineering.
- Using a mattress that is too thick: It reduces the effective guardrail height.
- Ignoring wall studs: Drywall is not a structural partner.
- Choosing weak or warped boards: Cheap lumber gets expensive when you rebuild.
- Forgetting daily use: A beautiful loft bed that is annoying to climb will age poorly.
- Skipping test assembly logic: If you cannot explain how it bears weight, don’t trust it.
How Much Does It Cost to Build a Loft Bed?
The price depends on size, lumber quality, hardware, finish, and whether you add a desk, drawers, or stairs. A simple DIY loft bed can be budget-friendly compared with a high-quality retail model, especially if you already own tools. But this is not a project where cutting corners pays off. Spend on structural hardware, straight lumber, and safe anchoring. Save money on décor pillows later when your wallet has emotionally recovered.
Final Thoughts
Learning how to build a loft bed is really about solving a room problem in a smart, lasting way. The best loft bed plans balance structure, comfort, and everyday practicality. They look intentional, not improvised. They feel sturdy, not hopeful. And they make the room work better from top to bottom.
If you take your time with measuring, choose solid materials, design around the user, and follow loft bed safety principles from the start, you can build something that feels custom because it is custom. And that’s the beauty of it: a loft bed is not just a place to sleep. It’s a space multiplier with pillows.
Extra Experience-Based Tips: What Real Loft Bed Builds Teach You
One of the most common experiences people have after building a loft bed is realizing that the hardest part was not the frame. It was the planning. Builders often start out thinking the project is mostly about lumber, screws, and a free weekend. Then they discover that room layout, mattress thickness, ladder comfort, and ceiling clearance are the details that make or break the final result. On paper, a loft bed can look brilliant. In real life, an extra two inches of mattress height or a poorly placed ladder can change the whole experience.
Another lesson that comes up again and again is that stability feels different in person than it does in a drawing. A design can seem structurally sound and still feel annoyingly shaky once someone climbs into bed. Many first-time builders end up adding extra bracing after the initial assembly, not because the bed is unsafe, but because a little side-to-side movement makes the whole thing feel less trustworthy. The builders who are happiest with their final project usually overbuild a little. Not wildly, not dramatically, but enough that the bed feels solid even when someone rolls over, climbs down in the dark, or flops onto the mattress after a long day.
Parents who build loft beds for kids often say the under-bed space becomes the real star of the project. What starts as “just a bed” quickly turns into a study station, reading hideout, LEGO headquarters, or storage zone that makes the whole room function better. That is usually the moment the project feels worth it. Suddenly the room looks less crowded, the floor opens up, and the bed starts acting like furniture with a purpose instead of furniture that simply exists.
People building loft beds for teens or adults usually report a different kind of win: visual order. In small bedrooms, studio apartments, and guest rooms, a loft bed creates the feeling of zones. Sleep goes above. Work, storage, or lounging goes below. That separation can make a compact room feel more organized, even when the square footage has not changed at all. It is a design trick, yes, but also a psychological one. The room stops feeling cramped and starts feeling intentional.
There are also predictable regrets. The biggest one is building too high. It sounds smart at first because more height means more room underneath. But once sheets need changing or someone sits up too fast, that extra height loses its charm. Another common regret is choosing a ladder that looks sleek but feels awkward. Daily comfort matters. A loft bed gets used over and over, and the ladder is part of that repeated experience. Good builders learn quickly that “minimal” and “pleasant to climb half asleep” are not always the same thing.
In the end, the best experiences come from loft beds that respect real life. They are safe, sturdy, easy to use, and tailored to the room. They do not just photograph well. They work well. And when a piece of furniture saves space, improves the room, and makes you feel a tiny bit smug every time you look at it, that is a pretty satisfying return on a pile of lumber.