Table of Contents >> Show >> Hide
- What a Retaining Wall Actually Does
- Before You Build: The Planning Stage Matters More Than People Want It To
- Tools and Materials
- How to Build a Retaining Wall Step by Step
- Common Retaining Wall Mistakes
- When to Call a Pro
- How Long Will a Retaining Wall Last?
- Real-World Experiences and Lessons From Retaining Wall Projects
- Conclusion
If your backyard has a slope that turns mowing into a calf workout and rainstorms into a mud parade, a retaining wall can be a smart fix. Built well, it holds back soil, reduces erosion, creates flatter usable space, and gives your landscape a more finished look. Built poorly, it becomes an expensive lesson in gravity. The good news is that a small retaining wall is a realistic DIY project for many homeowners, especially if you use interlocking concrete retaining wall blocks. The trick is understanding one hard truth early: a retaining wall is not just a stack of pretty blocks. It is a drainage system disguised as landscaping.
This guide walks through how to build a retaining wall step by step, with a focus on the most DIY-friendly option: a segmental concrete block wall. You will also learn when a wall crosses the line from weekend project to “please call an engineer before the hill calls you first.”
What a Retaining Wall Actually Does
A retaining wall is designed to resist the pressure of soil pushing against it. That pressure increases when the soil gets wet, when the wall gets taller, or when extra weight sits above it, such as a driveway, patio, fence, parked vehicle, or slope. That is why the best retaining walls are not only strong in front, but smart behind the scenes. They need a solid base, proper backfill, reliable drainage, and a slight backward lean or setback so the wall works with the hill instead of arguing with it.
For most homeowners, interlocking retaining wall blocks are the easiest material to work with. They are made for dry stacking, many include a rear lip or locking edge, and they create a neat, stable wall without mortar. Natural stone looks fantastic, timber has a rustic charm, and poured concrete is strong, but for a first-time DIY build, concrete retaining wall blocks usually offer the best mix of durability, forgiveness, and straightforward installation.
Before You Build: The Planning Stage Matters More Than People Want It To
Planning is the part everybody wants to skip because it is less exciting than swinging a shovel. Unfortunately, it is also the part that keeps your finished wall from doing an interpretive dance after the first heavy rain.
Call 811 Before Digging
Do this before the first shovel goes into the ground. Buried utility lines can be shallower than expected, and retaining wall projects often involve trenching. Having utilities marked is not optional common sense; it is the first real step of the job.
Check Local Codes and Permit Rules
Retaining wall permit rules vary by location. In many places, walls around 4 feet high, measured from the bottom of the footing to the top of the wall, may trigger permit or engineering requirements. Some jurisdictions require permits at lower heights if the wall is near a slope, supports surcharge loads, or is part of a tiered system. Translation: do not assume your town shares your optimism.
Decide Whether Your Wall Is Truly DIY-Friendly
A low garden wall is one thing. A tall retaining wall holding back a steep slope is another animal entirely. A good rule of thumb is this: if the wall is tall, if water naturally collects there, if the soil is very clay-heavy, or if there is anything important above or below the wall, bring in a professional. Many manufacturers publish residential guidance for shorter walls, but once you move into reinforced or taller wall territory, design gets more technical fast.
Study the Water
Look at your yard after rain. Does water run toward the wall area from a roof downspout, driveway, or uphill grade? If yes, solve that problem before or during the build. Surface water flowing downhill is one of the biggest reasons retaining walls fail. Sometimes the smartest move is not making the wall stronger; it is redirecting the water so the wall has less work to do.
Tools and Materials
For a basic segmental retaining wall, you will typically need retaining wall blocks, cap blocks, crushed stone or wall rock, paver base or compactable base aggregate, landscape fabric or filter fabric, drainage pipe if needed, stakes, mason’s line, a shovel, hand tamper or plate compactor, level, mallet, measuring tape, rake, wheelbarrow, work gloves, and safety gear. If your wall includes cuts, you may also need a masonry saw, splitter, or chisel depending on the block system.
How to Build a Retaining Wall Step by Step
1. Lay Out the Wall
Mark the location with stakes and mason’s line, or use marking paint for curves. Stand back and check how the wall fits the yard. Straight walls look crisp and formal. Curved walls often blend better with the landscape and can distribute pressure nicely. Either way, now is the time to catch awkward design choices before they become permanent concrete poetry.
2. Excavate the Trench
Dig a trench that is wide enough to support the block system and the base. For many block walls, the trench ends up about twice the width of the wall unit. Depth varies by product and site conditions, but the usual idea is the same: you need room for compacted base material and for the first course of block to sit partially buried. That buried first course is not wasted effort. It helps prevent sliding and gives the wall a grounded, stable start.
Remove topsoil and any loose or organic material. Grass, roots, soft fill, and mushy dirt do not belong under a retaining wall. Your wall wants dense, stable support, not a compost pile with ambition.
3. Install the Base
Add your crushed stone or approved base material in lifts and compact it thoroughly. This is one of the most important parts of the entire project. A retaining wall can forgive small cosmetic mistakes. It does not forgive a lazy base. The finished base should be level front to back and along the full length of the wall. Take your time here. Every minute spent making the base perfect saves ten minutes of frustration when you start setting block.
Some systems call for about 4 to 8 inches of compacted gravel base. Others vary. Follow the manufacturer’s instructions for the specific block you are using. Product details matter.
4. Set the First Course
Place the first row of blocks carefully and check every block for level side to side and front to back. Then check again, because the first course controls everything above it. If one block is high, low, or twisted, the rest of the wall will happily magnify the mistake. Use a rubber mallet to make small adjustments. Add or remove base material as needed, but avoid the temptation to “fix it later.” Later is how people end up muttering at block number 47.
Most retaining wall systems rely on this base course being partially buried. As you go, backfill behind the first course with gravel to lock it in place and help with drainage.
5. Build the Drainage Zone
This step is where long-lasting walls separate themselves from future cautionary tales. Behind the wall, add clean, free-draining gravel or crushed stone. Many systems call for at least 12 inches of drainage rock behind the wall, though exact requirements vary. The goal is to keep water from building pressure in the soil behind the wall.
Depending on wall height, soil type, and site conditions, you may also need a perforated drainpipe placed at the base behind the wall and routed to daylight. This becomes especially important for taller walls, reinforced walls, poorly draining soils, paved areas, and slopes above the wall. If your site tends to stay wet, do not gamble. Water is undefeated when ignored.
6. Install Filter Fabric Correctly
Use filter fabric between the native soil and the drainage stone, not randomly wherever it happens to be convenient. The purpose is to keep fine soil particles from washing into the gravel and clogging the drainage zone. Think of it as crowd control for dirt. You want water to pass through, but not the soil itself.
7. Stack Additional Courses
Once the first course is perfect, stack the next courses according to the block system. Stagger the joints so the seams do not line up vertically. Many blocks have lips, grooves, pins, or interlocking features that automatically create a slight setback. That slight backward step matters because it helps the wall lean into the retained soil for better stability.
As you add each course, continue backfilling with drainage stone directly behind the wall and approved soil farther back. Compact the backfill in lifts. Do not dump in a huge pile of loose fill and call it done. Compaction adds strength, reduces settling, and helps the wall behave like a system rather than a suggestion.
8. Add Geogrid If the Design Requires It
Some walls need geogrid reinforcement. This mesh-like material extends back into the retained soil and helps tie the wall to the hillside. If your product instructions or engineered plan call for geogrid, follow them exactly. This is not a freestyle moment. Geogrid length, placement, and number of layers depend on wall height, soil conditions, and loading. Taller residential walls and reinforced walls often move into this category.
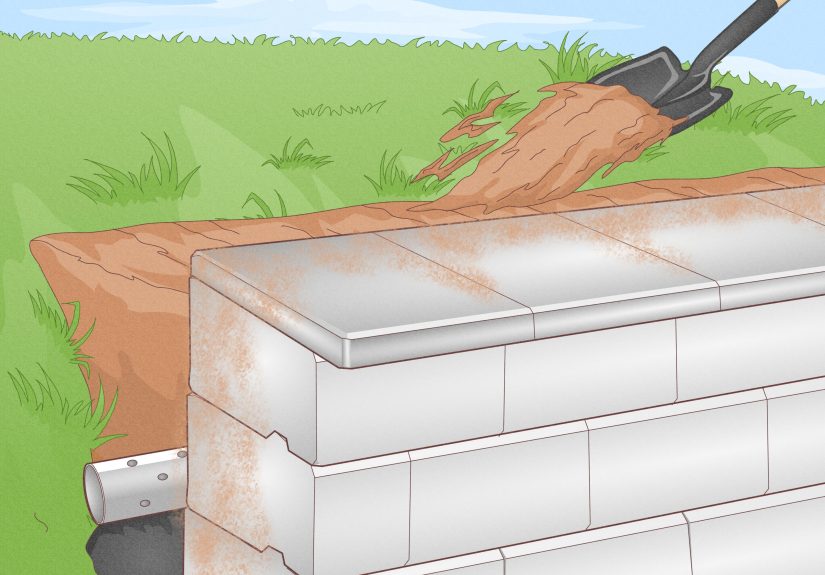
9. Finish With Caps and Final Grading
Install cap blocks using the recommended adhesive if your system calls for it. Then grade the soil at the top of the wall so water drains away from the edge rather than toward it. This final shaping is easy to overlook, but it matters. Even a beautifully built wall can struggle if runoff constantly pours over the top and saturates the backfill.
Common Retaining Wall Mistakes
Poor Base Preparation
If the base is not compacted and level, the wall may settle unevenly, lean, or separate over time.
Bad Drainage
This is the classic wall killer. Water buildup behind the wall adds pressure, weakens soil, and speeds up failure.
Using the Wrong Backfill
Heavy clay packed directly behind the wall is a recipe for trouble. Use the drainage stone and approved fill your system recommends.
Ignoring Setback or Batter
A retaining wall should usually lean slightly into the slope, not outward into the yard like it is trying to escape.
Building Too High Without Engineering
This is where confidence can become a structural load. Tall walls, tiered walls, or walls supporting surcharge need more design work than most DIY guides can safely cover.
When to Call a Pro
Call a professional if your wall is tall, near a house or driveway, below a slope, beside a septic area, in unstable or wet soil, or if local code requires engineering. Also call a pro if you notice groundwater during excavation. Water coming out of the hill is not the kind of surprise bonus anyone wants. It means the wall design may need special drainage details, different backfill, or a different structural approach entirely.
How Long Will a Retaining Wall Last?
A well-built retaining wall can last for decades. Concrete block systems tend to offer good durability with relatively modest maintenance. The biggest factors affecting lifespan are drainage, installation quality, soil conditions, freeze-thaw exposure, and whether the wall was asked to do more than it was designed to handle. In other words, the wall usually does not fail because it got old. It fails because it got wet, overloaded, poorly supported, or all three at once.
Real-World Experiences and Lessons From Retaining Wall Projects
One of the most common experiences homeowners describe after building a retaining wall is surprise at how much of the project happens below grade. Before they start, many imagine the job as stacking blocks until the yard looks better. After they finish, they usually say the hidden work was the real work. Digging the trench, hauling stone, compacting the base, checking level again and again, and setting up drainage took more time than the visible wall itself. That realization is not a disappointment. It is usually the moment they understand why some walls last and some do not make it through the first wet season.
Another common experience comes from people building on clay-heavy soil. At first, the soil can seem solid enough because it feels dense and holds shape well. Then rain arrives, and everything changes. Clay holds water, gets heavier, and pushes harder against the wall. Homeowners who have gone through this often say the biggest lesson was not “use stronger blocks.” It was “respect water.” Once they added proper gravel backfill, redirected a downspout, or installed a drain line to daylight, the whole project made more sense. The wall was never just about resisting soil. It was about managing moisture.
People also learn quickly that the first course can test your patience more than your strength. Many DIY builders spend an hour laying out the wall and then three hours fiddling with the first row of blocks. That can feel slow in the moment, but it pays off beautifully. Once the base course is level and aligned, the next courses move far faster and look dramatically better. Ask anyone who rushed the first row and they will tell you the same thing, usually with the tone of someone recalling a regrettable haircut.
Curved walls create their own learning curve. Homeowners love the softer look, but curves can require extra cuts, tighter attention to joint spacing, and more thought about how caps will finish. The payoff is often worth it. A curved retaining wall can make a yard feel more natural and custom, especially when it follows the slope instead of fighting it.
Many homeowners also discover that retaining walls change how they use the yard. What started as erosion control becomes a planting bed, a seating edge, a clean border for a patio, or the first step in turning a difficult hillside into a functional outdoor space. That is one of the best experiences tied to this kind of project. A retaining wall is rarely just a wall. It often becomes the structure that makes the rest of the landscape possible.
And perhaps the most valuable lesson is this: the best retaining wall projects are not the fastest ones. They are the ones where the builder paused, checked local rules, called 811, overdid the drainage instead of underdoing it, and treated the invisible parts with as much care as the visible ones. Pretty matters, of course. But with retaining walls, boring details are what make beauty stay put.
Conclusion
Building a retaining wall is one of the most practical ways to reclaim a sloped yard, control erosion, and create cleaner, more usable outdoor space. For a small to moderate wall, interlocking concrete blocks can make the process approachable for a careful DIYer. The formula is simple, even if the labor is not: plan well, call 811, check code requirements, excavate properly, build on a compacted base, manage drainage like your wall’s life depends on it, and do not fake your way through taller or more complex builds. Because the hill always knows.