Table of Contents >> Show >> Hide
- Jump to
- What You’ll Need
- Choose the Right Trimmer Line (Size & Type)
- How to Change the String on a Lawn Trimmer: 8 Easy Steps
- Step 1) Power down like you mean it
- Step 2) Confirm the line spec (diameter & length)
- Step 3) Open the trimmer head
- Step 4) Remove old line (and clean the “grass confetti”)
- Step 5) Cut new line cleanly (no “gnawed end” energy)
- Step 6) Wind the line onto the spool (the part that causes 90% of the drama)
- Step 7) Thread the line through the eyelets and reassemble
- Step 8) Test, trim, and get back to the satisfying part
- Head Types: What’s Different (and Why It Matters)
- Troubleshooting: When the Line Won’t Feed, Snaps, or Tangled
- Pro Tips for Longer-Lasting Line and Cleaner Cuts
- FAQ
- Conclusion
- Extra : Real-World “Restringing” Experiences (and What They Teach)
Your lawn trimmer is basically a tiny, spinning lasso that fights weeds for a living. It’s brave. It’s loud. And it will absolutely eat through string at the worst possible momentusually when you’ve already started and you’re feeling productive (which is clearly unacceptable).
The good news: changing trimmer line is one of those DIY jobs that looks mysterious until you do it once… and then you wonder why you ever paid someone (or swore at your garage floor) to handle it. Below is a practical, no-drama guide to replacing weed eater string on the most common head stylesbump feed, fixed-line, pre-wound spools, and quick-load systems.
What You’ll Need
- New trimmer line (correct diameter for your modelmore on that below)
- Scissors or a utility knife
- Gloves and eye protection (because string trimmers are tiny chaos machines)
- A rag or small brush (for cleaning grass gunk out of the head)
- Optional: pliers (helpful if old line is stubborn or melted in place)
One more “tool” that helps: your owner’s manual. Most trimmers print the line diameter on the spool or head, but the manual is the official source of truthespecially for the maximum line thickness your motor can handle.
Choose the Right Trimmer Line (Size & Type)
Picking the right line is like picking the right shoes: the biggest pair in the store won’t help if they don’t fit. Using line that’s too thick can cause poor feeding, extra wear, and sluggish cuttingespecially on cordless trimmers.
Line diameter: the “Goldilocks” rule
The most common diameters for homeowner trimmers are 0.065″, 0.080″, and 0.095″. A handy rule of thumb from accessory makers: corded trimmers often use .065″–.080″, cordless commonly .065″–.080″, and many gas trimmers run .080″–.095″ (with some cordless models also accepting .095″).
- 0.065″: Great for light edging and small weeds. Easier feeding, less motor strain.
- 0.080″: The all-around “most yards” choicebalanced durability and clean cuts.
- 0.095″: Better for heavier weeds and thicker growthif your trimmer is rated for it.
If you’re trimming thicker weeds, a tougher line profile can help. For example, square-shaped line is often marketed for cleaner passes through heavier vegetation, and .095″ is commonly positioned for heavier weed cutting. Still: match the line diameter to what your trimmer accepts.
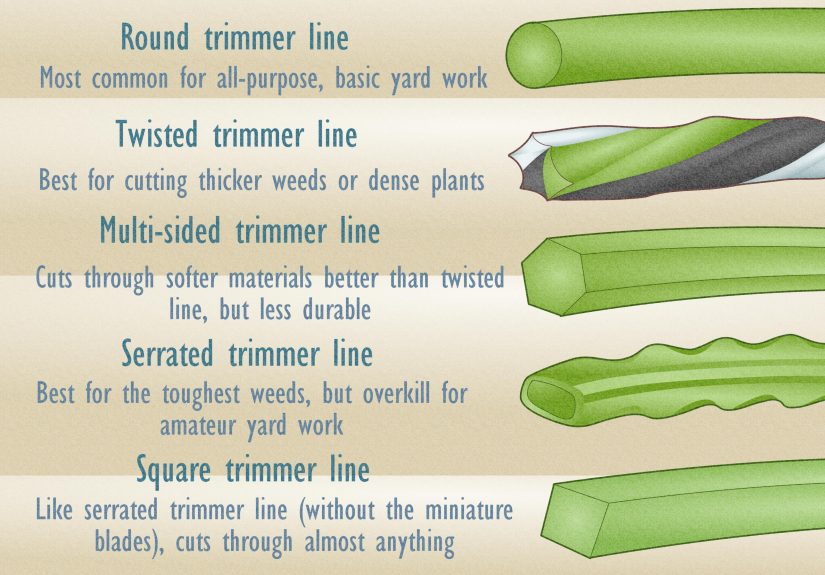
Line shape: round vs. twisted vs. edged
- Round line: Smooth feeding, durable, and forgivingexcellent for most homeowners.
- Twisted line: Often quieter and cuts cleanly; good for routine trimming.
- Square/tri-edged line: More aggressive cutting feel, but can wear faster on hard surfaces.
Safety note: never replace trimmer line with wire, chain, or anything “creative.” That’s not a hack; that’s a hazard. Stick with flexible, non-metallic trimmer line designed for your head.
How to Change the String on a Lawn Trimmer: 8 Easy Steps
Step 1) Power down like you mean it
Turn the trimmer off and wait until everything stops moving. Then:
- Cordless: remove the battery.
- Corded: unplug it.
- Gas: shut it off and disconnect the spark plug wire so it can’t accidentally start.
This is not paranoia; it’s standard practice. Trimmer heads don’t care if your fingers were “just checking something.”
Step 2) Confirm the line spec (diameter & length)
Look for the line size printed on the spool, inside the head, or in your manual. If the manual gives a specific length for your head style, follow it. Some bump-feed spools call for surprisingly specific lengths (like a 6-foot piece of split line on certain designs), while quick-load heads may cap the length you can insert.
If you’re not sure, choose the correct diameter first; then start with a conservative length (you can always adjust next time once you learn your trimmer’s “personality”).
Step 3) Open the trimmer head
Flip the trimmer so the head faces up. Then open it using whichever method your head uses:
- Snap-on cap: press side tabs and lift the cover off.
- Bump feed knob: unscrew the bump knob (often counterclockwise) and remove the cap/spool.
- Quick-load head: you may not remove the spool at allmany feed line through eyelets and wind by twisting a knob.
Step 4) Remove old line (and clean the “grass confetti”)
Pull out any remaining line, remove the spool if it comes out, and clean the inside of the head. Grass dust and packed debris can cause line to stick, weld, or feed poorly.
While you’re in there, inspect:
- Eyelets (the metal/plastic holes the line exits) for wear or sharp edges
- Spool spring for damage or misalignment
- Cracks in the spool or cap
Step 5) Cut new line cleanly (no “gnawed end” energy)
Cut the line to the right length for your head style:
- Dual-line spool: typically two equal lengths, or one long piece folded (depends on your spool design).
- Quick-load/insert-and-wind: many systems use one piece fed through until equal on both sides; follow your manual’s max length.
- Fixed-line heads: usually short pre-cut pieces that “snap” into place.
Pro move: cut the ends at a slight angle so they slide through eyelets easier. Clean cuts also reduce fraying, which helps feeding.
Step 6) Wind the line onto the spool (the part that causes 90% of the drama)
If your head uses a removable spool, look for arrows showing the winding direction. Wind the line neatly and tightly. Loose winding is how you get tangles, jams, and the classic “why is it feeding all weird?” experience.
For dual-line spools:
- Find the two channels (or upper/lower tracks) on the spool.
- Anchor each line end in its start hole or notch.
- Wind each line in its own channel, keeping tension as you go.
- Leave a short tail (often 4–6 inches) and lock it into a holding notch so it doesn’t unwind.
For split-line designs (example approach):
Some spools specify a single piece of “split line” and use an internal divider wall to keep the two strands separate. In those cases, you insert one split end into a top hole and the other into a bottom hole, then wind tightly in the indicated direction so the divider separates the line as you wrap.
Step 7) Thread the line through the eyelets and reassemble
Feed each line tail through the head’s eyelets. If the spool uses holding notches, keep the line secured while you reinstall the spool and capotherwise it may “explode unwind” like a party streamer you didn’t ask for.
Reinstall the spring (if your head uses one), seat the spool fully, and snap or screw the cap back on. Pull the line ends gently to make sure they’re released from holding slots and move freely.
Step 8) Test, trim, and get back to the satisfying part
Reconnect power (battery back in, plug in, or spark plug wire back on). Start the trimmer briefly and verify:
- The line spins smoothly without wobble
- Bump feed advances line correctly (if applicable)
- The line isn’t so long that it tangles around the head
Most trimmers have a small blade on the debris shield that trims excess line automatically once you spin it up. If the line is extremely long, trim it first so you don’t create a nylon bird’s nest on startup.
Head Types: What’s Different (and Why It Matters)
Bump feed (most common)
Bump-feed heads store line on a spool and feed more line when you tap (“bump”) the head on the ground while running. They’re popular because they’re simple in usethough reloading can vary by brand and spool design.
Pre-wound replacement spool
Some trimmers let you skip winding entirely: you remove the cap, pop out the old spool, drop in a pre-wound spool, thread the line through the eyelet(s), and snap the cover back on. It’s fast, convenient, and costs a little more per refill.
Quick-load / insert-and-wind heads
These systems aim to eliminate spool removal. You align eyelets, feed a single piece of line through until it’s even, then twist a knob (or similar mechanism) to wind the line. If your head has arrows, use themwinding direction matters, and the head will absolutely punish you for ignoring that tiny detail.
Fixed-line heads
Instead of a spool, fixed heads take short, pre-cut pieces of line that you insert into the head. They’re common in heavier-duty setups or specialty heads designed for quick swaps.
Troubleshooting: When the Line Won’t Feed, Snaps, or Tangled
Problem: The line won’t advance (bump feed)
- Likely cause: line wound the wrong direction or crossed in the spool.
- Fix: rewind following the arrow direction; keep wraps tight and in the correct channel.
- Also check: the spool spring is seated, and the cap is installed fully.
Problem: The line keeps tangling inside the head
- Likely cause: loose winding, overfilling, or debris buildup.
- Fix: rewind with tension, don’t exceed the spool’s fill limit, and clean the head regularly.
Problem: The line breaks constantly
- Likely cause: you’re “edging with enthusiasm” on concrete, rocks, or fence posts.
- Fix: keep the head slightly off hard surfaces; let the line cut, not grind.
- Upgrade: if your trimmer supports it, step up to a tougher line profile or a slightly thicker diameter.
Problem: The line “welded” together on the spool
Line welding is when line fuses to itself inside the spool from heat and friction. It’s more common when the spool is packed too tightly, used with the wrong diameter, or stored in high heat. Cleaning the head, using the correct line size, and not overfilling helps a lot.
Pro Tips for Longer-Lasting Line and Cleaner Cuts
1) Match line to the job (not your ego)
Thick line can help on heavier weeds, but it also increases drag. On cordless trimmers, that can mean shorter runtime and more strain. For routine edging and light weeds, a standard diameter often cuts better and feeds more reliably.
2) Keep the head clean
A quick brush-out after trimming prevents gunk buildup that interferes with spool movement and line feed. It also makes future line changes dramatically less annoying.
3) Use the line-cutting blade the way it was intended
If you start with 12-inch tails on each side, the trimmer will try to whip them into shapesometimes by tangling itself. Start closer to recommended tail lengths and let the guard blade “finalize” the trim.
4) Don’t “mow” with the string trimmer
Trimmers are great at edges, fences, and awkward corners. They’re terrible lawnmowers. If you bury the head into thick, wet grass and drag it like a plow, you’ll burn through line and patience.
FAQ
How often should you replace trimmer line?
Replace it whenever it’s too short to feed, brittle, frayed, or constantly breaking. For many homeowners, that’s “as needed” during the growing season. If you trim weekly, expect line changes regularlyespecially in spring when everything grows like it’s competing for a trophy.
Can I use thicker line than the manual says?
It’s not recommended. Thicker line may not feed correctly and can overload the motor or wear the head faster. If you want more cutting power, choose a tougher profile (like twisted or edged) in the correct diameter, or upgrade the head to one rated for heavier line.
Why does my trimmer spit out too much line?
Usually the spool was wound incorrectly, the cap isn’t seated properly, or the line wasn’t locked into holding notches during assembly. Rewind neatly, reinstall carefully, and confirm the bump mechanism moves smoothly.
Conclusion
Changing trimmer string isn’t complicatedit’s just picky. The big wins are: power off, use the correct line diameter, wind in the right direction, and keep the head clean. Once you do it a couple times, you’ll reload line faster than you can say “why do weeds exist?”
Save this guide, keep an extra roll of line in the garage, and your future self will thank youprobably while standing next to the fence line, quietly admiring how crisp the edge looks.
Extra : Real-World “Restringing” Experiences (and What They Teach)
The most common first-time experience goes like this: the cap comes off, the spring pops out, and the spool looks like a plastic fossil from an ancient civilization that communicated exclusively through arrows and tiny tabs. That moment is normal. The head is designed to survive vibration, heat, and occasional “oops” drops onto the drivewayso it’s naturally built like a miniature vault.
Another classic: someone winds the line beautifully… in the wrong direction. The spool goes back in, everything clicks, and the trimmer runsuntil the line refuses to feed and the user starts bargaining with it (“Please, just one more inch.”). This is why manufacturers put arrows on the spool. Those arrows are not decoration. They are the difference between a five-minute refill and a twenty-minute re-do that ends with “I swear it worked last year.”
Many homeowners also learn, through disappointment, that “more line” is not always better. Overfilling the spool feels efficient (who wants to reload again?), but it often leads to tangles. The line can overlap itself, pinch, or bind, which prevents smooth feeding. The result is a trimmer that sounds fine but behaves like it’s on strike. A slightly underfilled spool that winds neatly can outperform an overpacked spool every timeespecially on bump-feed heads where clean spool movement matters.
Then there’s the “why does it break every 15 seconds?” phase. In most yards, it’s not because the line is badit’s because the trimming style is basically sandpapering the line against concrete. Edging along sidewalks and driveways is a perfect example: the line is doing real work, but if it’s constantly grinding hard surfaces, it’ll snap and shorten fast. People who get the best life out of line tend to edge with a lighter touch: the line kisses the grass edge and only occasionally contacts the concrete. The difference can be dramatic.
Cordless users often notice another pattern: when the battery is low, feeding can feel less consistent, especially on heads that rely on a smooth mechanical rotation to wind or release line. Keeping batteries charged (and using the manufacturer-recommended line diameter) helps maintain consistent cutting speed, which reduces heat buildup and improves how the head behaves.
Finally, there’s the underrated “cleanup win.” People who take 30 seconds to brush grass and dirt out of the head before reassembly usually have fewer jams and fewer “mystery problems” later. Debris inside the head can interfere with spool seating, spring action, and line movement through the eyelets. A quick wipe feels boringuntil it saves the next reload from turning into a troubleshooting session.
In short, most restringing frustrations come down to three things: winding direction, winding tension, and cleanliness. Master those, and changing your lawn trimmer string becomes routinelike sharpening a kitchen knife, except louder and with more grass in your socks.