Table of Contents >> Show >> Hide
- Why “Real Bitrate” Is More Complicated Than It Sounds
- Step 1: Check the File’s Reported Metadata First
- Step 2: Use a Dedicated Audio Analyzer
- Step 3: Cross-Check the Bitrate with File Size Math
- Step 4: Inspect the Spectrogram for Signs of Lossy Compression
- Step 5: Trace the File’s Family Tree
- How to Tell if a “320 kbps” File Is the Real Deal
- Common Mistakes When Checking Audio Bitrate
- What Bitrate Should You Use in the First Place?
- Final Takeaway
- Experience Notes: What You Learn After Checking Bitrate in the Real World
- SEO Tags
If you have ever downloaded a song labeled “320 kbps”, opened it, and thought, “Why does this sound like it was recorded inside a sandwich bag?” you are not alone. Audio files lie. Well, technically, the files do not lie, but labels, metadata, and shady re-encodes definitely do. That is why learning how to check the real bitrate of audio files matters.
Here is the big idea: the number you see in a file browser is only the reported bitrate. It tells you how the file is packaged, not whether the audio inside is truly high quality. A fake “320 kbps MP3” can simply be an older 128 kbps file that got re-exported at a higher setting. The container looks fancy. The sound does not.
In this guide, you will learn five practical steps to verify audio bitrate, spot suspicious files, and avoid being fooled by a file that wears a tuxedo over pajama pants. We will also cover the common mistakes people make when judging bitrate, how sample rate and bit depth fit into the picture, and what signs suggest a file has been transcoded more than once.
Why “Real Bitrate” Is More Complicated Than It Sounds
Before we jump into the steps, let’s clear up one important point. Bitrate is the amount of data used per second of audio, usually measured in kbps. In general, higher bitrate means more data and often better quality for lossy audio formats like MP3 or AAC. But bitrate is not the same thing as audio quality. It is more like a budget. Two files can spend the same number of bits very differently depending on the codec, encoder, and source material.
This is where many people get tripped up. They confuse bitrate with sample rate or bit depth. Sample rate refers to how often audio is sampled per second, such as 44.1 kHz or 48 kHz. Bit depth refers to how much information is stored in each sample, such as 16-bit or 24-bit. Bitrate, by contrast, is mostly the headline number you watch in compressed delivery formats. In other words, these three are related, but they are not interchangeable. Treating them as twins is how audio confusion spreads faster than a bad karaoke remix.
So when people ask how to check the “real bitrate,” what they usually mean is this: How do I know whether the file is genuinely high quality, or just pretending to be? That is exactly what these five steps will help you answer.
Step 1: Check the File’s Reported Metadata First
Start with the obvious. Inspect the file properties in your operating system, media player, or editing software. This gives you the reported bitrate, codec, sample rate, channels, and sometimes whether the file uses CBR or VBR.
What to look for
- Codec: MP3, AAC, FLAC, WAV, OGG, and so on
- Bitrate: 96 kbps, 128 kbps, 192 kbps, 256 kbps, 320 kbps, etc.
- Mode: Constant Bitrate (CBR) or Variable Bitrate (VBR)
- Sample rate: 44.1 kHz, 48 kHz, 96 kHz
- Channels: mono or stereo
- Duration: critical for later math checks
This first pass is useful, but it is not enough. Metadata can be incomplete, inaccurate, or misleading after conversion. A file may say 320 kbps because it was exported at that setting yesterday, even if the original source was already a compressed 128 kbps MP3 from ten years ago. In that case, the reported bitrate is technically correct for the current file, but the real quality ceiling is still stuck in the basement.
Think of Step 1 as reading the name tag at a conference. Helpful? Yes. Proof of expertise? Absolutely not.
Step 2: Use a Dedicated Audio Analyzer
If you want a more reliable answer, open the file in a dedicated analyzer. This can be a metadata inspector, a command-line utility, or a professional audio editor. The point is to go beyond the quick summary shown by your file browser.
Why this matters
Specialized tools often show details that casual apps skip, including:
- Average bitrate versus nominal bitrate
- Whether the file is actually VBR
- The true codec profile
- Encoder information
- Container details that might explain weird readings
This is especially important for VBR audio files. With VBR, the bitrate changes depending on how complex the sound is. Quiet speech may use fewer bits; dense music passages may use more. So a file might average 212 kbps even if it was encoded with a target that sounds “closer to 256.” That does not automatically mean anything is wrong. It just means the encoder was doing its job and making decisions instead of throwing the same number of bits at every second like a confused intern with a budget spreadsheet.
When checking the analyzer, pay attention to whether the file is lossless or lossy. WAV and FLAC are usually better choices for editing and archiving. MP3 and AAC are mainly delivery formats. If someone sends you a “high-end master” as a tiny MP3, that is your cue to start raising an eyebrow.
Step 3: Cross-Check the Bitrate with File Size Math
Now we do one of the simplest and most underrated checks: basic math.
If you know the file size and duration, you can estimate the average bitrate:
Average bitrate ≈ (file size in bytes × 8) ÷ duration in seconds
Then convert the result into kbps. This will not give you a courtroom-grade verdict, but it is a terrific sanity check.
Example
Let’s say you have a 5 MB MP3 that runs for 4 minutes.
- 5 MB is about 40 megabits
- 4 minutes is 240 seconds
- 40,000 kb ÷ 240 ≈ 167 kbps average
If that file is labeled 320 kbps CBR, something smells funny. If it is labeled VBR, the situation may be more normal, but you still want to compare the result with what your analyzer says.
This step is most useful for catching obvious nonsense. A “320 kbps stereo MP3” that is suspiciously tiny usually is not a miracle of engineering. It is more likely a transcode, a mislabeled file, or a file padded with confidence and very little data.
One caution: short files can be skewed by metadata overhead. Album art, tags, and container data matter more when the audio is brief. So use this calculation as a reality check, not a religion.
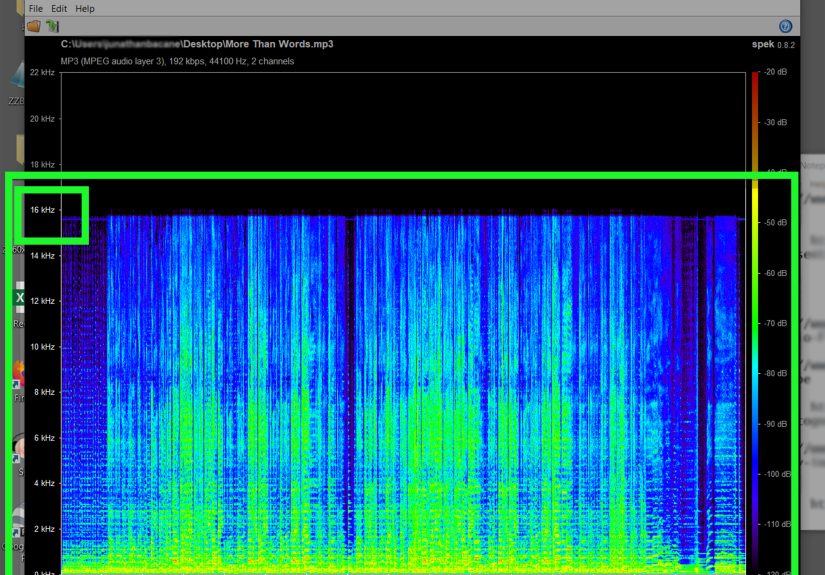
Step 4: Inspect the Spectrogram for Signs of Lossy Compression
This is where things get fun. Or nerdy. Or both.
Open the file in a program that shows a spectrogram. A spectrogram maps frequency over time. It lets you see how much high-frequency information is present and whether there is a suspicious cutoff. If the file was previously compressed at a lower bitrate, the spectrogram often reveals it.
What a fake high-bitrate file can look like
- A sharp high-frequency ceiling, such as a hard cutoff around 16 kHz
- A jagged or uneven upper edge
- Dark “holes” in the upper frequencies
- Very little content above a suspiciously low range for the claimed quality
For example, if a file claims to be a fresh, high-quality encode but the spectrogram shows a clear brick-wall cutoff far below what you would expect, that can suggest the audio was already lossy before being re-exported. In plain English: once the high-frequency detail is gone, re-encoding at a higher bitrate does not magically regrow it. Audio is not a lizard.
That said, spectrogram analysis is not a magic wand either. Some recordings naturally roll off in the highs. Some masters are dark on purpose. Some spoken-word recordings simply do not contain much useful energy up top. So use the spectrogram as a clue, not a final verdict. It helps answer whether the file behaves like genuine high-quality audio.
Step 5: Trace the File’s Family Tree
The final step is the most important: figure out where the file came from.
If you have access to the original source, compare it. Was the file exported from a WAV or FLAC master? Was it converted from an old MP3? Was it downloaded from a platform that already applies its own compression? The history matters because bitrate only tells part of the story.
Questions to ask
- Was the file originally lossless?
- Has it been converted more than once?
- Did someone upsample it or re-encode it at a higher bitrate later?
- Was it exported for speech, music, streaming, or editing?
This is the step that exposes the classic fake upgrade. A 128 kbps MP3 converted to 320 kbps is still carrying the limitations of the original 128 kbps source. Yes, the new file is bigger. No, it is not truly better. It is like photocopying a photocopy on more expensive paper.
If you have the original lossless source, compare waveforms, spectrograms, and listening tests. If you do not have the source, combine what you learned from metadata, analyzer output, file-size math, and spectrogram clues. When all four start pointing in the same direction, you usually have your answer.
How to Tell if a “320 kbps” File Is the Real Deal
Let’s make this practical. A genuinely solid 320 kbps MP3 usually checks out in several ways at once:
- The metadata says 320 kbps and the analyzer agrees.
- The file size makes sense for the duration.
- The spectrogram does not show a suspiciously low cutoff inherited from a poor source.
- The source history points back to lossless or high-quality original material.
- The file actually sounds clean, especially in cymbals, ambience, reverb tails, and stereo detail.
If one of those fails, it may still be okay. If three of them fail, congratulations: you have likely found an audio file with a very confident résumé and a shaky backstory.
Common Mistakes When Checking Audio Bitrate
- Mistake 1: Trusting one number. Bitrate alone does not prove quality.
- Mistake 2: Ignoring VBR. A lower average bitrate does not always mean poor encoding.
- Mistake 3: Confusing sample rate with bitrate. They are related, but not the same thing.
- Mistake 4: Assuming bigger file equals better audio. Bigger can just mean less efficient.
- Mistake 5: Forgetting the source. You cannot restore detail that was already thrown away.
What Bitrate Should You Use in the First Place?
While this guide is about checking bitrate, the natural follow-up is choosing one. For spoken-word audio, lower bitrates can still sound perfectly fine, especially in mono. For music, people typically prefer higher bitrates because complex mixes, transients, ambience, and stereo information benefit from more data. For editing, mastering, or archiving, keep a lossless source such as WAV or FLAC. Do not edit from a small delivery file if you can avoid it.
A smart workflow looks like this: record or keep your master in a lossless format, do your editing there, then export compressed versions only when you need to distribute them. That way you never have to wonder whether your “master” is secretly an MP3 wearing a fake mustache.
Final Takeaway
If you want to check the real bitrate of an audio file, do not stop at the label. Use a five-step process:
- Read the reported metadata.
- Inspect the file in a dedicated analyzer.
- Cross-check the bitrate with file-size math.
- Study the spectrogram for lossy cutoffs and artifacts.
- Trace the file back to its original source.
Together, these steps tell you far more than a single number ever could. They help you spot fake upgrades, understand VBR versus CBR, and judge whether a file is truly high quality or just dressed to impress. In audio, numbers matter. But context matters more.
Experience Notes: What You Learn After Checking Bitrate in the Real World
Once you start checking bitrate seriously, you begin to notice how often audio files wear misleading little costumes. The first time many people do this, they expect a simple detective story: open file, read number, case closed. Instead, it becomes more like investigating a suspiciously polished used car. The sticker says premium. The engine says, “Let’s not rush to conclusions.”
One common experience is finding a music file labeled 320 kbps that looks respectable in the file browser, only to discover that the spectrogram tells a different story. The upper frequencies may drop off hard around 16 kHz, or the file may have that familiar “processed air” feeling where cymbals lose shimmer and reverbs flatten out. That is when it clicks: the file is not necessarily fake in the technical sense, but it may be a higher-bitrate copy of a lower-quality source. The number is current. The damage is older.
Another interesting situation happens with podcasts and voice recordings. A lot of users panic when they see a lower bitrate than they expected, but spoken-word audio often survives compression far better than dense music. A mono interview at a modest bitrate can sound surprisingly clear, while a busy song encoded poorly can fall apart like a cheap lawn chair. This teaches an important lesson: content matters. The “best” bitrate is never just a number floating in space. It depends on what the file is trying to do.
People also learn quickly that VBR is the great confusion generator. A VBR file can be excellent and still refuse to match the nice round number people want to see. That leads to a lot of false alarms. Someone expects 256 kbps, sees an average around 220 kbps, and assumes disaster. But when the analyzer confirms VBR and the file sounds clean, that lower average is often a sign of efficient encoding rather than poor quality. In other words, the encoder was being smart, not lazy.
Then there is the classic sample-rate misunderstanding. Many beginners open a file, see 44.1 kHz or 48 kHz, and assume that must be the bitrate. It is not. That confusion leads to some wonderfully chaotic conversations, usually involving phrases like “This WAV is only 44.1, is that bad?” At some point, almost everyone who works with audio has had that moment. It is basically a rite of passage, like spilling coffee near your keyboard and promising yourself it was the last time.
The most valuable experience, though, is realizing that source quality beats rescue attempts. If you start with a clean WAV or FLAC, life is easy. If you start with a tired old MP3 that has already been compressed into next week, no amount of re-exporting, renaming, or wishful thinking will restore the missing detail. Once you understand that, your whole workflow gets better. You stop chasing inflated numbers and start protecting the original source. And that is the real upgrade.