Table of Contents >> Show >> Hide
- Why Kitchen Sink Cleaning Matters More Than You Think
- Before You Start: The Basic Supplies
- Step 1: Clean the Kitchen Sink Basin
- Step 2: Clean the Faucet and Handles Without Damaging the Finish
- Step 3: Clean and Deodorize the Drain
- Step 4: Clean the Garbage Disposal the Right Way
- What Not to Do When Cleaning a Sink, Drain, or Disposal
- How Often to Clean Each Part
- When to Clean vs. When to Disinfect
- of Real-Life Sink Cleaning Experience
- Final Takeaway
- SEO Tags
Your kitchen sink works harder than most people in the house. It handles dirty dishes, greasy pans, coffee sludge, mystery crumbs, and the occasional “I’ll rinse it later” disaster. Then we all expect it to sparkle like a showroom by dinner. Rude, honestly.
The good news: cleaning your kitchen sink, faucet, drain, and garbage disposal doesn’t require a chemistry degree or a cart full of products. With the right routine, you can keep everything looking great, smelling fresh, and running smoothlywithout damaging finishes or wrecking your pipes.
This guide gives you a practical, step-by-step system that works for most kitchens, whether you have a stainless steel sink, a polished faucet, a moody drain odor, or a disposal that smells like it’s holding a grudge.
Why Kitchen Sink Cleaning Matters More Than You Think
A kitchen sink is one of the busiest and germiest zones in the home, especially because it’s wet, used constantly, and often exposed to raw food residue. Even if the basin “looks clean,” the faucet handles, drain opening, splash guard, and disposal can collect grime and odor-causing buildup fast.
Translation: if your sink smells weird when hot water runs, or your faucet has white spots, or your disposal growls like it’s in a bad mood, it’s time for a reset.
Before You Start: The Basic Supplies
You probably already have most of these on hand:
- Dish soap (mild)
- Baking soda
- White vinegar
- Hydrogen peroxide (optional for basin scrubbing)
- Microfiber cloths or soft sponges
- Soft toothbrush or detail brush
- Rubber gloves
- Ice cubes
- Lemon or lime wedges/peels (optional)
- EPA-registered disinfectant (or properly diluted bleach solution for hard surfaces)
Important: Avoid abrasive scrubbers, steel wool, and harsh chemical cleaners unless your fixture manufacturer specifically says they’re safe. Fancy finishes can get scratched, dulled, or damaged faster than you can say “spot-resistant.”
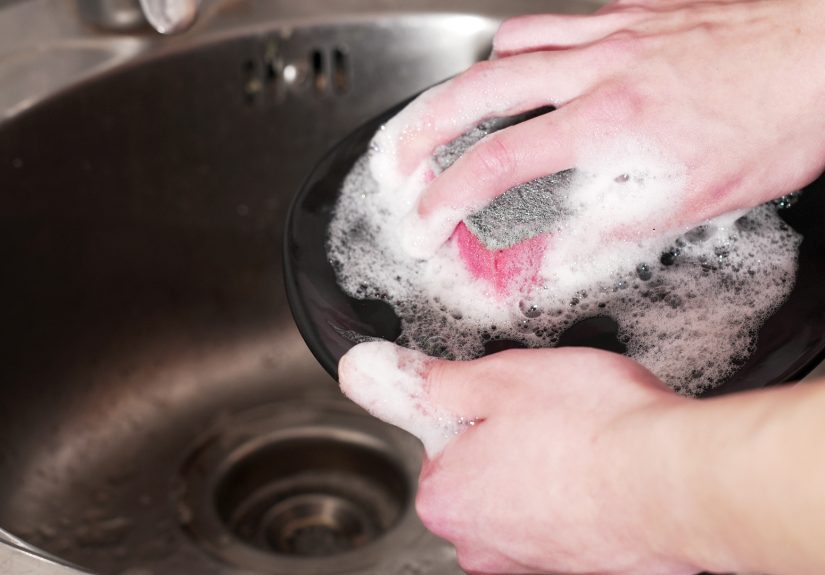
Step 1: Clean the Kitchen Sink Basin
1) Empty and Rinse First
Remove dishes, strainers, and random utensils that somehow migrated into the sink. Rinse away loose crumbs, sauce splatters, and anything that looks like it could become a science project.
2) Scrub with a Gentle Cleaner
For most sinks, a simple combo of mild dish soap and warm water is perfect for daily or weekly cleaning. If you want a deeper scrub, sprinkle baking soda over a damp sink and scrub gently with a soft sponge. Baking soda gives you mild abrasion without being too aggressive on most sink materials.
If you have a stainless steel sink, scrub in the direction of the grain (not random circles) to help preserve the finish and avoid a dull, streaky look.
3) Tackle Hard Water Spots and Scale
White spots or cloudy mineral buildup? That’s usually hard water. A short soak with white vinegar can help loosen the scale. Apply it to the affected area, let it sit briefly, then scrub gently and rinse thoroughly. Dry the sink afterward so the mineral deposits don’t come right back for round two.
If your sink manufacturer warns against prolonged bleach contact or harsh products, listen to them. Stainless steel in particular can be sensitive to corrosion if the wrong cleaner sits too long.
4) Rinse and Dry
This step gets skipped all the time, and it matters. Rinse thoroughly, then dry with a soft cloth. Drying prevents water spots, slows mineral buildup, and makes the whole sink look instantly cleaner.
Step 2: Clean the Faucet and Handles Without Damaging the Finish
Faucets are the jewelry of the sink area. They also collect fingerprints, water spots, soap residue, and whatever was on your hands while you were making meatballs.
1) Start with Soap and Water
Use a damp microfiber cloth with a drop of mild dish soap to wipe the faucet body, base, and handles. Then rinse with a clean damp cloth and dry completely.
This simple routine is surprisingly effective and much safer than blasting the finish with a harsh spray cleaner.
2) Remove Mineral Spots the Safe Way
If you see crusty buildup or dried water spots, a 50/50 vinegar-and-water mix can help on many faucet finishes. Apply briefly (don’t let it sit forever), then rinse and dry well. This is especially useful around the base and spout where water tends to linger.
Pro tip: Don’t use rough green scrub pads, steel wool, or abrasive powders on decorative finishes. They can scratch the surface and turn your nice faucet into a “distressed industrial look” you did not request.
3) Don’t Forget the Faucet Aerator
If your water flow has gotten weak or sprays sideways like a tiny fountain show, the aerator may be clogged with mineral deposits. Deep cleaning the aerator every few months can improve flow and reduce splatter.
If your faucet manual allows it, remove the aerator, rinse out debris, and soak it briefly in a vinegar solution to loosen buildup. Reinstall carefully and avoid overtightening.
Step 3: Clean and Deodorize the Drain
The drain is where fresh kitchens go to become funky. Even if the basin shines, the drain opening can trap grease film, food particles, and odor-causing residue.
1) Wipe the Drain Opening Daily
This is the easiest habit with the biggest payoff. Use a microfiber cloth or soft sponge to wipe the drain area after doing dishes. It takes about 10 seconds and prevents grime rings and smell buildup.
2) Use a Monthly Deodorizing Clean
For routine drain cleaning (not major clogs), a baking soda and vinegar treatment is a popular, low-cost option:
- Pour baking soda into the drain
- Add vinegar slowly
- Let it fizz for 10–15 minutes
- Flush with hot water
This helps with odor and light residue. It’s a maintenance methodnot a miracle cure for a serious clog the size of a potato.
3) Be Smart About Pipe Materials
If you have older plumbing (especially copper or brass), don’t overdo acidic cleaning methods. Occasional use is usually fine for maintenance, but repeated heavy use can be hard on certain pipes over time. When in doubt, use an enzyme drain cleaner or ask a plumber what your system can handle.
4) For Slow Drains, Don’t Rely on Wishful Thinking
If water is draining slowly, routine cleaning may not be enough. A partial clog usually needs a plunger, drain snake, or a professional. Also, be careful with aggressive chemical drain openersthey can be rough on pipes and seals, especially if used frequently.
Step 4: Clean the Garbage Disposal the Right Way
Your garbage disposal doesn’t have “blades” in the movie sense, but it absolutely can hold onto food residue and odors. The stink is often coming from the splash guard (that rubber baffle) and the gunk underneath it, not just the disposal chamber itself.
1) Start with Safety
Turn off the disposal before cleaning near the opening. Don’t put your hand down into the disposal chamber. Ever. Not even if you “know where everything is.” That’s how kitchen cleaning becomes a dramatic story.
2) Clean the Splash Guard (Rubber Baffle)
This is the most overlooked step and one of the most important. Lift or loosen the rubber splash guard if your model allows it, and scrub the underside with a soapy sponge or toothbrush. That hidden underside is often where the nastiest sludge hangs out.
Rinse thoroughly and place it back correctly.
3) Flush and Freshen with Cold Water + Ice
Run a medium stream of cold water, then run the disposal and add ice cubes. Ice helps knock loose residue inside the unit. For a fresher smell, add lemon or lime wedges/peels while it runs.
Cold water matters here. It helps keep fats and oils more solid so they move through the drain instead of melting and coating the pipe walls.
4) Use a Deodorizing Treatment if Needed
If the disposal still smells a little suspicious, use baking soda and vinegar as a deodorizing step, then rinse. Some people also use disposal-cleaning tablets (especially enzyme-based products) for a deeper odor reset.
5) Keep It Cleaner Between Deep Cleans
Use the disposal regularly, run cold water during operation, and let the water continue for a few seconds after grinding stops. That extra rinse time helps wash food particles through instead of leaving them behind to ferment overnight like a tiny garbage kombucha.
What Not to Do When Cleaning a Sink, Drain, or Disposal
1) Don’t Mix Cleaners
Never mix bleach with ammonia, vinegar, or other cleaners. If you disinfect with bleach, use it only as directed and on compatible surfaces. Ventilate the area and wear gloves if needed.
2) Don’t Disinfect Before Cleaning
Disinfectant works best on a clean surface. First remove grease, residue, and visible grime with soap and water. Then disinfect if needed (for example, after handling raw meat or when someone in the house is sick).
3) Don’t Use Abrasives on Nice Finishes
Abrasive pads can scratch stainless steel sinks and damage faucet finishes. When in doubt, go soft: microfiber, soft sponge, and mild soap are your best friends.
4) Don’t Pour Grease Down the Drain
Even with a garbage disposal, grease and oils are bad news. They can coat pipes, trap food particles, and create clogs. Let grease cool and throw it in the trash instead.
How Often to Clean Each Part
Daily (or after heavy use)
- Rinse the basin
- Wipe the faucet and handles
- Wipe the drain opening
- Dry the sink to prevent water spots
Weekly
- Scrub the sink basin thoroughly
- Clean the faucet base and handles
- Do a quick drain deodorizing clean if needed
Monthly
- Clean the garbage disposal splash guard and interior
- Run an ice + citrus freshening cycle
- Deep-clean the drain area
Every Few Months
- Check and clean the faucet aerator
- Inspect for slow-drain signs or buildup
- Adjust your routine if hard water spots return quickly
When to Clean vs. When to Disinfect
Here’s the simple rule: clean often, disinfect when needed.
Routine cleaning removes dirt, grime, and most everyday mess. Disinfecting is the extra step for higher-risk situations, like after raw poultry or raw meat touches the sink area, when someone is sick, or when you want a deeper hygiene reset.
Use an EPA-registered disinfectant and follow the label directions exactly (especially contact time). If you use a bleach solution on a compatible hard surface, clean first, ventilate the room, and rinse food-contact surfaces if the product label says to do so.
of Real-Life Sink Cleaning Experience
I learned the hard way that a kitchen sink can look clean and still be… not clean. A few years ago, I had one of those “my kitchen is spotless” moments right before guests came over. Counters wiped? Check. Dishes done? Check. Candle lit? Check. Then someone turned on the hot water and the sink released a smell that can only be described as “haunted soup.”
That was my introduction to the difference between cleaning the basin and cleaning the drain and disposal. I had been polishing the visible parts and completely ignoring the rubber splash guard in the disposal. Once I flipped that thing up and scrubbed underneath it, I understood everything. The smell disappeared immediately, and I felt both victorious and mildly betrayed.
Since then, I’ve stuck to a much more practical routine. I don’t do a giant deep-clean every day because I enjoy having hobbies, but I do a quick wipe-down after dishes. It takes less than a minute: rinse the sink, wipe the faucet, wipe around the drain, and dry everything with a microfiber cloth. That one habit alone made a huge difference in water spots and that weird slippery film that likes to form around the drain opening.
I also used to overdo cleaners. If a little product worked, I assumed more product would work better. In reality, too much cleaner just meant more rinsing, more residue, and one very dramatic faucet finish that started looking dull. Once I switched to mild dish soap and a soft cloth for the faucet, it looked better and took less effort. Turns out the sink area prefers calm, not chaos.
Hard water was another issue in one apartment I lived in. The faucet and sink would get white spots almost overnight. I started doing a quick vinegar-and-water wipe once in a while for the mineral buildup, but the real game-changer was drying the sink and faucet after use. It sounds annoyingly simple, but it works. Future me was much less annoyed than present me.
The disposal routine that worked best in my kitchen was this: cold water on, disposal running, add ice, then a couple lemon wedges. I used to think citrus was just for making the kitchen smell nice (which it does), but it also helped loosen residue and made the whole area feel cleaner. I still scrub the splash guard separately, thoughthat part is non-negotiable now.
The biggest lesson? Don’t wait for a smell or a clog to start caring. Sink maintenance is one of those chores that rewards small, boring consistency. A 30-second wipe today saves you a 45-minute “why does this kitchen smell like regret?” cleanup next week. And if you cook often, especially with raw meat, the clean-then-disinfect habit is worth making automatic. It keeps the sink safer, the faucet cleaner, and your whole kitchen feeling more under control.
Basically, the kitchen sink is like a cast member on a reality show: high maintenance, dramatic under pressure, and much easier to manage when you stick to a routine.
Final Takeaway
Cleaning a kitchen sink, faucet, drain, and disposal isn’t difficultit just works best when you break it into parts. Gentle basin cleaning, finish-safe faucet care, monthly drain deodorizing, and regular disposal maintenance can prevent odors, buildup, and clogs while keeping everything looking polished.
If you remember only three things, make it these: clean first before disinfecting, use cold water with the disposal, and always scrub the splash guard. That little rubber flap is probably the villain.