Table of Contents >> Show >> Hide
- First, Choose the Right TV (Because Not All TVs Want a Second Career)
- Safety First (Yes, This Is the Boring PartAnd Yes, You Need It)
- Plan the Build Like a Grown-Up (So Your Floor Doesn’t File a Complaint)
- Tools and Materials
- Step-by-Step: Convert the TV Into a Fish Tank Cabinet
- Electrical Setup: Keep Water Where It Belongs (Not in an Outlet)
- Set Up the Aquarium Like You Want Fish to Live There
- Fish and Stocking Ideas for a TV Aquarium
- Common Mistakes (A.K.A. How Most TV Aquariums Become Sad)
- Maintenance: Keep Your “Channel” From Getting Static
- Be a Good Human: Don’t Release Aquarium Pets Into the Wild
- Experience Corner (Extra ): What DIYers Learn the Hard WaySo You Don’t Have To
- Wrap-Up
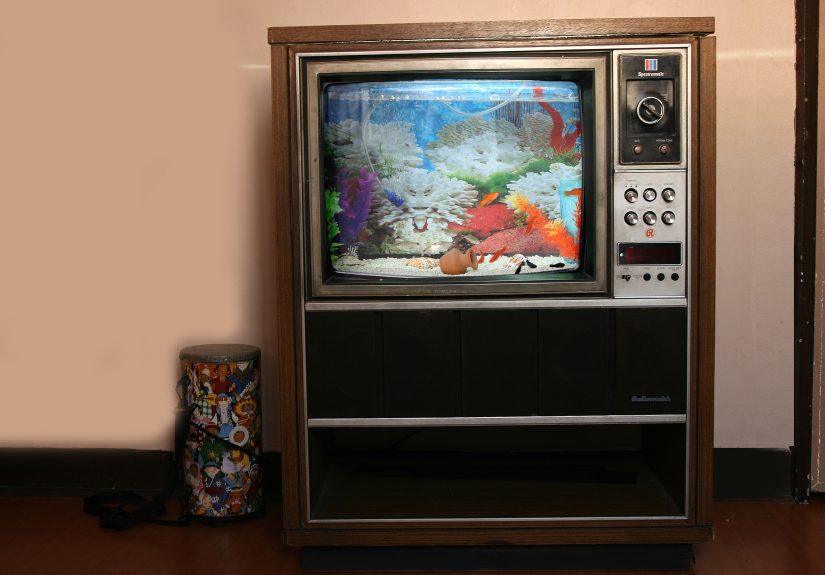
You know that old TV sitting in the garagethe one that weighs roughly the same as a baby hippo and
has exactly zero streaming apps? Congratulations: it’s about to become the coolest aquarium in your
house. A “TV fish tank” is part upcycling, part conversation starter, and part “wait… is that Nemo
watching Netflix?” (He isn’t. He’s judging your aquascape.)
This guide is designed to be easy, safe, and fish-friendly.
We’ll cover the best TV types for the job, a low-drama build method, and the aquarium basics that keep
your new underwater “channel” from turning into a cloudy soap opera.
First, Choose the Right TV (Because Not All TVs Want a Second Career)
The easiest option: a hollow “TV shell” + a separate aquarium insert
The simplest, most reliable approach is: the TV becomes the cabinet and a
real aquarium (glass or acrylic) becomes the water-holding vessel.
That means fewer leaks, less chemical guesswork, and dramatically lower odds of waking up to a living-room lagoon.
CRT vs. flat-screen: what you need to know
- Flat-screen TVs (LCD/LED) are usually lighter and easier to gut. If you want “easy mode,” start here.
-
Old CRT TVs are iconic and super “retro,” but they can hold dangerous high voltage and contain leaded glass.
If you’re not experienced working around CRT components, treat the electronics like a “do not pet” sign. - Console TVs / wooden cabinets are the jackpot because they already have space and structure.
Bottom line: if you can find an already-empty cabinet or a flat-screen shell, your project becomes woodworking + aquarium care
instead of “electrical hazard meets archaeology.”
Safety First (Yes, This Is the Boring PartAnd Yes, You Need It)
CRT warning: high voltage and hazardous materials
CRTs can retain high voltage even after unplugging. If you don’t already know what “discharge” means in this context,
the safest move is to avoid opening a CRT yourself and use a TV that’s already been properly gutted.
CRTs also contain lead in the glass and are treated as hazardous waste when disposed, so recycling/disposal matters.
General build safety checklist
- Unplug everything. Remove batteries. Let devices sit before handling.
- PPE: safety glasses, cut-resistant gloves, and a dust mask if sanding/painting.
- No water near outlets: plan cord routes and power strip placement before you add water.
- Use GFCI protection and drip loops for aquarium equipment cords.
- Fish safety: only use aquarium-safe materials inside the wet zone (sealants, paints, plastics).
Plan the Build Like a Grown-Up (So Your Floor Doesn’t File a Complaint)
Step 1: Measure your TV opening and pick a tank size
Measure the inside width, height, and depth where the tank will sit. Then choose a tank that:
- Fits with room for hoses and cords (you want airflow, not a jammed-in glass brick).
- Leaves space above for maintenance (netting fish is hard when your hand can’t fit).
- Has a lid or canopy option (evaporation and jumpy fish are real).
Step 2: Calculate the weight (and assume it’s heavier than you think)
A gallon of water weighs about 8.3–8.34 pounds. Then add glass, gravel, rocks, wood, and equipment.
A “small” aquarium can still weigh as much as a fridge with opinions.
A good rule for repurposed furniture is to round up and build with a safety buffer. If your tank is 20 gallons,
you’re already in the neighborhood of ~160–170 pounds of water alonebefore décor.
Tools and Materials
Basic tools
- Screwdrivers, nut drivers, and a small socket set
- Drill + bits (wood + a hole saw for ventilation/cable passthroughs)
- Jigsaw or oscillating multi-tool (for cabinet cutouts)
- Measuring tape, level, pencil
- Sandpaper or a sander
Build materials
- A real aquarium tank (glass/acrylic insert)
- 3/4″ plywood (base reinforcement) + 2×2 or 2×4 lumber (internal frame)
- Wood screws + wood glue
- Aquarium-safe silicone (for small sealing needs, trim, or splash guardsNOT as your main “tank” wall)
- Water-resistant paint or polyurethane (outside wet zone), or an aquarium-safe epoxy/liner for the interior wet zone
- Foam leveling mat (especially for rimless tanks)
- Vent grilles or mesh (helps with heat and humidity)
Aquarium equipment
- Filter (sponge filter, HOB, or canister depending on tank)
- Heater (if keeping tropical fish) + thermometer
- Water conditioner/dechlorinator
- Test kit (ammonia, nitrite, nitrate)
- Light (if planted) + timer
Step-by-Step: Convert the TV Into a Fish Tank Cabinet
Step 1: Gut the TV (the safe way)
For a flat-screen: remove the back panel, speakers, and internal boards until you’re left with a clean shell.
For a CRT: the safest “easy guide” move is not to DIY-discharge and dismantle the tube unless you already
have experience with CRT safety. Consider using a TV that’s already emptied by a qualified recycler, or switch to a flat-screen shell.
Whatever you remove, handle e-waste responsiblyespecially CRT components and glass.
Step 2: Reinforce the base (your future self will thank you)
Most TV cabinets were built to hold electronics and dust bunniesnot a mini indoor ocean. Add a rigid base:
- Cut a piece of 3/4″ plywood to fit the cabinet floor.
- Add 2×2 or 2×4 supports underneath, forming a rectangle frame that transfers weight to the cabinet’s strongest corners.
- Screw and glue the frame together. Check level in every direction.
If the cabinet is particleboard, assume it’s secretly made of compressed cookies. Reinforce generously.
Step 3: Create ventilation (humidity is sneaky)
Aquariums evaporate water. In a closed cabinet, that moisture turns into “mildew’s favorite vacation home.”
Drill ventilation holes in the back or sides and install vent grilles or mesh.
Step 4: Waterproof the interior zone
Even if your aquarium is a separate insert, splashes happen. Line or coat the cabinet interior where water could drip:
- Seal seams and corners.
- Use a water-resistant coating appropriate for damp environments.
- Keep finishes fully cured and odor-free before placing the tank inside.
Step 5: Make the “screen” look intentional
Clean the bezel, remove any sharp edges, and consider adding a simple trim frame so it looks like the fish are
actually “on TV.” Optional upgrades:
- Add LED accent lighting behind the bezel for a soft “glow” effect.
- Install a hinged back panel for easy filter access.
- Add a pull-out shelf for food, test kit, and maintenance tools.
Step 6: Place the aquarium insert and level it
Put the foam mat (if needed), then the tank. Use a level to confirm it’s flat left-to-right and front-to-back.
A tank that’s slightly off-level can stress seams over time, and “slow leaks” are the worst kind of surprise.
Electrical Setup: Keep Water Where It Belongs (Not in an Outlet)
Use drip loops on every cord
A drip loop is a simple “U” shape below the outlet so any water running down a cord drips off before reaching electricity.
It’s cheap insurance and takes about six seconds to do.
Use GFCI protection
A GFCI outlet or breaker can shut off power quickly if there’s a faultespecially important around aquariums,
where splashes and damp hands are part of life.
Mount power strips away from splash zones
Don’t put power strips on the floor under the tank. Mount them to the inside wall of the cabinet (high up, away from drips),
or to a nearby wall, and keep cords neatly routed.
Set Up the Aquarium Like You Want Fish to Live There
Step 1: Rinse substrate and décor (no soap!)
Rinse gravel/sand and decorations with plain water. Soap residue is not “spa day for fish.” It’s… not good.
Step 2: Fill with conditioned water
Use a water conditioner to remove chlorine/chloramine. Fill slowly to avoid stirring up a sandstorm.
Step 3: Start the nitrogen cycle (the invisible part that keeps fish alive)
New tanks need time to establish beneficial bacteria that convert toxic ammonia into nitrite, then into less harmful nitrate.
This process is called the aquarium nitrogen cycle. Rushing it is the #1 reason new tanks crash.
Practical tips:
- Run the filter and heater (if used) continuously.
- Test water regularly for ammonia, nitrite, and nitrate.
- Add fish slowlyyour bacteria colony grows with the bio-load.
- Plants can help manage nitrates, but they aren’t magic erasers.
Step 4: Add fish gradually and acclimate them
Once parameters are stable and the tank is cycled, acclimate new fish gently:
- Turn off the aquarium lights (less stress).
- Float the sealed bag for ~15 minutes to match temperature.
- Net the fish into the tank (avoid adding store bag water).
- Feed lightly and watch behavior for the next 24–48 hours.
Fish and Stocking Ideas for a TV Aquarium
If your insert is 5–10 gallons
- Betta with gentle filtration and a heater
- Shrimp (neocaridina) with plants and hiding spots
- Snails for a low-key cleanup crew (don’t overdo it)
If your insert is 15–29 gallons
- A small community: tetras/rasboras + a peaceful bottom group (depending on compatibility)
- A planted “nature tank” where the fish are the supporting cast and the aquascape is the star
The bigger the tank, the more stable it tends to be (within reason). Tiny tanks can swing in parameters fast,
which is why many beginners do better with “medium small” rather than “micro.”
Common Mistakes (A.K.A. How Most TV Aquariums Become Sad)
- Making the TV shell the actual tank: DIY glass/acrylic tanks can be done, but it’s not “easy mode.” Use a real aquarium insert.
- Underestimating weight: water is heavy, and gravity never takes a day off.
- No ventilation: mold and warped wood show up like uninvited guests.
- Skipping the cycle: your fish will pay for your impatience.
- Messy electrics: no drip loops + no GFCI = risky.
Maintenance: Keep Your “Channel” From Getting Static
- Weekly: test parameters, wipe glass, top off evaporation (treated water), and remove uneaten food.
- Every 1–2 weeks: partial water change based on stocking and nitrate levels.
- Monthly: inspect cabinet interior for moisture damage, check seals, and tidy cables.
Be a Good Human: Don’t Release Aquarium Pets Into the Wild
If you rehome your fish or reset your tank, never dump aquarium animals or contents into local waterways.
That’s how invasive species spread and ecosystems get wrecked. When in doubt, rehome through local aquarium groups
or a responsible store.
Experience Corner (Extra ): What DIYers Learn the Hard WaySo You Don’t Have To
If you read enough TV-aquarium build stories, you start to notice a pattern: the “easy” part isn’t the screwdriver work
it’s resisting the temptation to do five ambitious upgrades at once. The first time someone says, “I’ll just build a custom
acrylic tank inside the TV,” you can practically hear a distant chorus of hobbyists whisper, “Bless your heart.”
The most successful builds usually start with one humble decision: use a real aquarium insert. It feels almost
too simple, like cheating. But it’s the kind of cheating that prevents leaks, keeps fish safe, and protects your flooring from
becoming a surprise indoor pool. People who try to make the TV itself watertight often learn a dramatic truth: water is patient,
persistent, and absolutely thrilled to find the one seam you trusted too much.
Another common “experience moment” is the weight reality check. On paper, a 20-gallon tank sounds adorable. In real life,
once it’s full of water, substrate, rocks, and that gorgeous driftwood you found, it’s suddenly a compact car made of glass.
DIYers often discover that old cabinets flex in ways that feel… emotionally unsupportive. The fix is almost always reinforcement:
add a strong base, transfer weight to the corners, and level it like your future depends on it (because your seams do).
Then there’s the humidity lesson. A fish tank inside a cabinet is basically a tiny weather system. Builders who skip ventilation
are often surprised by condensation, warped wood, and the faint scent of “basement chic.” Cutting a couple of vent holes and
adding a grille isn’t glamorous, but neither is discovering mold has moved in and started paying zero rent.
Fishkeeping experience stories also tend to include one rite of passage: the cloudy water panic. New builders fill the tank,
turn everything on, and the next day the water looks like someone poured in a latte. It’s usually a normal bacterial bloom
during cycling, but it can feel like your aquarium is airing a disaster documentary. The best “experienced builder” move is
boring (and therefore powerful): test your water, don’t overfeed, keep the filter running, and let the cycle mature. Stability
is what makes the fish look like they’re starring in a calming nature show instead of a suspense thriller.
Finally, the best TV-aquarium builds treat maintenance access as a first-class feature. People who design a cabinet that looks
incredible but can’t be cleaned easily tend to discover a new hobby: swearing quietly while holding a siphon at a weird angle.
Leave yourself room to remove the lid, swap filter media, and catch a fish without performing interpretive dance. Your aquarium
should be a relaxing centerpiecenot a monthly boss battle.
In short: the “experienced” version of this project is less about fancy materials and more about smart compromises. Reinforce
the base. Vent the cabinet. Keep cords safe. Cycle the tank patiently. And remember: the goal is not to win an engineering award.
The goal is to make your fish feel like they’re living in the coziest little retro studio apartment on Earthcomplete with a
front-row seat to the humans doing their strange human things.
Wrap-Up
Converting an old TV into a fish tank is one of those projects that looks wildly impressive while being totally doableif you
keep it simple. Use the TV as a cabinet, use a real aquarium as the water vessel, reinforce the base, manage humidity, and
respect the nitrogen cycle like it’s the laws of physics (because for fish, it basically is).
Build it safely, cycle it patiently, and you’ll end up with a living “screen” that never asks if you’re still watching.