Table of Contents >> Show >> Hide
- Table of Contents
- Before You Model: Plan the Layout
- Step 1: Start a Clean Revit Project
- Step 2: Build the Envelope First
- Step 3: Lay Out the Interior Walls
- Step 4: Place Doors and Windows
- Step 5: Add Rooms, Tags, and Area Checks
- Step 6: Dimension and Annotate
- Step 7: Schedules and Sheets
- Step 8: Quality Checks and Smart Revisions
- Bonus: A Sample 2 Bed / 1 Bath Layout You Can Copy
- Experiences: What People Learn the Hard Way (So You Don’t Have To)
- Wrap-Up
Designing a two-bedroom, one-bath house is like making a great sandwich: the ingredients are simple, but the order matters.
In Revit, the “order” is your workflowset up the project correctly, block out the building shell, then shape the rooms,
then document like you’re trying to impress a picky building inspector (because… you might be).
This guide walks you through a clean, real-world process to create a practical 2 bed / 1 bath layout in Revit,
with specific example dimensions, modeling tips, and documentation steps. You’ll end with a readable plan,
rooms tagged, key dimensions placed, and sheets ready for plotting. No chaos. No mystery meat walls.
Before You Model: Plan the Layout
Revit is amazing, but it’s not a mind reader. If you start drawing walls without a plan, you’ll end up “designing”
by repeatedly moving things around until your cursor develops resentment.
Define your program in plain English
- Two bedrooms (closets included)
- One bathroom (full bath or 3/4 bath)
- Kitchen + dining (combined or separate)
- Living area
- Laundry (closet, nook, or dedicated space)
- Mechanical/storage
Pick a realistic footprint
Many 2 bed / 1 bath homes land around 750–1,100 sq ft, depending on storage, hallway strategy,
and whether you’re doing open-plan living or more traditional separation. For this tutorial, we’ll model an example
footprint around 28′ x 40′ (about 1,120 sq ft gross), then tighten it as needed.
Do a quick “code sanity check” before you commit
Codes vary by jurisdiction, but a few common residential checks help you avoid rework:
- Hallway width: many residential layouts target at least 3′-0″ clear for main circulation.
- Bedroom egress: sleeping rooms typically need an emergency escape/rescue opening (often a compliant egress window).
- Door clearances: don’t trap your bathroom door behind a vanity swing like it’s a jump scare.
Translation: plan enough circulation, make sure bedrooms have usable windows, and keep door swings from fighting each other.
Your future self will send you a thank-you card. (In Revit, that card is called “fewer warnings.”)
Step 1: Start a Clean Revit Project
1) Create a new project from the right template
Start a New Project using an Architectural Template. Templates matter because they preload
view types, line weights, and common familiesbasically the difference between “ready to cook” and “why is there no pan?”
2) Set Project Units immediately
Go to Manage > Project Units. Confirm feet and inches (or the unit system your standards require).
Do this now, before you’ve placed a single wallbecause fixing units later is like changing your tire after the road trip.
3) Establish Levels (even for a one-story plan)
In an elevation view, set up levels such as:
- Level 1: 0′-0″
- Top of Plate / Level 2 (optional): 8′-0″ or 9′-0″ (for reference)
- Roof: depends on your roof strategy
Even if you only need one floor plan, clean levels keep your model organized and make later steps (ceilings, roof, sections)
far easier.
4) Add Grids (lightlydon’t turn your house into a chessboard)
For a small residence, grids are optional, but they can help you keep structure aligned. Use them sparingly:
maybe a few key grid lines to anchor the footprint and major partitions.
Pro tip: If grids feel like overkill, use Reference Planes as your “soft grids.”
Reference planes are perfect for lining up hallways, bedroom walls, and kitchen runs without turning your drawing into alphabet soup.
Step 2: Build the Envelope First
The envelope is your outer shell: exterior walls, overall footprint, and the basic floor boundary.
Build this first so your interior layout has something stable to snap to.
1) Create exterior walls
- Open Level 1 floor plan.
- Go to Architecture > Wall.
- Select an exterior wall type (or duplicate and edit one to match your construction).
- Set wall height (e.g., up to “Top of Plate” or a roof constraint).
- Sketch a simple rectangle for your initial footprint (example: 28′ x 40′).
Keep it simple at first. You can add jogs, porches, and bump-outs laterafter the plan works.
A fancy outline doesn’t fix a bathroom that opens directly into the kitchen like a sitcom plot.
2) Add a floor boundary
Go to Architecture > Floor. Use Pick Walls to trace the exterior boundary quickly.
Make sure the boundary is a closed loop (Revit is very strict about thislike a bouncer checking IDs).
3) Consider exterior openings early
At minimum, decide where your main entry and a secondary exit might go (if your design includes one).
You don’t need every window perfect yet, but you should know which side is “front,” where you want daylight,
and where you definitely don’t want your neighbor’s fence starring in your living room view.
Step 3: Lay Out the Interior Walls
Now the fun part: turning a rectangle into a home that feels good to live in.
A solid 2 bed / 1 bath plan usually wins by doing three things well:
privacy (bedrooms not exposed), efficient plumbing (bath/kitchen near each other),
and simple circulation (you shouldn’t need a map to find the bathroom).
A practical layout strategy
One common approach:
- Public zone: entry → living → dining/kitchen (often open concept)
- Private zone: a short hall to bedrooms + bath
- Plumbing cluster: bathroom shares a wall with kitchen/laundry to reduce piping runs
Model the main partitions (example)
- Create a hallway about 3′-0″ to 3′-6″ wide (depending on your goals and local requirements).
- Place the bathroom near the hallway center (good access for both bedrooms and guests).
- Put Bedroom 1 at one end of the private zone and Bedroom 2 at the other (privacy win).
- Keep closets on “buffer walls” between bedrooms and living spaces where possible (sound control bonus).
Use constraints so the plan behaves
In Revit, don’t just “eyeball” wall locationsuse dimensions and constraints:
- Place walls roughly.
- Add Aligned Dimensions between wall faces.
- Lock key dimensions that define the plan (hallway width, bathroom width, kitchen run).
- Adjust numbers to refine. Revit will move the geometry cleanly.
This is how you get a layout that edits smoothlyso when someone says, “Can we make the second bedroom bigger?”
you don’t have to rebuild the entire universe.
Step 4: Place Doors and Windows
1) Add doors with real sizes
In Architecture > Door, load families as needed and choose realistic door sizes.
Residential interiors often use doors around 2′-6″ to 3′-0″ wide, while main entry doors are commonly larger.
Use what matches your standards and local expectations.
Place doors so they swing into rooms logically and don’t collide with fixtures. Bathrooms especially:
make sure the door swing doesn’t clip the toilet, vanity, or your dignity.
2) Use temporary dimensions to position doors and windows
When you place a door/window, Revit shows temporary dimensions. Use them.
Dial in offsets (like centering a door in a wall segment) instead of dragging until it “looks right.”
3) Add windows with daylight and privacy in mind
Use Architecture > Window and pick window types that make sense for each room.
Bedrooms typically need a window that satisfies emergency escape/rescue requirements in many jurisdictions.
Living areas usually want larger glazing for daylight and views.
If you want a quick, realistic starting point:
- Bedrooms: one primary window each, placed for furniture flexibility (avoid putting it exactly where the bed headboard wants to be).
- Bathroom: smaller privacy window (often higher sill) or frosted glazing.
- Living/Dining: larger windows or a slider, depending on your design.
Reminder: Confirm local code for egress, glazing, and safety glazing requirements.
This tutorial shows a workflow; compliance is your local jurisdiction’s final boss.
Step 5: Add Rooms, Tags, and Area Checks
1) Place rooms
Go to Architecture > Room and click inside each enclosed space.
If Revit refuses to recognize a room boundary, it usually means there’s a tiny gap somewhere
(Revit loves tiny gaps the way cats love knocking things off shelves).
2) Fix boundaries with Room Separation Lines
When walls aren’t defining boundaries correctly (or when you’re using openings/conditions that confuse the room solver),
use Room Separator lines to close the boundary logically.
3) Tag rooms and check areas
Turn on Tag on Placement or add room tags after. Then sanity-check the areas:
do the bedrooms feel large enough? Is the bathroom workable? Is the hallway eating half the house?
4) Use color fills for quick plan reads
A color fill legend can help you instantly see whether the plan is balanced (or whether your “hallway” has quietly become a bowling lane).
It’s also a nice way to communicate program zones in presentations.
Step 6: Dimension and Annotate
A modeled plan is great. A documented plan is usable. And if you’re sharing this layout with anyone else
(teacher, client, teammate, reviewer), documentation is the difference between “cool” and “what am I looking at?”
Dimension strategy that stays readable
- Overall dimensions: building width/length outside the plan
- Primary interior strings: major partitions, hallway width, bathroom width
- Openings: key door/window locations as needed
Use Aligned Dimensions and choose “Wall Faces” when you want consistent clear dimensions.
Avoid dimensioning to random model edges unless you want your future revision set to become a horror movie.
Add key notes without turning the plan into a text novel
Use short, standard notes (wall type tags, door tags, window tags, basic finish notes). Keep the plan clean.
If everything is labeled, nothing is readable.
Step 7: Schedules and Sheets
1) Create schedules (optional, but powerful)
Even for a small house, schedules make your output feel professional:
- Door Schedule: mark, type, width, height
- Window Schedule: mark, type, width, height
- Room Schedule: room name, number, area (great for quick checks)
2) Create a sheet and place your views
- Load or create a Title Block (matching your sheet size).
- Create a new Sheet.
- Drag your Floor Plan view onto the sheet.
- Set a clear view scale (commonly 1/4″ = 1′-0″ for small residential plans, but use your standards).
Keep one clean plan sheet first. Then add more sheets only when needed (e.g., dimension plan, reflected ceiling plan, elevations, sections).
The goal is clarity, not a 37-sheet epic saga about a 900-square-foot cottage.
Step 8: Quality Checks and Smart Revisions
Check your model health
- Warnings: review and resolve the important ones (overlapping walls, unattached elements, constraint conflicts).
- Room bounding: verify rooms are enclosed and labeled correctly.
- Door swings: confirm doors clear fixtures and circulation paths.
- Furniture test-fit (optional): drop in basic furniture families to confirm usability (beds, sofa, dining table).
Use View Templates for consistency
If your line weights, tags, and visibility keep changing from view to view, create a View Template
and apply it to your plans. This keeps output consistent and saves time when you add new views later.
Plot/export early (so you don’t panic later)
Print to PDF or export early to confirm your line weights and text sizes look good at the chosen scale.
It’s better to fix readability now than the night before a deadline when everything is “mysteriously tiny.”
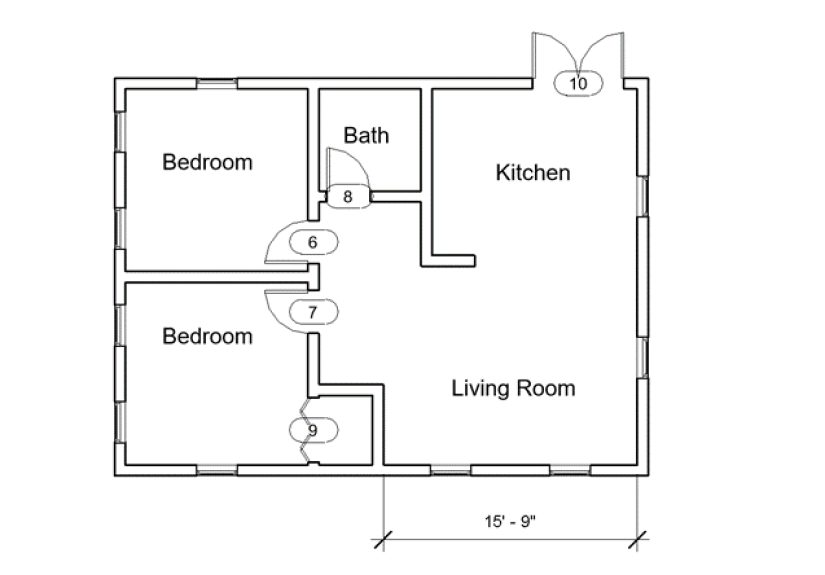
Bonus: A Sample 2 Bed / 1 Bath Layout You Can Copy
Here’s a simple, workable layout concept you can model quickly. Treat this as a starting point, not gospel.
Adjust for site, climate, client needs, and local code.
Example footprint
- Overall: 28′ x 40′ (gross)
- Exterior walls: choose a realistic thickness (e.g., 2×6 assembly) based on your standards
Example room sizes
| Space | Target Size (Example) | Notes |
|---|---|---|
| Living Room | 14′ x 16′ | Front-facing windows; flexible furniture wall |
| Kitchen/Dining | 12′ x 14′ | Keep plumbing wall near bath/laundry if possible |
| Bedroom 1 | 11′ x 12′ | Closet on shared wall for sound buffering |
| Bedroom 2 | 10′ x 11′ | Great for guest room/office/kid room |
| Bathroom | 5′ x 8′ | Classic full-bath footprint; watch clearances |
| Hallway | 3′ to 3’6″ wide | Short and efficient; avoid “hallway mansion” syndrome |
| Laundry Closet | 3′ x 3′ or stacked niche | Near bath/kitchen for shared utilities |
How to model this quickly in Revit
- Sketch the exterior wall rectangle at the footprint size.
- Place a short hall along one side or through the center, depending on window strategy.
- Block out bathroom near the kitchen plumbing wall.
- Create bedrooms with closets on shared buffer walls.
- Place doors, then windows; then rooms and tags; then dimensions.
Once the plan “works,” refine: align key walls, lock critical dimensions, and adjust openings for furniture and daylight.
That’s the rhythm: block → test → constrain → document.
Experiences: What People Learn the Hard Way (So You Don’t Have To)
Revit tutorials often show the “happy path,” where every wall lands perfectly, rooms tag themselves, and nobody accidentally
draws a wall 0′-0 1/256″ off grid like a tiny act of sabotage. In reality, most Revit users learn the same lessons the same way:
by making a mess once, then swearing they’ll never do that again… and then doing it again one more time for character development.
One of the biggest “experience-based” upgrades is learning to treat dimensions as design controls, not just annotations.
Beginners often draw a layout by dragging walls until it looks right, then they dimension it later. That works until the first change request:
“Can we shift the bathroom two feet?” Suddenly your doors, windows, and room tags start behaving like they’re in a slapstick comedy.
The smarter workflow is to dimension early, then lock only the dimensions that define the plan. For example, lock hallway width,
bathroom width, and key offsets for kitchen runs. Keep other dimensions flexible. This creates a layout that adapts without exploding.
Another lesson: set your output scale sooner than you think. A plan that looks fine at 1:50 can become unreadable at
1/4″ = 1′-0″ if your line weights and annotation sizes aren’t tuned. Revit gives you enough control to make a plan look crisp,
but it also gives you enough rope to make your text microscopic. The practical trick is to pick a target sheet and scale early,
drop your plan onto a sheet, and print a test PDF. If your room tags look like ants holding protest signs, adjust your annotation settings now,
not the night before a deadline.
Rooms are their own “rite of passage.” When a room won’t place, the issue is almost always a tiny boundary gapan open corner,
a wall that didn’t quite connect, or a sketch line that’s not actually closed. Experienced users don’t panic; they zoom in, use thin lines,
and look for the culprit like a detective in a very unglamorous mystery novel titled The Case of the Missing Room Boundary.
When the geometry is legitimately complex (open to below areas, niches, partial-height conditions, or conceptual boundaries),
Room Separation Lines become your best friend. They let you define logical boundaries without forcing walls into places
they don’t belong.
Door and window placement also gets easier when you stop thinking “objects” and start thinking “relationships.”
Instead of placing a door and eyeballing it, use the temporary dimensions to center it or give it a clean offset.
Then, if the wall shifts, your door stays aligned the way you intended. The same mindset applies to windows:
if you place bedroom windows with consistent offsets from corners or centered on wall segments, edits are painless,
and your elevations look intentional instead of “random window generator.”
Finally, the most underrated experience tip: name things like you’re going to hand the file to someone else tomorrow.
Even if you won’t. Name views consistently (e.g., “A1 – Floor Plan – Level 1”), keep your sheets organized,
and use view templates when you can. A small 2 bed / 1 bath project can still become messy if you duplicate views 12 times
and leave them named “Copy of Copy of Level 1 (2).” That’s not a workflowit’s a cry for help.
If you remember nothing else, remember this: a great Revit layout isn’t just drawing walls. It’s building a plan that edits cleanly,
documents clearly, and tells the story of the house in a way other humans can understand. Revit can absolutely do that
as long as you drive it like a tool, not like a slot machine.
Wrap-Up
Creating a two-bedroom, one-bath house layout in Revit is a lot easier when you follow a deliberate sequence:
set up the project → model the envelope → build interior logic → place openings → define rooms → document → sheet it.
That workflow keeps edits sane, keeps your plan readable, and keeps your deadline from eating you alive.
Use the sample layout as a starting point, then refine it with real constraintssite conditions, orientation,
local code requirements, and how people actually live. Your goal isn’t just a “finished Revit file.”
Your goal is a layout that’s comfortable, buildable, and clear enough that someone else could use it without guessing.