Table of Contents >> Show >> Hide
- Why Flank Steak Gets Tough (and Why Cutting Matters More Than You Think)
- Step 1: Find the Grain (a.k.a. Follow the “Meat Lines”)
- Step 2: Let It Rest (So You Don’t “Juice-Bomb” Your Cutting Board)
- Step 3: The Foolproof Slicing Method (Works Even If the Grain Changes Direction)
- Before You Slice: Prep Moves That Make Flank Steak Easier to Eat
- Cooking Choices That Help Tenderness (So Cutting Isn’t Doing All the Work)
- Common Mistakes That Make Flank Steak Chewy
- Specific Examples: How to Slice for Different Dishes
- FAQ: Real Questions People Ask Right Before They Start Slicing
- Conclusion: Tender Flank Steak Is Mostly a Knife Skill
- Real-World Experience: The Little Things That Made My Flank Steak Consistently Tender (500+ Words)
Flank steak is the friend who shows up to the party with amazing flavor… and a slightly intense personality.
Cook it right and it’s bold, beefy, and downright craveable. Slice it wrong and it turns into a jaw workout you
didn’t sign up for. The good news: tenderness isn’t a mystery ingredientit’s mostly geometry.
In this guide, you’ll learn exactly how to spot the grain, slice against it like a pro, and avoid the classic
“why is this so chewy?” heartbreak. We’ll also cover the little prep and cooking choices that make slicing easier
and results more consistentbecause “tender every single time” is the vibe.
Why Flank Steak Gets Tough (and Why Cutting Matters More Than You Think)
Flank steak comes from a hard-working area of the cow, which means it’s lean, flavorful, and packed with long muscle
fibers. Those fibers run in a clear directioncalled “the grain.” When you bite into steak, your teeth are basically
trying to break apart those fibers.
Slice with the grain and you leave fibers long, ropey, and stubborn. Slice against the grain and you
shorten those fibers into tiny segments, making every bite easier to chew and noticeably more tender. Same steak,
totally different experience.
Think of it like cutting a bundle of straws: if you cut along the straws, you get long straws (harder to bite through).
If you cut across them, you get short pieces (much easier). Your mouth will thank you. Possibly send you a thank-you note.
Step 1: Find the Grain (a.k.a. Follow the “Meat Lines”)
What the grain looks like
On flank steak, the grain usually appears as long, parallel lines running across the surfacelike the world’s most delicious
wood plank. Those lines are the muscle fibers. Your goal is to cut perpendicular to them.
Quick tricks to make the grain obvious
- Use good light: Tilt the steak under a bright kitchen light. The fibers pop when the light rakes across the surface.
- Look for “striations”: The surface often shows ridges and grooves; the direction they run is the grain.
- The bend test: Pick up one endflank tends to bend more easily with the grain than across it.
Pro move: mark it before cooking
Once seared or grilled, the surface can get dark and the grain becomes harder to see. Before cooking, make one tiny notch
on an edge to remind you which way the grain runs. Future-you (holding a knife) will feel extremely supported.
Step 2: Let It Rest (So You Don’t “Juice-Bomb” Your Cutting Board)
Resting isn’t just traditionit’s practical. When steak comes off high heat, juices are active and mobile. Give the meat a few minutes
to settle so you keep more of that moisture in the slices (instead of watching it pool like a tiny tragedy).
- Typical rest: 5–10 minutes for flank steak.
- How to rest: Place on a cutting board and loosely tent with foil (don’t wrap tightsteam is the enemy of crust).
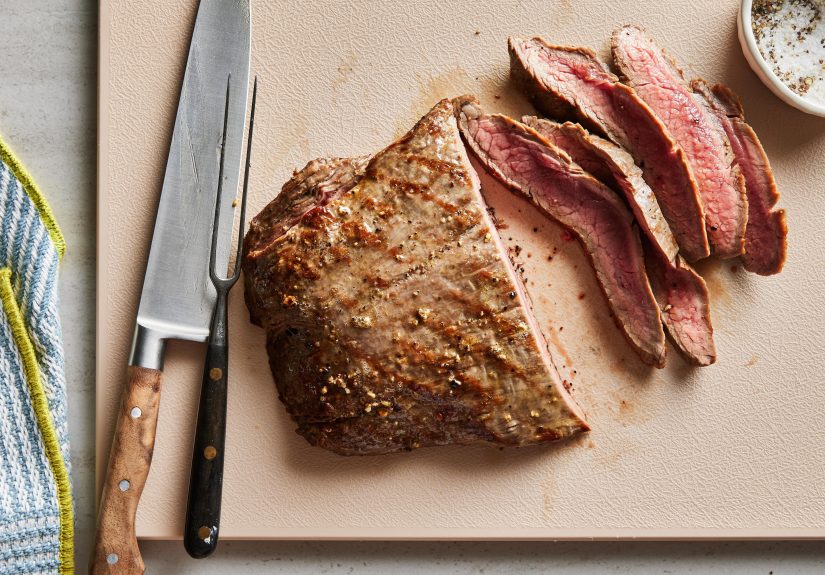
Step 3: The Foolproof Slicing Method (Works Even If the Grain Changes Direction)
1) Cut into manageable pieces first
Flank steak can be wide and awkward. If it’s longer than your cutting boardor you just want more controlcut the steak into
2–3 shorter sections with the grain (yes, with the grainthis is the one time it’s allowed). This step is about making
the next step safer and more precise.
2) Rotate each piece and slice against the grain
Turn a section so the grain lines run left-to-right in front of you. Then slice straight down (or slightly forward) so your knife
cuts across those lines.
3) Slice thinand consider a 45° bias cut
Aim for thin slices, about 1/8 to 1/4 inch. Thinner slices = shorter chew distance and more tenderness. For extra “steakhouse”
vibes, hold the knife at about a 45-degree angle (a bias cut). This increases the surface area of each slice and can make the
bite feel even more tender.
4) Use the right knife (sharp beats fancy)
A sharp chef’s knife or slicing knife gives clean cuts without shredding the fibers. A dull knife crushes and tears, which can make the texture
seem tougher. If your knife needs a pep talk and a honing rod, now is the time.
Cheat Sheet: Tender Slices in 20 Seconds
| Goal | What to Do | Why It Works |
|---|---|---|
| Shorten fibers | Slice against the grain | Turns long fibers into short, easy-to-chew pieces |
| Improve texture | Slice thin (1/8–1/4″) | Less resistance per bite |
| Extra tenderness | Cut on a 45° bias | More surface area; softer perceived bite |
| Keep it juicy | Rest 5–10 minutes | Reduces juice loss when slicing |
Before You Slice: Prep Moves That Make Flank Steak Easier to Eat
Cutting technique is the MVP, but a few smart prep steps can make tenderness even more consistentespecially if you’re aiming for
weeknight reliability.
Trim silver skin (if present)
Some flank steaks come with bits of tough membrane (silver skin). Slide a knife under it, lift slightly, and trim it away. You’re not trying to
remove every molecule of fatjust the chewy, shiny stuff that doesn’t soften with cooking.
Use salt strategically
Salting ahead of time can improve seasoning and help the meat hold onto moisture. If you have time, salt 40 minutes to a few hours before cooking
(or even overnight in the fridge). If you don’t have time, salt right before cooking and focus on proper slicing after.
Marinate for flavor (and sometimes a slight tenderness boost)
Flank steak loves marinades because it’s lean and coarse-grained. A few hours in a well-balanced marinade can improve flavor penetration and make the
texture feel more forgiving. But don’t let an ultra-acidic marinade go for an eternitytoo much acid for too long can make the surface turn mushy
or oddly firm.
- Sweet spot: Often a few hours; many cooks like the 1–8 hour range.
- Balance: Acid + oil + salt + aromatics (think citrus or vinegar + olive oil + soy/fish sauce + garlic).
Cooking Choices That Help Tenderness (So Cutting Isn’t Doing All the Work)
Flank steak performs best with quick, high-heat methodsgrilling, broiling, or searingfollowed by a rest and a proper slice. Overcooking makes a lean
cut drier and firmer, which can feel tougher even if you slice correctly.
Use a thermometer if you want repeatable results
If “every single time” is the goal, a thermometer is your cheat code. Cook to your preferred doneness, then rest.
Food safety guidance for whole cuts of beef is different than personal preference, so follow reliable handling practices and choose a doneness you’re comfortable with.
Let crust happen, but don’t torch the inside
High heat creates a great sear (hello, flavor), but you still want the interior to stay tender. If your steak is very thick, consider a two-zone grill
setup: sear over high heat, then finish over gentler heat.
Common Mistakes That Make Flank Steak Chewy
- Slicing with the grain: The #1 cause of “why is this so tough?” heartbreak.
- Slicing too thick: Even against the grain, thick slices can feel chewy.
- Skipping the rest: You lose juices and the texture can feel firmer.
- Assuming the grain is uniform: Sometimes it shifts. Cutting into sections first helps you realign.
- Dull knife: A torn slice eats tougher than a clean slice.
Specific Examples: How to Slice for Different Dishes
Fajitas or steak tacos
Slice thinly against the grain, ideally on a bias. This maximizes tenderness and gives you flexible strips that fold into tortillas without fighting back.
Stir-fry
For raw slicing, partially freeze the steak for 15–25 minutes so it firms up. Then slice thin against the grain into bite-size pieces. Thin slices cook fast,
staying tender before they dry out.
Steak salad or grain bowls
Cut across the grain into thin ribbons, then fan the slices across the salad. It looks fancy, eats tender, and makes you seem like someone who owns matching
spice jars.
FAQ: Real Questions People Ask Right Before They Start Slicing
Can I cut flank steak before cooking?
Yesespecially for stir-fry. Just make sure you identify the grain first and slice against it. For grilling or broiling, cooking it whole is often easier,
then slicing after resting.
What if I can’t tell the grain after cooking?
That’s why the pre-cook notch is so helpful. If you didn’t mark it, look at the cut edges and the direction of the fibers in the cross-section. When in doubt,
cut a small test sliceif it looks like long strings running through it, rotate 90 degrees and try again.
Is flank steak supposed to be medium-rare?
Many people like flank steak around medium-rare to medium for tenderness and juiciness, but preferences vary. The most important part is avoiding extreme overcooking
and slicing correctly.
How is flank steak different from skirt steak?
Both are flavorful, coarse-grained cuts that benefit hugely from slicing against the grain. Skirt steak can have an even more pronounced grain and is often
narrower and thinner, so the “cut into sections, then rotate and slice” method is especially useful.
Conclusion: Tender Flank Steak Is Mostly a Knife Skill
If you remember only one thing, make it this: find the grain and slice against it. Then stack the odds in your favorrest the steak,
slice thin, and consider a 45-degree bias cut for next-level tenderness.
Flank steak will always have a bold personality (it’s a hardworking cut), but with the right slicing method, it becomes the kind of tender you serve proudly
whether it’s fajita night, salad night, or “I grilled something and now I need applause” night.
Real-World Experience: The Little Things That Made My Flank Steak Consistently Tender (500+ Words)
The first time I cooked flank steak, I did everything “right” (or so I thought). I marinated it, I got a nice sear, I let it restthen I sliced it into
thick, heroic slabs the way you’d slice a ribeye. The flavor was fantastic. The chew was… ambitious. It was the culinary equivalent of buying a sports car
and leaving the parking brake on.
The fix wasn’t a new recipe. It was learning to treat flank steak like what it is: long, coarse muscle fibers that need to be shortened with smart cutting.
Once I started paying attention to the grain, the whole experience changed. One of the simplest habits that improved my results was the pre-cook “grain notch.”
I’d find the direction of the fibers, then cut a tiny V-shaped notch on the edge. After grilling, when everything looked dark and dramatic, that notch still
told me exactly how to orient the steak on the board. It’s such a small move, but it eliminates the guessing game.
Another game-changer was slicing thinner than I felt emotionally ready for. Many people stop at “thin-ish,” especially when the steak looks so good
they want big slices. But flank steak rewards restraint. When I started aiming for 1/8-inch to 1/4-inch slices, the tenderness skyrocketed. And the funny part?
Thin slices actually look more plentiful and more “restaurant” on a platter, so everyone feels like they’re getting a generous portion.
I also learned that bias slicing is the difference between “this is pretty tender” and “wait… this is flank steak?” Holding the knife at a 45-degree angle
felt awkward at first, like writing with your non-dominant hand. But after a couple tries, it became natural. The slices looked wider, draped better over
tacos and salads, and the bite felt softer. It’s not magic; it’s just more surface area and a slightly different fiber geometry working in your favor.
Resting mattered, toobut not in a fussy, “walk away for 20 minutes” way. Five to ten minutes was enough for flank steak in my kitchen. If I sliced too soon,
I’d lose a noticeable amount of juice and the meat felt a little firmer. If I rested too long under a tight foil wrap, I’d sacrifice crust, which is a tragedy
of a different kind. The sweet spot was a loose tent: warm slices, better moisture retention, still a decent exterior.
One more practical discovery: when the grain changes direction (which can happen across a big piece), cutting the steak into 2–3 shorter sections first makes
it almost impossible to mess up. I’d cut it into chunks (with the grain, just for manageability), then rotate each chunk so the fibers ran left-to-right,
and slice down across them. It’s like breaking a big problem into smaller problemsexcept delicious.
Finally, I stopped blaming marinades for what was really a slicing issue. Marinades are great for flavor, and sometimes they help tenderness a bit, but they can’t
rescue a with-the-grain slice. Once I nailed the cutting technique, I realized I could keep marinades simpleolive oil, citrus, garlic, salt, maybe soyand still
get a steak that tasted bold and ate tender. The lesson: your knife does the heavy lifting. Everything else is just the supporting cast.
If you’re chasing consistent tenderness, don’t overcomplicate it. Find the grain, mark it, rest the steak, slice thin against it, and use a confident bias cut
when you want to feel fancy. Do that, and flank steak stops being “the tough cut you have to work around” and becomes “the flavorful cut you can’t wait to make again.”