Table of Contents >> Show >> Hide
- Before You Start: A Quick Setup That Saves Your Sanity
- Step 1: Pick the Right Cake (and Let It Cool Completely)
- Step 2: Level, Fill, and Stack Like You Mean It
- Step 3: Apply a Thin Crumb Coat
- Step 4: Chill Until Firm
- Step 5: Choose Your Fondant Strategy (Store-Bought or Homemade)
- Step 6: Knead Fondant Until It’s Warm and Flexible
- Step 7: Color the Fondant (Without Turning It into a Swamp)
- Step 8: Prep the Work Surface the Smart Way
- Step 9: Roll Fondant to the Right Size and Thickness
- Step 10: Drape Fondant Over the Cake (The “Deep Breath” Moment)
- Step 11: Smooth the Top First, Then the Sides
- Step 12: Trim Excess Fondant Cleanly
- Step 13: Add Decorations (Cutouts, Texture, Letters, and Details)
- Step 14: Store and Serve Without Ruining Your Finish
- Quick Troubleshooting: When Fondant Gets Weird
- Design Example: A Simple “Modern Birthday Cake” in 10 Minutes
- Bonus: Real-World Experiences (The Stuff Tutorials Don’t Warn You About)
- Conclusion
Fondant is basically edible Play-Doh with a résumé. It can give cakes that clean, bakery-window finish, plus it lets you make everything from classy bows to tiny edible dinosaurs wearing party hats (your cake, your rules).
The trick is that fondant has a personality: it likes warmth (not too much), hates dryness (unless you want decorations to dry), and will absolutely expose your impatience in HD.
Follow these 14 steps and you’ll get smooth coverage, crisp edges, and decorations that look intentionalnot like they escaped from a sugar-dough crime scene.
Before You Start: A Quick Setup That Saves Your Sanity
What you’ll need (no fancy bakery vault required)
- Fondant: store-bought or homemade (rolled fondant works best for covering cakes).
- Buttercream (or ganache): to create a smooth base and help fondant stick.
- Turntable (nice) or a lazy Susan (chaotic good).
- Rolling pin (nonstick if possible) and a smooth work surface/mat.
- Powdered sugar and/or cornstarch: for dusting.
- Fondant smoother (helpful) and your clean hands (mandatory).
- Pizza cutter/parring knife: for trimming.
- Gel food coloring: for tinting without turning fondant into soup.
- Cutters/embossers, small tools, toothpicks, and a soft brush for details.
- Edible glue (or water) and a tiny bit of shortening for repairs.
One more thing: fondant loves a smooth foundation. If your cake looks like a lumpy mattress, fondant will not magically turn it into a marble countertop. It will just become a lumpy mattress in a tuxedo.
Step 1: Pick the Right Cake (and Let It Cool Completely)
Start with a sturdy cake that can handle a little pressure: classic butter cakes, chocolate cakes, or well-chilled sponge layers. Let the cake cool completely before decorating.
Warm cake + fondant = melted sadness and sliding.
Step 2: Level, Fill, and Stack Like You Mean It
Trim domes so the cake is level. Fill and stack your layers, then press gently to settle them. If the cake is leaning, fondant will highlight that lean like a spotlight in a courtroom drama.
Step 3: Apply a Thin Crumb Coat
Spread a thin layer of buttercream over the entire cake to trap crumbs and create a neat surface. Think of it as primer before painting a wallexcept you can lick the spatula.
Step 4: Chill Until Firm
Refrigerate the crumb-coated cake until the frosting feels set and firm to the touch. This step helps your fondant glide and stick cleanly without pulling crumbs or smearing buttercream.
Step 5: Choose Your Fondant Strategy (Store-Bought or Homemade)
Store-bought fondant is convenient and consistent. Homemade fondant (especially marshmallow fondant) can taste better and be softerbut it’s also more sensitive to humidity and stickiness.
If you’re new, don’t start with “I’ll make fondant from scratch at midnight.” That’s how legends become cautionary tales.
Step 6: Knead Fondant Until It’s Warm and Flexible
Knead fondant until it’s smooth, pliable, and slightly warm from your hands. If it’s cracking, it’s too dry or too cold. If it’s sticky, dust lightly or rub a tiny amount of shortening on your hands.
The goal is soft and elasticnot greasy.
Step 7: Color the Fondant (Without Turning It into a Swamp)
Use gel coloring for the best control. Add a small dab, fold the fondant over it, and knead until the color is even. For deep colors (red, black), plan aheadthose shades often need time to darken as they rest.
Wear gloves if you’d like to avoid looking like you lost a fight with a unicorn.
Step 8: Prep the Work Surface the Smart Way
Lightly dust your surface with powdered sugar or cornstarch (too much can dry fondant). Rotate the fondant often as you roll so it doesn’t glue itself to your counter like a dramatic goodbye note.
If your kitchen is humid, use cornstarch sparingly and keep extra fondant covered when not in use.
Step 9: Roll Fondant to the Right Size and Thickness
Roll fondant into a circle large enough to cover the top and sides of your cake with a little extra. Aim for about 1/8 inch for most cake coveringthin enough to look polished, thick enough not to tear when you lift it.
Measure by placing your rolling pin across the cake: you want diameter = cake width + 2×cake height (plus a small buffer).
Step 10: Drape Fondant Over the Cake (The “Deep Breath” Moment)
Lift the fondant using your rolling pin (drape it over the pin like a blanket), then center it over the cake. Work relatively quicklyfondant dries as it sits out, and dried fondant is about as cooperative as a cat in a bath.
Step 11: Smooth the Top First, Then the Sides
Start smoothing from the center of the top outward. Push air bubbles toward the edges. Then move to the sides, gently lifting and smoothing the fondant downward to avoid pleats.
Use a fondant smoother on top for a clean finish and your hands (or smoother) for the sides.
Mini-fix: Air bubbles
If a bubble won’t move, prick it with a pin/needle (tiny hole!) and smooth the air out toward the hole. The goal is “invisible repair,” not “polka-dot cake.”
Step 12: Trim Excess Fondant Cleanly
Use a pizza cutter or sharp knife to trim around the base. Keep the blade close to the board for a neat edge. If you’re adding a border, you can leave a hair of extra fondant for insurance.
Otherwise, trim confidentlyfondant can sense fear.
Step 13: Add Decorations (Cutouts, Texture, Letters, and Details)
Now the fun part: turn your smooth fondant cake into a theme cake, a wedding cake, or a cake that screams “I watched three tutorials and chose greatness.”
Easy decoration ideas that look professional
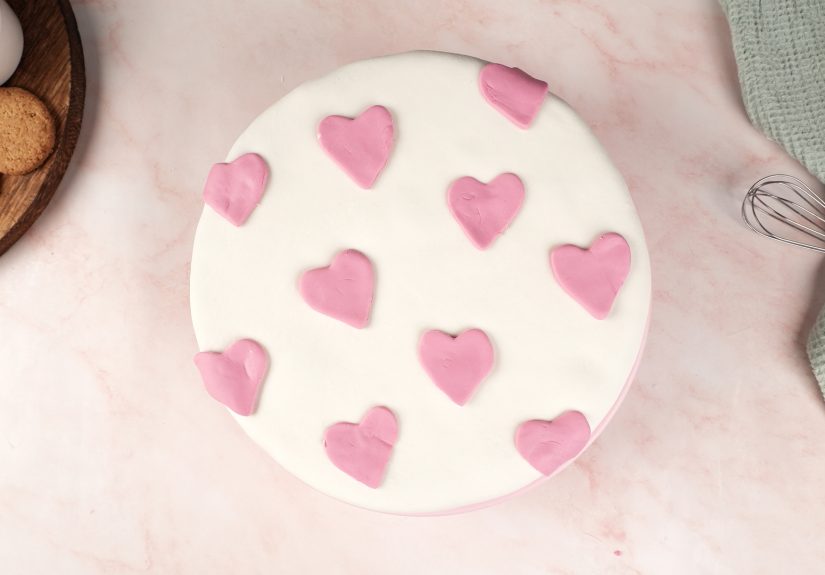
- Cutouts: Roll fondant slightly thicker for shapes. Use cookie cutters for stars, hearts, florals, or geometric patterns.
- Ruffles and ribbons: Cut strips, thin edges with your fingers, then attach with a light brush of water or edible glue.
- Embossing and texture: Press textured mats or embossers gently into fondant for instant “wow.”
- Letters and numbers: Use alphabet cutters or stamp sets; let pieces firm up a bit before moving to avoid warping.
- Painted details: Mix gel color with a little clear alcohol (or lemon extract) to paint fine lines that dry quickly.
How to attach decorations
For fondant-on-fondant: brush a small amount of water or edible glue (less is more). For heavier pieces: consider royal icing as “edible cement.”
If you add wet glue everywhere, you can cause sticky spots or color bleedfondant is dramatic like that.
Step 14: Store and Serve Without Ruining Your Finish
Fondant-covered cakes store best in a cool, dry environment. Refrigeration can cause condensation (“fondant sweat”) when you bring the cake back to room temperature.
If you must refrigerate (because of fillings or food safety), keep the cake in a box and let it come to room temp in the box so condensation forms on the box, not on your masterpiece.
Quick Troubleshooting: When Fondant Gets Weird
Problem: Cracks around the edges
Usually too dry or rolled too thin. Knead longer, use a tiny bit of shortening, and roll slightly thicker next time. Small cracks can be smoothed with warm fingertips and a dab of shortening.
Problem: Elephant skin (tiny wrinkles)
Fondant dried out while rolling or was overworked with too much powdered sugar. Work faster, cover unused fondant, and use less dusting next round.
Problem: Tearing at the top edge
Fondant is stretched too hard over sharp corners. Make sure your buttercream base is rounded (not a sharp edge), and lift the fondant gently as you smooth down the sides.
Problem: Sticky fondant
Humidity or too much liquid coloring. Use cornstarch lightly, run a dehumidifier if possible, and stick with gel coloring. If it’s very sticky, let it rest briefly covered, then knead again.
Problem: Bulges near the bottom
Often from soft fillings or trapped air. Chill the cake layers firmly before covering, avoid overfilling, and let the cake settle before fondant goes on.
Design Example: A Simple “Modern Birthday Cake” in 10 Minutes
Want something that looks trendy without sculpting a sugar swan?
- Cover cake in smooth white fondant.
- Cut a few fondant circles in two or three sizes.
- Brush the back of each circle lightly with water and place in a loose cluster on one side.
- Add a short message in fondant letters (or use edible markers on a small fondant plaque).
- Finish with a thin ribbon border at the base.
It’s clean, modern, and gives “boutique bakery” vibeseven if you made it while wearing pajama pants. (The pajamas stay between us.)
Bonus: Real-World Experiences (The Stuff Tutorials Don’t Warn You About)
Here’s what people usually learn the hard wayso you don’t have to.
1) Your kitchen’s weather is part of the recipe. On a dry day, fondant can crust fast while you’re still rolling it, leading to those tiny “elephant skin” wrinkles. On a humid day, it can feel sticky no matter how politely you ask it to behave.
Many home bakers find that simply running the A/C, closing windows, and keeping fondant covered between steps makes a bigger difference than buying another gadget. If your fondant starts sticking, resist the urge to bury it in powdered sugar like you’re trying to survive a blizzard.
Too much sugar dries the surface and can make it crack later. A light dusting and steady rolling usually wins.
2) The crumb coat is not optionalit’s the boring hero. Beginners often want to skip straight to the “smooth fondant reveal.”
But most people who do that end up with crumbs showing through like freckles, bumps that get worse as you smooth, and frosting smears that make the fondant look greasy.
Once you try a proper crumb coat + chill, you’ll notice the fondant glides instead of drags, and smoothing becomes a calm activity rather than a competitive sport.
3) Rolling fondant feels like a workout because it kind of is. Expect your first rolled sheet to be slightly lopsided.
That’s normal. People usually improve quickly once they start rotating the fondant every few rolls and lifting it occasionally to prevent sticking.
A common “aha!” moment is realizing that the rolling pin isn’t just for flatteningit’s also the easiest way to lift and drape the fondant without stretching it.
4) Color has feelings, and those feelings are chaos. If you’re making bright red or deep black fondant, don’t be surprised if your hands look like you’ve been finger-painting with a villain.
Many decorators wear gloves and knead in stages, letting the fondant rest so the color develops.
Another common experience: mixing two colors is faster than trying to bully one color into existence. For example, start with brown for black, or pink for red, then deepen it.
5) Decorations are easier when they’re not made “live.” A lot of people try to cut letters and stick them on immediately… then watch them stretch, warp, and turn into abstract art.
The fix is simple: cut decorations first, let them sit for 10–20 minutes to firm up, then place them. For pieces that need to stand up (like petals, bows, or loops), many bakers dry them on curved surfaces or forms and give them timesometimes overnightto set.
It’s the difference between “elegant” and “sad noodle.”
Bottom line: The best fondant decorators aren’t the ones who never make mistakesthey’re the ones who know how to fix them without panicking.
Fondant is forgiving if you stay gentle, keep things covered, and remember that smooth cakes are mostly about preparation, not magic.
Conclusion
Decorating with fondant is a mix of technique and timing: build a smooth base, roll to the right thickness, drape carefully, then smooth with patience (and maybe a little comedic self-talk).
Once you’ve nailed the basics, fondant becomes a creative playgroundclean lines, bold colors, textured patterns, and decorations that make people say, “Wait, you made that?”
Follow the 14 steps, keep your fondant covered, and remember: if something goes wrong, it’s not a disasterit’s just an opportunity to add a border and pretend it was always part of the design.