Table of Contents >> Show >> Hide
- Choose Your Harley Quinn Hair Version (Quick Decision)
- What You’ll Need
- Before You Start: 3 Smart Safety Notes
- The 15 Steps to Harley Quinn Hair
- Step 1: Decide your vibe (neat-enough vs. “beautiful disaster”).
- Step 2: Start with dry hair that has some grip.
- Step 3: Prep your “color zone” protection.
- Step 4: Create a clean center part (the backbone of the look).
- Step 5: Leave out face-framing pieces.
- Step 6: Section each side for high pigtails.
- Step 7: Add lift at the crown (optional, but very Harley).
- Step 8: Secure the pigtails tightly.
- Step 9: Make it “intentionally messy.”
- Step 10: Choose your color placement strategy.
- Step 11: Apply temporary color (spray or chalk) the smart way.
- Step 12: Apply semi-permanent dye (only if you’re committed).
- Step 13: Lock in the look with heat styling (optional).
- Step 14: Add Harley Quinn details (ribbon wrap or accessories).
- Step 15: Finish with holdand a quick “transfer check.”
- Aftercare: Keep the Color (and Your Hair) Happier
- Troubleshooting (Because Hair Has Opinions)
- Real-Life Notes: What It’s Like to Wear Harley Quinn Hair (Experience-Based Tips)
- Conclusion
Harley Quinn hair is iconic for one reason: it looks like you got ready in a rush… on purpose. The messy-high pigtails, the face-framing pieces, and those bold pink and blue tips scream “chaotic confidence” in the best way. The good news? You don’t need a movie-studio wig team. You just need the right plan for your hair type, your time, and your “do I want this to wash out tomorrow?” commitment level.
This guide walks you through a clean, repeatable methodwhether you’re doing temporary hair color spray, hair chalk, colored clip-in extensions, or a more lasting semi-permanent dye. Bonus: you’ll also learn how to make it look intentionally imperfect (the secret sauce of great cosplay hair and Halloween hairstyles).
Choose Your Harley Quinn Hair Version (Quick Decision)
Option A: Temporary Color (Best for one night)
- Hair color spray or colored hair wax: fastest, bold, can transfer onto clothing.
- Hair chalk: fun, more control, can be messy, shows best on lighter hair.
Option B: Semi-Permanent Color (Best for a weekend or a few washes)
- Semi-permanent dye: brighter payoff, longer-lasting, more prep and cleanup.
- Tip for dark hair: bright pink/blue usually pops more on pre-lightened ends. If you don’t want to lighten, use clip-ins instead.
Option C: Zero-Commitment Shortcut (Best for beginners)
- Wig or pink/blue clip-in extensions: cleanest, least risk, most consistent color.
What You’ll Need
- Rat-tail comb (for a sharp center part)
- Hair brush + teasing comb (or a fine-tooth comb)
- 2 strong elastics (plus 2 small clear elastics if you like extra hold)
- Bobby pins (because gravity is not your friend)
- Texturizing spray or dry shampoo (optional but helpful)
- Hairspray (medium or strong hold)
- Heat protectant (if you’ll curl or straighten)
- Temporary color spray OR hair chalk OR semi-permanent dye OR clip-in extensions
- Gloves, old towel, old T-shirt, and petroleum jelly (for stain prevention)
- Optional: pink and blue ribbon/scrunchies to wrap the bases of the pigtails
Before You Start: 3 Smart Safety Notes
- Patch test any dye or color product before full application (especially if you’ve never used it).
- Don’t color an irritated scalp (sunburn, rash, scratches, or active flaking).
- Protect your skin and surfaces: gloves, towels, and a barrier like petroleum jelly around the hairline save you from looking like you fought a highlighter and lost.
The 15 Steps to Harley Quinn Hair
Step 1: Decide your vibe (neat-enough vs. “beautiful disaster”).
Harley Quinn pigtails look best when they’re not too perfect. Plan for a little frizz, a little texture, and a little “I did this with confidence and a questionable playlist.” If you want a cleaner version, keep flyaways minimal and use ribbon wraps for polish.
Step 2: Start with dry hair that has some grip.
Freshly washed hair can be too silky and slippery. If your hair is super clean, mist a little dry shampoo or texturizing spray at the roots. If your hair is naturally textured, congratulationsyou already have the main ingredient.
Step 3: Prep your “color zone” protection.
Drape an old towel over your shoulders. Put on an old T-shirt. Apply a thin layer of petroleum jelly around your hairline and on your ears if you’re using dye or spray. Lay another towel on the floor or counter. Future You will be grateful.
Step 4: Create a clean center part (the backbone of the look).
Use a rat-tail comb to part your hair straight down the middle from hairline to nape. It doesn’t have to be laser-perfect, but it should be clearly centered. This makes the split-dye effect (pink on one side, blue on the other) read instantly.
Step 5: Leave out face-framing pieces.
On both sides, pull out small sections near the frontthink eyebrow to cheekbone area. These pieces give that lived-in, slightly chaotic Harley Quinn hairstyle feel. If you want extra drama, leave a few wispy pieces near the ears too.
Step 6: Section each side for high pigtails.
Brush the left side up and the right side up. Aim for pigtails that sit highusually a bit above the ears, closer to the crown than a “school day pony.” High placement is what gives that playful, animated silhouette.
Step 7: Add lift at the crown (optional, but very Harley).
Tease lightly at the crown (top center area) and smooth the surface gently with your brush. You’re not building a skyscraperjust adding a little volume so the style looks punchy in photos.
Step 8: Secure the pigtails tightly.
Tie each pigtail with a strong elastic. If your hair is heavy or layered, double up elastics or add a small clear elastic on top for extra hold. Use bobby pins at the base if the pigtail wants to droop.
Step 9: Make it “intentionally messy.”
Gently tug at the pigtails and a bit at the crown to loosen. Don’t yankjust soften. If you want a grittier look, add dry shampoo at the roots and scrunch the pigtails with your hands.
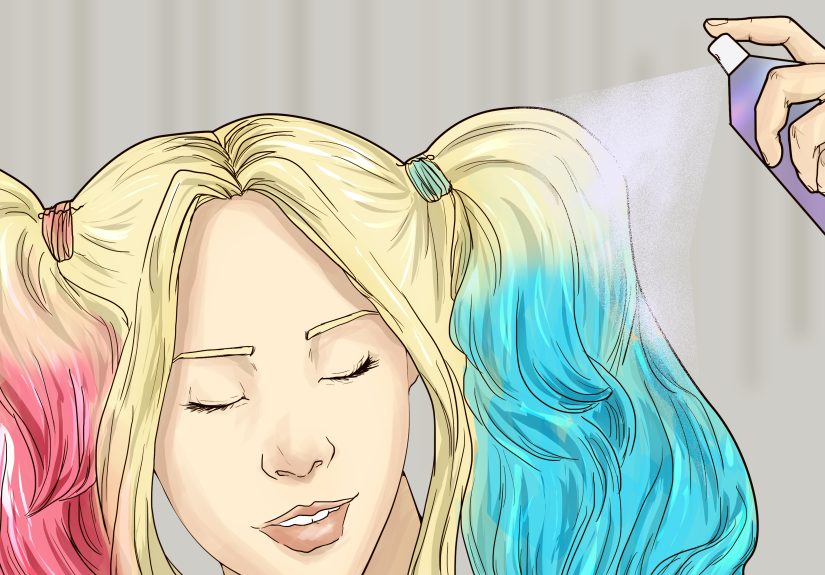
Step 10: Choose your color placement strategy.
Classic look: pink ends on the left pigtail, blue ends on the right pigtail (or vice versa). Focus color mostly on the bottom third to half of each pigtail for that dip-dye effect. On shorter hair, color just the last few inches.
Step 11: Apply temporary color (spray or chalk) the smart way.
Spray: Do it in a well-ventilated bathroom. Place paper or a towel behind the section you’re spraying to protect walls. Spray in light passes, let it set, then add more for intensity.
Chalk: Slightly dampen the ends first, then rub color onto the strands and seal with a quick mist of hairspray. Expect some transferHarley would call that “free souvenirs.”
Step 12: Apply semi-permanent dye (only if you’re committed).
Follow the product instructions exactly, wear gloves, and work in small sections. Apply color to the ends first for maximum brightness, then feather upward slightly. If you’re new to dye, consider doing a small strand test firstespecially if your hair is porous, curly, or previously bleached.
Important: If you need to lighten hair for brightness, a salon is the safest route. If you’re doing it at home, use a reputable kit and do not exceed recommended timing.
Step 13: Lock in the look with heat styling (optional).
If you want that movie-ish finish, add a slight wave to the pigtails with a curling wand or flat iron (with heat protectant). If you prefer the “I ran here from a comic book panel” vibe, skip heat and just scrunch with texturizer.
Step 14: Add Harley Quinn details (ribbon wrap or accessories).
Wrap pink ribbon around the base of the pink side and blue ribbon around the base of the blue side. You can loop the ribbon under the elastic and wrap upward so it stays put. Scrunchies also work if you want a softer, cuter take.
Step 15: Finish with holdand a quick “transfer check.”
Mist hairspray lightly at the roots and pigtails. Then press a tissue gently to the colored areas. If color transfers heavily, add one more light layer of hairspray to help seal (especially with chalk and spray). You’re now ready for selfies, tricks, and totally legal amounts of mischief.
Aftercare: Keep the Color (and Your Hair) Happier
If you used temporary spray or chalk
- Let it dry fully before putting on a hoodie, jacket, or light-colored collar.
- Expect some transferchoose darker clothing or add a cape/jacket layer for safety.
- Wash out with shampoo (a clarifying shampoo helps if it clings). Condition afterward.
If you used semi-permanent dye
- Use cool water and color-safe shampoo to slow fading.
- Deep condition once a week to keep ends from feeling crunchy.
- Limit heat styling or lower the temperaturebright colors fade faster with high heat.
Troubleshooting (Because Hair Has Opinions)
“My pigtails keep sliding down.”
Use texturizing spray at the roots before tying. Double elastic. Add 2–3 bobby pins in an “X” at each base. If your hair is layered, twist the base once before tying to create a tighter anchor.
“The color isn’t bright on my dark hair.”
That’s common with temporary products. Try colored clip-in extensions, a hair wax, or concentrate color on smaller sections for a more saturated look. For truly neon payoff, pre-lightened ends usually work bestbut it’s optional, not mandatory.
“I got color on my skin.”
Wipe quickly with gentle soap and water. If staining remains, try a small amount of oil-based cleanser or a stain-removal method designed for cosmetic dyes, then moisturize.
“It looks too neat… I don’t look unhinged enough.”
Loosen the crown slightly, pull out a few extra wisps, and add texture spray. The goal is “intentional chaos,” not “forgot how elastics work.”
Real-Life Notes: What It’s Like to Wear Harley Quinn Hair (Experience-Based Tips)
People love this look because it’s instantly recognizable, even from across a crowded room. Many first-timers notice that the silhouette does most of the work: once your pigtails are high enough and you’ve got that bold two-tone color placement, you could be wearing plain black and still read as Harley-adjacent. That’s why it’s such a popular cosplay hair choicebig visual impact, surprisingly doable technique.
One thing that tends to surprise beginners is how much texture matters. If your hair is ultra-smooth and you tie two perfect pigtails, it can look more like “cute sporty hairstyle” than “Harley Quinn.” Adding a little grit with dry shampoo, gently tugging the crown, and letting face-framing pieces hang makes it feel character-accurate. If you’re taking photos, that small messiness reads as confidence on camera.
Another common “aha” moment: temporary color has personality. Sprays can look super vibrant, but they may transfer onto collars, backpacks, or a white hoodie (which is basically the universe testing your patience). Chalk can look awesome in pictures, especially if you seal it lightly with hairspray, but it can feel a bit dry or stiff on the ends. Many people end up choosing a hybrid approachlike using clip-in extensions for bold color while keeping their natural hair mostly product-freebecause it’s fast, bright, and low-stress.
If you’re wearing the look for a party, performance, or a full Halloween night, comfort becomes the quiet hero. High pigtails can tug if they’re too tight, especially on thick hair. A trick many people use is to secure the pigtail firmly, then slightly loosen the tension at the scalp by lifting and adjusting the hair right above the elastic. It keeps the style in place without giving you a “headache by chapter two.” Bobby pins at the base also help distribute weight so the pigtails don’t droop as the night goes on.
Color placement is also more flexible than it seems. On shorter hair, a few inches of bright pink and blue at the ends can look more intentional than trying to force a long dip-dye effect that isn’t there. On curly hair, the color often looks coolest when you focus on the ends of defined curlseach curl becomes a little ribbon of color. And if your hair is dark and you don’t want to lighten it, you can still get that “Harley” punch by placing brighter color on select strands, using bold accessories (pink/blue ribbons), and making sure the pigtail height and shape are right.
Finally, the best part of this hairstyle is that it rewards confidence more than perfection. A slightly uneven ribbon wrap, a few flyaways, and that “I did this in my bathroom with determination” vibe are honestly on-theme. If your goal is a photo-ready, instantly recognizable Harley Quinn hairstyle that you can do again without panic, focus on three anchors: center part, high pigtails, and pink/blue ends. Everything else is bonus sparklepreferably the kind that doesn’t end up permanently living in your shower drain.
Conclusion
Harley Quinn hair is equal parts structure and chaos: a clean center part, high pigtails, and bold pink-and-blue tipsthen a little strategic mess to make it feel real. Whether you go temporary with spray or chalk, commit with semi-permanent dye, or cheat brilliantly with clip-ins, the goal is the same: a look that’s instantly recognizable, camera-friendly, and fun to wear. Nail the shape, pick your color method, and let the attitude do the rest.