Table of Contents >> Show >> Hide
- Diamond Hunting in Minecraft PE: The 30-Second Reality Check
- Step 1: Turn On Coordinates (So You’re Not Mining Blind)
- Step 2: Pack the Right Gear (Diamond Mining Is a Lava Sport)
- Step 3: Pick Your Target Y-Level (Fastest vs. Safest)
- Step 4: Get Down There Safely (No, Digging Straight Down Is Still a Bad Idea)
- Step 5: Branch Mine Like a Pro (The “8 Steps” Workhorse)
- Step 6: Use Caves Strategically (Because Diamonds Don’t Love Fresh Air)
- Step 7: Mine Diamonds Safely (And Make Every Vein Count)
- Step 8: Turn One Diamond Trip Into a Diamond Routine
- Bonus: Other Legit Ways to Get Diamonds in Minecraft PE
- of Minecraft PE Diamond-Hunting Experiences (So You Don’t Have to Learn the Hard Way)
- Wrap-Up: Your Fastest Path to Diamonds in Minecraft PE
Diamonds in Minecraft PE (aka Minecraft Bedrock Edition on mobile) are the game’s version of
finding a $20 bill in your winter coat… except the coat is on fire, the closet is full of zombies, and you dug the closet yourself.
Still: once you learn where diamonds actually spawn now (spoiler: not at the “old-school” levels), you can go from
“stone tools forever” to “diamond drip” without sacrificing your sanityor your phone’s battery.
This guide is built from current ore-generation info and practical mining strategies used across the Minecraft community,
written specifically for mobile play. You’ll get 8 clear steps, plus a longer “field notes” section at the end with
real-world-style mobile mining experiences (the good, the bad, and the “why is my torch placement doing that?”).
Diamond Hunting in Minecraft PE: The 30-Second Reality Check
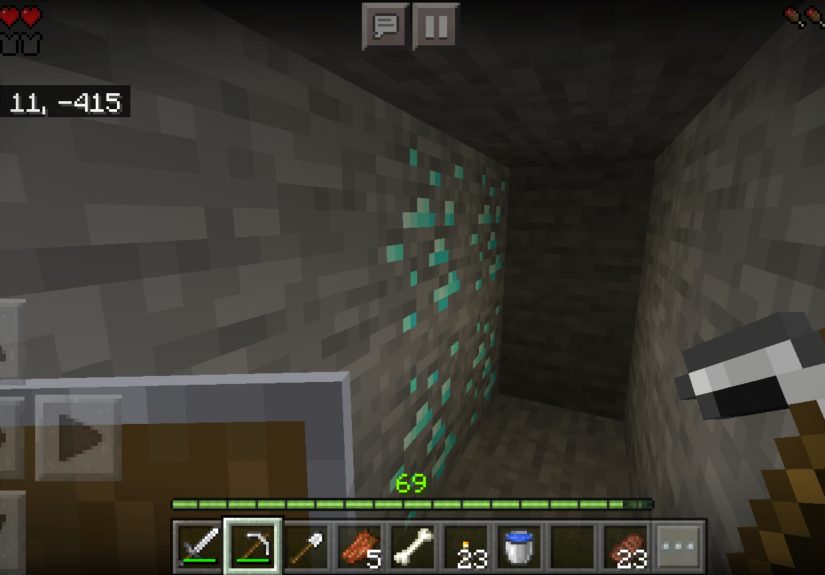
- Diamonds generate below Y=16, and they get more common the deeper you go.
- Deepslate layers (below Y=0) are where serious diamond mining happens.
- Diamond ore is less likely to be exposed to open air than it used to beso caves can be hit-or-miss.
- The “sweet spot” most miners aim for is around Y=-59, with a safer alternative around Y=-53 to -55.
Step 1: Turn On Coordinates (So You’re Not Mining Blind)
Diamonds don’t care about your vibes. They care about Y-level. On Minecraft PE, the easiest upgrade you can make
is enabling coordinates so you always know how deep you are.
How to do it on mobile
- Single-player worlds: In your world settings, toggle Show Coordinates on.
- Realms/servers: The host may need to enable coordinates (sometimes via a gamerule or settings).
Once coordinates are on, glance at the middle number (Y). That’s your depth. This one change turns diamond mining from
“hope-based” to “science-based.” (Your pickaxe approves.)
Step 2: Pack the Right Gear (Diamond Mining Is a Lava Sport)
If you’re going deep enough for diamonds, you’re going deep enough to meet lavaoften suddenly and enthusiastically.
Gear up like you’re going on a snack run in the middle of a horror movie.
Minimum kit for a smart diamond run
- Iron pickaxe (or better): Diamonds won’t drop if you mine them with stone.
- Water bucket: Your best friend for lava accidents and safe descents.
- Torches or lots of light sources: Caves are mob magnets. Light is your “no thank you” sign.
- Food: Mining hungry is how you sprint into lava and call it “bad luck.”
- Blocks (cobblestone): For bridges, quick walls, and plugging surprise lava leaks.
- Spare pickaxe: Deepslate takes longer to mine; tools wear faster than your patience.
Optional but wonderful: iron armor, a shield (if you’re comfortable using it on mobile),
and a few doors if you plan to deal with underwater sections (doors can create air pockets in Bedrock).
Step 3: Pick Your Target Y-Level (Fastest vs. Safest)
Diamonds generate below Y=16, and the deeper you go, the better the odds. That said, “deeper” also means “more lava”
and “more deepslate” (read: slower mining). Choose based on your playstyle.
Two proven target ranges
-
High-yield target: Y=-58 to Y=-59. This is the famous “best level” range for diamond density.
You’re very close to the bedrock floor, so you want clean tunnels and good lava discipline. -
Safer target: Y=-53 to Y=-55. Slightly fewer diamonds than -59, but typically fewer
annoying bedrock interruptions and fewer lava-lake surprises.
Pro tip for PE: if you’re playing on a smaller screen or your controls feel slippery,
the “safer target” can be more productive in the long run because you spend less time extinguishing yourself.
Step 4: Get Down There Safely (No, Digging Straight Down Is Still a Bad Idea)
The quickest way to end a diamond run is to dig straight down into a cave, a lava pocket, or a sudden regret.
Use a controlled descent instead.
Best descent options for mobile players
-
Staircase (recommended): Dig a 2-block-high staircase down. It’s slower than a drop, but you’ll have a safe
route back up and fewer “I can’t place blocks fast enough” moments. -
Water drop: Place water at the top and swim down. Great for speed, but bring blocks to mark your path
it’s easy to get turned around underground. -
Use a big cave… carefully: If you find a huge cave that goes deep, you can use it as a shortcut.
Just light it, block off dangerous edges, and don’t assume the next ledge is there.
As you descend, keep an eye on your Y-level and start paying attention when you cross Y=0.
That’s where deepslate becomes commonand where diamonds become a real possibility.
Step 5: Branch Mine Like a Pro (The “8 Steps” Workhorse)
If you want consistent diamondsespecially with diamond ore being less likely to sit openly in cave wallsbranch mining is
the reliable, repeatable method. It’s not glamorous, but neither is being broke in iron gear.
A simple branch-mining layout that works on PE
- At your chosen Y-level (start around -59 or -54), dig a 2×1 tunnel (two blocks tall, one block wide).
- Every 2 blocks, dig a side branch tunnel.
- Keep branches 20–30 blocks long (or longer if you’re feeling patient and snack-supported).
- Place torches regularly and keep your main tunnel clearly marked so you don’t create an underground spaghetti masterpiece.
Why every 2 blocks? Because you’re maximizing the number of blocks you “expose” while minimizing how much you mine.
It’s the best kind of math: the kind that turns into diamonds.
Mobile-friendly comfort tip
Deepslate mining can feel slow. Consider turning on “tap to place” settings that feel most natural for you,
and take brief breaks so you don’t start aiming your pickaxe like you’re swatting a fly.
Step 6: Use Caves Strategically (Because Diamonds Don’t Love Fresh Air)
Big caves are tempting because you can see a ton of blocks quickly. But modern diamond generation has a twist:
diamond ore is less likely to generate exposed to open air.
Translation: sometimes you’ll tour a gorgeous cavern and find… absolutely nothing.
How to cave-mine for diamonds without wasting time
- Focus on deep caves below Y=0: If the cave floor is around -30 and lower, you’re in the right neighborhood.
-
Look near aquifers (underground water): Diamonds are more likely to be “not air-exposed,” which means
areas with water can be surprisingly productive. -
Mine “one block in” from cave walls: If you see deepslate, carve a thin layer behind the wall in a few spots.
You’re checking for ore that didn’t generate directly on the surface. - Don’t ignore ceilings and ledges: Diamonds can hide in awkward spots that are easy to miss on a phone screen.
Best combo strategy: use caves to reach the depth faster, then switch to branch mining for consistency.
Step 7: Mine Diamonds Safely (And Make Every Vein Count)
You found diamonds. Congratulations! Now don’t do the classic thing where you pop the first block and release a lava spill
that turns your victory into an emergency swim lesson.
The “diamond safety” checklist
- Mine around the ore first: Expose the sides, top, and bottom so you can spot lava or a drop.
- Start from the top block if possible: If lava is underneath, you’ll see it before the diamonds disappear.
- Place blocks to control lava: If lava shows up, block the source and pour water to turn it into obsidian/cobble.
- Bring a spare pickaxe: You don’t want to break your only pick mid-vein.
Fortune vs. Silk Touch (the diamond multiplier decision)
If you have an enchanted pickaxe:
- Fortune increases the number of diamonds you get per ore (Fortune III is the jackpot).
- Silk Touch lets you pick up the ore block itself, so you can save it for later when you get Fortune.
PE-friendly plan: If you don’t have Fortune yet, consider using Silk Touch (if available) to stash ore safely at home.
Mining deep on mobile is a lot less stressful when your “diamond haul” can’t fall into lava.
Step 8: Turn One Diamond Trip Into a Diamond Routine
The real flex isn’t finding diamonds once. It’s building a system where diamonds show up regularlylike you’re running a tiny,
extremely dangerous underground business.
Make your diamond runs repeatable
- Mark your main tunnel: Use distinct blocks (like diorite/andesite) or signs so you don’t get lost.
- Use “stations” every 100 blocks: A small room with a crafting table, furnace, and chest saves time.
- Bring home XP: Mining deepslate and ores builds XP; combine mining with an enchanting plan.
- Upgrade your gear path: Iron → diamonds → enchanting → Fortune → more diamonds. The loop feeds itself.
If you want to go full efficiency mode later: add a villager trading setup for enchantments like Mending and Efficiency.
That’s when diamond mining stops being “a mission” and becomes “Tuesday.”
Bonus: Other Legit Ways to Get Diamonds in Minecraft PE
Mining is the main event, but if you’re early-game or just feeling adventurous, you can also find diamonds in loot chests.
Think: villages, shipwrecks, buried treasure, mineshafts, and other structures. You might not get a full stack,
but even a couple diamonds can jump-start your tools.
Just remember: if your goal is consistent diamonds, deep mining at the right Y-level still wins on reliability.
of Minecraft PE Diamond-Hunting Experiences (So You Don’t Have to Learn the Hard Way)
My first “serious” diamond run on Minecraft PE started with confidence and ended with me trying to place a block while my thumb
did interpretive dance across the screen. I had coordinates off (bold choice), torches on the hotbar (good), and exactly one iron
pickaxe (questionable). I found a massive cave, ran in like I owned the place, and immediately discovered that “massive cave”
also means “massive number of places for skeletons to practice archery.”
After I respawned (humbling), I turned on coordinates and decided to do it properly. The biggest PE upgrade wasn’t a better pickaxe
it was knowing my Y-level. I staircase-mined down, because digging straight down on mobile feels like signing a waiver you didn’t read.
Around Y=-20, I found a lava-filled cavern with that orange glow that says, “Welcome! Please panic responsibly.” I didn’t see diamonds,
but I learned something: caves are great for travel, not always great for results. I started carving a branch mine off to the side.
When I hit the deepslate layers, everything slowed down. Deepslate has the energy of a block that wants you to reconsider your life choices.
So I made it a routine: mine 20 blocks, place torches, snack break, repeat. That sounds silly, but on a phone it mattersfatigue turns into
sloppy movement, and sloppy movement turns into lava souvenirs.
The first diamonds I found were at about Y=-54. I got excited and tapped the ore immediatelyclassic mistake. Lava bubbled out from behind
the block like it had been waiting for its moment. Luckily I had a water bucket. I poured water, turned everything into safe-ish stone,
and then did the smart thing: I mined around the vein before touching another diamond block. The difference between “panic mining” and
“controlled mining” is basically the difference between keeping your diamonds and watching them sizzle into a sad little memory.
The funniest part? After all that, my “big haul” was five diamonds. Five. But those five diamonds turned into a diamond pickaxe, which turned
into an enchanting table, which turned into better tools. Later, when I finally got Fortune, I remembered where I’d built my tunnels, went back
down, and the same exact mining pattern started paying out like a vending machine that decided I deserved a treat. That’s the real PE lesson:
don’t just hunt diamondsbuild a diamond habit. Your future self (and your thumbs) will thank you.
Wrap-Up: Your Fastest Path to Diamonds in Minecraft PE
If you want the simplest formula: turn on coordinates → mine below Y=0 → branch mine around Y=-59.
Add safe habits (water bucket, controlled digging, torches), and you’ll find diamonds consistently instead of accidentally.
And once you get Fortune, every future diamond trip gets dramatically more satisfying.