Table of Contents >> Show >> Hide
- What Exactly Is a Pop Up Socket (and Why People Love Them)?
- Step Zero: Pick the Right Type for Your Surface (This Matters More Than the Hole)
- Plan the Location Like a Pro (Because You Only Want to Cut Once)
- Tools and Supplies You’ll Typically Need (for the Non-Electrical Part)
- How to Fit a Pop Up Socket in a Kitchen Countertop (Safe, Practical Workflow)
- Step 1: Read the manufacturer specs (yes, before shopping for the hole saw)
- Step 2: Mark the cutout location (and double-check below)
- Step 3: Cut the opening cleanly
- Step 4: Dry-fit the unit (no sealant yet)
- Step 5: Mount it securely from below
- Step 6: Handle the power connection the right way
- Step 7: Test function and do a “real use” check
- How to Fit a Pop Up Socket in a Desk (The Friendlier Version)
- Common Mistakes (and How to Avoid the “Why Did I Do This” Phase)
- Maintenance and Safety Habits That Actually Matter
- FAQ: Quick Answers Before You Start Drilling
- Real-World Experiences: What People Usually Learn After Installing a Pop Up Socket (About )
- Conclusion
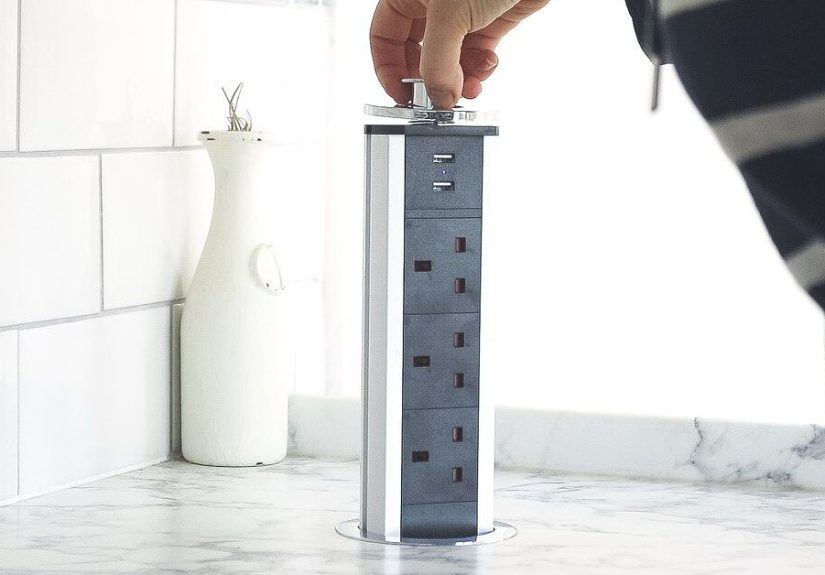
A pop up socket is basically the “now you see it, now you don’t” trick of the electrical world. When you need power,
it pops up like a helpful little groundhog. When you don’t, it disappears so your countertop (or desk) can go back to
looking clean, calm, and totally not like a charging station for every gadget you’ve ever owned.
This guide walks you through how to fit a pop up outlet the smart wayplanning, choosing the right type, cutting a
clean opening, mounting it securely, and making sure it’s safe and code-friendly. We’ll keep the tone light, but we
won’t mess around with safetyelectricity does not care if you’re having a “quick DIY moment.”
What Exactly Is a Pop Up Socket (and Why People Love Them)?
A pop up socket (also called a pop up outlet, countertop outlet, or
desk grommet outlet) is a power unit that mounts through a hole in a surface. The top sits flush or
nearly flush when closed. Press, pull, or tap it and the outlets/USB ports become accessible.
- In kitchens: Great for islands, peninsulas, and window backsplashes where wall outlets are awkward.
- On desks: Ideal for workstations, gaming setups, craft tables, conference tables, and home offices.
- In both: They reduce cord clutter and keep power where you actually use it.
Step Zero: Pick the Right Type for Your Surface (This Matters More Than the Hole)
Countertop-rated vs. furniture-rated: don’t mix them up
Here’s the biggest mistake people make: buying a “cool-looking” pop up unit that’s meant for furniture and then
trying to use it in a built-in kitchen countertop. These categories can be tested and approved differently.
-
Built-in kitchen countertops (physically attached to the building):
You generally want a countertop-rated, listed receptacle assembly intended for that use.
These are often designed for fixed installation and may be intended to be hardwired
(wired into the branch circuit). -
Desks, tables, and furniture surfaces:
Cord-and-plug pop up units are common here, and many are designed to be plugged into an existing receptacle
(often with guidance to use GFCI protection depending on location).
Translation: Buy the unit that matches the job. If your kitchen install is anything beyond a simple,
manufacturer-approved setup, a licensed electrician should be involvedboth for safety and to keep you on the right
side of local code.
Features to choose (without falling into gadget chaos)
- AC outlets: Most common are 2 outlets; some offer more.
- USB-A / USB-C: Handy for phones/tablets; look for USB-C if you want modern charging.
- Flush vs. raised lid: Flush looks sleeker; raised lids can be easier to grab.
- Round vs. rectangular cutout: Round is usually simpler to drill; rectangular may provide more ports.
- Finish: Match your faucet/hardware (stainless, matte black, white, brass tones, etc.).
- Spill resistance: Especially important in kitchenslook for products specifically intended for countertop use.
Plan the Location Like a Pro (Because You Only Want to Cut Once)
1) Check what’s below the surface
Before you even think about drilling, open the cabinet or crawl under the desk and look for:
plumbing, drawer boxes, slide hardware, braces, outlets, and anything structural.
- Clearance: Many pop up sockets need significant vertical space to retract/extend.
- Drawer conflicts: A perfect top location can be a disaster if there’s a drawer directly beneath it.
- Sink and plumbing zones: Avoid placing the unit where it’s likely to get splashed or where plumbing crowds the install.
2) Think about real-life use (not just “centered looks nice”)
On a kitchen island, “centered” often means “exactly where the mixing bowl, laptop, and cookbook fight for space.”
A better approach is to place the pop up outlet near the edgebut not so close it becomes a spill magnet or interferes
with seating, overhang supports, or daily prep.
3) Respect kitchen safety requirements (GFCI, tamper-resistant, and spacing)
Kitchen power is not like desk power. Kitchen receptacles commonly require protections such as GFCI
(to reduce shock risk in areas where water is present) and tamper-resistant receptacles in homes.
Local rules vary, and code adoption differs by state/cityso treat code guidance as a starting point and confirm your
local requirements.
A common planning rule you’ll hear for kitchen countertop receptacles is:
outlets should be placed so that no point along the wall line is more than 24 inches from a receptacle,
which effectively means spacing so outlets are generally no more than 48 inches apart along typical countertop runs.
Islands and peninsulas have their own rules and can change by code cycle and jurisdictionanother reason to involve a
licensed electrician when you’re installing built-in countertop power.
Tools and Supplies You’ll Typically Need (for the Non-Electrical Part)
Exact tools depend on your surface material and the outlet’s cutout shape. Most pop up socket installs involve
some mix of:
- Measuring tape and pencil
- Painter’s tape (helps protect finishes and reduce chipping on some materials)
- Template (often included with the outlet)
- Hole saw (for round units) or a drill + jigsaw (for rectangular units)
- Sandpaper or a deburring tool (for wood/laminate)
- Vacuum/shop vac
- Silicone sealant (only if the manufacturer recommends it for your installation type)
For stone/quartz/granite: cutouts are often best handled by a countertop fabricator using the proper
tools and methods. This isn’t gatekeepingit’s about avoiding expensive cracks and chips.
How to Fit a Pop Up Socket in a Kitchen Countertop (Safe, Practical Workflow)
This section focuses on the fitting/mounting process. If your unit requires hardwiring or changes to circuits,
that work should be done by a licensed electrician.
Step 1: Read the manufacturer specs (yes, before shopping for the hole saw)
Every pop up outlet has requirements for:
cutout size, countertop thickness range, minimum clearances, and
installation orientation. Some are designed only for vertical use; others have specific distance
recommendations from walls and water sources.
Step 2: Mark the cutout location (and double-check below)
- Measure and mark the center point (round units) or outline (rectangular units).
- Use painter’s tape over the area if you’re working on wood or laminate finishes.
- Verify cabinet/drawer clearance again. Then verify it one more time, because regret is loud.
Step 3: Cut the opening cleanly
Round pop up sockets: are commonly installed with a hole saw in the correct diameter.
Drill slowly and keep steady pressure so the cut stays clean.
Rectangular units: typically require a drilled starter hole and then a jigsaw cut to the marked outline.
Smooth edges afterward so the unit seats properly.
Stone countertops: often require a different cutting method (and often a professional shop environment).
If your countertop is stone, the safest route is having the fabricator cut the opening as part of the countertop work.
Step 4: Dry-fit the unit (no sealant yet)
Place the unit into the hole and confirm:
- It sits flush and level.
- The flange/lip fully covers the cut edge.
- The retracting mechanism moves freely without rubbing.
- Below-counter parts won’t hit drawers, doors, or plumbing.
Step 5: Mount it securely from below
Most pop up sockets use a clamp ring, locking nut, or mounting brackets underneath the counter. The goal is simple:
tight enough to prevent movement, but not so aggressive that you stress the countertop material.
- Align the unit so outlets face a convenient direction.
- Hand-tighten where possible first; then tighten per the manufacturer’s guidance.
- If a gasket or sealing ring is included, install it as directed (it’s not “extra,” it’s the point).
Step 6: Handle the power connection the right way
This is where many installs split into two paths:
-
Furniture/desk-style corded units: The unit typically plugs into an existing receptacle.
In kitchens, cord routing and protection can still matterespecially near water or heatso follow the product’s
requirements and local guidance. -
Built-in countertop receptacle assemblies: If the unit is intended for fixed installation,
a licensed electrician should connect it to the proper circuit with required protections (often including GFCI,
and in many cases AFCI for dwelling kitchens depending on local code adoption).
If anything about this step feels confusing, stop and call a pro. Confusion is not a safety feature.
Step 7: Test function and do a “real use” check
- Open/close it several times to ensure smooth operation.
- Plug in a small device to confirm it powers correctly.
- Confirm cords don’t snag drawers or doors.
- Make sure the top closes fully when not in use.
How to Fit a Pop Up Socket in a Desk (The Friendlier Version)
Desk installs are often simpler because many desk pop up sockets are designed as furniture power units with a cord
and plug. You’re usually not altering household wiringjust adding convenient access.
Desk installation workflow
-
Pick the spot: Common locations are rear corners (easy cord management) or centered near monitor arms
(easy charging). - Confirm clearance: Check for drawers, keyboard trays, cable trays, and support rails.
-
Mark and cut: Use the included template. For round units, drill the specified hole size.
For rectangular units, drill starter holes and cut carefully. - Mount from below: Tighten the ring or brackets. Don’t overtightendesk materials can crush or crack.
- Route cables neatly: Use clips or a cable tray to prevent yanks and tangles.
-
Plug in responsibly: Use a properly rated receptacle and avoid overloading the circuit with multiple
high-draw devices at once.
Common Mistakes (and How to Avoid the “Why Did I Do This” Phase)
Mistake 1: Choosing the wrong unit for the location
Not every pop up outlet is intended for kitchen countertop use. If it’s not listed or intended for that environment,
don’t force it. Kitchens are wet-ish, messy, and full of appliances that pull serious power.
Mistake 2: Cutting before confirming thickness and clearance
Pop up sockets often have maximum countertop thickness limits. If your surface is thicker than the unit allows, it
may not clamp properly or retract fully.
Mistake 3: Placing it where spills and splashes are inevitable
Even countertop-rated units aren’t “please pour soup into me” devices. Keep outlets away from the splash zone and
don’t treat the closed lid like a drain cover.
Mistake 4: Over-tightening hardware
Especially with laminate, butcher block, or thinner desk tops, overtightening can crush the material or cause
warping that prevents a flush fit.
Maintenance and Safety Habits That Actually Matter
- Keep it dry: Wipe spills quickly. Close the unit when not in use.
- Don’t yank cords: Pulling a plugged-in appliance sideways can stress the unit and the surface.
- Test protection devices: If your setup uses GFCI protection, test it periodically per the device instructions.
- Replace damaged units: If the top cracks, the mechanism sticks, or outlets feel loose, stop using it and get it serviced or replaced.
FAQ: Quick Answers Before You Start Drilling
Can I install a pop up socket in any countertop material?
Many can go into wood and laminate with typical tools. Stone/quartz/granite often require specialized cutting and is
commonly handled by fabricators. Always follow the outlet manufacturer’s cutout and mounting instructions.
Do I need USB ports?
If you charge phones/tablets at the surface daily, yesit’s convenient. If you mostly plug in appliances (kitchen) or
a laptop charger (desk), it’s optional. USB-C is generally the most future-friendly.
Is a pop up outlet “code compliant” automatically?
Compliance depends on the product’s listing/intended use and how/where it’s installed. Local rules and adoption
dates vary. When in doubtespecially in kitchenswork with a licensed electrician and your local inspector guidance.
Real-World Experiences: What People Usually Learn After Installing a Pop Up Socket (About )
Most people don’t regret adding a pop up socketthey regret where they put it. A super common story goes like this:
the outlet gets installed dead-center on the island because it looks symmetrical, and then real life moves in. That
“perfect” center becomes the exact spot where cutting boards slide, where dough gets rolled, where someone drops a
grocery bag, and where a kid decides the lid is a button that must be pushed 47 times. The lesson: prioritize
function over photo symmetry. A spot slightly off to the side (but still convenient) often feels more
natural day-to-day.
Another frequent experience is underestimating what’s happening beneath the surface. On paper, the cabinet looks
empty. In reality, there’s a drawer box, a trash pull-out, a shelf pin rail, or a surprise support bracket exactly
where the pop up outlet wants to live. People who have the smoothest installs tend to do a “mock-up” first: they
measure the unit’s body depth, mark the footprint inside the cabinet with tape, and open/close drawers to confirm
nothing collides. That five-minute check can save you from the classic “we can’t open this drawer anymore” moment.
In kitchens, the strongest feedback you’ll hear is about spill reality. Even careful cooks spill.
Even neat people have guests who set down a sweating drink. Folks are happiest when they choose a unit intended for
countertop use and then still treat it with respectclosing it when they’re done, wiping the surface quickly, and
not parking a blender cord so it drapes across the lid. The “hidden outlet” vibe works best when it stays hidden
unless you’re actively using it.
Desk installs bring a different set of “I wish I knew” lessons. The first is cable length and routing. Many desk
pop up sockets come with a power cord that’s generous… until your receptacle is on the opposite wall or your cable
management tray routes everything the long way around. People who love their setups plan a cable path first: down a
rear leg, into a tray, then to a surge protector or wall receptacle without crossing knee space. The result is a
clean workstation where you don’t accidentally unplug your monitor by lightly existing near the desk.
Another desk-specific experience is choosing ports you’ll actually use. A bunch of AC outlets is great if you’re
powering speakers, lamps, and chargers. But many people eventually realize their day-to-day needs are “USB-C for the
phone, USB-C for the headphones, and one AC outlet for the laptop brick.” When the ports match your habits, the pop
up socket feels like a smart upgrade instead of a cool gadget you forget about.
Finally, there’s the “pro vs. DIY” realization. Many homeowners feel totally confident drilling and mounting the
unitbut they also feel relieved letting a licensed electrician handle anything involving branch circuits, required
protections, or code checks. The best installs often come from that split: DIY the surface work you can do safely,
then bring in a pro for the electrical portion if needed. You end up with a pop up outlet that looks sharp, works
smoothly, and doesn’t come with a side order of anxiety.
Conclusion
Fitting a pop up socket in a kitchen counter or desk is one of those upgrades that feels smalluntil you use it
every single day. The secret is picking a unit that matches the location (countertop-rated vs furniture-rated),
placing it where it won’t fight drawers or water, and cutting a clean opening so it sits flush and secure.
Do the planning carefully, follow the manufacturer instructions, and treat electrical work with the respect it
deserves. Your future self (and your uncluttered surface) will thank you.