Table of Contents >> Show >> Hide
- What Is a Toilet Supply Line, Exactly?
- Signs Your Toilet Water Supply Line Needs Attention
- Should You Tighten the Line or Replace It?
- Tools and Materials You Will Need
- How to Fix a Leaky Toilet Supply Line Step by Step
- Step 1: Shut off the water
- Step 2: Confirm where the leak is coming from
- Step 3: Disconnect the old supply line
- Step 4: Take the old line to the store if you are unsure
- Step 5: Choose the right replacement line
- Step 6: Install the new supply line by hand first
- Step 7: Tighten carefully, not aggressively
- Step 8: Turn the water back on slowly
- Step 9: Test flush and inspect again
- Common Mistakes to Avoid During Toilet Supply Line Replacement
- When the Shutoff Valve Is the Real Problem
- How Long Does a Toilet Supply Line Last?
- Should You Call a Plumber?
- Final Thoughts
- Real-World Experience: What Replacing a Leaky Toilet Supply Line Actually Feels Like
A leaky toilet supply line is one of those home problems that looks tiny, sounds harmless, and somehow still manages to make you feel like your bathroom is plotting against you. One drip becomes two. Two drips become a mysterious puddle. And before long, you are standing there with a towel, an adjustable wrench, and the expression of someone who did not plan to become a plumber before lunch.
The good news is that fixing a leaky toilet supply line is usually one of the most beginner-friendly plumbing repairs in the house. In many cases, you do not need to replace the toilet, tear into the wall, or call in a cavalry of contractors. You simply need to identify where the leak is coming from, choose the correct replacement water supply line, and install it carefully without making the classic DIY mistake: tightening everything like you are trying to win a strength contest.
This guide walks you through how to fix a leaky toilet supply line, when tightening is enough, when full toilet water supply line replacement makes more sense, which connector sizes matter, and how to avoid ending up with a new leak that is somehow more annoying than the old one.
What Is a Toilet Supply Line, Exactly?
The toilet supply line is the flexible tube that connects the shutoff valve on the wall or floor to the fill valve under your toilet tank. Its job is simple: bring fresh water into the toilet tank after each flush. Its personality, however, is less charming. When it gets old, cracked, kinked, corroded, or loosely connected, it leaks without apology.
Most modern toilet connectors are flexible braided lines. They are popular because they are durable, easy to route in tight spaces, and simpler to install than rigid tubing. In many American homes, the common size for a standard toilet connector is 3/8-inch compression on the shutoff valve side and 7/8-inch ballcock on the toilet side. That said, older homes are famous for being “special,” which is homeowner code for “annoying.” Always confirm your existing connection size before buying a replacement.
Signs Your Toilet Water Supply Line Needs Attention
Some leaks are dramatic. Others are sneaky little gremlins. Watch for these signs that your toilet supply line may be the real problem:
1. Water dripping from the nut near the shutoff valve
If the leak appears where the supply line connects to the wall valve, the connection may be loose, the washer may be worn, or the line itself may be failing.
2. Water dripping where the line meets the toilet tank
This can happen at the ballcock connection under the tank. Sometimes the nut is not seated correctly. Sometimes the rubber sealing surface is worn. Sometimes the line has simply reached retirement age and would like to stop working.
3. Moisture on the braided hose or at the crimped ends
If the hose body is damaged, bulging, rusting, or leaking at the crimped metal ends, replacement is usually the smart move. At that point, “maybe I can tighten it” becomes a risky little fantasy.
4. A puddle that keeps returning after you wipe it up
Bathrooms are masters of misdirection. A tank bolt leak, a fill valve issue, condensation, or even a wax ring problem can all masquerade as a supply line leak. Dry the area completely, flush once, and watch carefully to pinpoint the real source.
Should You Tighten the Line or Replace It?
Not every leaky toilet connector needs full replacement. Sometimes a slightly loose connection is the only issue. But there is a difference between “needs a gentle snug” and “needs to go live on a farm upstate.”
Try tightening first if:
- The hose looks clean, flexible, and undamaged.
- The leak is clearly at one connection point, not from the hose body.
- The line is fairly new.
- The connector was recently installed and may not be fully seated.
Replace the toilet supply line if:
- The hose is cracked, kinked, corroded, or leaking through the braided body.
- The crimped ends are leaking.
- The rubber washers look worn or unreliable.
- The line is old and has already started acting suspicious.
- You tightened the connection and the drip kept going.
In general, replacement is inexpensive, quick, and often more dependable than trying to rescue a worn connector. When a part costs only a few dollars, it usually makes more sense to replace it than to spend your Saturday arguing with it.
Tools and Materials You Will Need
- New toilet supply line in the correct length and connection size
- Small bucket or shallow pan
- Old towel or rag
- Adjustable wrench or channel-lock pliers
- Sponge for any leftover water
- Flashlight if your bathroom lighting is terrible, which many somehow are
You generally do not need plumber’s tape for the flexible connector itself when it seals with built-in washers. In fact, adding tape or sealant to the wrong connection can interfere with a proper seal. This is one of those moments where “more stuff” is not the same as “better repair.”
How to Fix a Leaky Toilet Supply Line Step by Step
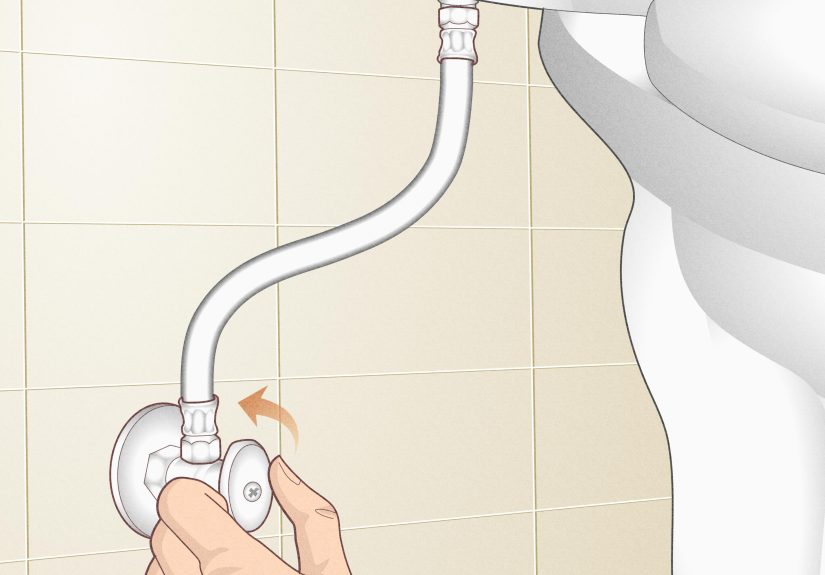
Step 1: Shut off the water
Turn the toilet shutoff valve clockwise until it stops. Then flush the toilet to empty most of the water from the tank. Hold the handle down to drain as much as possible. Place a towel or small bucket under the supply line to catch the water left inside.
Step 2: Confirm where the leak is coming from
Before removing anything, inspect both ends of the line and the hose body. If water appears near the shutoff valve stem itself rather than the connector nut, your shutoff valve may be the real issue. If the leak is from the hose or the end fittings, proceed with supply line replacement.
Step 3: Disconnect the old supply line
Loosen the nut at the shutoff valve first, then loosen the nut under the toilet tank. Most flexible lines are easy to remove with an adjustable wrench. Keep the bucket in place because a little leftover water will spill out. That is normal. That is not the bathroom judging you.
Step 4: Take the old line to the store if you are unsure
If you do not know the connector size or length, bring the old toilet water supply line with you. Match both ends carefully. A line that is too short may strain the fittings. A line that is too long can loop awkwardly, rub against surfaces, or look like your toilet is wearing a seatbelt.
Step 5: Choose the right replacement line
Pick a braided toilet connector that matches the inlet and outlet sizes of your setup. For many standard toilets, that means 3/8-inch compression by 7/8-inch ballcock. Choose a length that allows a smooth, natural curve with no stretching, twisting, or kinking. Flexible does not mean invincible.
Step 6: Install the new supply line by hand first
Thread the new connector onto the shutoff valve by hand. Then attach the toilet-side nut under the tank. Hand-threading first helps prevent cross-threading, which is plumbing’s version of putting your shirt on backward and pretending it is fashion.
Make sure each nut goes on straight and spins smoothly. If it feels crooked, binds early, or refuses to cooperate, back it off and start again. Forcing it will not teach it a lesson. It will just create a leak.
Step 7: Tighten carefully, not aggressively
Once both ends are hand-tight, use a wrench only as needed for a small additional turn on the shutoff side, depending on the connector style and manufacturer guidance. Some newer toilet connectors are designed for tool-free installation at the toilet connection. The big rule is simple: do not overtighten. Over-tightening can damage washers, strip threads, crack plastic parts, or create a “mystery leak” that did not exist five minutes earlier.
Step 8: Turn the water back on slowly
Open the shutoff valve gradually and let the tank fill. Watch the connections closely. Use a dry paper towel or tissue around each joint to check for moisture. Even a tiny leak will show up quickly.
Step 9: Test flush and inspect again
Flush the toilet a few times and inspect the line again. If you see a drip, shut the water off and give the leaking connection a very small additional turn. If it still leaks after that, disconnect it and inspect the washer alignment and thread seating. Do not keep cranking harder and hope the plumbing gods take pity on you.
Common Mistakes to Avoid During Toilet Supply Line Replacement
Buying the wrong size
The wrong connector is the fastest way to turn a 20-minute repair into a second trip to the hardware store. Check both ends and the line length before leaving the aisle.
Reusing a damaged old line
If the connector is visibly worn, bent, brittle, corroded, or leaking at the crimped end, replace it. Old supply lines do not become more trustworthy because you stared at them for a while.
Overtightening the nuts
This is probably the most common DIY mistake. Many flexible water connectors seal with rubber washers, not brute force. More tightening is not always more sealing.
Using tape or sealant where it does not belong
If the connector relies on a built-in washer or compression-style seal, adding plumber’s tape can interfere with proper alignment and create false tightness. Follow the connector instructions instead of improvising like a reality-show plumber.
Ignoring the shutoff valve
If the valve itself leaks, is corroded, or will not turn properly, the supply line may not be the only thing that needs replacement. A new hose attached to a failing valve is like buying fancy shoes for a collapsing staircase.
When the Shutoff Valve Is the Real Problem
Sometimes the supply line gets blamed for a leak that actually starts at the shutoff valve. If water seeps from the valve stem, packing nut, or body, you may need to repair or replace the valve. In some cases, gently tightening the packing nut helps. In others, the valve is worn out and needs replacement.
If your shutoff valve will not fully close, is frozen in place, or leaks from the valve body, do not ignore it. Replacing the toilet supply line without addressing a bad stop valve is like patching a raincoat while standing under a waterfall.
How Long Does a Toilet Supply Line Last?
There is no single magic expiration date, because quality, water conditions, installation quality, and usage all matter. But if a line is visibly worn, leaking, damaged, or simply old enough that you no longer remember installing it, replacement is a smart preventive repair. Some home improvement guidance also recommends replacing supply lines when they show damage or when they have been in service for years and are starting to look tired.
Considering the low cost of a new braided connector, proactive replacement often makes more financial sense than waiting for a failure that soaks the bathroom floor at 2:13 a.m. Homeownership loves that exact kind of timing.
Should You Call a Plumber?
Call a plumber if:
- The shutoff valve will not close.
- The valve or pipe inside the wall appears damaged.
- You cannot identify the source of the leak.
- The toilet tank connection is cracked.
- The leak has already caused floor or subfloor damage.
- You replaced the line correctly and water is still leaking.
There is no shame in calling a pro. The real shame would be turning a small supply line issue into “why is the bathroom ceiling in the room below sagging?”
Final Thoughts
Fixing a leaky toilet supply line is one of the most practical DIY plumbing jobs for homeowners because it is affordable, fast, and usually low drama. The keys are simple: verify the leak source, buy the correct replacement toilet supply line, install it carefully, and resist the universal urge to overtighten everything in sight.
In many bathrooms, a leaky toilet water supply line replacement can be done in less than an hour with basic tools and a little patience. Once the new line is installed and tested, you will have something even better than a dry bathroom floor: the deeply satisfying knowledge that you beat a plumbing problem without having to hold music on speakerphone while waiting for a service appointment.
Real-World Experience: What Replacing a Leaky Toilet Supply Line Actually Feels Like
Here is the part most how-to guides skip: the emotional journey. Not because it is dramatic, but because every small plumbing repair comes with its own tiny roller coaster. At first, you notice the puddle and think, “That is weird.” Then you wipe it up and hope it was a one-time thing. Then it comes back. Now you are no longer a casual observer. You are a person with a mission and a damp sock.
One of the most common real-world experiences is discovering that the repair itself is easier than the diagnosis. A lot of homeowners assume the toilet is leaking from the base, the tank bolts, or the wax ring, only to find out the actual problem is the supply line quietly dripping at the connection. That is why drying the area and watching one flush cycle matters so much. A little patience up front can save a lot of wildly inaccurate confidence later.
Another common experience is buying the wrong replacement line on the first trip. This happens constantly. You stand in the plumbing aisle staring at packages labeled compression, FIP, ballcock, braided polymer, braided stainless, and several other words that seem to have been invented specifically to make people question their reading comprehension. The best move is to bring the old line with you. That one simple habit saves time, money, and the deeply humbling experience of making two hardware-store runs for a five-dollar part.
Then comes installation, which usually starts out smooth. The old line comes off, the new one goes on, and you begin to feel like maybe you missed your calling as a plumbing prodigy. But this is the stage where people get overconfident and overtighten the fittings. Real experience teaches you that plumbing repairs are often about finesse, not force. A snug connection beats a heroic one. The goal is a watertight seal, not a personal record.
One especially relatable moment happens when the water gets turned back on. You crouch there like a detective at a crime scene, staring at the connection while the tank fills. Is that a drip? No, maybe a reflection. Wait, was that a drip? You dab it with a paper towel, hold your breath, and inspect again. That moment of suspense is part of the process. The victory is not just that the leak stops. It is that the repair teaches you how manageable many home maintenance tasks really are once you slow down and do them carefully.
In the end, replacing a toilet supply line often gives homeowners more than a dry bathroom. It gives them confidence. After doing it once, the next plumbing repair feels less intimidating. You stop seeing every leak as a looming disaster and start seeing it as a solvable problem with steps, tools, and logic. That is a pretty good return on investment for one small braided hose and half an hour of work.