Table of Contents >> Show >> Hide
- What Are Hammerhead Worms, Exactly?
- Are Hammerhead Worms Dangerous?
- Why You Shouldn’t Squish or Chop a Hammerhead Worm
- Step-by-Step: How to Get Rid of Hammerhead Worms in Your Garden
- How to Keep Hammerhead Worms From Taking Over Your Garden
- Extra : Real-World Experience Fighting Hammerhead Worms
- Conclusion: You’re in Charge, Not the Worms
If you’ve ever walked into your garden after a good rain and spotted a long, slimy creature with a head shaped like a tiny shovel, congratulations: you’ve probably met a hammerhead worm. They look like something out of a low-budget sci-fi movie, and unfortunately, they’re not just ugly they’re invasive predators that eat the good guys in your soil, especially earthworms.
The good news? You can get rid of hammerhead worms in your garden without nuking your entire yard, poisoning your soil, or accidentally creating more of them (yes, that’s a thing). This guide walks you through what these worms are, why they’re a problem, and exactly how to get rid of them safely and effectively.
What Are Hammerhead Worms, Exactly?
Hammerhead worms (also called hammerhead flatworms or hammerhead slugs) are land planarians, most commonly in the genus Bipalium. They’re native to parts of Asia but have spread to the United States and are now found in many warm, humid regions, especially the South and parts of the Midwest and East Coast.
How to Recognize a Hammerhead Worm
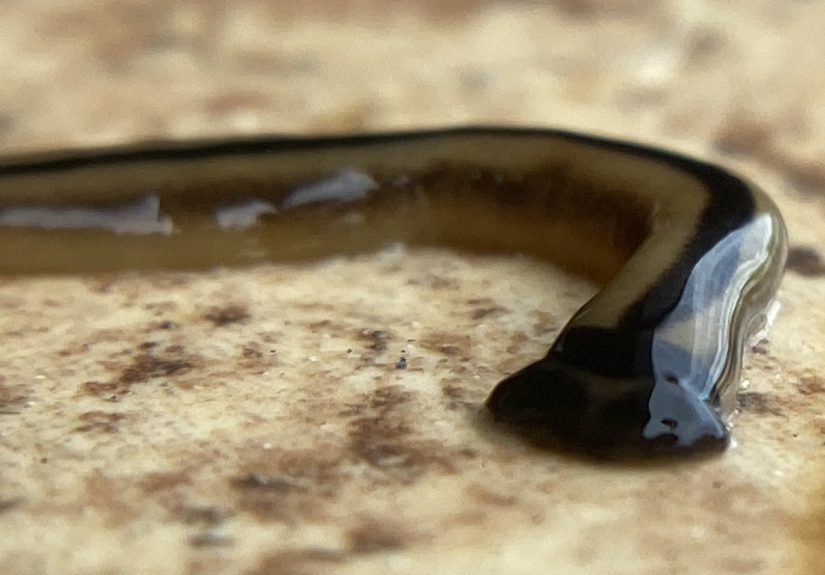
- Head shape: The most obvious clue is the head it’s broad and fan- or hammer-shaped, somewhat like a tiny hammerhead shark.
- Body: Long, flat, and slimy, often between 4 and 12 inches, though some can grow close to a foot in ideal conditions.
- Color: Colors vary by species from tan or honey-brown to dark brown often with one or more stripes running down the back.
- Behavior: They’re most active at night or after heavy rain, gliding along on a trail of mucus like dramatic little villains of the mulch layer.
These worms aren’t just gross. They’re voracious predators of earthworms and other soil invertebrates, and that’s where the real problem starts.
Are Hammerhead Worms Dangerous?
Let’s get this out of the way: hammerhead worms are toxic, but they’re not the stuff of medical drama for most people and pets as long as you don’t handle or eat them (which, hopefully, was never on your to-do list). Many species produce a neurotoxin called tetrodotoxin, the same toxin found in pufferfish.
Risks to People and Pets
- Skin irritation: Their mucus can irritate human skin, especially if you have cuts or sensitive skin. Always wear gloves when dealing with them.
- Pets: If a dog or cat eats one, they may drool, vomit, or act nauseous. Most sources note that serious poisoning is unlikely, but it’s still a “call your vet” situation.
- Don’t inhale or ingest: You shouldn’t handle them with bare hands, rub your eyes, or put anything contaminated near your mouth. Common sense, but worth saying.
For humans and pets, the bigger risk is irritation and mild illness, not death. However, that doesn’t mean they’re harmless. For your soil ecosystem, they’re a much bigger deal.
Why Gardeners Should Care: The Earthworm Problem
Hammerhead worms are top predators of earthworms. They track earthworms through the soil, latch on, and secrete toxins and digestive enzymes that turn their prey into worm soup.
Earthworms are the quiet heroes of your garden. They:
- Aerate the soil
- Improve drainage
- Break down organic matter
- Help cycle nutrients that plants need to thrive
Lose enough earthworms and your soil health can suffer and that’s the main reason gardeners and extension services recommend killing hammerhead worms when you find them.
Why You Shouldn’t Squish or Chop a Hammerhead Worm
If your first instinct is, “I’ll just smash it with a shovel,” hit pause. Hammerhead worms have a creepy superpower: regeneration.
They can reproduce asexually by fragmentation. In plain English: if you chop one worm into several pieces, there’s a good chance you’ll eventually have several worms instead of one. Extension experts and invasive species specialists are very clear about this do not cut or mash them into pieces.
The goal is to kill the entire worm in a way that prevents it from escaping or regenerating. Here’s how to do that.
Step-by-Step: How to Get Rid of Hammerhead Worms in Your Garden
Step 1: Gear Up Safely
Before you touch anything, protect yourself. Experts recommend:
- Gloves: Wear disposable or washable rubber or nitrile gloves.
- Tools: Use tongs, a small shovel, or a stick to move the worm not your hands.
- Container: Have a sealable plastic bag or jar ready.
Think of this like handling something mildly toxic and very dramatic, not like picking up a harmless nightcrawler.
Step 2: Capture and Contain the Worm
- Locate the worm usually on moist soil, mulch, patio stones, or under pots after rain.
- Using gloves and a tool, gently lift the worm into a plastic bag or jar. Don’t squeeze or crush it.
- Seal the bag or close the jar so the worm can’t escape.
Containment first, killing second. That way if it thrashes around, it’s already trapped.
Step 3: Kill the Hammerhead Worm Humanely and Effectively
Once the worm is contained, choose one of the methods recommended by university extension offices and invasive species programs.
Option A: Salt
Sprinkling plain salt directly on the worm is one of the simplest and most widely recommended solutions. The salt dehydrates and kills the worm.
- Pour a generous amount of salt into the bag or jar with the worm.
- Make sure the worm is fully coated or sitting in the salty environment.
- Leave it sealed for several hours to ensure it is fully dead.
Option B: Vinegar or Citrus Oil (or Both)
Hammerhead worms are also vulnerable to acidic substances like white vinegar and citrus oil (orange or lemon oil). These are commonly recommended by extension agents and invasive-species organizations.
- Fill the bag or container with enough white vinegar to completely submerge the worm, or
- Mix vinegar with a small amount of citrus oil and pour it over the worm.
- Seal and leave it for several hours to ensure the worm is completely dead.
Option C: Freezing
If you’d rather not mess with salt or vinegar right away, you can freeze the worm. Some extension publications note that placing the bag in the freezer for at least 24–48 hours will kill the worm.
- Seal the worm in a plastic bag (you can add a bit of water or saline solution).
- Place it in the freezer for two days.
- After that, it’s safe to dispose of in the household trash.
If the idea of a hammerhead worm in your freezer makes you emotionally unwell, you’re not alone many gardeners choose the salt or vinegar route for that reason.
Step 4: Dispose of the Worm Properly
Once the worm is clearly dead (no movement, body broken down or shriveled), you can:
- Place the sealed bag in your regular trash.
- Do not toss it into your compost pile or out into the yard. You don’t want surviving tissue re-entering the environment.
After handling, remove your gloves and wash your hands thoroughly with soap and water, even if you never touched the worm directly.
How to Keep Hammerhead Worms From Taking Over Your Garden
You may never be able to completely prevent a hammerhead worm from wandering into your yard they move via soil, mulch, potted plants, and sometimes just by crawling in from neighboring properties. But you can reduce how inviting your garden is and stay ahead of any population that’s starting to build.
1. Reduce Excess Moisture and Hiding Spots
Hammerhead worms adore warm, damp, shady environments. To make your garden less appealing:
- Fix low spots where water pools after rain.
- Avoid leaving boards, tarps, and plastic pots sitting directly on bare soil for long periods.
- Lift and check under stepping stones, bricks, and landscape edging occasionally, especially after heavy rain.
You don’t need to dry your yard out like the Sahara; just avoid chronically soggy, cluttered areas where worms can hide and hunt in peace.
2. Protect Your Earthworm Population
Healthy soil with lots of earthworms can better tolerate some predation. To support your “good worms” while fighting the bad ones:
- Limit broad-spectrum pesticides that kill non-target soil life.
- Add organic matter (compost, leaf mold) to feed soil organisms.
- Use mulch wisely enough to protect the soil, but not so much that it stays soggy and anaerobic.
Ironically, hammerhead worms are more likely to show up in the same types of rich, moist soils that earthworms love the kind good gardeners work hard to build.
3. Check New Plants and Soil
Because hammerhead worms can hitchhike in potted plants and bagged soil, it’s a smart habit to:
- Inspect new plants (and the surface of the soil) before planting.
- Check the bottoms of nursery pots and trays for lurking worms.
- If you spot one, treat it immediately and let the nursery know.
4. Monitor and Report Sightings
In many states, extension offices and invasive-species programs are tracking hammerhead worm reports to better understand their spread. If you find them regularly, consider sending a photo and location to your local cooperative extension or invasive species reporting system. This helps scientists and agencies monitor where these flatworms are becoming established.
Extra : Real-World Experience Fighting Hammerhead Worms
Let’s zoom in from the science and talk about what this actually looks like when you’re the gardener dealing with these creatures in real life. Imagine this scenario which is a composite of several gardeners’ experiences and common patterns reported to extension offices and online gardening communities.
It starts with a rainy week in late spring. You head out one morning, coffee in hand, to admire your tomato plants and check whether the zinnias finally decided to sprout. As you move a terracotta pot to pull a weed, you see it: a long, flat, caramel-brown worm with a head that flares out like a tiny spade.
At first, you think, “Oh, strange slug.” Then it moves. Smooth, snake-like, almost too deliberate. You do what many gardeners do snap a quick photo and consult the hive mind. A rapid series of replies confirms your suspicion: hammerhead worm.
The initial reaction is usually disgust, followed quickly by panic: “Is this going to kill my dog? Are my plants doomed? Do I have to burn my house down?” Thankfully, after reading what the experts say, you realize it’s not an apocalypse scenario but it is something to take seriously.
The first time you try to catch one, you may underestimate how squirmy and determined they are. You poke at it with a stick, it stretches and contracts like a slow-motion horror movie. If you’re not prepared, it’s easy to accidentally break off a piece and that’s when all those warnings about regeneration ring in your ears.
After that, you get smarter. You start keeping a “worm kit” near the back door: a pair of gloves, a small trowel, a dedicated set of tongs, a roll of plastic bags, and a container of salt. When the next storm rolls through, you go on a quick patrol. You lift a few pots, flip a stepping stone, and sure enough, you spot another hammerhead skating along the edge of a flower bed.
This time, it’s smooth: gloves on, worm nudged into a bag, generous sprinkle of salt, sealed up and set aside where it can’t escape. You leave it for the rest of the day while you get back to pruning and harvesting. By evening, the worm is clearly dead and you toss the bag into the trash no drama, no fragmentation, no accidental cloning.
Over the next few weeks, you might find a handful more. You start to notice a pattern: they love the shaded, damp corner behind your raised beds, where you used to stack old boards and extra pots. So you clean that area up, improve drainage, and lift everything off the ground. You also make a habit of checking after heavy rains, much like you’d check for slugs or standing water.
Along the way, you talk to neighbors. One has seen them on the side of their driveway after storms. Another never heard of them and is now thoroughly creeped out but grateful for the heads-up. You share the simple steps: don’t touch, don’t cut, salt or vinegar, seal and trash. A couple of neighbors send photos to the local extension office, which confirms the ID and adds the sightings to their records.
What you don’t do is panic and blast the whole garden with broad-spectrum pesticides. Those products could harm earthworms, pollinators, and beneficial insects more than the flatworms themselves. Instead, you treat hammerhead worms as a targeted issue: kill the ones you find, make your garden less inviting to them, and keep your soil life as healthy and diverse as possible.
After a season or two of paying attention, you notice something encouraging: sightings drop. You still occasionally find a stray worm, usually after an especially wet week, but it’s no longer a surprise invasion. It’s just another part of your “post-rain checklist,” like dumping water out of saucers or checking for broken branches.
That’s what success looks like with hammerhead worms. You may never completely eliminate every individual, especially if they’re already present in your area, but you can absolutely keep them from overrunning your garden or devastating your earthworm population. With gloves, a bit of salt or vinegar, and a calm-but-firm attitude, you’re more than a match for these slimy little invaders.
Conclusion: You’re in Charge, Not the Worms
Hammerhead worms are invasive, toxic predators that absolutely deserve your respect and your proactive response. But they’re not an unbeatable enemy. With proper identification, safe handling, and effective killing methods like salt, vinegar, citrus oil, or freezing, you can remove them from your garden without wrecking your soil or risking your health.
Stay alert after heavy rains, gear up when you handle them, and support the earthworms and soil life that keep your garden thriving. The more informed and prepared you are, the less those creepy hammer-shaped heads will bother you. In the showdown between gardener and hammerhead worm, knowledge (plus gloves and salt) wins every time.