Table of Contents >> Show >> Hide
- Why grow hydrangeas in pots?
- Step 1: Choose the best hydrangea for container life
- Step 2: Pick a pot that makes your life easier
- Step 3: Use the right soil (your hydrangea is not a fan of “random dirt”)
- Step 4: Light and placement (aka “where do I put this thing?”)
- Step 5: Watering potted hydrangeas (the #1 success factor)
- Step 6: Fertilizer (feed the blooms, not just the leaves)
- Step 7: Pruningknow your hydrangea “bloom wood”
- Step 8: Changing bloom color in pots (blue, pink, purple)
- Step 9: Common problems (and what to do)
- Step 10: Overwintering hydrangeas in pots
- Step 11: Repotting and long-term container care
- Container styling ideas (because you’re allowed to be a little extra)
- FAQ: Quick answers for common “Am I doing this right?” questions
- Real-World Container Hydrangea Lessons (Experiences)
- Experience #1: The “It was fine yesterday” summer meltdown
- Experience #2: The patio “sun trap” nobody warned you about
- Experience #3: The pruning regret spiral
- Experience #4: The color-change experiment that goes sideways (and how to do it sanely)
- Experience #5: Winter is where container hydrangeas either level upor tap out
Hydrangeas have a reputation: gorgeous, dramatic, and just a little bit… diva. Put one in a pot and you’ve basically given
it a penthouse apartmentgreat views, premium amenities, and very strong opinions about watering schedules.
The good news? With the right setup, potted hydrangeas can bloom like they’re trying to win an award for “Best Summer
Overachiever,” even if all you have is a patio, balcony, or small yard.
This guide walks you through choosing the right hydrangea, picking a container that won’t sabotage you, dialing in soil,
water, fertilizer, pruning, winter protection, and even bloom color (yes, the blue/pink magic is realno, coffee grounds
aren’t a cheat code). Along the way, you’ll get practical examples so you can stop guessing and start growing.
Why grow hydrangeas in pots?
Containers make hydrangeas possible in places where in-ground gardening isn’t: apartments, rental homes, hardscape-heavy
patios, and yards with questionable soil. Pots also let you move the plant to chase the best light, protect it from
harsh weather, or keep it closer to a hose (because hydrangeas love water like a golden retriever loves puddles).
When pots are a bad idea
- You can’t water consistently: container hydrangeas dry out faster than in-ground shrubs.
- You want “set it and forget it” gardening: pots require more frequent check-ins.
- Your winters are severe and you can’t protect pots: roots in containers freeze faster than roots in soil.
Step 1: Choose the best hydrangea for container life
Not all hydrangeas behave the same. Some bloom on old wood (last year’s stems), some on new wood (this year’s growth),
and some do both. That matters a lot in pots, where winter and pruning mistakes can cost you blooms.
Best “easy win” choices for pots
- Panicle hydrangea (Hydrangea paniculata): generally the most forgiving, handles more sun, blooms on new wood.
Great for brighter patios and gardeners who don’t want to overthink pruning. - Smooth hydrangea (Hydrangea arborescens): also blooms on new wood and can be pruned harder. Good option if you
want reliable flowers and don’t mind giving it space. - Reblooming bigleaf hydrangea (Hydrangea macrophylla, remontant types): blooms on old and new wood, which helps
if cold snaps or a “whoops” pruning moment happens.
Bigleaf hydrangeas: beautiful, but know what you’re signing up for
Bigleaf hydrangeas (mopheads and lacecaps) are the ones with the famous blue/pink color shift. Many bigleaf varieties
form flower buds on old wood, so winter damage and late pruning can reduce blooms. If you love bigleaf types, choosing a
reblooming variety is often the most container-friendly path.
Size matters (and not in the way your hydrangea thinks)
Even “compact” hydrangeas can get surprisingly robust in pots. Read the plant tag for mature size and pick a variety that
won’t outgrow your space in two seasons. A plant that matures at 3–4 feet is usually manageable in a large container; a
6–8 foot shrub is basically demanding a long-term lease and a bigger patio.
Step 2: Pick a pot that makes your life easier
Go bigger than you think
Small pots dry out fast and stress the plant. A roomy container holds more soil, buffers moisture swings, and keeps roots
healthier. For many hydrangeas, a container roughly 16–24 inches wide and deep is a strong “permanent-ish”
starting point, while even 14 inches wide can work for smaller plants or short-term displays (the bigger,
the better for consistent moisture).
Drainage: non-negotiable
Hydrangeas like moisture, not swamp conditions. Use a pot with drainage holes. If you fall in love with a container that
doesn’t have holes, either drill them (if the material allows) or use it as a decorative cachepot and place the hydrangea
in a properly draining nursery pot inside.
Material matters, especially in winter
- Cold climates: choose weatherproof, frost-resistant materials (resin, fiberglass, heavy-duty plastic).
- Avoid fragile pots outside in freeze/thaw: terra cotta and some ceramics can crack in freezing weather.
- Use pot feet or risers: improves drainage and reduces freeze damage from water trapped under the pot.
Bonus upgrades that feel fancy (and are actually practical)
- Casters: lets you roll the hydrangea into shade or shelter without throwing out your back.
- Self-watering insert or reservoir system: helpful for summer, but still monitor moisture carefully.
- Light-colored pots in hot areas: can reduce root-zone overheating compared to dark containers.
Step 3: Use the right soil (your hydrangea is not a fan of “random dirt”)
Skip garden soil in containersit compacts, drains poorly, and can create root problems. Use a high-quality
potting mix designed for outdoor containers. For extra bloom power, blend in organic matter.
A simple container mix recipe
- 80–90% quality potting mix (not seed-starting mix)
- 10–20% compost (for biology, nutrients, and moisture retention)
- Optional: a small amount of pine bark fines for drainage (especially in rainy climates)
Planting your hydrangea (step-by-step)
- Pre-water the plant (a moist root ball settles in better than a dry brick).
- Add soil so the root ball will sit slightly above the final soil line (containers settle).
- Loosen circling roots gently; if severely root-bound, tease or slice the outer roots to encourage outward growth.
- Position the plant and backfill, keeping the crown at the same height it was in the nursery pot.
- Water thoroughly until water drains from the bottom.
- Mulch the top with 1–2 inches of bark or shredded leaves, keeping mulch off the stems.
Step 4: Light and placement (aka “where do I put this thing?”)
Hydrangeas generally bloom best with strong light, but intense afternoon sun can scorch leaves and dry pots quicklyespecially
on reflective patios. Aim for a sweet spot: bright light with protection from the harshest heat.
Quick light guide
- Bigleaf/mountain types: morning sun + afternoon shade is often ideal in warmer regions.
- Panicle types: tolerate more sun; great for brighter patios.
- Too much shade: fewer blooms and leggier growth.
Example: If your balcony gets blazing sun from 1–6 p.m., move the pot so it gets morning sun and late-day shade,
or use a patio umbrella as “portable tree coverage.”
Step 5: Watering potted hydrangeas (the #1 success factor)
Hydrangeas prefer evenly moist soil. In containers, “evenly moist” usually means watering more often than you thinkespecially
in summer. The goal is to avoid repeated wilting, because chronic stress can reduce flowering and overall vigor.
How often should you water?
- Spring: every 2–4 days, depending on temperature, wind, and pot size.
- Summer heat: often daily; small pots may need twice a day during extreme heat.
- Fall: taper down as temperatures cool, but don’t let the pot dry out completely.
The finger test (low tech, high accuracy)
Stick your finger 2 inches into the soil. If it feels dry at that depth, water. If it feels cool and moist, wait. This
beats guesswork and prevents both drought stress and root rot.
Water smart to prevent disease
- Water the soil, not the leaves when possible.
- Water early in the day so any splashed foliage dries quickly.
- Use drip or a soaker setup if you’re managing multiple containers.
Step 6: Fertilizer (feed the blooms, not just the leaves)
Container plants rely on you for nutrients. But too much fertilizerespecially high nitrogencan push lots of green growth
and fewer flowers. Think “steady and moderate,” not “all you can eat buffet.”
A practical feeding plan for potted hydrangeas
- Early spring: apply a slow-release, balanced fertilizer formulated for shrubs or flowering plants.
- Mid-summer (optional): a light follow-up feeding for heavy bloomers or reblooming types.
- Stop by late summer: avoid stimulating tender growth that can be damaged by cold.
Compost counts
A top-dressing of compost (a thin layer on top of the soil) can support soil health and reduce the need for frequent
feeding. It’s like giving your potting mix a multivitaminwithout the caffeine jitters.
Signs you’re overdoing it
- Lots of leafy growth, fewer blooms
- Leaf edge burn (salt buildup)
- White crust on the soil surface
Step 7: Pruningknow your hydrangea “bloom wood”
The biggest pruning mistake is treating all hydrangeas the same. Some set buds on last year’s stems, some on new growth,
and some do both. If you prune at the wrong time, you may remove the buds that would have become flowers.
Quick pruning cheat sheet
- Bigleaf & oakleaf (often old wood): prune right after flowering (if needed), not in late fall or spring.
- Panicle & smooth (new wood): prune in late winter or early spring.
- Reblooming/remontant bigleaf: prune lightly; remove as little as possible to avoid delaying blooms.
How to prune in pots without drama
- Remove dead wood first (dead stems are brittle; scrape gentlygreen inside means alive).
- Thin crowded stems for airflow (especially important in humid climates).
- Shape lightlycontainers look best with a tidy, natural form.
- Deadhead spent blooms (optional) to keep the plant looking neat, cutting back to a healthy set of buds.
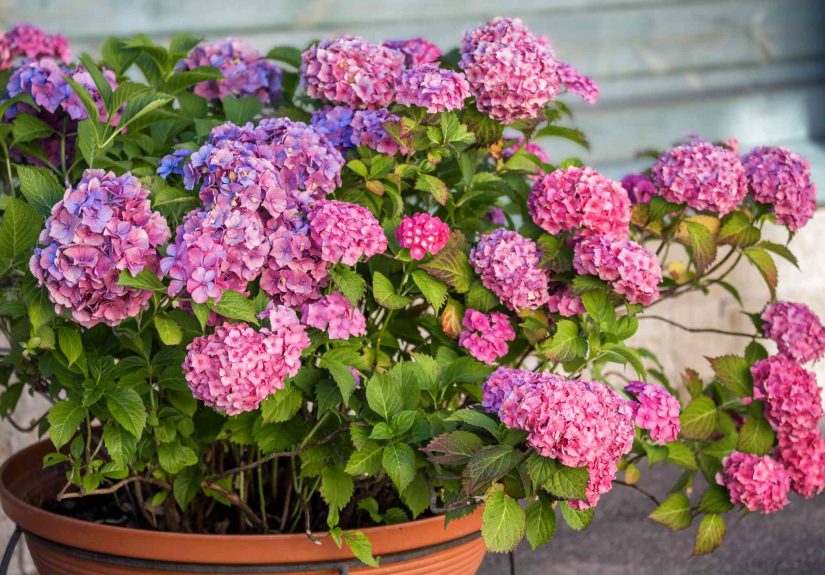
Step 8: Changing bloom color in pots (blue, pink, purple)
Only certain hydrangeasmostly bigleaf and mountain typesshift flower color based on soil chemistry. White hydrangeas
stay white, no matter how persuasive your soil amendments are.
The science in plain English
In acidic soil, aluminum is more available to the plant, which can push blooms toward blue. In more alkaline soil,
aluminum becomes less available, pushing blooms toward pink. Purple often lives in the middle.
Target pH ranges (common guidance)
- Blue: about pH 5.0–5.5
- Purple: about pH 5.5–6.0
- Pink: about pH 6.0–6.5 (sometimes higher for strong pink)
How to adjust color safely in containers
- Test first: use a soil test kit or local Extension testing for accuracy.
- For bluer blooms: use an acidifying product labeled for hydrangeas (often sulfur-based) or aluminum sulfate
according to label directions. - For pinker blooms: apply garden lime (again, follow label directionscontainers need smaller amounts).
- Be patient: color changes can take weeks to months and may be stronger next season.
Important: Don’t over-apply amendments. In pots, it’s easier to swing pH too far, too fast.
Think “small, measured adjustments,” not “dump and hope.”
Step 9: Common problems (and what to do)
1) Wilting (even when you water)
- Pot too small: roots fill the container and there’s not enough soil to hold moistureupgrade the pot.
- Hydrophobic potting mix: dry mix can repel waterwater slowly, repeat, and top-dress with fresh mix.
- Root rot: if wilting doesn’t improve after watering, inspect roots and improve drainage.
2) No blooms
- Wrong pruning time: you removed old-wood buds.
- Too much shade: bright light drives blooming.
- Too much nitrogen: lush leaves, fewer flowers.
- Winter bud damage: common in bigleaf types; rebloomers help.
3) Leaf spot or powdery mildew
- Water the soil, not the foliage
- Improve airflow (space pots, thin stems)
- Remove heavily affected leaves and avoid overhead watering late in the day
4) Pests (aphids, spider mites)
Start with a strong spray of water to knock pests off. If needed, use insecticidal soap or horticultural oil,
following label directions and avoiding application during the hottest part of the day.
Step 10: Overwintering hydrangeas in pots
In winter, a container is basically a tiny island of soil exposed to cold air on all sides. That means roots can freeze
more deeply than in the ground. Your winter strategy depends on your climate and hydrangea type.
Easy winter rules of thumb
- Keep watering until freeze: hydrated plants handle winter better than dry ones.
- Avoid freeze/thaw stress: pots near walls can be warmer and more stable.
- Don’t keep dormant plants soggy: wet + cold can rot roots.
Three good overwintering options
- Shelter outdoors: move the pot against the house, out of wind, and mulch the surface heavily.
Wrap the pot with burlap or bubble wrap (covered with burlap for looks) to insulate roots. - Unheated garage or shed: after the plant goes dormant, move it to a protected, unheated space.
Check moisture occasionally and water lightly if the soil becomes dry. - Bury the pot: sink the container into the ground (even in a temporary spot) to use the earth’s insulation,
then pull it back out in spring.
Spring wake-up plan
When temps moderate, bring the pot back into brighter light, resume regular watering, and wait to prune bigleaf types
until you can see what’s truly alive. Then fertilize once active growth is underway.
Step 11: Repotting and long-term container care
Hydrangeas don’t mind living in a pot, but they do expect periodic renovationsfresh soil, a little extra room, and fewer
tangled roots. Repotting helps replenish nutrients, improve aeration, and reduce fertilizer salt buildup.
When to repot
- Roots circling the pot or pushing out drainage holes
- Soil dries out extremely fast
- Growth is stunted despite good care
- It’s been 2–4 years and the potting mix has broken down
How to repot without stressing the plant
- Repot in early spring before heavy growth starts (best timing).
- Slide the plant out and inspect roots; loosen circling roots gently.
- Move up one pot size (or refresh the mix in the same pot if size is still appropriate).
- Use fresh potting mix + compost, water in thoroughly, and keep it out of harsh sun for a week.
Container styling ideas (because you’re allowed to be a little extra)
Hydrangeas look incredible as “solo stars,” but you can also underplant for a fuller display. Choose companions that like
similar moisture and light.
Easy companion plants
- Shade/part shade: coleus, sweet potato vine, ferns, heuchera
- More sun (panicles especially): calibrachoa, petunias, trailing verbena
- Texture contrast: carex (ornamental sedge), dwarf grasses, ivy (where non-invasive)
Tip: keep companions shallow-rooted so they don’t steal all the water. Your hydrangea will notice. And judge you.
FAQ: Quick answers for common “Am I doing this right?” questions
Can hydrangeas live in pots year-round?
Yesmany gardeners keep them in containers for years. The keys are a large pot, consistent watering, and winter protection
appropriate to your climate.
Do potted hydrangeas need full sun?
They need strong light to bloom well, but many varieties prefer protection from intense afternoon sun, especially in hot
regions or on reflective patios.
How do I keep a potted hydrangea from drying out?
Use a larger pot, mulch the surface, water deeply, and consider drip irrigation. During heat waves, check soil daily.
Should I bring my hydrangea indoors for winter?
In many climates, the best “indoors” is actually an unheated sheltered space (like a garage) so the plant stays
dormant but protected from the harshest freeze/thaw cycles.
Real-World Container Hydrangea Lessons (Experiences)
Reading care instructions is one thing. Living with a potted hydrangea is another. It’s a relationship: you provide water,
light, and a decent pot; it provides blooms and occasional emotional manipulation via dramatic wilting. Below are
real-world “what it’s actually like” experiencesbased on common patterns gardeners reportso you can skip the most
predictable mistakes.
Experience #1: The “It was fine yesterday” summer meltdown
The most common container surprise is how fast a hydrangea can go from “thriving” to “Victorian fainting couch.” A warm day
plus wind can dry the top few inches of a pot quickly, especially if the plant has grown roots through most of the mix.
Gardeners often assume wilting means “needs a little sip,” then they splash water on top and walk away. The hydrangea
rebounds… briefly… then wilts again because the deeper root zone never got soaked.
The fix is boring but powerful: water slowly until it drains, wait a minute, then water again. That second pass catches
dry pockets where water ran down channels. If you’re seeing frequent wilting even with deep watering, it’s usually a sign
the pot is too small or the root ball is packed tightupgrade the container or repot and loosen circling roots.
Experience #2: The patio “sun trap” nobody warned you about
A hydrangea that’s happy in part shade can struggle on a bright patio simply because patios create microclimates.
Light-colored walls reflect sunlight, dark decking radiates heat, and wind tunnels between buildings speed evaporation.
Gardeners often place the pot where it looks best (center stage), then wonder why leaves crisp or blooms scorch.
A small move can change everything: shift the pot so it gets morning sun and afternoon shade, or put it behind a railing,
plant stand, or umbrella that blocks the hottest hours. Many people discover that a hydrangea doesn’t need less lightit
needs less heat and less “solar oven” exposure.
Experience #3: The pruning regret spiral
Another classic: “I pruned it to tidy it up, and now it won’t bloom.” Container hydrangeas tempt you to shape them like a
topiary because they’re right at eye level. But if you prune an old-wood bloomer at the wrong time, you can remove the
buds that would have opened next season. That’s why gardeners in colder regions often fall in love with reblooming types:
even if buds are lost to winter or pruning, new-wood blooms can still appear later.
The lived-in rule is: if you don’t know what type you have, prune lightly, remove only dead wood, and wait until you see
spring growth to judge what survived. Most hydrangeas look better with “less intervention, better timing” rather than
heavy shaping.
Experience #4: The color-change experiment that goes sideways (and how to do it sanely)
Gardeners love the idea of turning blooms blue or pink, and containers feel like the perfect lab. But containers are also
where people overcorrect. A little too much amendment can swing pH quickly, and then you’re troubleshooting yellow leaves
or stalled growth instead of enjoying flowers.
The successful pattern is always the same: test first, adjust slowly, and accept that the “final color” may take more than
one season to fully settle. Also, gardeners who chase blue often forget the hidden requirement: aluminum availability.
That’s why using products labeled for hydrangea color adjustment (and following directions) is more reliable than random
kitchen remedies. If you want a fun experiment, start with one plant, not your entire patio collection.
Experience #5: Winter is where container hydrangeas either level upor tap out
In the ground, hydrangeas have the earth buffering their roots. In pots, roots are exposed to cold from every angle, and
freeze/thaw cycles can be brutal. Gardeners often do the right thing all summer, then lose the plant in winter because the
pot sat in an exposed spot, dried out completely, or repeatedly thawed and refroze.
The most practical “real life” move is simply relocating the pot for winter: against the house, out of wind, with mulch on
top, and insulation around the container if your climate demands it. Many gardeners also succeed by moving dormant pots to
an unheated garage and checking moisture occasionallyjust enough water to prevent bone-dry soil, not enough to keep roots
wet and cold. The reward for getting winter right is huge: a stronger plant that wakes up ready to bloom instead of
limping through spring.
If you remember one experience-based truth, make it this: potted hydrangeas don’t need perfectionjust consistency. Big
pot, steady moisture, correct pruning timing, and sensible winter protection turn “diva” into “star performer.”