Table of Contents >> Show >> Hide
- What a Tachometer Does
- Before You Install: Know Your Ignition System
- Tools and Supplies You Will Want
- Where to Mount the Tachometer
- Basic Tachometer Wiring Explained
- Step-by-Step: How to Install a Tachometer
- Hookup Tips for Specific Ignition Types
- Common Tachometer Problems and Fixes
- Best Practices for a Clean, Reliable Install
- Do You Need a Tach Adapter?
- Real-World Installation Experiences and Lessons Learned
- Final Thoughts
There are two kinds of drivers: the ones who casually shift by ear, and the ones who want the engine to stop sounding like a caffeinated blender before they grab the next gear. A tachometer is for the second group. It gives you a clear read on engine speed, helps with tuning, makes driving more precise, and adds a nice bit of old-school performance style to the dash. In other words, it is part useful instrument, part mechanical jewelry.
If you are installing an aftermarket tach, the job is usually very doable for a patient DIYer. The trick is not just mounting the gauge. The real magic is choosing the correct signal source, wiring it cleanly, protecting the circuit, and setting the tach for the correct number of cylinders. Get those details right and the needle will sweep smoothly. Get them wrong and you may end up with a bouncing needle, no RPM reading, or a tach that acts like it is listening to a different engine.
Note: Always confirm wire colors, signal type, and cylinder settings with both your tachometer manual and your vehicle service information before making final connections.
What a Tachometer Does
A tachometer measures engine speed in revolutions per minute, or RPM. It reads a pulse signal from the ignition system, ECU, or an ignition control box, then turns that signal into a needle movement or digital display. That information is useful when you are checking idle speed, dialing in a shift point, diagnosing drivability issues, or just keeping the engine in its happy place.
Many aftermarket tachs also include extras like shift lights, warning functions, playback memory, dimmable backlighting, and adjustable cylinder settings. Some are simple analog gauges with four wires. Others are programmable units that can work with modern engine computers, ignition boxes, distributorless setups, or even diesel adapters.
Before You Install: Know Your Ignition System
This is the part people try to skip. This is also the part that saves headaches.
Before wiring a tach, identify which ignition setup your vehicle uses. The correct hookup point depends on that system. A standard distributor ignition with an external coil is usually the easiest. A GM HEI setup often uses a dedicated TACH terminal. An aftermarket CDI or ignition box usually wants the tach connected to the box’s tach output, not directly to the coil. On distributorless and coil-on-plug systems, the signal may come from a specific ECU wire, a tach output lead, or an adapter module.
Common tach signal sources
- Standard ignition with external coil: negative side of the ignition coil
- GM HEI with internal coil: TACH terminal on the distributor cap
- Aftermarket ignition box: dedicated tach output wire or terminal
- Distributorless or ECU-controlled systems: specified tach output wire, ECU tach lead, or adapter
- Some computer signals: may need a pull-up resistor or brand-specific setup
If your vehicle has multiple coils, coil packs, or an engine swap with custom wiring, do not assume the old “green wire to coil negative” rule applies. That shortcut works often enough to be famous, but not often enough to be foolproof.
Tools and Supplies You Will Want
- Aftermarket tachometer and mounting hardware
- Manufacturer wiring diagram or instructions
- Wire stripper and crimping tool
- Solder and heat shrink tubing, or quality crimp connectors
- 18- to 20-gauge stranded wire, depending on the gauge instructions
- Inline fuse holder and proper fuse
- Ring terminals, spade terminals, and butt connectors
- Electrical tape or braided loom
- Rubber grommet for firewall pass-through
- Test light or multimeter
- Drill, hole saw, or bracket hardware if dash mounting is required
- Safety glasses
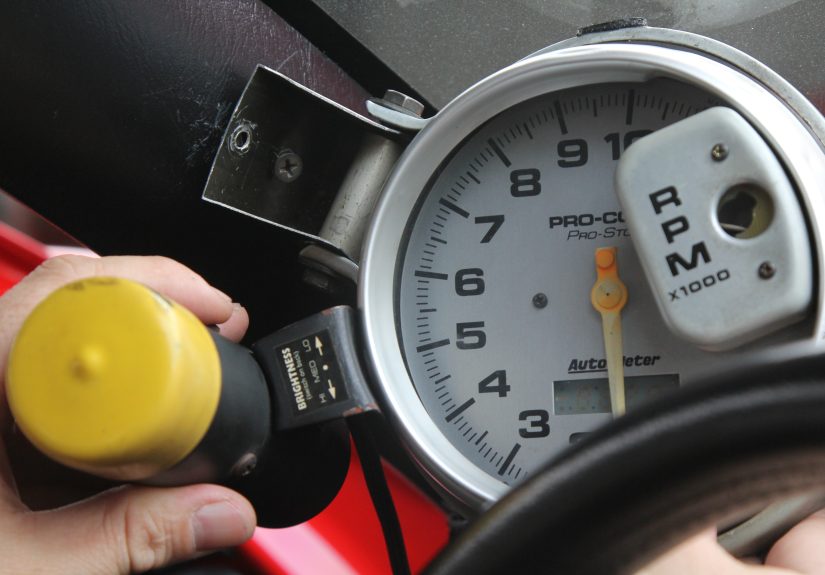
Where to Mount the Tachometer
Choose a mounting spot you can see without taking your eyes too far off the road. Popular options include a steering-column clamp, dash-top cup, A-pillar pod, or in-dash gauge opening. If you are adding the tach to a classic car, a bracket mount often keeps the install reversible. If you want a cleaner factory-style look, an in-dash mount is the prettier route.
Whatever location you choose, make sure the tach clears steering wheel movement, does not block warning lamps, and leaves room behind the panel for wiring and brackets. A gauge that is perfectly visible but blocks your turn signal indicator is not a victory.
Basic Tachometer Wiring Explained
Most aftermarket tachs use a simple four-wire layout, although some models add extra wires for memory, shift lights, dimming, or alternate signal inputs.
| Typical Wire | Usually Connects To | What It Does |
|---|---|---|
| Red | Switched 12V ignition source | Powers the tach only when the key is on |
| Black | Clean chassis or engine ground | Completes the circuit and stabilizes operation |
| Green or Gray | Tach signal source | Reads engine RPM pulses |
| White | Dash lighting or dimmer circuit | Illuminates the gauge with the rest of the dash |
Some tachs also have a dedicated battery-memory wire, a shift-light output, or dual signal inputs for “clean” tach signals versus coil-negative signals. This is why the manual matters. The color code above is common, not universal.
Step-by-Step: How to Install a Tachometer
1. Disconnect the battery
Start by disconnecting the negative battery cable. This prevents accidental shorts, protects the vehicle electronics, and makes the whole install less exciting in a bad way.
2. Mount the tachometer
Install the tach using the supplied bracket, cup, or panel hardware. If you are cutting into the dash, measure twice and cut once. Then measure again because dashboards are very good at making people overconfident.
Feed the harness through the mounting hole or bracket opening and leave enough slack to connect everything without straining the terminals.
3. Connect switched 12-volt power
Find a keyed 12V source that is hot when the ignition is on and off when the key is off. An accessory or ignition terminal in the fuse box is a common choice. Use an inline fuse near the power source if your tach instructions call for one. Many manufacturers recommend a fused switched-power feed for protection.
4. Ground the tach properly
Attach the ground wire to a clean, bare-metal grounding point. Remove paint, rust, or undercoating if needed. A weak or dirty ground is one of the most common reasons for erratic tach readings, dim lighting, or total gauge failure.
On older vehicles, it is also smart to check that the engine block, chassis, and battery all have solid ground straps. A fancy new tach cannot overcome a crusty 40-year-old ground path.
5. Connect the tach signal wire
This is the important one.
If your engine uses a standard external ignition coil and no ignition box, connect the signal wire to the negative side of the coil. If it uses a large-cap GM HEI distributor, connect to the TACH terminal. If it uses an MSD or similar ignition box, connect to the box’s tach output wire or terminal. Do not hook the tach directly to the coil when the ignition box instructions say to use the dedicated tach output. That is one of the fastest routes to a bad reading or damaged gauge.
6. Connect the lighting wire
If the tach has a lighting lead, connect it to the dash-light circuit or dimmer circuit so the tach lights up with the rest of the instruments. If you prefer a constant brightness setup, some models allow a direct 12V lighting feed, but matching the factory dimmer usually looks cleaner.
7. Route and protect the wiring
Keep the wiring away from headers, exhaust pipes, fan blades, linkages, and sharp sheet metal. Route wires through a rubber grommet if they pass through the firewall. Secure everything with clamps, zip ties, or loom so nothing rubs through later.
Neat wiring is not just for show points. Good routing reduces electrical noise and helps prevent the signal wire from picking up interference that can make the needle bounce.
8. Set the cylinder count or pulse setting
Many tachs must be configured for four-, six-, or eight-cylinder engines. Others use pulse-per-revolution or programmable engine settings. If you skip this step, the tach may work, but the reading can be hilariously wrong. A small-block V8 idling at “11,000 RPM” is not a tuning breakthrough. It is a setup problem.
9. Reconnect the battery and test
Reconnect the battery, turn the key on, and verify that the tach powers up and the lighting works. Start the engine and watch the needle or display. It should rise smoothly and respond consistently to throttle input.
If the reading is unstable, too high, too low, or dead, shut the engine off and troubleshoot before driving.
Hookup Tips for Specific Ignition Types
Standard coil and distributor
This is the classic setup. The tach signal usually comes from coil negative. Switched power, ground, and lighting connections are straightforward. For many hot rods, muscle cars, and older street builds, this is the easiest tach install you will ever do.
GM HEI
With a large-cap HEI distributor that has an internal coil, use the TACH terminal on the cap. Do not guess based on nearby wires when the cap literally gives you a labeled terminal like a polite host.
MSD or CDI ignition boxes
Use the dedicated tach output. Many ignition boxes provide a square-wave tach signal specifically for gauges and shift lights. Some factory tachs and some aftermarket units will also require a tach adapter. If the tach reads incorrectly after connecting to the tach output, the next step is usually checking whether an adapter is required for your trigger style.
Distributorless, ECU, or coil-on-plug systems
These systems are less forgiving. The tach signal may come from an ECU pin, a dedicated tach output lead, an interface box, or an adapter. Some brands specify a pull-up connection for weaker computer tach signals. If your engine management system offers a clean tach-out lead, use that instead of probing random wires and hoping for romance.
Common Tachometer Problems and Fixes
Tach does not power on
- Check the fuse
- Verify switched 12V with a meter
- Confirm the ground is solid
- Make sure the key-on source is actually switched
Tach powers on but shows no RPM
- Wrong signal source
- Signal wire connected to the wrong coil terminal
- Ignition box requires tach output hookup instead of coil hookup
- Tach adapter needed
- Cylinder or signal setting incorrect
Tach needle jumps or bounces
- Poor ground
- Signal wire routed too close to ignition wires or power wires
- Electrical noise from the ignition system
- Need for a tach filter, resistor, or cleaner signal source
Reading is too high or too low
- Wrong cylinder selection
- Wrong signal input selected on dual-input tachometers
- Computer tach signal needs pull-up or alternate configuration
Best Practices for a Clean, Reliable Install
- Use stranded automotive wire, not random leftovers from the mystery drawer
- Fuse the power feed when the instructions call for it
- Solder or use quality crimp connectors, then insulate the joint properly
- Run wires through grommets at the firewall
- Keep signal wires away from plug wires, coils, and extreme heat
- Double-check the manual before connecting to any aftermarket ignition box
- Label wires if the car has multiple future upgrades planned
Do You Need a Tach Adapter?
Maybe. Not every install does, but enough do that it deserves its own section.
You may need a tach adapter when a factory or aftermarket tach does not understand the signal produced by an ignition box, magnetic pickup, coil pack, or ECU output. Symptoms include a dead tach, a wildly inaccurate reading, or a tach that only works until the RPM climbs.
Adapters are especially common on vehicles running MSD-style ignition boxes, current-triggered factory tachs, older specialty setups, and some distributorless systems. The rule is simple: if the tach output is correct but the gauge still disagrees with reality, an adapter or filter may be the missing piece.
Real-World Installation Experiences and Lessons Learned
Across DIY installs, a few patterns show up again and again. The first is that the mounting part feels like the big job, but it usually is not. Most people can mount the tach in under an hour. The real time goes into confirming the right signal source, making clean electrical connections, and rerouting wires when the first plan puts them too close to heat or ignition noise.
Another common experience is the “it powers up, but the reading is wrong” moment. This often happens on the first startup after a clean-looking install. The tach lights up, the engine starts, and then the gauge insists your mild cruiser is idling like a Formula car. In real-world cases, the fix is often simple: the tach is set for the wrong cylinder count, the signal wire is on the wrong terminal, or the installer used the coil hookup when the ignition box wanted the dedicated tach output instead.
Grounds also cause more trouble than people expect. Plenty of installers assume any metal screw under the dash is good enough. Sometimes it is. Sometimes it is painted, rusty, loose, or tied into a weak grounding path that turns the tach needle into a nervous bird. A better ground almost always improves gauge behavior. On older classics, adding or refreshing engine-to-chassis ground straps can solve weird tach issues that seem unrelated at first glance.
Lighting hookups are another place where small details matter. Many people want the tach to glow at full brightness all the time, then realize at night it looks like a tiny stadium floodlight attached to the dash. Connecting the light wire into the dash illumination circuit usually makes the install feel much more factory and far easier on the eyes.
Installers working with modern EFI swaps or coil-on-plug engines tend to report the same lesson: stop hunting for a random wire and start with the ECU documentation. Modern systems often provide a clean tach-out lead for a reason. Using that dedicated output is usually more reliable than tying into a coil signal, especially on engines with multiple coils or custom management systems.
There is also the question of appearance. A tach can make a dash look purposeful and performance-minded, but only if the wiring does not look like it was done during a power outage. The best installs usually involve simple planning: correct wire length, tidy routing, loom where needed, good pass-through protection, and enough service slack to remove the gauge later without yanking on connections.
Finally, experienced installers almost always say the same thing after a successful tach hookup: read the instructions before touching the wire cutters. That sounds obvious, yet it saves the most time. Tachometers may look similar from the front, but the backside tells a very different story depending on brand, ignition type, and signal style. A careful thirty minutes spent reading the manual can save three hours of troubleshooting and one extremely dramatic conversation with a dead gauge.
Final Thoughts
Installing a tachometer is one of those upgrades that can be simple, satisfying, and surprisingly useful. The key is matching the tach to the vehicle’s ignition system, using the right signal source, and wiring it with care. Switched power, a solid ground, correct signal hookup, clean routing, and proper cylinder setup will solve most problems before they start.
If you are working with a basic distributor-and-coil setup, the install can feel pleasantly old-school. If you are working with an HEI distributor, aftermarket ignition box, EFI swap, or coil-on-plug system, the process gets more technical, but the same principle applies: the tach only works as well as the signal you feed it.
Take your time, verify the wiring, and do not be afraid to use an adapter or cleaner signal source if the gauge needs it. Once it is installed correctly, your tach becomes one of the most helpful instruments in the car. It tells the truth, does not care about your excuses, and keeps the engine from singing higher than it should.