Table of Contents >> Show >> Hide
- What Is a Water Heater Expansion Tank?
- When You Probably Need an Expansion Tank
- Before You Start: Safety, Permits, and Planning
- How to Install a Water Heater Expansion Tank
- Step 1: Check your home’s water pressure
- Step 2: Size the expansion tank correctly
- Step 3: Set the tank pre-charge before installation
- Step 4: Shut off power or fuel to the water heater
- Step 5: Choose the right installation location
- Step 6: Install a tee fitting on the cold-water line
- Step 7: Mount and support the tank properly
- Step 8: Restore water and purge air
- Step 9: Restore power or gas and test the system
- Common Mistakes to Avoid
- How Long Does It Take?
- Signs Your Expansion Tank May Need Attention Later
- Real-World Experiences and Lessons From Installing a Water Heater Expansion Tank
- Final Thoughts
- SEO Tags
If your water heater has been acting dramatic latelydripping from the relief valve, bumping your plumbing pressure around, or making your pipes seem moodier than usualan expansion tank may be the quiet little hero your system needs. It is not flashy. It will not win a design award. But it does have one important job: giving heated water somewhere to go when it expands.
That matters because water gets bigger when it heats up. In an open plumbing system, the extra pressure can move back toward the municipal supply. In a closed system, it cannot. That is where trouble starts. Pressure spikes can strain your water heater, fittings, valves, and appliances. A properly installed water heater expansion tank helps absorb that pressure instead of making your plumbing system throw a tiny tantrum.
This guide walks you through how to install a water heater expansion tank step by step, with plain-English explanations, practical tips, and the kind of warnings that can save you from leaks, callbacks, and a very annoying second trip to the hardware store.
What Is a Water Heater Expansion Tank?
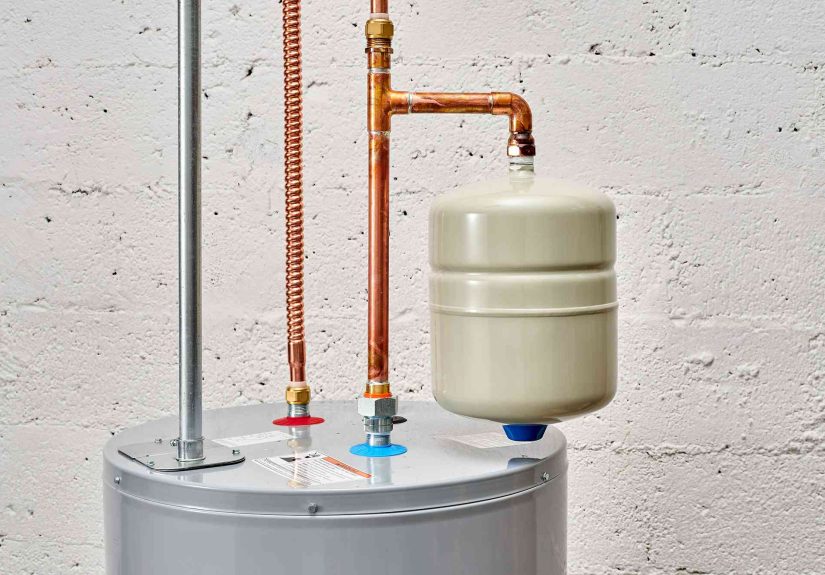
A water heater expansion tank is a small auxiliary tank that connects to the cold-water line near your water heater. Inside, it has an air chamber and a bladder or diaphragm. When heated water expands and system pressure rises, the tank absorbs that extra volume. In simple terms, it gives your plumbing system some breathing room.
You usually need one when your home has a closed water system. That often happens when there is a check valve, backflow preventer, pressure-reducing valve, or similar one-way device on the incoming water line. Many modern homes have one of these devices, even when homeowners have no idea it is there. Surprise: plumbing is full of hidden plot twists.
When You Probably Need an Expansion Tank
You should strongly consider a thermal expansion tank if any of the following apply:
- Your home has a pressure-reducing valve on the main water line.
- Your water meter includes a check valve or backflow device.
- Your temperature-and-pressure relief valve drips during heating cycles.
- Your plumber or local inspector says your system is closed.
- You are installing a new water heater and want to bring the setup up to current code expectations.
One more important detail: buy a potable-water expansion tank, not a hydronic or boiler expansion tank. They are not the same product. Grabbing the wrong one is a classic DIY move right up there with “I thought I had a 3/4-inch fitting in the garage.”
Before You Start: Safety, Permits, and Planning
Check local code and permit requirements
In many areas, water heater work requires a plumbing permit, and sometimes an electrical permit too. Even if you are only adding an expansion tank, it is smart to check with your local building department. Plumbing codes may also affect placement, seismic strapping, pressure limits, and accessory requirements.
Know when to call a pro
If you are working on a gas water heater and the job involves gas piping, venting, or major repiping, this may be a better project for a licensed plumber. Electric water heater systems are often more DIY-friendly, but any time you are unsure about pressure, code compliance, soldering, or support, calling a pro can be cheaper than repairing a mistake.
Gather the right tools and materials
Most expansion tank installations require:
- Potable-water expansion tank
- Pressure gauge for a hose bibb or outdoor spigot
- Tire gauge for checking tank air charge
- Manual bicycle pump or small air pump
- Pipe tee with a 3/4-inch threaded branch
- Appropriate adapters or flex connectors
- PTFE tape or approved pipe joint compound
- Adjustable wrenches or channel-lock pliers
- Bucket and towels
- Pipe cutter, if you need to cut into rigid pipe
- Support bracket or straps, if required by orientation or tank size
How to Install a Water Heater Expansion Tank
Step 1: Check your home’s water pressure
Before you touch the tank, check the incoming water pressure at an outdoor spigot or hose bibb with a pressure gauge. This matters because the tank’s air charge should match your home’s cold-water pressure when the tank is empty of water.
A good target for many homes is around 50 to 60 psi. If your pressure is over 80 psi, deal with that first by adjusting or installing a pressure-reducing valve. An expansion tank is not a substitute for excessively high water pressure. It handles thermal expansion, not every pressure problem under the sun.
Step 2: Size the expansion tank correctly
Do not guess here. Tank size depends on your water heater capacity, incoming pressure, and sometimes the maximum water temperature. A small residential tank may work for many 40- to 50-gallon heaters, but not for every setup. Follow the expansion tank manufacturer’s sizing chart. Too small, and it will not do the job. Too large, and you have wasted money and space.
Step 3: Set the tank pre-charge before installation
With the expansion tank still dry and not connected to the system, remove the cap on the air valve and check the pressure with a tire gauge. Adjust the tank’s air charge to match your measured cold-water pressure. If your home pressure is 60 psi, set the tank to 60 psi. If it is 55, set it to 55.
This step is easy to skip and easy to regret. Many tanks come precharged from the factory, but factory pressure is not the same thing as your pressure. Installing a tank without matching the pre-charge is like buying running shoes in a random size and hoping your feet will adapt.
Step 4: Shut off power or fuel to the water heater
Turn off the breaker for an electric water heater. For a gas unit, follow the manufacturer’s shutdown instructions and turn off the gas supply as needed. Then shut off the cold-water supply to the heater.
Open a hot-water faucet somewhere in the house to relieve pressure. Depending on your setup, you may also want to drain a little water from the tank into a bucket or hose to reduce pressure in the line where you are working.
Step 5: Choose the right installation location
The best place for the expansion tank is on the cold-water supply line near the water heater, typically between the water heater and any check valve, backflow preventer, or pressure-reducing valve. That placement lets the tank absorb thermal expansion where it actually happens.
Do not place a shutoff valve between the water heater and the expansion tank. That would isolate the tank from the heater and defeat the whole purpose. Think of it as giving the pressure an emergency exit, then boarding up the door.
Step 6: Install a tee fitting on the cold-water line
Once pressure is relieved, cut into the cold-water line if needed and install a tee with a 3/4-inch threaded branch for the expansion tank. If your system already has a threaded fitting or expansion tank tee, even betteryou just saved yourself some work.
Apply PTFE tape or approved pipe joint compound to the tank’s male threads, following the fitting manufacturer’s guidance. Thread the tank into the tee carefully and tighten it snugly without overdoing it. “Really tight” is not the same thing as “professionally correct.”
Step 7: Mount and support the tank properly
Many manufacturers prefer the tank installed with the water connection pointing up for best performance. Some tanks allow inverted or horizontal installation, but those positions often require full support for the tank body when it is full of water. In other words, if the tank is not hanging in the preferred orientation, do not make the pipe carry all the weight like some kind of plumbing CrossFit challenge.
If the tank is larger, mounted horizontally, or installed where movement or vibration is possible, use a wall bracket or support straps. Supporting the tank reduces strain on the piping and lowers the odds of long-term leaks.
Step 8: Restore water and purge air
Open the cold-water supply valve and let the system refill slowly. Leave a nearby hot-water faucet open while the tank fills so trapped air can escape. Once you get a steady stream of water, close the faucet and inspect all fittings for leaks.
Check the tee, the tank connection, and any cut-in fittings or flex connectors. A dry paper towel wiped around the joints can help reveal small leaks that your eye may miss.
Step 9: Restore power or gas and test the system
When the water heater is completely full and all air is purged, restore power or turn the gas back on according to the manufacturer’s instructions. Let the unit run through a heating cycle, then inspect again for leaks and listen for anything unusual.
If your relief valve had been dripping before, watch whether that problem improves once the system is back up to temperature. A properly installed and properly charged expansion tank often solves recurring pressure-related dripping. If the valve still leaks, you may also have a high-pressure issue, a failing relief valve, or another plumbing problem.
Common Mistakes to Avoid
Installing the tank on the wrong side of a check valve
If the tank is not on the building side of the one-way device, it cannot absorb the expanding water properly. Placement matters.
Skipping the pressure check
Matching pre-charge to actual house pressure is not optional busywork. It is one of the main reasons the tank works correctly.
Using the wrong kind of tank
Potable-water systems need a potable-water expansion tank. Boiler tanks and hydronic tanks are not interchangeable.
Leaving the tank unsupported
A water-filled tank is heavier than it looks. Unsupported horizontal or awkwardly mounted tanks can stress fittings and eventually leak.
Putting a shutoff valve between the heater and the expansion tank
That creates an isolation problem and can make the tank useless at the exact moment you need it.
Ignoring high incoming pressure
If your pressure is above 80 psi, fix that too. Otherwise, you are asking one small tank to solve a much bigger problem.
How Long Does It Take?
If the plumbing is accessible and you are adding the tank to an existing threaded setup, the project may take an hour or two. If you need to cut pipe, add a tee, support the tank, or troubleshoot pressure issues, expect longer. Gas water heater setups, tight utility closets, and older plumbing can make the job more involved.
Signs Your Expansion Tank May Need Attention Later
- The T&P relief valve starts dripping again
- System pressure fluctuates noticeably
- The tank sounds waterlogged or feels abnormally heavy
- There is corrosion around the threaded connection or air valve
- The tank loses air charge over time
Like many home components, expansion tanks are not immortal. They need occasional inspection, especially as the system ages.
Real-World Experiences and Lessons From Installing a Water Heater Expansion Tank
One of the most common homeowner experiences with this project is realizing the tank installation itself is not usually the hardest part. The hard part is all the little details around it. People often start the job thinking, “I just screw the tank onto a pipe and I’m done.” Then they discover the line needs a tee, the pipe is in an awkward corner, the house pressure is higher than expected, and the tank does not quite fit where they imagined it would. The tank is small. The project, however, has a sneaky ability to become a whole afternoon.
Another frequent experience is finding out that the tank’s factory air charge does not match the home’s actual water pressure. This catches a lot of people off guard. They install everything neatly, turn the system back on, and then wonder why the relief valve still drips. A quick check with a tire gauge often reveals the issue. Once the pre-charge is adjusted to match the incoming pressure, the system behaves much better. It is one of those satisfying fixes that makes you feel smarter than you did an hour earlier.
Many DIYers also report that space is the real villain. In a roomy garage, the job can feel almost civilized. In a tiny utility closet, it starts to resemble a yoga class for plumbers. Reaching the cold-water line, angling a wrench, and supporting the tank without putting stress on the piping can be genuinely awkward. That is why wall brackets and support straps get so much love from people who have done this before. They make the final installation look cleaner and feel sturdier.
There is also the classic “I fixed one thing and discovered another” experience. A homeowner adds an expansion tank and, during the process, notices an aging shutoff valve, crusty fittings, or a relief valve that looks like it has seen things. The upside is that the project creates a natural moment to inspect the whole water heater area. Sometimes the best part of learning how to install a water heater expansion tank is that it forces you to notice the rest of the plumbing before it becomes tomorrow’s emergency.
For first-time installers, the emotional arc is usually the same. At the start: confidence. Midway through: confusion mixed with hardware-store dust. At the end: relief, followed by repeated leak checks because trust must be earned. That last part is normal. Most people stand there for a while watching the fittings like they are waiting for a confession. Smart move, honestly.
Professionals often mention that the most reliable installs are the boring ones. Correct pressure, correct tank size, correct placement, correct support, and no creative plumbing shortcuts. Nothing fancy. No mystery valves. No upside-down improvisation supported by hope alone. Just a properly charged potable-water expansion tank on the cold-water line near the water heater, installed the way the manufacturer intended.
So if your goal is a smooth project, focus less on speed and more on setup. Measure pressure first. Read the tank instructions. Leave room for support. Double-check orientation. And keep a towel nearby, because even a neat project tends to include one stubborn drip that wants a moment of attention.
Final Thoughts
Installing a water heater expansion tank is one of those home plumbing projects that is small in size but big in payoff. Done correctly, it helps protect your water heater, reduces pressure swings, can stop nuisance relief-valve dripping, and adds a layer of long-term safety to a closed plumbing system.
The keys are simple: use the right potable-water expansion tank, size it correctly, match the air charge to your home’s cold-water pressure, install it on the cold-water line near the water heater, and support it properly if the orientation or size requires it. Do those things, and your plumbing system should be a lot calmerand a lot less dramatic.
And that, in the glamorous world of water heater maintenance, counts as a major victory.