Table of Contents >> Show >> Hide
- What Quarter Round Is (and When You Should Use It)
- Quarter Round vs. Shoe Molding: Quick Decision Guide
- Tools and Materials
- Prep Work That Makes the Install Look Pro
- Measure and Plan Without Losing Your Mind
- How to Cut Quarter Round: Corners, Seams, and Stops
- Installation: Fasten It the Right Way
- Finishing: Fill, Caulk, Touch Up
- Troubleshooting: Common Problems (and Fixes)
- FAQ
- Cost and Planning Snapshot
- Safety Notes (Because Fingers Are Useful)
- Real-World Experiences: What People Learn Installing Quarter Round (500+ Words)
- 1) Everyone Cuts at Least One Piece Backwards
- 2) Out-of-Square Corners Are the Norm, Not the Exception
- 3) The Best Looking Rooms Usually Have Fewer Seams
- 4) Nail Placement Is Half the Battle
- 5) Pre-Finished Trim Is a Cheat Code (In a Good Way)
- 6) The Project Feels Small… Until You Hit Doorways
- 7) The Final Result Is Usually Worth It
Quarter round is the tiny finishing move that makes a new floor look like it knows how to pay its taxes: clean, responsible,
and suspiciously professional. It hides the expansion gap where flooring meets the wall, covers minor oopsies, and protects the
edge of your floor from vacuums, shoes, and that one chair that scoots like it’s training for the Olympics.
In this guide, you’ll learn how to install quarter round the right waytight corners, smooth joints, clean fastening, and a finish
that doesn’t scream “I did this at 11:47 p.m. the night before company came over.”
What Quarter Round Is (and When You Should Use It)
Quarter round is a trim molding shaped like a quarter of a circle. It’s commonly installed at the bottom of baseboards to cover
the perimeter gap left by flooringespecially floating floors like laminate and luxury vinyl plank (LVP), which need room to
expand and contract.
You’ll usually choose quarter round when:
- You installed new flooring but didn’t remove/reinstall baseboards.
- The gap between the flooring and the baseboard is too wide for thinner trim.
- You need a durable, quick-to-install option that hides irregular edges.
If you want a slimmer look, consider shoe molding instead. Shoe molding tends to be less bulky and can hug the
baseboard more subtly, while quarter round is chunkier and more noticeable. The tradeoff: quarter round often covers larger gaps
more confidently.
Quarter Round vs. Shoe Molding: Quick Decision Guide
Both trims cover the gap where floor meets wall, but they don’t look the same in the room’s “final photo.”
- Quarter round: More rounded, thicker profile. Better for larger gaps and slightly uneven edges.
- Shoe molding: Typically a lower-profile shape that can look more “built-in” and less bulky.
A simple rule: If you want the trim to blend in, shoe molding often wins. If you need the trim to solve a problem (big
gaps, imperfect cut edges), quarter round is the reliable friend who shows up with a truck.
Tools and Materials
Here’s what you’ll want on hand before you start cutting like a reality TV carpenter.
Tools
- Tape measure and pencil
- Miter saw (or miter box and hand saw for small jobs)
- Brad nailer (18-gauge) or finish nailer/hammer and nail set
- Stud finder (helpful, not mandatory)
- Utility knife and pry bar (if removing old quarter round)
- Sandpaper or sanding sponge
- Caulk gun
Materials
- Quarter round (wood, MDF, or pre-finished)
- Finish nails or brad nails (common lengths: 1-1/4″ to 1-3/4″)
- Wood glue (for joints)
- Wood filler or putty (paintable)
- Paintable caulk (for the top edge, if needed)
- Paint/stain and touch-up supplies
Prep Work That Makes the Install Look Pro
1) Decide: Remove Old Quarter Round or Install Over It?
If old quarter round exists, remove it. Stacking trim on trim is how you end up with a baseboard that looks like it’s wearing
three winter coats indoors. Use a utility knife to score along the top edge (break the paint/caulk line), then gently pry it off.
2) Clean and Inspect the Baseboard Line
Vacuum dust and grit along the baseboard and floor edge. A surprising amount of “my trim won’t sit flat” is actually “my trim is
sitting on a fossilized crumb line.”
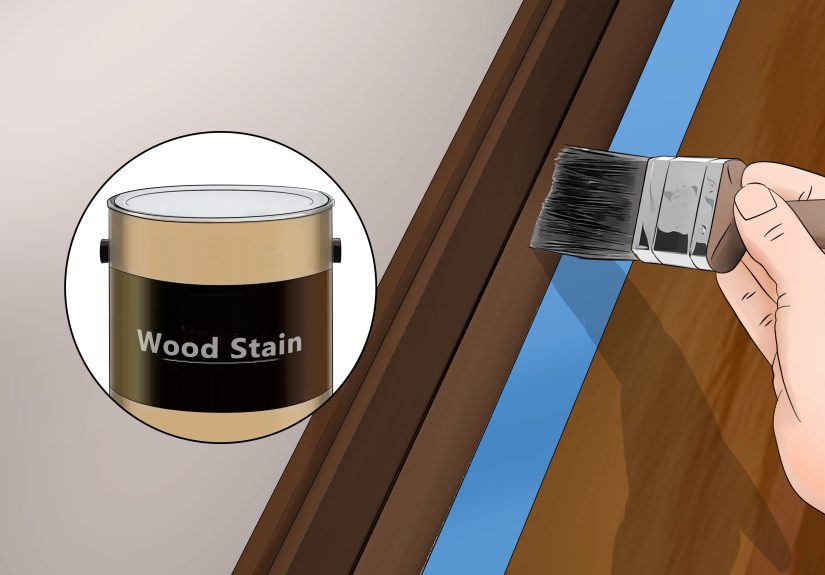
3) Think About Finish Before Installation
If your quarter round is raw wood or MDF and you plan to paint, many DIYers prefer to prime/paint it before installation, then do
final touch-ups after filling nail holes. It’s faster and cleaner than trying to cut in paint along the floor later. If you plan
to stain, it’s often best to stain before installation as well, then touch up cuts and nail holes carefully.
Measure and Plan Without Losing Your Mind
Make a “Cut List” Room by Room
Work one wall at a time. Measure each run and label it (Wall A, Wall B, etc.). Quarter round is forgiving, but your time isn’t.
- Measure along the baseboard, not the floor edge (floors can wave and wander).
- Plan where seams will land on long walls (aim for less noticeable areas).
- Buy 10% extra material for waste, imperfect corners, and “learning moments.”
Corner Reality Check: Your House Is Probably Not Square
Inside and outside corners are rarely perfect 90s, especially in older homes. That’s normal. If you have an angle finder, use it.
If you don’t, test-fit and sneak up on cuts. The goal is not “mathematically correct.” The goal is “looks correct at standing
height while holding a coffee.”
How to Cut Quarter Round: Corners, Seams, and Stops
Inside Corners: Miter or Cope?
For quarter round, many people use simple miter cuts for inside corners because the profile is small and forgiving. But if your
walls are wavy or the corner is out-of-square, a coped joint can hide gaps better.
- Miter: Fast. Cut both pieces at 45° and meet them in the corner.
- Cope: More advanced, often tighter in imperfect corners. One piece runs square into the corner; the other is
cut to match its profile.
If you’re new: miter inside corners, but keep a tube of caulk and a sense of humor nearby. If you’re picky (or your corners are
chaotic): consider coping.
Outside Corners: Miters + Glue = Stronger Joints
Outside corners get bumped, kicked, and generally bullied by life. Cut clean 45° miters, apply wood glue to the joint, press tight,
and fasten near the corner so it stays closed. Painter’s tape can act like a clamp while glue sets.
Long Walls: Use Scarf Joints (Not Butt Joints)
When one piece isn’t long enough, don’t butt two square ends together. Use a scarf joint: cut both ends at 45°
so they overlap. The seam becomes less visible and less likely to open up if the wood shrinks slightly.
Door Casings and “Stops”: Use a Return
Quarter round shouldn’t usually crash awkwardly into a doorway like it missed the last exit. If the trim ends at a casing, you can
add a returna tiny piece that turns the profile back into the baseboard. It looks intentional and hides the raw
cut end. Yes, it’s fiddly. Yes, it’s worth it.
Installation: Fasten It the Right Way
Step 1: Dry Fit First
Place each piece along the baseboard and check the fit before nailing. Adjust your cuts if needed. The time to “discover” a bad
angle is nownot after it’s attached forever with nails, glue, and spite.
Step 2: Where to Nail (Important!)
In many flooring installationsespecially floating floors (laminate, many LVP systems)you should fasten quarter
round to the baseboard/wall, not the floor. This prevents pinning the flooring and interfering with expansion and
contraction.
If you’re finishing a nailed-down hardwood floor and you truly need to, some installers fasten in a way that catches the subfloor,
but the safest general approach for modern floating flooring systems is: attach trim to the wall/baseboard.
Step 3: Nail Spacing and Technique
A common spacing is about every 8–12 inches, and closer near joints so seams stay tight. Angle nails slightly toward the baseboard
so the trim pulls snug. If you’re using a hammer, set nails slightly below the surface with a nail set so filling is easy.
To avoid splitting:
- Stay a little back from the ends when nailing.
- For very hard wood or thin stock, pre-drill near ends and corners.
- Use the correct nail sizetoo thick can split, too short won’t hold.
Step 4: Glue the Joints (Not the Whole Wall)
Use wood glue on miter joints and scarf joints. This helps keep corners closed over time. You generally don’t need construction
adhesive along the full length unless the wall/baseboard is oddly shaped and you can’t fasten reliably.
Bathrooms, Kitchens, and Wet Zones
In wet areas, manufacturers often call for silicone sealant in specific expansion zones to reduce the risk of water getting under
the floor. If your flooring instructions mention sealing perimeters, follow them. Trim is decoration; flooring instructions are
the law of the land.
Finishing: Fill, Caulk, Touch Up
Fill Nail Holes
Use wood filler (paint-grade) or color-matched putty (stain-grade). Let it dry, sand lightly, and touch up paint/stain.
Caulk the Top Edge (Usually), Not the Bottom
If there’s a small gap between quarter round and the baseboard, run a thin bead of paintable caulk along the top
edge and smooth it. Most installers avoid caulking the bottom edge to the floor because floors move and caulk can crack or look
messyplus floating floors need freedom.
Final Touch-Up
Touch up paint on the trim and baseboard. If you’re painting the trim, a small angled brush gives the best control. If you’re
staining, use a stain marker for cut ends and a careful hand around putty.
Troubleshooting: Common Problems (and Fixes)
Problem: Gaps at an Inside Corner
- Recut the miters slightly (your corner isn’t 90°).
- Switch to a coped joint for that corner.
- As a last resort: a small, neat bead of caulk.
Problem: Outside Corner Keeps Opening
- Glue the joint and add a nail near the corner (but don’t blow out the tip).
- Use painter’s tape as a clamp while glue sets.
- Check that both pieces are cut cleanly and are the same orientation.
Problem: The Trim Won’t Sit Flat Against the Floor
- There’s debris under itclean the edge again.
- Your floor is uneven; use shoe molding if you need a more flexible profile.
- For minor waviness, adjust nail placement to “pull” the trim down gently.
Problem: Too Many Visible Seams
- Use scarf joints and place them in low-visibility areas (behind furniture, less-traveled walls).
- Painted trim hides seams better than stain-grade trim.
- Keep cuts sharp and use glue on joints.
FAQ
Can I install quarter round without a nail gun?
Yes. Use small finish nails and a nail set. It’s slower, but totally doable. The key is consistent spacing and clean nail setting
so you can fill holes neatly.
Should quarter round be nailed into the baseboard or the floor?
If you have a floating floor, typically nail into the baseboard/wallnot the flooringso the floor can expand/contract. In other
scenarios (like some traditional trim details), installers may fasten differently, but for modern floating systems, avoiding the
floor is a common best practice.
Do I need to remove baseboards instead?
If you’re starting from scratch and want the cleanest look, removing and reinstalling baseboards can eliminate the need for quarter
round. But it’s more work and can involve drywall repairs and repainting. Quarter round is the faster finish that still looks great
when installed cleanly.
How long does it take?
A typical room can take a few hours depending on how many corners, doors, and seams you have. Cutting and fitting usually takes
longer than nailing.
Cost and Planning Snapshot
Quarter round is usually budget-friendly, but the final cost depends on material (MDF vs. pine vs. hardwood vs. pre-finished) and
whether you need tools. If you already own a miter saw and nailer, this is one of those “high impact, low drama” projects.
- Material: typically sold in 8-foot lengths; buy ~10% extra.
- Fasteners and filler: small cost, big difference in finish quality.
- Tools: a miter saw and brad nailer speed things up dramatically.
Safety Notes (Because Fingers Are Useful)
- Wear eye protection when cutting and nailing.
- Keep hands away from the blade path on a miter saw.
- Let the saw reach full speed before cutting, and wait for it to stop before lifting.
- Use hearing protection if you’re running a saw and nailer for a while.