Table of Contents >> Show >> Hide
- Why a Christmas ornament wreath is such a holiday win
- What you need to make a Christmas ornament wreath
- How to choose the best ornaments for your wreath
- Step-by-step: How to make a Christmas ornament wreath
- How to make your ornament wreath look fuller and more expensive
- Common mistakes to avoid
- Where to hang your Christmas ornament wreath
- How to store it after the holidays
- Creative style ideas for your wreath
- Final thoughts on making a Christmas ornament wreath
- Real-life crafting experiences: what making an ornament wreath actually feels like
Some holiday decorations whisper. A Christmas ornament wreath does not. It sparkles, shines, and politely tells every guest, “Yes, the holiday spirit lives here, and yes, it has excellent taste.” If you want a front-door project that looks expensive but can absolutely be made at your kitchen table while wearing fuzzy socks, this is it.
This guide walks you through how to make a Christmas ornament wreath that looks full, balanced, and beautifully festive without turning into a rolling avalanche of glittery chaos. Whether your style leans classic red-and-green, glam gold, candy-colored retro, or winter-white elegance, the basic method stays simple: start with a sturdy form, build with large ornaments first, layer in smaller ones, and secure everything so it survives the season with dignity.
Video tip: If you are publishing this article with a tutorial video, place the embed right here so readers can watch the wreath come together before starting. A short overhead video showing the layering order, gluing points, and final ribbon placement works especially well.
Why a Christmas ornament wreath is such a holiday win
A DIY ornament wreath checks all the boxes. It is eye-catching, customizable, reusable, and easier than it looks. That last part matters because many people assume these wreaths require advanced crafting powers, industrial-strength patience, or a glitter immunity not granted to ordinary humans. In reality, once you understand the layering method, this is a very beginner-friendly project.
It also solves a common decorating problem: how to create something bold enough for a door, wall, mantel, or entryway without buying a giant store-made wreath that costs more than your December coffee budget. With the right mix of ornaments, your wreath can look lush and professional while still reflecting your personality.
What you need to make a Christmas ornament wreath
Before you begin, gather everything in one place. That way you are not halfway through gluing ornaments only to realize the ribbon is still in the trunk of your car, right next to that bag of mystery receipts.
Basic supplies
- A wreath form, wire wreath frame, or sturdy wire hanger shaped into a circle
- Shatterproof Christmas ornaments in a mix of large, medium, and small sizes
- Hot glue gun and glue sticks
- Floral wire, paddle wire, or thin craft wire
- Wire cutters
- Ribbon for hanging or making a bow
- Optional: ornament hooks removed from ornaments, faux greenery, bells, berries, pinecones, or battery-operated micro lights
How many ornaments do you need?
For a medium wreath, plan on roughly 50 to 100 ornaments depending on the size of the frame and how packed you want the design to look. A smaller 12-inch form may need fewer, while a full front-door wreath may need plenty more. The easiest way to avoid a last-minute ornament shortage is to buy extra. Leftovers can go on the tree, into a bowl centerpiece, or into your future “I totally meant to buy these” holiday stash.
How to choose the best ornaments for your wreath
The best ornament wreaths use variation. You want different sizes, finishes, and a controlled color palette. Think shiny, matte, glittered, ribbed, or metallic finishes mixed together so the wreath catches light without looking flat.
Shatterproof ornaments are the smartest option for most homes, especially if the wreath will hang on a front door, around children, near pets, or in a high-traffic entryway. Glass ornaments can look gorgeous, but they also come with a dramatic side. One slammed door and suddenly your cheerful DIY turns into a tiny holiday crime scene.
For the most polished look, choose one of these approaches:
- Classic Christmas: red, green, and gold
- Winter glam: silver, white, champagne, and mirrored finishes
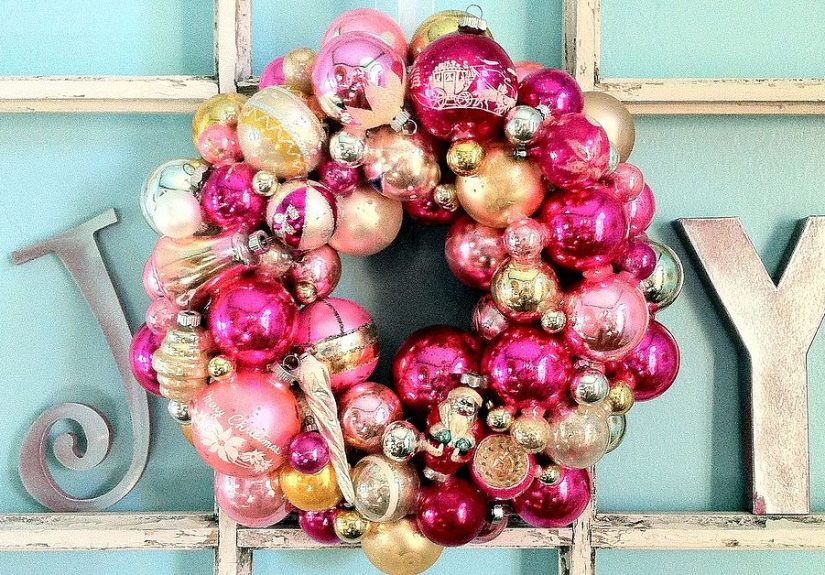
- Vintage fun: pink, aqua, mint, and bright red
- Modern minimal: all white, all gold, or all matte metallics
- Woodland style: neutrals, bronze, muted greens, and natural accents
Step-by-step: How to make a Christmas ornament wreath
Step 1: Prep your wreath form
If you are using a wire hanger, untwist it carefully and shape it into a circle. Keep the hook at the top if you want an easy built-in hanger. If you are using a wire wreath frame, even better: it already means business. You can wrap the form lightly with ribbon, greenery, or tinsel if you want a softer background, but many ornament wreaths look best when the ornaments do all the talking.
Set your frame on a flat surface and decide where the top will be. This helps you place your largest ornaments where they will create the best visual balance.
Step 2: Remove ornament caps if needed and sort by size
Take off fragile hanging strings or loose hooks. Sort your ornaments into large, medium, and small piles. This makes assembly much easier and helps you avoid the classic crafting mistake of using all the dramatic statement pieces too early and then being left with a handful of tiny filler ornaments wondering how you got here.
Step 3: Start with the largest ornaments
Attach your biggest ornaments first. If your ornaments have a good opening for threading, you can slide them onto a wire frame or hanger. Many crafters also add a dab of hot glue for extra security. If you are working with a flat wreath form or want more control, glue the ornaments directly onto the surface.
Space the large ornaments evenly around the wreath rather than clustering all of them in one area. This creates structure and helps the finished design look intentional. Step back after every few ornaments to check the shape. A beautiful wreath is all about balance, not speed.
Step 4: Add medium ornaments to build fullness
Now fill the gaps with medium-size ornaments. Tuck them between the larger baubles at slightly different angles so the wreath gains depth. You do not want every ornament facing forward in a stiff little parade. Tilt some inward, some outward, and let the arrangement feel layered and dimensional.
This is the stage where the wreath starts to look real. You will go from “interesting pile of ornaments” to “oh wow, that actually looks amazing” pretty quickly.
Step 5: Fill small gaps with mini ornaments and accents
Use your smallest ornaments to cover visible spaces and tighten the overall design. This finishing layer is where the wreath gets that rich, packed look people love. Add bells, berries, glitter picks, faux cedar sprigs, or tiny pinecones if you want extra texture.
If you are aiming for a lush designer look, avoid leaving obvious holes where the frame shows through. A little background peeking through is fine. Big empty spots are not. Mini ornaments are your best friends here.
Step 6: Glue with strategy, not panic
Hot glue works best when used to reinforce, not rescue. Add glue at ornament contact points where pieces touch each other or the frame. Hold each piece a few seconds so it sets properly. If one ornament feels wobbly, secure it with both glue and wire.
Focus on structural strength near the top, sides, and lower curve of the wreath. These are the areas most likely to shift when the wreath hangs vertically.
Step 7: Add ribbon or a bow
Once the ornament arrangement is finished, add a loop of ribbon for hanging or attach a bow at the top, bottom, or side. Wide velvet ribbon feels traditional and upscale. Satin ribbon brings shine. Plaid ribbon says, “I bake cookies on purpose.” Choose whatever fits your holiday style.
If the wreath is already visually busy, keep the bow simple. If your color palette is restrained, a dramatic ribbon can become the final statement piece.
How to make your ornament wreath look fuller and more expensive
The secret is not just “more ornaments.” It is better distribution. Mix finishes. Repeat colors around the wreath so the eye moves naturally. Use large ornaments sparingly and medium ornaments generously. Finish with tiny ornaments where the frame peeks through.
Another trick is to build in layers instead of one flat ring. Slightly overlap ornaments so some sit higher than others. This creates depth and makes the wreath look more custom and high-end.
Want an even more elevated result? Stick to two or three main colors and let texture do the heavy lifting. For example, a wreath made only from white, silver, and champagne ornaments can still look dynamic if you mix glossy, matte, glittered, and brushed finishes.
Common mistakes to avoid
Using all one size of ornament
That usually creates a flat look. Variety adds shape and interest.
Choosing a weak base
If your frame bends easily, the wreath may sag or lose shape over time. Start with something sturdy.
Skipping reinforcement
Glue alone may not be enough for heavy ornaments. Wire plus glue is safer for large pieces.
Ignoring weight balance
If one side has all the large ornaments, your wreath may hang crooked. Spread visual weight evenly.
Overdecorating the top
A crowded top can make the hanger disappear and the wreath look bulky. Let the shape breathe a little.
Where to hang your Christmas ornament wreath
This wreath is most popular on a front door, but it can also shine above a mantel, over a mirror, in a dining room, or on an interior wall that needs a holiday focal point. If you want to use it outdoors, a covered porch is best. Even shatterproof ornaments prefer not to spend weeks getting smacked by wind and weather like they are auditioning for an action movie.
To hang it safely, use a sturdy wreath hanger, ribbon loop, or command-style hook rated for the weight of your wreath. Do not guess. Ornament wreaths can get surprisingly heavy once fully assembled.
How to store it after the holidays
A well-made ornament wreath can last for years. Store it in a wreath box or a large plastic storage bin with tissue paper or soft packing material around delicate sections. Keep it upright if possible and avoid stacking heavy décor on top of it. Your future self will be delighted when next year’s wreath emerges looking festive instead of emotionally exhausted.
Creative style ideas for your wreath
If you want to personalize the project, here are a few fun twists:
- Monogram wreath: add a wooden initial in the center
- Candy theme: use red, white, and peppermint-striped ribbon
- Farmhouse look: mix muted ornaments with burlap or soft greenery
- Kid-friendly version: use bright plastic ornaments and playful ribbon
- Elegant entryway: create two matching wreaths for double doors
Final thoughts on making a Christmas ornament wreath
If you have been wondering how to make a Christmas ornament wreath that looks beautiful without becoming a complicated holiday marathon, the answer is simple: choose a strong base, use a thoughtful mix of ornament sizes, layer carefully, and secure everything well. That is really the whole magic. The rest is just your personal style, your favorite holiday colors, and perhaps a seasonal beverage cheering you on from the sidelines.
The best part of this project is that no two wreaths turn out exactly the same. Even when two people use the same colors and supplies, the final result has its own personality. That is the charm. A handmade wreath feels warm, welcoming, and just a little proud of itself. Honestly, it should.
Real-life crafting experiences: what making an ornament wreath actually feels like
The first time I made a Christmas ornament wreath, I was wildly confident for about seven minutes. I had a table full of shiny ornaments, a wreath frame, a glue gun, and the kind of holiday optimism that usually appears right before a minor crafting detour. In my head, the project would be quick, cinematic, and worthy of a cheerful montage. In real life, one ornament rolled off the table, another lost its cap, and I discovered that hot glue waits for no one. Still, once the first layer was attached, the project became unexpectedly relaxing.
What surprised me most was how satisfying the layering process felt. Adding the big ornaments created the structure, but the medium and small ones were where the real personality showed up. Every little gap was an opportunity to improve the wreath. It started looking less like loose holiday supplies and more like an actual decoration with style. That moment is part of the fun. You stop following steps mechanically and begin making design choices. Should the glitter ball go here? Would silver look better than red in that corner? It becomes a low-stakes, high-sparkle creative puzzle.
Another experience many crafters share is learning that restraint matters. It is easy to keep adding “just one more ornament” until the wreath starts looking crowded. I have done it. Many people have done it. The holiday season is basically a nationwide festival of cheerful overconfidence. But the prettiest wreaths usually have rhythm and breathing room. Once I started stepping back every few minutes to look at the overall shape, the result improved immediately. A wreath should feel full, not frantic.
There is also something deeply nostalgic about working with ornaments outside the tree. You may use leftover ornaments from older holiday themes, a few treasured colors that always remind you of childhood, or shatterproof ones you bought during a year when practicality won out over glass. Somehow, all of those choices carry memory. That is one reason ornament wreaths feel so personal. They are not just décor. They become a visual little scrapbook of holiday taste, tradition, and whatever phase of life you happen to be in.
Families often enjoy this project because it is flexible. One person can shape the frame, another can sort ornaments by size, and kids can help hand over the smaller pieces or choose color placement. It feels collaborative without being chaotic, at least most of the time. And when it is slightly chaotic, that can become part of the memory too. No one reminisces twenty years later about the perfectly organized craft session. They remember the glitter on the dog, the crooked bow that everyone defended for sentimental reasons, and the moment the finished wreath went on the door and suddenly made the whole house feel ready for Christmas.
Perhaps the best experience tied to this project is the reaction afterward. A handmade ornament wreath tends to get noticed. Neighbors comment on it. Guests pause at the door. You catch sight of it coming home in the evening and think, “Okay, that is actually gorgeous.” There is a special pleasure in making something that looks polished enough to buy, but still feels unmistakably yours. For many people, that is the sweet spot of holiday decorating: beautiful, personal, festive, and just handmade enough to have a story.