Table of Contents >> Show >> Hide
- What Is a “Tide Pod Scarecrow,” Exactly?
- Safety First (Yes, Even for Crafts)
- Project Snapshot
- Materials and Tools
- Step-by-Step: Build Your Tide Pod Scarecrow
- Step 1: Clean and prep the container
- Step 2: Decide your style (head or body?)
- Step 3 (Option A): Build a simple scarecrow frame
- Step 4 (Option A): Attach the shirt and stuff it
- Step 5 (Option A): Add pants, stuff, and secure
- Step 6 (Option A): Mount the container head
- Step 7: Make the face (cute, not cursed)
- Step 8: Hat hair, accessories, and “fall swagger”
- Step 3 (Option B): Turn the container into a tabletop scarecrow
- Painting the Plastic Like a Pro (So It Doesn’t Peel in Two Days)
- Design Ideas: Pick Your “Porch Personality”
- Styling Your Scarecrow in Fall Decor Displays
- Troubleshooting (Because Hot Glue Has Opinions)
- FAQ
- Experience Notes: What You’ll Actually Run Into When You Make One (And How to Win)
- Wrap-Up
Fall decorating is basically the Olympics of “Look how cozy my life is.” We stack pumpkins like they’re Jenga,
we buy mums that immediately choose violence, and we pretend we don’t have 14 half-burned cinnamon candles
rolling around a drawer somewhere.
If you want a front-porch decoration that’s cute, cheap, and just a tiny bit ridiculous (in the best way),
meet the DIY Tide Pod Scarecrow: a cheerful little fall friend made from an empty laundry pod container
(or any similar plastic tub) plus classic scarecrow materials like straw, twine, and a flannel shirt.
It’s “upcycled fall decor” meets “farmhouse-ish,” with a dash of “I refuse to throw away a perfectly good container.”
Important note before we craft: this project uses a clean, EMPTY container only. We are not decorating with actual pods.
We are not leaving pods out as “cute candy-colored accents.” We are not reenacting the internet’s worst era. Cool? Cool.
What Is a “Tide Pod Scarecrow,” Exactly?
In this tutorial, “Tide Pod scarecrow” means a scarecrow whose head (or body) is made from a
reused laundry pod containerusually one of those sturdy, lidded plastic tubs. You turn the container into a friendly face,
then build a simple scarecrow form with a shirt, pants, stuffing, and accessories.
Don’t love brand labels on your porch? No problem. You can peel the label, paint the whole container, wrap it in burlap,
or use any similar plastic tub you already have. The goal is the same: a lightweight, weather-friendly, budget DIY that looks
right at home beside pumpkins, hay bales, and a smug wreath.
Safety First (Yes, Even for Crafts)
- Use an EMPTY, washed container only. Keep all laundry pods locked away and out of reachalways.
- Don’t let kids handle pods or play with them. Laundry packets dissolve quickly with wet hands or saliva.
-
If a child is exposed to detergent packets (ingestion, eye contact, etc.), call Poison Help: 1-800-222-1222 right away.
If it’s an emergency, call 911. - Consider de-branding (remove the label or cover it). A bright, recognizable container may attract curious kids.
Project Snapshot
| Skill level | Beginner |
| Working time | About 1–2 hours (plus drying time if painting) |
| Total time | 2–4 hours (mostly “waiting for stuff to dry”) |
| Estimated cost | $10–$30 (often less if you already have clothes, twine, and straw) |
| Best for | Front porches, entryways, patios, gardens (decorative), indoor fall vignettes |
Materials and Tools
Core materials
- Empty laundry pod container (washed and fully dry)
- Old button-up shirt (flannel = instant autumn)
- Old pants (jeans or overalls are adorable)
- Straw/hay (or raffia). Alternatives: plastic grocery bags, bubble wrap, shredded paper (indoor only)
- Twine or rope (the scarecrow’s best friend)
- Wood stake or post (for an outdoor standing scarecrow) OR a sturdy dowel (for a porch leaner)
- Optional hat (straw hat, felt hat, or a bandana “cap”)
- Buttons/felt/foam sheets for eyes and details (or paint/marker)
Tools
- Hot glue gun + glue sticks
- Scissors
- Painter’s tape (optional)
- Permanent marker and/or acrylic paint + paintbrush
- Drill + small bit (helpful for mounting and drainage)
- Zip ties or a staple gun (optional, but handy outdoors)
- Sandpaper (220 grit is fine) if you plan to paint the plastic
Step-by-Step: Build Your Tide Pod Scarecrow
Step 1: Clean and prep the container
- Wash the empty container with warm water and dish soap. Rinse thoroughly.
- Let it dry completelyinside and out. (Moisture is paint’s sworn enemy.)
-
If you want to remove the label, warm it with a hair dryer and peel slowly. Any sticky residue can be rubbed off with
cooking oil and wiped clean, then washed again. - Optional: lightly sand glossy spots so paint or glue grips better. Wipe away dust.
Step 2: Decide your style (head or body?)
You’ve got two main builds. Both are cute; one is sturdier for outdoors.
- Option A: Container as the HEAD (classic scarecrow body with shirt + pants). Best for a full porch/yard figure.
- Option B: Container as the BODY (tiny/tabletop scarecrow). Best for indoor decor, shelves, or a small porch vignette.
Step 3 (Option A): Build a simple scarecrow frame
A scarecrow frame is basically a wooden “T” with a personality. For an outdoor scarecrow, you want a vertical post
and a horizontal piece for arms.
-
Make a cross shape with two pieces of wood: one vertical, one horizontal. Position the horizontal piece near the top,
leaving a little head space. - Secure with screws (or nails). If you don’t have landscaping stakes, you can repurpose handles, branches, or scrap wood.
- For a porch-only scarecrow, you can skip the ground stake and build a shorter frame that leans against a wall.
Step 4 (Option A): Attach the shirt and stuff it
- Slide the shirt onto the frame so the horizontal “arm” goes through the sleeves.
- Use twine to tie the shirt at the waist to the vertical post so it doesn’t slide.
- Stuff the shirt with straw (or your chosen stuffing) until it looks pleasantly plump and scarecrow-ish.
- Tie the wrists with twine so straw can peek out like “hands.” Add gloves if you want extra charm.
Step 5 (Option A): Add pants, stuff, and secure
- Tie off the bottoms of the pant legs with twine.
- Stuff the pants firmly so they keep their shape.
- Secure the pants to the frame using twine “suspenders,” belt loops, staples, or zip ties. The goal is snug and stable.
- Optional: add boots/shoes. If they’ll be outdoors, drill a small drainage hole in the bottom so they don’t turn into rain buckets.
Step 6 (Option A): Mount the container head
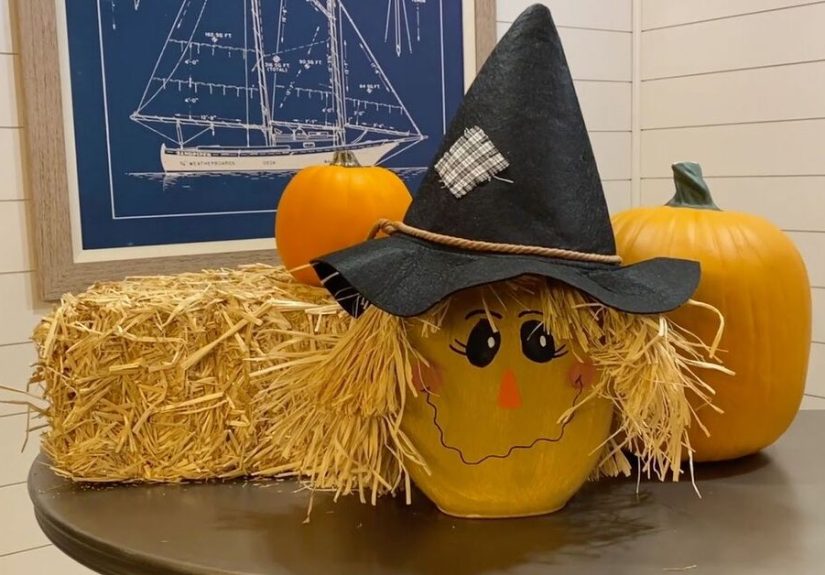
This is the signature “Tide Pod scarecrow” moment. You’re turning the container into a head with a friendly face.
- Decide where the face goes (usually the flattest side). If the lid opens on top, keep it closed and secured during display.
-
To mount: pre-drill a small hole through the container’s bottom (or back) and screw it into the top of the vertical post.
If you prefer no holes, you can strap it on with heavy-duty zip ties and hide them under a hat or scarf. - Add a “neck” scarf (bandana) to hide hardware and make it look intentionallike you meant to do this all along.
Step 7: Make the face (cute, not cursed)
The difference between “adorable porch buddy” and “why is it looking into my soul?” is usually eyebrows. Keep it simple:
big eyes, rosy cheeks, and a gentle smile.
- Eyes: buttons, felt circles, or painted dots. Add a tiny white highlight for instant cuteness.
- Nose: a small felt triangle or an orange foam “carrot” nose.
- Mouth: paint a curved smile or use a marker. Dimples optional, but encouraged.
- Cheeks: blush with diluted paint or chalk pastel (seal it if outdoors).
Step 8: Hat hair, accessories, and “fall swagger”
- Glue raffia/straw around the top edge as “hair,” then place a straw hat on top. Hot glue in a few spots so wind doesn’t steal it.
- Add a sunflower, mini pumpkin, or plaid ribbon to the hat band.
- Optional accessories: a “Welcome” tag, tiny broom, faux leaves, or even a mini lantern (battery only).
Step 3 (Option B): Turn the container into a tabletop scarecrow
Want something smaller? Use the container as the body and skip the full clothing build.
- Weigh the container with a small bag of rocks or sand inside (lid closed).
- Wrap it in burlap or paint it a neutral color.
- Add a face directly to the front.
- Make arms from twigs or dowels attached at the sides with hot glue and twine wraps. Add tiny gloves or felt hands.
- Add a scarf, hat, and a raffia “collar” at the top edge. Set it on a hay bale, crate, or inside a planter for display.
Painting the Plastic Like a Pro (So It Doesn’t Peel in Two Days)
You can absolutely leave the container unpainted and just cover it with fabric. But if you want that “boutique fall decor”
look, paint helps. Plastic is notorious for rejecting paint like it’s a bad group project, so prep matters.
Quick paint method (best for beginners)
- Clean thoroughly and let dry.
- Lightly sand shiny areas, then wipe dust away.
- Use a bonding primer designed for plastic (optional, but it improves adhesion).
- Apply several light coats of spray paint rather than one thick coat. Let coats flash dry between passes.
- Finish with a clear protective coat if the scarecrow will live outdoors.
Outdoor durability tips
- Paint on a dry day and avoid windy/dusty conditions.
- Let paint cure fully before adding hot glue details (fresh paint + hot glue = regret).
- Consider storing the scarecrow indoors during heavy storms so it stays cute longer.
Design Ideas: Pick Your “Porch Personality”
1) Cozy Farmhouse Scarecrow
- Neutral paint + burlap hair
- Buffalo plaid scarf
- Sunflower on the hat
- Wooden “Hello Fall” tag
2) Whimsical Pumpkin Patch Scarecrow
- Bright rosy cheeks and big cartoon eyes
- Orange-and-cream ribbon
- Mini pumpkin tucked under one arm
3) Minimalist Modern Scarecrow (Yes, That’s a Thing)
- Matte cream or black-and-white paint
- Simple line-drawn face
- Solid-color scarf + a single faux stem
Styling Your Scarecrow in Fall Decor Displays
A scarecrow looks best when it’s part of a “scene,” not standing alone like it missed the memo. Try these:
- Classic porch stack: hay bale + pumpkins + mums + your scarecrow leaning in like it’s hosting a talk show.
- Planter buddy: place the scarecrow beside a tall planter and echo the colors with ribbon or a matching bow.
- Front door vignette: wreath above, lanterns below, scarecrow off to one side for balance.
- Indoor shelf moment: tabletop version with mini gourds and a fall garland.
Troubleshooting (Because Hot Glue Has Opinions)
“My paint is peeling!”
- Likely cause: slick plastic or not enough cure time.
- Fix: sand lightly, use a plastic-bonding primer, and repaint in thin coats. Seal if outdoors.
“The scarecrow keeps tipping over.”
- For outdoor builds: drive the stake deeper, or add a second stake behind it as a brace.
- For porch builds: add weight inside the container (sealed bag of rocks) and anchor with discreet twine to a railing.
“The face looks… haunted.”
- Move the eyes slightly closer together and raise them a bit.
- Add eyebrows (soft, curved). Instant friendly vibes.
- Use a smaller smile than you think you need. Huge smiles can read “horror movie poster.”
“Straw is going everywhere.”
- Stuff inside plastic bags first (then place bags inside clothing) for a cleaner build.
- Use raffia bundles tied with twine for “peek-out” straw at wrists/anklesless mess, same look.
FAQ
Can I make this without straw/hay?
Yes. For indoor decor, crumpled paper, fabric scraps, or polyfill works. For outdoor decor, plastic bags or weather-resistant stuffing
hold up better than paper.
Is it okay to use the container with the label still on?
You can, but for a more “decor” look (and to reduce kid curiosity), consider removing or covering it with paint or fabric.
Will it survive rain?
If you paint/prime properly, seal it, and avoid paper stuffing, it can handle light weather. But if your area gets heavy storms,
bringing it in will make it last longer (and keep it from becoming a tumbleweed with a hat).
Experience Notes: What You’ll Actually Run Into When You Make One (And How to Win)
Here’s the honest part: this is a beginner-friendly DIY, but it has a few “craft reality” momentslittle surprises that almost everyone
encounters the first time they build a porch scarecrow from an upcycled container. Knowing them ahead of time makes the whole project smoother,
cheaper, and way more fun.
First, you’ll probably underestimate how much the face matters. The container is rigid and symmetrical, so tiny changes (like placing the eyes
half an inch higher) can swing the vibe from “sweet fall friend” to “stares at you while you sleep.” A quick fix is to do a “test face” with painter’s tape:
tape on paper circles for eyes and a scrap for a mouth, step back ten feet, and see if it feels friendly. If it does, trace the shapes and commit. If it doesn’t,
congratulationsyou just saved yourself from repainting a haunted grin.
Next: wind. Even if you’re making a porch leaner, wind can flip hats, yank scarves, andif you used lightweight stuffingturn your scarecrow into
a traveling performance piece. The easiest workaround is adding weight inside the closed container (a sealed bag of rocks or sand) and anchoring the figure with
discreet twine to a railing or heavy planter. For hats, a few dots of hot glue under the brim usually works; for extra security, wrap a line of twine under the chin
like an old-timey bonnet tie. Your scarecrow will look quaint, and your hat will stop trying to relocate.
Then there’s straw management. Straw is classic and looks amazing… until it’s everywhere. A low-mess approach is stuffing the shirt and pants
with plastic bags or bubble wrap for structure, then adding straw only at the wrists, collar, and ankles for that “authentic scarecrow” peek-out effect.
You get the same visual payoff with a fraction of the cleanup. If you’re crafting indoors, you’ll appreciate not finding straw in your socks three days later.
Another common lesson: paint patience pays off. Plastic can be finicky. If you rush the prep, paint may scratch off when you hot-glue details,
tie twine, or bump it against a door frame. If you want the painted look, plan for drying time and use thin coats. If you don’t want to wait, fabric is your
best friendwrap the container in burlap, felt, or a scrap of flannel and secure it with hot glue. It instantly reads “fall decor” and hides the container’s
original color without any curing time drama.
Finally, you’ll discover that the cutest scarecrows are the ones with “story.” A tiny sunflower pinned to the hat, a bandana scarf, a little
name tag (“Hank,” “Mabel,” “Linton John”), or mismatched button eyesthose small details make it feel handmade instead of store-bought.
And that’s the whole point: you’re not just making another seasonal decoration. You’re making a porch mascot. A crunchy-leaf greeter. A flannel-wearing
icon of autumn who silently judges your Amazon packages with love.
Wrap-Up
A cute DIY Tide Pod scarecrow is the perfect fall craft: it’s budget-friendly, customizable, and just quirky enough to make guests smile.
Whether you go full-size for the porch or mini for the mantel, the recipe is the sameupcycle a sturdy container, build a simple scarecrow form,
add personality, and style it with classic fall decor. And if anyone asks where you bought it? You get to say, “Oh this? I made it.”
(Then casually accept your applause.)