Table of Contents >> Show >> Hide
- Why the 3-Color Bubble Method Works So Well
- Supplies You’ll Need
- How to Prep the Wreath Form
- Step-by-Step: How to Make the 3-Color Deco Mesh Bubble Wreath
- How to Add Ribbon Without Overcrowding the Wreath
- Best Embellishments for a Bubble Wreath
- Common Mistakes to Avoid
- Color Combo Ideas for a 3-Color Deco Mesh Bubble Wreath
- How to Store Your Wreath So It Stays Full
- Final Thoughts
- Common Crafter Experiences and Lessons From Making a 3-Color Bubble Wreath
If your front door has been looking a little too… emotionally neutral, a three-color deco mesh bubble wreath is the kind of cheerful chaos it needs. This project is bright, fluffy, dramatic, and surprisingly beginner-friendly once you understand the rhythm: attach, poof, twist, repeat. The bubble method is a favorite for a reason. It gives you a full, high-impact wreath without requiring a million tiny cuts, and it makes three colors look intentional instead of like a craft store exploded on your porch.
In this tutorial, you’ll learn exactly how to make a deco mesh bubble wreath with three colors, how to choose the right supplies, how to get evenly spaced bubbles, and how to finish the design with ribbon or a focal accent without overdoing it. Because yes, there is such a thing as “too much cute,” and wreath makers discover that line the hard way.
Why the 3-Color Bubble Method Works So Well
A deco mesh bubble wreath uses rounded “poofs” or “bubbles” of mesh attached section by section to a wire wreath form. When you use three colors together, the finished wreath has more depth and motion than a single-color version. One shade can act as the anchor, one can brighten the palette, and the third can add contrast or softness.
This method is especially popular for seasonal front door wreaths because it is flexible. Use red, white, and blue for summer holidays, pink, yellow, and mint for spring, orange, cream, and tan for fall, or classic red, green, and white for Christmas. Same method, different vibe, zero existential crisis.
Supplies You’ll Need
Before you start, gather everything in one place. Nothing kills crafty momentum faster than realizing your scissors have vanished into the same mysterious dimension that eats socks and tape dispensers.
- 1 wire wreath form, usually 14 to 18 inches
- 3 rolls of 10-inch deco mesh in coordinating colors
- 18 to 27 chenille stems or pipe cleaners, depending on wreath size and section count
- Zip ties for securing the starting and ending tails
- Scissors or wire cutters
- Optional wired ribbon for streamers or bows
- Optional sign, faux florals, picks, ornaments, or seasonal embellishments
- Optional hot glue gun for finishing accents
If you want a fuller wreath, you can also add extra ties to a middle ring or layer in ribbon after the mesh is done. That little upgrade can make a big difference when your wreath looks good but not yet “hello, neighbors, I clearly have main-character energy.”
How to Prep the Wreath Form
The wreath form is your structure, so set it up properly before you touch the mesh. Most bubble wreath tutorials use pre-attached ties or homemade ties added to a wire work wreath. If your frame is plain, twist chenille stems around the frame at regular intervals.
Basic Tie Placement
For a typical bubble wreath, place ties around the inner and outer working rings of the frame. On many forms, you’ll have one tie at each section edge and an extra tie at the center of the outer row. Larger forms usually have more sections than smaller ones, which means more ties and more bubbles.
The goal is simple: create evenly spaced attachment points so the mesh poofs stay balanced. If the spacing is off, your wreath may lean visually to one side. Not tragic, but not ideal either.
Step-by-Step: How to Make the 3-Color Deco Mesh Bubble Wreath
Step 1: Stack the Three Mesh Colors Together
Lay the three rolls of 10-inch deco mesh together so they can be treated as one bundle while you work. This is the secret to getting the three-color look without building three separate wreaths and questioning every decision you’ve made.
Overlap the colors slightly. Do not worry about perfect separation yet. At this stage, your job is only to keep the bundle manageable and consistent.
Step 2: Secure the Starting End
Gather the beginning ends of all three mesh rolls together and secure them to the frame with a zip tie near your first inner-ring tie. Trim the zip tie tail. Then use the first chenille stem to secure the mesh bundle in place at the starting point.
Make sure this attachment is tight. A loose start turns into a sloppy wreath fast.
Step 3: Create the Inner Ring Bubbles
Now the fun begins. Pull the mesh bundle forward and measure about 9 to 10 inches to form your first bubble or poof. Pinch the bundle at that point and twist it into the next chenille stem on the inner ring.
Repeat this process all the way around the inner ring:
- Measure about 9 to 10 inches
- Pinch the mesh bundle
- Twist into the next tie
- Keep the poofs soft and rounded
Do not stop to separate the three colors yet. That comes later. Right now, you’re building the skeleton of the wreath.
Step 4: Overlap the Last Inner Poof
When you reach the last tie on the inner ring, overlap the final bubble with the first one so the wreath looks continuous and full. Don’t cut the mesh. Instead, bring the bundle up to the outer ring and keep going.
Step 5: Move to the Outer Ring
Bring the mesh bundle to the tie directly above your starting point on the outer ring and twist it in. Then repeat the same bubble-making process around the outside of the frame. Use the same bubble size as you did on the inner ring so the wreath stays balanced.
On many wreath forms, the outer row includes center ties in each section. Use them. Those extra attachment points help distribute the mesh evenly and create a nice, full profile.
Step 6: Finish the End Cleanly
Once you’ve made it all the way around the outer ring, overlap the last bubble with the first outer bubble. Cut the mesh bundle, leaving a 2- to 3-inch tail. Wrap that tail to the back of the wreath form and secure it with a zip tie or an extra chenille stem.
Tuck the end neatly so it disappears into the back. The front of the wreath should look seamless, not like it has a weird little craft secret.
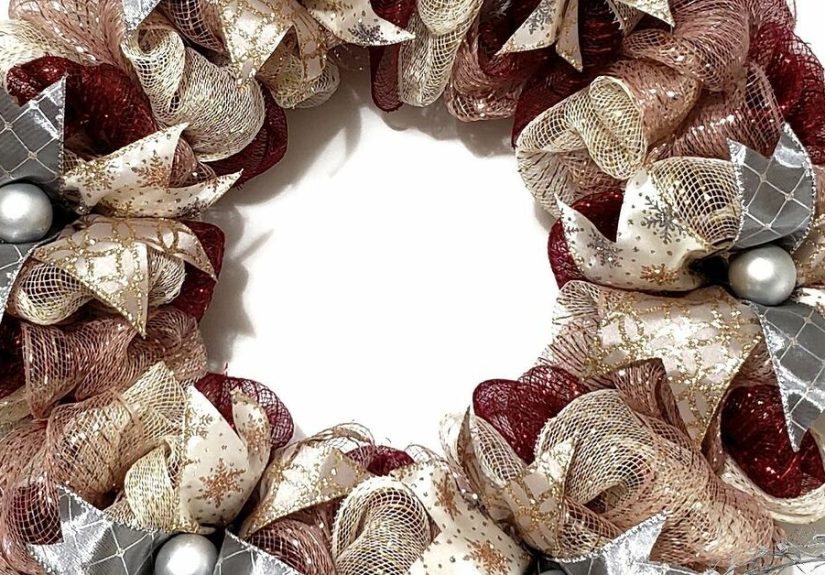
Step 7: Separate and Fluff the Three Colors
This is the step that transforms the project from “interesting lump of mesh” into “wow, that actually looks amazing.” Go poof by poof and gently separate the three colors so each one becomes visible.
A smart trick is to keep one color consistently in the center while alternating which of the other two colors goes on top and bottom. That gives the wreath a more even color distribution. Fluff each bubble outward so the mesh looks airy and generous, not crushed and moody.
How to Add Ribbon Without Overcrowding the Wreath
If you want extra movement and polish, add ribbon streamers after the mesh is finished. Wired ribbon is especially useful if your wreath will hang on an exterior door, because it holds shape better in wind and weather.
Easy Ribbon Streamer Formula
A good rule is to cut ribbon streamers about 2 to 3 inches longer than your mesh loops. So if your bubbles are around 10 inches, cut ribbon pieces around 12 to 13 inches long. Pair a wider ribbon with a narrower ribbon, pinch them in the middle, and twist them into the same ties used for the mesh.
Spread the ribbon into a soft X shape with a little curve and movement. You want texture, not ribbon panic.
Ribbon Bunches vs. Long Loops
You have two easy options:
- Ribbon bunches: small cut sections attached at each tie for pops of pattern
- Ribbon loops: longer lengths woven around the wreath for a softer, fuller look
If your mesh already has metallic stripes, foil, or busy texture, keep the ribbon simpler. If your mesh is matte and solid, patterned ribbon can wake the whole thing up.
Best Embellishments for a Bubble Wreath
The bubble method already gives you plenty of volume, so embellishments should support the design, not wrestle it to the ground. Good focal accents include:
- A small sign in the center
- Seasonal picks tucked into the outer edge
- Light faux florals
- Mini ornaments for holiday versions
- A bow placed slightly off-center
If you use a sign, make sure the color palette connects to at least one of the three mesh colors. That simple detail makes the whole wreath feel more intentional and less like a delightful accident.
Common Mistakes to Avoid
Making Uneven Bubbles
If some poofs are huge and others are tiny, your wreath can look lopsided. Measure consistently, especially at the beginning. After a few sections, your hands usually find a rhythm.
Using Too Many Extras
Mesh, ribbon, florals, picks, ornaments, signs, bows, glitter balls, and dangling charms do not all need to attend the same party. Choose one focal direction and let the mesh remain the star.
Forgetting to Fluff
Even a well-built wreath looks flat until you separate the colors and shape each bubble. Fluffing is not optional. It is the whole glow-up moment.
Leaving Sharp Ends Exposed
After trimming chenille stems, tuck or bend the ends toward the back of the frame so they do not snag hands, sleeves, or the very last ounce of your patience.
Color Combo Ideas for a 3-Color Deco Mesh Bubble Wreath
If choosing colors feels weirdly stressful, start with one dominant color, one supporting neutral or soft shade, and one accent color.
- Spring: blush pink, cream, and sage
- Summer: turquoise, coral, and white
- Patriotic: red, white, and royal blue
- Fall: orange, burlap tan, and cream
- Christmas: red, green, and white
- Everyday front door: navy, beige, and soft gold
Three colors give you more dimension than two, but they still feel easier to control than five. Once you pass three or four major tones, the wreath can start looking like it lost an argument with the rainbow.
How to Store Your Wreath So It Stays Full
Once your wreath is finished, store it hanging when possible or place it in a roomy wreath container. Avoid crushing it under heavy holiday bins unless your long-term plan is to make a “distressed” version next season.
If the ribbon gets bent, reshape it by hand. If the mesh flattens, refluff each bubble before hanging. Deco mesh is forgiving, which is great news for crafters, decorators, and anyone living in a household where people pretend not to see things they bump into.
Final Thoughts
Learning how to make a deco mesh bubble wreath with three colors is one of those DIY skills that looks complicated from a distance but becomes pleasantly repetitive once you start. The steps are simple, the results are dramatic, and the design can be customized for nearly any season, holiday, or home decor style.
The real trick is not fancy tools or professional-level crafting magic. It’s consistency. Keep your bubbles close in size, distribute the three colors evenly, use ribbon with restraint, and fluff the final design like you mean it. Do that, and your wreath will look polished, playful, and front-door ready.
And if someone asks where you bought it, you get to smile politely and say, “Oh, this old thing? I made it.” Which is basically the crafter’s version of a mic drop.
Common Crafter Experiences and Lessons From Making a 3-Color Bubble Wreath
One of the most common experiences beginners have with a three-color deco mesh bubble wreath is thinking the project looks wrong halfway through. That is completely normal. Early on, the mesh is usually compressed, the colors are blended together, and the frame is still visible in spots. It can look more “craft in progress” than “Pinterest-worthy front door masterpiece.” The turning point usually comes after the outer ring is finished and the colors are separated. That is when the wreath suddenly starts making sense.
Another common lesson is that color balance matters more than expensive supplies. Crafters often assume the fanciest mesh will automatically produce the best wreath, but a smart combination of three colors usually has a bigger visual payoff than a premium material with a confusing palette. A solid base color, a softer balancing shade, and a brighter accent often create the cleanest result. Many makers also discover that one color should visually repeat throughout the wreath so the design feels coordinated instead of random.
People also learn quickly that ribbon can either elevate the wreath or overwhelm it. A lot of first-time wreath makers get excited and add every ribbon they own. The result can feel crowded. The better experience usually comes from choosing one or two ribbon styles that echo the mesh colors and then spacing them intentionally. A few well-placed ribbon streamers often look more polished than a massive pile of ribbon drama.
There is also the practical experience of working with deco mesh itself. Mesh has a mind of its own. It curls, shifts, catches on rough edges, and occasionally behaves like it has personal opinions. That sounds annoying, but it is part of the process. Most crafters get better results once they stop fighting the material and start shaping it gently. Pinch, twist, fluff, and adjust. The wreath rarely needs perfection. It needs volume, balance, and confidence.
Another lesson that comes up again and again is that the final fluffing stage is where the professional look happens. Many people underestimate this part because the structural work feels like the “real” craft. In reality, fluffing is what reveals the color story, hides gaps, rounds out the bubbles, and gives the wreath that full, finished appearance. It is less glamorous than shopping for mesh, but much more important.
Finally, makers often come away from the project feeling more confident than they expected. A deco mesh bubble wreath teaches rhythm, color planning, light design editing, and basic assembly techniques in one project. It is a great gateway craft because the process is easy to repeat and adapt. Once you make one successful three-color wreath, it becomes much easier to imagine a holiday version, a sports-team version, a baby shower version, or an everyday front door version. In other words, this is how one wreath quietly turns into a whole seasonal decorating habit.