Table of Contents >> Show >> Hide
- Why a DIY Shiplap Fireplace Works So Well
- Before You Start: The Safety Part You Should Absolutely Not Skip
- Best Design Options for a Shiplap Fireplace
- Tools and Materials
- How to Make a DIY Shiplap Fireplace: Step-by-Step
- Step 1: Measure the wall and map the safe zone
- Step 2: Sketch the finished look
- Step 3: Prep the surface
- Step 4: Acclimate and plan your boards
- Step 5: Find and mark studs
- Step 6: Install the first board carefully
- Step 7: Work your way up the wall
- Step 8: Cut around the fireplace opening and trim details
- Step 9: Add mantel, side trim, or built-ins
- Step 10: Fill, caulk, prime, and paint
- Common DIY Shiplap Fireplace Mistakes to Avoid
- How Much Does a DIY Shiplap Fireplace Cost?
- Styling Ideas for the Finished Fireplace
- Conclusion
- What the DIY Experience Really Feels Like
- SEO Tags
If your fireplace currently looks like it gave up emotionally in 2007, a DIY shiplap fireplace can be a smart way to wake it up. Shiplap adds texture, warmth, and that custom-built look people love, whether your style leans farmhouse, coastal, modern, or somewhere between “designer” and “I own a nail gun now.” The trick is making it look intentional, not like you panic-bought boards on a Saturday and started stapling them to a heat source.
This guide walks you through how to make a DIY shiplap fireplace from planning and prep to installation and finishing. You’ll also learn the big thing many tutorials rush past: safety. A shiplap fireplace surround is beautiful, but fireplaces are not decorative candles with commitment issues. Heat, clearances, and material choices matter. Once you get those right, the project becomes far less intimidating and a whole lot more fun.
Why a DIY Shiplap Fireplace Works So Well
A shiplap fireplace makeover does two jobs at once. First, it turns the fireplace wall into a focal point. Second, it adds architectural character without requiring a full-blown renovation. Even a plain builder-grade fireplace can look custom when you add clean lines, a better mantel, and crisp paneling.
Shiplap also plays nicely with other materials. You can pair it with painted brick, tile, stone, a chunky wood mantel, or built-ins on either side. Horizontal boards create that classic farmhouse fireplace look, while vertical shiplap can feel more tailored and modern. If you want a fireplace accent wall that looks expensive without requiring you to sell a kidney, this project sits in a very sweet spot.
Before You Start: The Safety Part You Should Absolutely Not Skip
Before you buy a single board, figure out what kind of fireplace you have. That determines where shiplap can go, what needs to stay noncombustible, and whether this is a simple cosmetic upgrade or a “please read the manual three times” situation.
Know your fireplace type
In general, an electric fireplace insert is the easiest setup for a DIY shiplap fireplace because it usually produces less surface heat around the opening. Gas fireplaces vary widely, so you must check the manufacturer’s clearance requirements. A wood-burning fireplace demands the most caution because the heat can be intense and the surrounding materials must be handled accordingly.
Understand the clearance zone
Shiplap is typically wood or wood-look paneling, which means it is considered combustible unless you are using a specifically rated noncombustible product. That means you should not run it right up to the firebox opening unless your fireplace manual explicitly allows it. In many projects, the safest and smartest approach is to use tile, stone, metal, or another noncombustible surround close to the opening, then start the shiplap outside that zone.
When to call a pro
If your project involves moving a firebox, changing gas lines, altering a chimney, reframing around a wood-burning unit, or covering surfaces you are not sure are heat-safe, bring in a licensed professional. A custom fireplace wall is exciting. Accidentally creating a custom fire hazard is less charming.
Best Design Options for a Shiplap Fireplace
Before you start building, decide what version of this project you want. There is more than one good way to tackle a fireplace surround with shiplap.
Option 1: Shiplap around an electric insert
This is the most beginner-friendly route. You can build a bump-out wall, install the insert according to its specs, and finish the face with shiplap and trim. It gives you the full custom fireplace feel with fewer clearance headaches.
Option 2: Shiplap above an existing brick or tile surround
This is a great choice when the area nearest the firebox needs to remain noncombustible. You leave the safe material around the opening and add shiplap above it, often from the mantel to the ceiling or across the full chimney breast.
Option 3: Full fireplace wall with shiplap and built-ins
If you want that magazine-worthy fireplace accent wall, add flanking shelves or cabinets. This approach takes more planning, but the result can completely transform the room.
Tools and Materials
Your exact list will vary depending on your fireplace type, but most DIY shiplap fireplace projects use some combination of the following:
- Shiplap boards or faux shiplap panels
- Stud finder
- Tape measure
- Level or laser level
- Miter saw or circular saw
- Brad nailer or finish nailer
- Construction adhesive, if appropriate for your wall and product
- Caulk and wood filler
- Primer and paint
- Trim boards for edges or mantel details
- Heat-safe noncombustible material near the opening, if required
- Cement backer board for tile or stone areas, if needed
- Safety glasses, dust mask, and patience
How to Make a DIY Shiplap Fireplace: Step-by-Step
Step 1: Measure the wall and map the safe zone
Start by measuring the full fireplace wall, then mark the area where shiplap can safely go. If your fireplace manual gives required clearances for trim, mantels, or facing materials, treat those numbers like law, not suggestions from a particularly nervous aunt.
This is also the moment to decide whether the boards will run horizontally or vertically. Horizontal shiplap feels classic and cozy. Vertical shiplap can make the ceiling feel taller and the whole fireplace makeover look a bit more current.
Step 2: Sketch the finished look
Make a simple drawing that includes the firebox opening, mantel height, trim widths, and the outer edge of the fireplace surround. This helps you avoid weird skinny strips at the top or sides. A little math here saves a lot of muttering later.
If you are planning a TV above the fireplace, mark that location now as well. You may want extra blocking in the wall before the shiplap goes up.
Step 3: Prep the surface
Remove old trim, outlet covers, loose material, and anything else in the work zone. Clean the wall and patch major holes. If the wall is uneven, damaged, or masonry, you may need furring strips or a framed-out surface so the shiplap has something flat and secure to attach to.
If your design includes tile or stone close to the opening, install the proper cement backer board first rather than trying to fake it with regular drywall. This gives you a better substrate and a more durable finish.
Step 4: Acclimate and plan your boards
Bring the shiplap into the room and let it acclimate before installation. This helps reduce movement after the boards are on the wall. Lay the boards on the floor and mix lengths or tones if needed so the finished wall looks balanced instead of suspiciously copy-and-paste.
Step 5: Find and mark studs
Use a stud finder and mark each stud line clearly. If you are nailing shiplap directly to drywall over studs, those marks are your best friend. If you miss the stud repeatedly, your wall may start to judge you.
Step 6: Install the first board carefully
Your first board sets the tone for the entire project, so take your time. For horizontal shiplap, start at the bottom if that works best for your product and layout. Check for level, add adhesive if recommended, then nail into studs. If your floor is uneven, you may need to scribe or shim the first row so the rest stay straight.
Step 7: Work your way up the wall
Install the remaining boards one row at a time. Keep reveals consistent and stagger seams if you are using boards with multiple joints. A nickel or small spacer can help keep the gap uniform if your product does not self-space. Step back every few rows and check alignment. Crooked shiplap is one of those things your eye finds immediately, even if your brain is trying to be supportive.
Step 8: Cut around the fireplace opening and trim details
Use precise measurements around the firebox, mantel legs, outlets, or built-ins. Make clean cuts with a miter saw or jigsaw as needed. If the area immediately around the opening needs to remain noncombustible, stop the shiplap at the correct line and finish the transition with trim or a clean material break.
Step 9: Add mantel, side trim, or built-ins
If your design includes a mantel, install it according to your fireplace’s clearance requirements. A wood mantel can completely elevate the look, but it has to sit at a safe height and depth. Side trim, picture-frame molding, or simple edge boards can also make the project feel more custom.
Step 10: Fill, caulk, prime, and paint
Fill nail holes with wood filler, then caulk perimeter seams and trim joints. Avoid over-caulking the board reveals if you want that classic shiplap shadow line. After sanding smooth, prime the surface and paint it in your chosen finish.
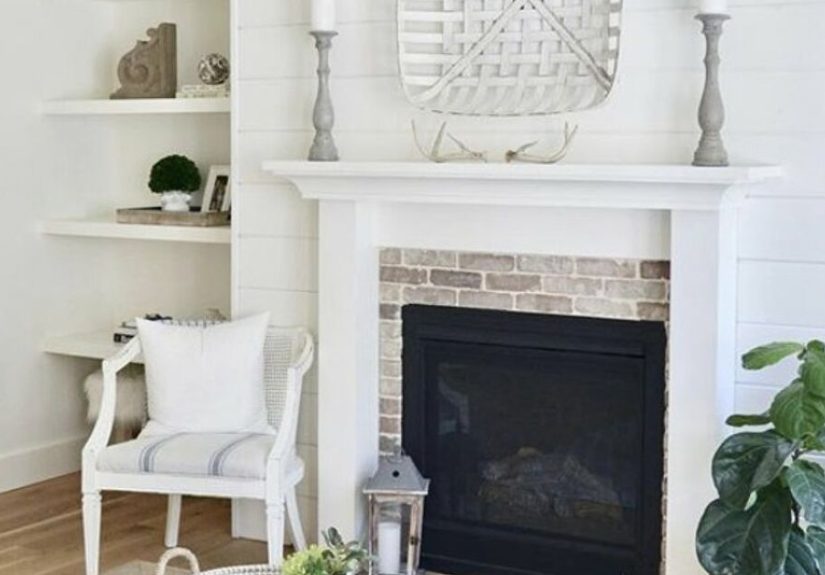
White is timeless for a farmhouse fireplace, but dark charcoal, warm greige, muted green, and soft black can look incredible too. If you want the shiplap fireplace to feel less “barn wedding” and more “designer knew what they were doing,” a moody color can work wonders.
Common DIY Shiplap Fireplace Mistakes to Avoid
Putting wood too close to the opening
This is the biggest mistake. Always respect the manual and required clearances. If you are unsure, assume the hotter area needs noncombustible material and verify before continuing.
Ignoring an uneven wall
Shiplap highlights flaws. If the wall bows or bumps, the finished fireplace wall will show it. A little prep behind the scenes makes the final result look much more professional.
Skipping layout planning
Without a plan, you may end up with awkward slivers of board near the ceiling or mantel. Dry-fit the layout first, especially on a tall fireplace accent wall.
Caulking every seam
Too much caulk can erase the dimension that makes shiplap attractive in the first place. Fill the holes, seal the edges, and let the panel lines stay visible.
How Much Does a DIY Shiplap Fireplace Cost?
The cost depends on the size of the wall, the type of shiplap you choose, and whether you are adding a mantel, tile surround, or built-ins. A small cosmetic fireplace makeover can stay relatively affordable if you are covering a limited area with paint-grade boards. A floor-to-ceiling fireplace surround with trim, a custom mantel, and side storage will naturally cost more.
The good news is that this is still usually far less expensive than a full masonry rebuild or a major structural fireplace remodel. It is one of those projects that can look high-end while still living firmly in the “normal human with tools” category.
Styling Ideas for the Finished Fireplace
Once the build is done, finish the look with restraint. Yes, restraint. Your new shiplap fireplace is the star now.
- Hang a large mirror or art piece above the mantel
- Add simple sconces for symmetry
- Use natural wood tones to warm up white shiplap
- Pair the paneling with black accents for a modern farmhouse look
- Style the hearth lightly so the texture of the fireplace wall remains visible
Conclusion
Learning how to make a DIY shiplap fireplace is really a mix of design confidence and practical restraint. You are creating a focal point, yes, but you are also working around a heat-producing feature that demands respect. Once you handle the clearances, the rest is a straightforward sequence: plan the layout, prep the wall, install the boards cleanly, finish the details, and step back to admire your suddenly far more attractive living room.
The best DIY shiplap fireplace projects do not just look pretty in photos. They feel intentional in real life. They fit the room, respect the fireplace, and add just enough charm without screaming for attention. Done right, this project can make a builder-basic wall feel custom, cozy, and a little bit smug in the best possible way.
What the DIY Experience Really Feels Like
The funny thing about building a DIY shiplap fireplace is that the emotional timeline is almost always the same. At first, you are wildly optimistic. You stare at inspiration photos, measure the wall twice, and think, “This will be easy.” Then you remove the old trim and discover that your wall is not straight, your corners are not square, and the previous builder apparently believed in abstract geometry. That is the moment the project becomes real. You stop imagining a perfect reveal and start learning what a custom-looking fireplace actually takes: patience, adjustments, and the ability to make small problems look intentional.
Many DIYers also discover that the hardest part is not installing the shiplap itself. It is deciding where the shiplap should stop. That sounds simple until you are standing in front of a firebox with a tape measure in one hand and mild panic in the other. The safe route often ends up being the best-looking route too. Once you commit to a noncombustible border near the opening and let the shiplap begin outside that heat zone, the design suddenly feels cleaner and more professional. In other words, the thing that protects your house also protects you from bad design choices. That feels like a win.
There is also a very specific satisfaction that comes from getting the first board perfectly level. It is a tiny victory, but it changes the energy of the whole project. Once that row is in, the fireplace wall starts to transform fast. The room looks different before the project is even finished. You begin walking past it more slowly. You glance back at it from the hallway. You accidentally become the kind of person who says things like, “The texture really changed the space.” Annoying, yes. Understandable, also yes.
Another common experience is learning that finish work matters more than expected. People assume the wow factor comes from the boards, but a lot of the magic comes from the last 10 percent: cleaner cuts, consistent reveals, well-placed trim, properly filled nail holes, and a paint finish that makes everything look unified. A mediocre installation can be rescued somewhat by careful finishing. A sloppy finish, on the other hand, can make good carpentry look rushed. This is where DIY patience pays off. The final caulk line and paint coat do more heavy lifting than they get credit for.
And then there is the moment it is done. You move the furniture back, set a few items on the mantel, and realize the fireplace no longer feels like an afterthought. It becomes the anchor of the room. The wall has shape. The space has mood. Even people who do not notice home projects will usually walk in and say, “Whoa, that looks good.” That reaction is part of why the DIY shiplap fireplace is such a satisfying project. It is approachable enough for a capable homeowner, dramatic enough to transform a room, and practical enough to feel worth the effort long after the sawdust is gone. You do not just end up with a prettier fireplace surround. You end up with a room that feels finished.