Table of Contents >> Show >> Hide
- First: Is a Succulent Terrarium the Same as a Terrarium?
- What Succulents Need (So Your Terrarium Isn’t a Fancy Rot Factory)
- Open vs. Closed: Choose the Right Container Type
- Supplies Checklist
- The Best Soil Mix for Succulent Terrariums
- Step-by-Step: How to Build Your DIY Succulent Terrarium
- Step 1: Clean and dry your container
- Step 2: Add a drainage layer
- Step 3: (Optional) Add activated charcoal
- Step 4: Add a barrier layer (optional but tidy)
- Step 5: Add your soil mix
- Step 6: Plan your layout before planting
- Step 7: Plant carefully (and protect the leaves)
- Step 8: Add top dressing
- Step 9: Water lightlythen pause
- Best Succulents for Terrariums
- Light Placement: The Biggest Success Factor (Seriously)
- Watering a Succulent Terrarium Without Ruining Everything
- Design Tips That Also Help Plant Health
- Maintenance: Keep It Happy for Months (Not Just the Photo)
- Troubleshooting: Fix Problems Before They Spread
- of Experiences: What People Learn After Building a Succulent Terrarium
- Conclusion: Your Succulents Want a Mini Desert, Not a Mini Swamp
A succulent terrarium is basically a tiny desert landscape you can keep on a shelflike a low-maintenance plant diorama that makes your home look like you have your life together. The trick is doing it in a way your succulents actually enjoy (because, yes, succulents can absolutely be dramatic). Done right, your terrarium becomes a bright, airy mini-garden with fast-draining soil, smart watering habits, and plants that stay compact instead of turning into sad, stretchy green noodles.
This guide walks you through the whole processfrom choosing the right container and soil mix to arranging plants and keeping them happy long-term. We’ll keep it beginner-friendly, but not “sprinkle hope on it and pray” friendly. Expect practical steps, real troubleshooting, and a few gentle jokes at the expense of overwatering (the leading cause of succulent heartbreak).
First: Is a Succulent Terrarium the Same as a Terrarium?
Sort ofand this is where people get tricked by pretty photos. Traditional terrariums are often closed containers designed to hold humidity for tropical plants. Most succulents, however, are from dry environments and prefer airflow and low humidity. That means the terrarium your succulents will love is typically an open terrarium (wide opening, no lid) or what many gardeners call a dish garden.
If you put most succulents in a sealed glass jar, you’re not making a “cute microclimate.” You’re making a steam room. Succulents don’t want a steam room.
What Succulents Need (So Your Terrarium Isn’t a Fancy Rot Factory)
- Fast drainage: Roots should never sit in soggy soil. Standing moisture is the express lane to rot.
- Gritty, airy soil: A mix with plenty of mineral material (perlite, pumice, coarse sand, grit) helps water move through quickly.
- Bright light: Most succulents need strong light to stay compact and colorful.
- Infrequent, thorough-ish watering: “Soak and dry” is ideal in pots with drainage holes. In glass terrariums without holes, you mimic this by watering sparingly and only when fully dry.
- Air circulation: Especially indoors. Airflow discourages fungus and helps soil dry out.
Open vs. Closed: Choose the Right Container Type
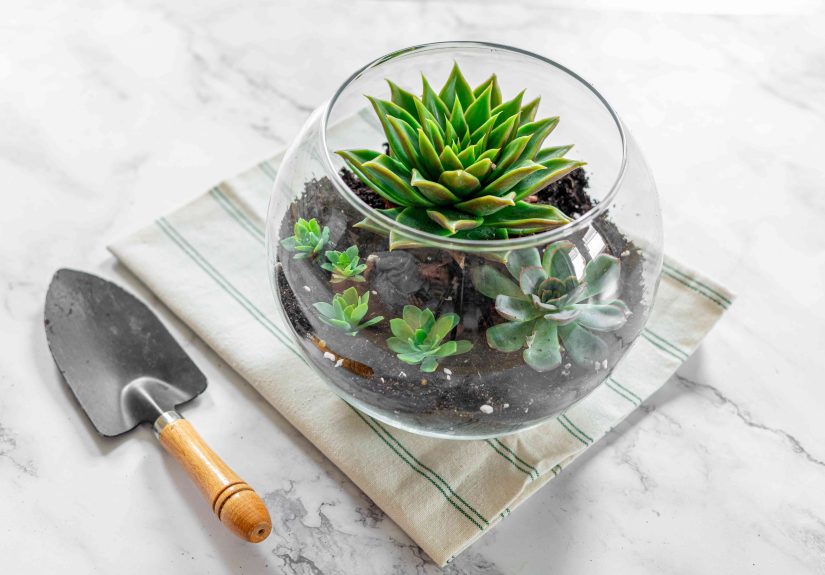
Open terrariums (recommended for succulents)
Open terrariums allow moisture to evaporate and air to circulate. This keeps the environment dry enough for succulents and reduces the risk of mold and rot. These are your wide-mouth bowls, geometric glass containers with big openings, or shallow glass planters.
Closed terrariums (generally not for succulents)
Closed terrariums trap humidity and recycle moisture. That’s perfect for mosses and tropical plants, but it’s usually a bad match for succulents, which are adapted to dry air and quick-drying soil. If you’re determined to use a jar, at least skip the lidand treat it like an open planter.
Supplies Checklist
Here’s what you need to build a succulent terrarium that’s actually functional (and not just “Pinterest pretty for two weeks”).
Container and tools
- Glass container with a wide opening (open terrarium style)
- Small trowel, spoon, or scoop (a big spoon works fine)
- Chopsticks, tweezers, or tongs (for placing plants and rocks neatly)
- Soft brush (for sweeping soil off leaves)
- Optional: gloves (especially for cacti/spiky succulents)
Terrarium “layers”
- Drainage layer: small gravel, pebbles, lava rock, or LECA
- Optional filtration layer: activated charcoal (use horticultural/aquarium charcoalnot charcoal briquettes)
- Barrier layer (optional but helpful): mesh screen or a thin layer of sphagnum moss to keep soil from sinking into rocks
- Soil layer: cactus/succulent mix + extra grit for faster drainage
Top dressing and decor
- Decorative gravel, sand, or small stones (top dressing helps keep leaves off damp soil)
- Rocks, driftwood (dry), or minimalist terrarium decor (optional)
The Best Soil Mix for Succulent Terrariums
Regular potting soil holds too much moisture for most succulentsespecially in a container with no drainage hole. Your goal is a mix that drains quickly and dries predictably.
Simple, reliable mix (great for beginners):
- 50% cactus/succulent potting mix
- 50% mineral grit (perlite, pumice, coarse sand, or small grit)
If your home is humid or your container is deep and narrow (harder to dry out), lean even grittierthink 60–70% mineral material. The soil should feel light and crumbly, not dense and muddy.
Step-by-Step: How to Build Your DIY Succulent Terrarium
Step 1: Clean and dry your container
Wash the container with mild soap and water, then dry completely. This reduces the chance of unwanted mold or funky smells later. (Yes, terrariums can get funky. Let’s not do that.)
Step 2: Add a drainage layer
Since most glass terrariums don’t have drainage holes, the drainage layer is your “oops, I watered too much” buffer. Add about 1–2 inches of gravel, pebbles, lava rock, or LECA depending on container size. Larger/taller containers typically need a deeper drainage layer.
Important reality check: this layer helps, but it doesn’t magically fix frequent overwatering. Think of it as a seatbelt, not invincibility.
Step 3: (Optional) Add activated charcoal
Add a thin layer of activated charcoal over the drainage material if you want extra odor control and a bit of filtration. It’s often recommended for terrariums, especially closed ones, but it can still be useful in open builds. Keep it thinjust enough to lightly cover the drainage layer.
Step 4: Add a barrier layer (optional but tidy)
To prevent soil from filtering down into the rocks, place a small piece of mesh screen over the charcoal/drainage layer. If you don’t have mesh, a thin layer of sphagnum moss can also help keep layers distinct (though moss holds moisture, so keep it minimal in succulent builds).
Step 5: Add your soil mix
Add enough gritty succulent soil to give roots roomusually 2–4 inches depending on plant size. Slightly mound the soil where you want the focal plants so the arrangement has depth and looks intentional (like you meant to do it, not like you dropped plants into a bowl and ran).
Step 6: Plan your layout before planting
Set your plants on top of the soil (still in their nursery pots) to test spacing. Mix heights, textures, and shapes:
- One “star” plant (bigger rosette or sculptural shape)
- 1–2 supporting plants (smaller rosettes or upright types)
- Optional accent plant (trailing sedum or tiny cluster)
Leave space for growth. Succulents may grow slowly, but they do growand they will take it personally if you cram them together.
Step 7: Plant carefully (and protect the leaves)
Remove plants from their pots and gently loosen tightly bound roots. Dig holes, set plants at the same depth they were growing before, and backfill with soil. Keep soil off the leaves when possible; leaves sitting on wet soil are more likely to rot.
If you’re planting rosette succulents, consider a slight angle so water doesn’t pool in the center. For cacti, use tongs or folded paper to avoid becoming a human pincushion.
Step 8: Add top dressing
Add a layer of decorative gravel or coarse sand on top. This helps in three big ways:
- Reduces splashing onto leaves during watering
- Keeps lower leaves from resting on damp soil
- Makes everything look crisp and finished
Step 9: Water lightlythen pause
After planting, give a light watering to settle the soil, but don’t drench. In a terrarium without drainage, your best tools are a squeeze bottle, small watering can with a narrow spout, or even a syringe/turkey baster for precision.
If you used freshly cut stems or offsets, you may want to wait a day or two before watering to reduce the chance of rot while cuts heal.
Best Succulents for Terrariums
You’re looking for plants that stay relatively compact, tolerate indoor conditions, and don’t demand scorching outdoor sun 12 hours a day. Here are dependable categories and examples.
Great choices for bright indoor light
- Echeveria (compact rosettes; may need very bright light to avoid stretching)
- Graptopetalum (often hardy and forgiving)
- Sedum (many types, including small trailing varieties)
- Crassula (jade plant varieties; some stay compact with pruning)
More tolerant of lower indoor light (still want brightness)
- Haworthia (excellent indoor candidate; stays small, handles bright indirect light well)
- Gasteria (similar vibe to haworthiagreat for shelves and desks)
- Small aloes (compact varieties can work well)
Plants to avoid mixing together
Try not to combine succulents with dramatically different light and water needs in the same terrarium. For example, high-sun rosettes and shade-tolerant haworthias can coexist only if you give everyone enough light without scorching the shade-lovers. If you want easiest success, keep your terrarium “team” consistent.
Light Placement: The Biggest Success Factor (Seriously)
Most succulent problems indoors aren’t caused by “bad luck.” They’re caused by not enough light. In low light, succulents stretch (etiolate), grow pale, and weaken. Aim for:
- Bright window light (often near a south- or west-facing window in the Northern Hemisphere)
- Several hours of sun if your plants are sun-loving varieties
- Rotation every week or two so growth stays even
One caution: glass can intensify heat. If your terrarium sits in strong direct sun, monitor for overheatingespecially in summer. Bright light is great; turning the container into a magnifying glass oven is not.
If natural light is limited (winter, apartments, shady rooms), a small grow light can make a huge difference and keep plants compact.
Watering a Succulent Terrarium Without Ruining Everything
In a pot with drainage, you can water thoroughly until water runs out, then let it dry completely. In a glass terrarium without drainage holes, your strategy is:
- Water less than you think you need.
- Water only when the soil is fully dry down several inches.
- Avoid frequent tiny sips that keep soil damp all the time.
Practical method: Use a squeeze bottle and water around the base of each plant, not over the leaves. If you accidentally overwater, tip the terrarium slightly and use a turkey baster or paper towel edge to remove pooled water from the drainage layer.
Common watering signals
- Underwatering signs: wrinkled leaves, slight softness, slowed growth (some wrinkling is normal in drought-tolerant plants)
- Overwatering signs: translucent/mushy leaves, leaves dropping easily, blackened stems, moldy soil surface
Design Tips That Also Help Plant Health
Use rocks strategically
Rocks aren’t just decor. They can support stems, keep leaves off soil, and create airflow gaps. Place larger stones near plants that tend to sprawl.
Top dress like you mean it
A clean top dressing (gravel, pumice, coarse sand) improves appearance and reduces moisture sitting against leaves. It also makes fungus gnats less likely (no promises, but it helps).
Skip humidity-loving extras
Moss may look adorable, but it likes moisture. In a succulent terrarium, moss often becomes a wet sponge that encourages rot. If you love the look, use dried, decorative moss onlyand keep it away from plant bases.
Maintenance: Keep It Happy for Months (Not Just the Photo)
- Check soil dryness weekly (water only when fully dry)
- Rotate the container so plants grow evenly
- Remove dead leaves (they trap moisture and invite pests)
- Dust leaves gently so plants can photosynthesize well
- Fertilize lightly (optional): a diluted fertilizer in spring/summer is plentyoverfertilizing can cause weak growth
Troubleshooting: Fix Problems Before They Spread
Problem: Mold on soil
- Cause: too much moisture, poor airflow, soil staying wet
- Fix: stop watering, increase light and airflow, remove moldy top layer and replace with dry gritty mix + fresh top dressing
Problem: Mushy leaves or collapsing plant
- Cause: overwatering and root rot
- Fix: remove the plant, cut away rotten tissue, let healthy parts callus, replant into dry gritty mix; reduce future watering
Problem: Stretching (etiolation)
- Cause: not enough light
- Fix: move to brighter light or add a grow light; rotate regularly; consider pruning/propagating leggy stems for a reset
Problem: Mealybugs or mites
- Cause: common indoor pests
- Fix: isolate if possible; dab pests with rubbing alcohol on a cotton swab; repeat weekly until clear
of Experiences: What People Learn After Building a Succulent Terrarium
If you’ve never made a succulent terrarium before, your first build will teach you a few things fastmostly because succulents are excellent at giving feedback. Sometimes that feedback is “Wow, I love it here,” and sometimes it’s “I’m turning to mush in protest.” Here are a few real-world style experiences and lessons that tend to show up after the initial excitement fades and your terrarium starts living its actual life.
Experience #1: The “It’s glass so it must be fancy” overwatering moment. A lot of DIYers water a terrarium the same way they water a normal potuntil they realize there’s nowhere for the extra water to go. The plants look fine for a week or two, and then suddenly the lower leaves go translucent, one plant leans like it’s exhausted, and you discover the drainage layer looks like a tiny aquarium. The fix usually isn’t complicated: stop watering, increase light, and remove any obviously rotting leaves. Once the soil fully dries, most healthy succulents bounce back. The bigger lesson: in a no-drainage container, you water like you’re adding seasoningcarefully, and with restraint.
Experience #2: The “closed jar looked cute online” regret. It’s common to fall in love with the idea of a sealed jar terrariumuntil the inside fogs up and your succulents start looking like they’re melting. High humidity encourages rot and fungus for many desert plants. People often salvage the situation by simply removing the lid permanently, swapping in a grittier soil mix, and choosing plants that tolerate indoor conditions (haworthias are frequent heroes here). The lesson: succulents want airflow more than they want a dramatic glass dome.
Experience #3: The lighting reality check. In the first week, your terrarium might look perfect anywherecoffee table, bookshelf, dim hallway that “gets some light.” Then the plants stretch toward the nearest window like they’re trying to escape. This is when many people realize succulents don’t thrive on vibes; they thrive on photons. Moving the terrarium closer to a bright window (and rotating it) usually helps. In winter, a simple grow light can be the difference between compact rosettes and lanky “plant spaghetti.” The lesson: if you want a terrarium that stays cute, treat light like a non-negotiable ingredient.
Experience #4: The “too many plants” phase. Terrariums are small, and it’s tempting to cram in every adorable baby succulent you own. At first it looks lush and fullthen growth starts, airflow decreases, and leaves touch leaves, trapping moisture. Many people end up editing their terrarium like a tiny garden haircut: removing one or two plants, re-rooting cuttings elsewhere, and giving the remaining plants breathing room. The lesson: negative space isn’t emptyit’s plant comfort.
Experience #5: The surprise joy of propagation. Once you’ve built one terrarium, you’ll eventually notice a leaf that fell off, a tiny offset forming, or a stem that got leggy. A lot of hobbyists discover that “fixing” a succulent often means propagating itsnipping, letting it callus, and replanting to create a fuller, healthier arrangement. The terrarium becomes less of a static decoration and more of a living project you tweak over time. The lesson: a succulent terrarium isn’t something you finishit’s something you grow into.
Conclusion: Your Succulents Want a Mini Desert, Not a Mini Swamp
The best DIY succulent terrarium is simple: an open container, a generous drainage layer, a gritty fast-draining soil mix, bright light, and careful watering. Keep humidity low, give your plants room, and treat watering like a precision toolnot a routine. If you do that, your terrarium won’t just look good for photos. It’ll stay healthy, tidy, and genuinely enjoyable to keep around.