Table of Contents >> Show >> Hide
- Why a faux boulder works (and why store-bought covers aren’t always the answer)
- Before you start: what you can (and cannot) cover
- Choose your build method
- Materials and tools checklist
- Step-by-step: Build a hollow faux boulder cover (foam + mortar method)
- Step 1: Measure the eyesore (then add “real life” clearance)
- Step 2: Decide the “rock story” so it looks believable
- Step 3: Build the foam shell (light, hollow, and liftable)
- Step 4: Carve it into a rock shape (messy, satisfying)
- Step 5: Reinforce the surface (especially for bigger covers)
- Step 6: Mix your coating to the right consistency
- Step 7: Apply the base coat (thin, sticky, no hero moves)
- Step 8: Build strength with a second coat (and sculpt your rock features)
- Step 9: Texture while it’s workable (this is what sells the illusion)
- Step 10: Cure it properly (boring but crucial)
- Step 11: Add believable color (rocks are never one flat tone)
- Step 12: Add ventilation and “lift points”
- Step 13: Seal (optional, but smart in harsh climates)
- Hypertufa variation (lighter “stone” look)
- How to make your faux boulder look “found,” not “built”
- Placement tips so it stays put (and doesn’t become a lawnmower boss fight)
- Troubleshooting: common DIY faux rock problems (and fixes)
- FAQ
- Real-world experience notes (about )
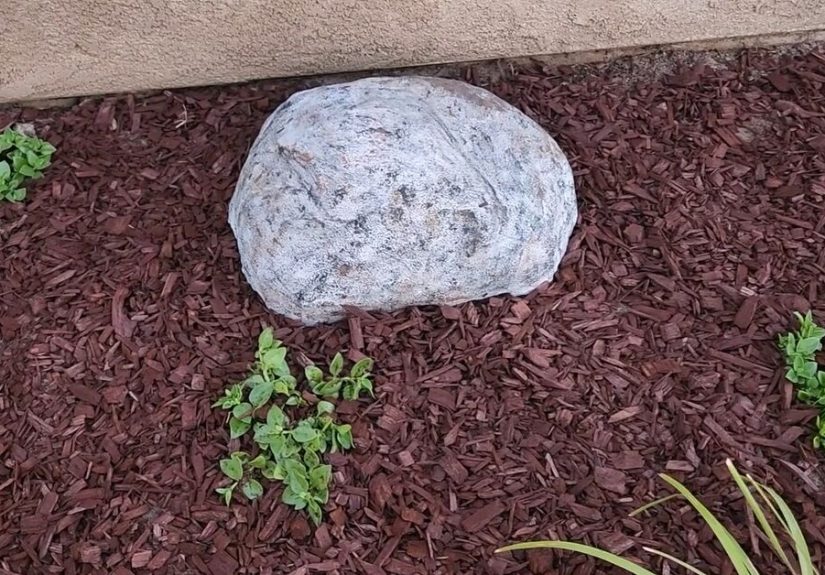
Every yard has that one thing: the irrigation backflow preventer that looks like a robot periscope, the septic cleanout that photobombs every patio picture, or the electrical box that screams “utility chic” (and not in the good way). A faux boulder cover is the landscaping equivalent of putting sunglasses on a tired morning: it doesn’t change the reality, but suddenly everything looks intentional.
The best part? You can build a custom, hollow “rock” that lifts off when you need accessno permanent obstructions, no awkward shrubbery that eventually turns into a leafy monster, and no pretending you don’t see it. This guide walks you through a durable DIY method (foam + cementitious shell), plus a lighter hypertufa option, realistic texturing tricks, and the small safety details that keep your “yard upgrade” from becoming a “why is the utility company mad at me?” situation.
Why a faux boulder works (and why store-bought covers aren’t always the answer)
A rock cover solves two problems at once: it hides the eyesore and blends into the landscape year-round. Compared with quick fixes like leaning a planter in front of a meter or building a little fence panel, a faux boulder looks natural from multiple angles and doesn’t rely on plants staying alive (or cooperative).
Store-bought faux rocks can be convenient, but DIY gives you three big wins:
- Perfect fit: You build around your exact height, width, and clearance needs.
- Better camouflage: You can match nearby stone color, texture, and scale.
- Smart features: Add vents, a hidden handle, a “lift here” notch, or an access opening where you need it.
Before you start: what you can (and cannot) cover
Let’s be grown-ups for a minutesome “eyesores” are also safety equipment.
A removable cover is usually fine for many low-risk items, but you need to keep access and airflow in mind.
Usually OK to camouflage (with easy access)
- Septic cleanouts and risers (don’t seal them injust cover)
- Irrigation valve boxes/manifolds
- Well head components (where allowed and with access)
- Low-voltage landscape transformers and junction boxes (check ventilation)
- Unsightly caps, stubs, or utility markers you don’t need daily
Be cautious or don’t cover at all
- Gas meters/regulators/vents: Many utilities require clear, visible, well-ventilated access. Don’t enclose or cover them with anything that blocks airflow or slows emergency shutoff.
- Electrical service panels: Anything that must remain accessible with required working clearance should not be blocked by a heavy cover.
- Anything labeled “keep clear” or “do not obstruct”: That label is not a decorating suggestion.
If your project involves any digging (even “just a few inches”), contact 811 to have buried utilities marked. It’s fast, it’s usually free, and it’s wildly better than discovering your sprinkler line the dramatic way.
Choose your build method
There are a few reliable ways to make a faux boulder. Here’s the honest breakdown so you can pick the one that matches your patience level and your biceps.
Option A: Foam core + cementitious shell (best all-around)
You build a lightweight hollow form from rigid foam insulation (or foam board), carve it into a rock shape, then coat it with a cement-based layer (polymer-modified mortar, surface bonding cement, or a mortar mix). This produces a durable, realistic cover that’s still liftable.
Pros: Strong, very realistic, custom size, good weather resistance.
Cons: Messy, needs curing time, you’ll definitely find mortar on one elbow later.
Option B: Hypertufa “stone” shell (lighter, rustic, garden-friendly)
Hypertufa is a lightweight mix of cement + perlite + peat/coir (often with reinforcing fibers). It’s famous for planters because it looks aged and stone-like. You can adapt it for a rock cover, especially if you want a naturally weathered finish.
Pros: Lighter than standard concrete, naturally stone-looking, takes patina nicely.
Cons: Can be more porous; sealing helps. Needs careful handling while curing.
Option C: Foam + specialty coatings (super light, more “prop” than “boulder”)
Specialty urethane coatings or scenic coatings can make foam extremely durable while staying lightweight. This is popular in set design and themed landscapes.
Pros: Very light, high detail potential.
Cons: Materials can cost more; not everyone wants “movie prop” chemistry in the garage.
For most homeowners: Option A is the sweet spot. That’s what the step-by-step below is based on, with a hypertufa variation included if you prefer that route.
Materials and tools checklist
Core and structure
- Rigid foam insulation sheets (XPS) or foam board
- Utility knife, serrated knife, or small hand saw (for carving)
- Hot glue gun or foam-safe construction adhesive (water-based/foam-safe)
- Packing tape (surprisingly helpful for quick shaping)
- Optional reinforcement: fiberglass mesh tape or alkali-resistant mesh
- Optional: light wire mesh (for bigger covers)
Outer shell (pick one)
- Polymer-modified mortar / thinset (good adhesion, easier troweling)
- Surface bonding cement (fiber-reinforced, strong, exterior-friendly)
- Mortar mix (works, but can be less “sticky” without additives)
Texturing + coloring
- Cheap paintbrushes, a stiff scrub brush, and/or a sea sponge
- Masonry pigments or cement colorant (optional)
- Concrete stain, diluted acrylic paint, or exterior masonry paint
- Optional: real sand/stone dust to press into wet coat for grit
- Exterior masonry sealer (optional but helpful in freeze/thaw climates)
Safety + cleanup
- Nitrile or waterproof gloves
- Eye protection
- Dust mask/respirator (especially when handling dry cement powders)
- Drop cloth/tarp, bucket, mixing tool
Step-by-step: Build a hollow faux boulder cover (foam + mortar method)
Step 1: Measure the eyesore (then add “real life” clearance)
Measure the height, width, and depth of what you’re hiding. Then add clearance:
- Add 2–4 inches on all sides for easy lift-off and airflow.
- Add extra height if you plan to add a vent or a hidden handle inside the “rock.”
- Plan an access side if you need to reach a valve or cap without removing the whole boulder.
Step 2: Decide the “rock story” so it looks believable
Real rocks aren’t perfectly round (unless you live on a riverbed). Decide what you’re imitating:
- Granite-ish boulder: chunky, fractured faces, speckled color.
- Sandstone slab: layered “shelves,” subtle horizontal lines.
- Limestone look: softer edges, pitting, pale warm tones.
This matters because you’ll carve and texture differently. (Also, telling yourself a “rock backstory” makes the project feel important, which helps when you’re on coat three and questioning your choices.)
Step 3: Build the foam shell (light, hollow, and liftable)
The easiest method is a simple “boxy dome” you later carve into shape.
- Create a base ring: Cut foam strips that form a perimeter slightly larger than the object. Leave the bottom openyour boulder needs to lift off.
- Add walls: Stack foam pieces like a low, chunky wall. Hot glue or foam-safe adhesive works well.
- Add a roof: Bridge the top with foam pieces. Don’t worry if it looks like a weird foam igloo. Carving fixes everything.
- Test fit: Place it over the eyesore and confirm it clears easily. If you have to “wiggle” it like a stuck jar lid, enlarge now.
Step 4: Carve it into a rock shape (messy, satisfying)
Carving is where the magic happens. Use a serrated knife or utility knife to knock off corners and create planes.
- Think “planes,” not “ball”: Real boulders have faces and breaks.
- Add undercuts lightly: A little shadow makes it look heavier and more natural.
- Vary the silhouette: One side taller, one side flatternature rarely uses symmetry.
Tip: Save a few foam crumbs. You can glue them on later as “rock protrusions” to break up a boring side.
Step 5: Reinforce the surface (especially for bigger covers)
Cement-based coatings stick better and resist cracking when reinforced.
For medium-to-large covers, wrap or patch the foam with fiberglass mesh tape (the drywall kind works) or embed mesh in the first coat.
If you’re going big (think “covers a well head” big), consider adding light wire mesh in key areas. The goal is a shell that doesn’t flex like a cereal box.
Step 6: Mix your coating to the right consistency
Follow the bag directions for your chosen product. In general, you want a mix that spreads like thick peanut butterwet enough to bond, not so wet that it slumps off vertical faces.
- Too dry: Crumbly, poor adhesion, won’t texture nicely.
- Too wet: Slides off, weak cure, and will drip into places you’ll discover later.
Step 7: Apply the base coat (thin, sticky, no hero moves)
Start with a thin “bond” coat. Press it in so it grabs the foam and any mesh. Don’t aim for perfectionaim for coverage.
- Coat the sides first, then the top.
- Keep your edges slightly thicker (they’re impact-prone).
- Let the first coat firm up before adding more (timing depends on product and weather).
Step 8: Build strength with a second coat (and sculpt your rock features)
Once the base coat is firm (not fully cured, just not squishy), add a second coat. This is your chance to sculpt:
- Cracks and seams: Draw shallow lines with a trowel edge.
- Layering: Add thin ridges for sedimentary “shelves.”
- Chips and breaks: Press and pull with a stiff brush or putty knife.
Keep stepping back. If it looks like a frosted cupcake, add sharper planes. If it looks like a spiky space potato, soften the edges.
Step 9: Texture while it’s workable (this is what sells the illusion)
Texture is the difference between “rock” and “large gray loaf.”
- Sponge dab: A porous sponge creates natural pits and random pores.
- Stiff brush stipple: Adds grain and micro-texture.
- Real sand press: Sprinkle sand or stone dust onto wet areas and press lightly.
Pro move: Texture more on the lower half where splash, dirt, and wear would naturally happen.
Step 10: Cure it properly (boring but crucial)
Cement-based materials gain strength as they cure. If the shell dries too fast, it’s more likely to crack or weaken.
Cure in a shaded area if possible. Lightly misting and loosely covering with plastic can help maintain moisture (follow the product guidance).
Step 11: Add believable color (rocks are never one flat tone)
Real rock color has layers: base tone, darker shadows, mineral streaks, and lighter highlights.
You can build that effect with diluted exterior paint, masonry stain, or pigments.
- Base wash: A thin coat in your main rock tone (gray, tan, warm brown, etc.).
- Shadow wash: Darker color into cracks, undercuts, and the bottom edge.
- Dry-brush highlight: A lighter tone brushed across raised faces to pop texture.
Less is more. You’re not painting a cartoon rock for a theme parkyou’re suggesting natural variation.
Step 12: Add ventilation and “lift points”
If you’re covering something that can generate heat or needs airflow, add vents.
Even for simple covers, a little airflow helps prevent damp funk underneath.
- Vent gap: Leave a small hidden gap at the back base edge.
- Discreet holes: Drill a few holes near the bottom sides (hide them in texture/shadow).
- Hidden handle: Create an interior notch or install a small strap handle inside the top.
Step 13: Seal (optional, but smart in harsh climates)
In rainy areas or freeze/thaw climates, a breathable masonry sealer can help reduce water absorption and surface wear. Avoid glossy finishesshine is the enemy of realism.
Hypertufa variation (lighter “stone” look)
If you like a naturally rustic, weathered finish, hypertufa is worth considering. The typical recipe blends cement with lightweight aggregates (like perlite) and an organic component (often peat or coir), sometimes with reinforcing fibers.
The result looks like aged stone and can develop patina over time.
To adapt hypertufa for a boulder cover:
- Use the same foam shell as your form.
- Apply hypertufa in layers, pressing it firmly so it holds shape.
- Keep edges thick enough to resist chipping and add mesh where needed.
- Cure slowly and consider sealing once fully cured (hypertufa can be more porous).
How to make your faux boulder look “found,” not “built”
Copy local stone, not internet stone
The most realistic faux rocks match what’s already in your region. Take a quick look around: are nearby rocks more warm tan than cool gray? Are they layered? Smooth? Rough?
Your goal is harmony, not perfection.
Use three textures: big, medium, tiny
- Big: Overall shape and planes (carving stage).
- Medium: Chips, seams, ledges (trowel stage).
- Tiny: Pits, grain, speckle (sponge/brush stage).
Make the bottom dirtier on purpose
Real rocks are stained by soil and splash. Darken the lower edge slightly and add subtle mossy or earthy tones where the rock meets the ground. It’s a small detail that makes the whole illusion click.
Placement tips so it stays put (and doesn’t become a lawnmower boss fight)
- Level the base: A small bed of compacted soil or gravel keeps it stable.
- Hide the seam: Nestle the base slightly into mulch or decorative gravel.
- Keep access obvious: If someone needs to service the item, make sure the boulder lifts easily and doesn’t require tools.
- Don’t trap water: Avoid sealing the bottom edge tight against wet soil.
Troubleshooting: common DIY faux rock problems (and fixes)
“My coating cracked.”
Hairline cracks happen, especially if the shell dried too quickly or is too thin in spots. Patch with a thin skim coat of the same cementitious product, then re-texture and touch up color.
For larger cracks, add mesh reinforcement before patching.
“It looks fake. Like… aggressively fake.”
Usually it’s one of these:
- Too smooth: Add sponge texture and a darker wash into pits.
- One flat color: Add a shadow wash + highlight dry-brush.
- Too round: Carve more planes and add a couple of “break” lines.
“It’s heavier than I planned.”
Next time: keep the shell thinner, use fiber-reinforced coatings, and avoid adding “just one more coat” everywhere.
For this one: add a hidden handle inside and consider trimming the interior foam to reduce weight (without weakening structure).
FAQ
How long does this last outdoors?
With a solid shell, decent curing, and sensible placement, a foam-core faux boulder with a cementitious coating can last for years. Sealing helps in wet or freeze/thaw climates, and occasional touch-ups keep it looking natural.
Can I plant on or around it?
Around it, yesgravel, low groundcover, and mulch look great. On top of it, skip heavy planters unless you designed the shell for load.
If you’re covering something that needs access, avoid deep-root plants that turn removal into an archaeology project.
Do I need to anchor it?
Usually no. If wind is an issue, increase the footprint slightly, add weight low inside the cover (like a removable paver), or set it into a shallow mulch/gravel nest.
Real-world experience notes (about )
The first faux boulder I ever made (in spiritbecause every DIY project is a character arc) taught me a valuable lesson: rocks are basically nature’s way of showing off texture. My early version looked like a gray beanbag chair that had gone to finishing school. From ten feet away, it was fine. From five feet away, it was suspicious. From two feet away, it was clearly a “concrete-frosted foam loaf,” and I say that with affection.
The fix wasn’t buying fancy supplies. It was slowing down at the texture stage and giving the surface three different “scales” of detail. The carving created big planes, but I hadn’t added enough medium featuresthose little ledges, chips, and seams that make a rock look like it has a geological history instead of a recent appointment with a trowel. Once I started carving shallow fracture lines and pressing in a few layered ridges, the shape suddenly looked heavier and more believable. It’s strange how a couple of well-placed “breaks” can make something look like it’s been sitting in the yard for 30 years minding its own business.
Coloring was the second aha moment. A single paint color makes even real stone look fake. The day I tried a simple three-step color approachbase wash, darker shadow wash in cracks, and a light dry-brushed highlightmy faux boulder stopped looking like a craft project and started looking like landscaping. The highlight step feels almost too subtle while you’re doing it, but when the sun hits the texture, you get that natural contrast your eye expects from rock.
Practical lesson: build “grab points” early. The first time you need to lift the cover off to access a valve, you don’t want to perform an awkward hug-and-heave maneuver while trying not to scrape your knuckles. A hidden interior notch (or a small strap handle tucked under the top) makes the cover feel like a professional product. And if you’re hiding something that needs airflow, planning vents from the beginning is easier than trying to drill holes later and pretending they’re “natural mineral voids.”
Also: your yard has an opinion about realism. If your neighborhood rock is warm tan and you paint yours cool battleship gray, it won’t matter how perfect the texture isyour brain will flag it as “not from here.” Matching local stone tones is the fastest realism shortcut. I’ve even taken a photo of nearby rocks in morning light and used it as a reference for the stain layers. It feels extra. It works.
Finally, accept the weird joy of imperfect edges. Real rocks aren’t symmetrical, and they’re rarely “smoothly finished.” Slightly uneven borders and a few rough patches are a feature, not a flaw. The best compliment you can get is someone stepping past it without noticingbecause in landscaping, invisibility is sometimes the highest form of success.