Table of Contents >> Show >> Hide
- Quick Overview (So You Know What You’re Getting Into)
- What You Need
- Before You Knot: Choose Colors, Cut Strings, Set Up
- Learn the 2 Knots That Power (Almost) Every Friendship Bracelet
- Beginner Pattern #1: Candy Stripe Bracelet (The Confidence Builder)
- Beginner Pattern #2: Chevron Bracelet (The Classic “V”)
- Beginner Pattern #3: Spiral Staircase (Looks Advanced, Feels Easy)
- How to Finish Your Bracelet (So It Actually Stays On)
- Troubleshooting: Beginner Problems (and Fixes That Work)
- Make It Yours: Fun Customization Ideas
- Care Tips (Because Bracelets Go on Adventures)
- Conclusion
- Beginner Experiences: What It’s Like Making Your First Friendship Bracelet (and Why You’ll Probably Make More)
If you’ve ever wanted to make a friendship bracelet but felt personally attacked by the idea of “patterns,” breathe easy. Friendship bracelets are basically tiny, wearable knots that say: “I appreciate you… and also I had 45 minutes and some embroidery floss.”
This beginner guide walks you through supplies, setup, the only knots you truly need, and three easy patterns (Candy Stripe, Chevron, and Spiral Staircase). By the end, you’ll know how to start, how to fix mistakes, and how to finish your bracelet so it stays on wristsnot in the “unfinished crafts” drawer.
Quick Overview (So You Know What You’re Getting Into)
- Best beginner pattern: Candy Stripe (easy to memorize)
- Most “classic” pattern: Chevron (the iconic V shape)
- Looks fancy but isn’t: Spiral Staircase (it’s just repeating one move)
- Time: 30–90 minutes depending on pattern + how often you stop to admire it
- Skill level: Beginner (no crafting résumé required)
What You Need
- Embroidery floss (classic choice) or smooth craft string
- Scissors (sharp enough to cut floss, not your patience)
- Something to anchor your work: masking tape, painter’s tape, a clipboard, safety pin + pillow, or a binder clip
- Optional but helpful: measuring tape or ruler, small piece of cardboard, a pin/needle for undoing knots, and a bead or button for a loop closure
Before You Knot: Choose Colors, Cut Strings, Set Up
Pick floss like a pro (without overthinking it)
Embroidery floss is inexpensive, easy to find, and comes in a huge range of colors. For your first bracelet, choose 2–4 colors you love. High-contrast colors make patterns easier to see while you learn (and make your bracelet pop in photosbecause yes, you will take photos).
How long should you cut the strings?
Rule of thumb: cut longer than you think you need. Running out of floss in the last 2 inches is the crafting version of stepping in a puddle with socks on.
Try one of these beginner-friendly approaches:
- Simple standard: Cut each strand about 30 inches (great for many beginner bracelets).
- Wrist-based method: Measure around your wrist and multiply by 5 for a reliable starting length.
- If you’re unsure: Go longer. Extra floss is easy to trim; missing floss is… emotionally complicated.
How many strands do you need?
It depends on the pattern and how wide you want the bracelet:
- 4–6 strands: Narrow bracelet, faster finish (great for first attempts)
- 8–10 strands: Thicker bracelet with bolder patterns
Set up your “bracelet station”
You need your knotting area to stay put. Pick one method:
- Tape to a table (fast and simple)
- Clipboard (portable and stablecrafting’s little office vibe)
- Safety pin to a pillow (cozy and classic)
- Binder clip on a book (surprisingly effective)
Start the bracelet: Gather your cut strands, line up the ends, and tie an overhand knot about 2–3 inches from the top. That extra space becomes your finishing ties.
Learn the 2 Knots That Power (Almost) Every Friendship Bracelet
Most beginner patterns use variations of two knots: the forward knot and the backward knot. Here’s the secret that makes everything easier:
Each “knot” is actually two half-hitches. So when instructions say “make a forward knot,” you’re usually doing the motion twice with the same working string.
Forward Knot (moves left to right)
- Choose your working string (often the leftmost string).
- Lay it over the string next to it to form a shape like the number 4.
- Bring the end under the other string and up through the loop.
- Pull upward to tighten near the top knot.
- Repeat once more (two half-hitches = one complete forward knot).
Tip: Keep the string you’re knotting around straight and slightly taut while the working string does the looping.
Backward Knot (moves right to left)
- Choose your working string (often the rightmost string).
- Cross it over the string next to it, like a backward 4 (or a mirror image of the forward knot setup).
- Bring the end under and up through the loop.
- Pull upward to tighten near the top knot.
- Repeat once more.
Beginner knot tension: the Goldilocks rule
Your knots should be snug but not yanked so tight your bracelet curls like it’s trying to become a cinnamon roll. Consistent tension is more important than “tight.”
Beginner Pattern #1: Candy Stripe Bracelet (The Confidence Builder)
The Candy Stripe pattern creates diagonal stripes and is one of the easiest to memorize because you repeat the same move across the row. It’s perfect for beginners because it teaches rhythm and tension fast.
What you’ll need
- 4–8 strands of embroidery floss
- Any color order you like (your order affects the stripe sequence)
Steps
- Cut and knot your strands together at the top, leaving 2–3 inches for ties.
- Anchor the top knot to your surface.
- Lay the strands out in the color order you want the stripes to repeat.
- Take the leftmost strand as your working string.
- Tie a forward knot (two half-hitches) around the strand next to it.
- Keep going: tie forward knots around each strand in order until your working string reaches the far right.
- Now your working string is on the right. Start again with the new leftmost string and repeat the same process.
- Continue until the knotted section wraps your wrist comfortably.
Example color setup
Try 6 strands: Blue, Blue, White, White, Pink, Pink. The stripes will repeat in that order, giving you bold diagonal bands without complicated counting.
Beginner Pattern #2: Chevron Bracelet (The Classic “V”)
Chevron looks impressive, but it’s just forward knots on the left and backward knots on the right, meeting in the middle like two teams shaking hands at the center line.
Best beginner setup
- 8 strands (2 strands of each of 4 colors)
- Arrange colors so they mirror: A B C D | D C B A
Steps
- Cut strands and tie a top knot, leaving 2–3 inches for ties.
- Arrange in mirrored order: A B C D D C B A (left to right).
- Take the far-left strand (A). Tie forward knots over each strand moving toward the center. Stop when A reaches the center.
- Take the far-right strand (A). Tie backward knots over each strand moving toward the center. Stop when it reaches the center.
- Make the center point: Tie the two center strands together (usually a forward knot or backward knot worksjust be consistent).
- That completes one “V” row. Now repeat with the new outermost strands.
Chevron sanity tips
- Keep your strands flat after each row. Untangle often (future-you will thank you).
- If the “V” looks crooked, it’s usually tensiontighten gently and consistently.
Beginner Pattern #3: Spiral Staircase (Looks Advanced, Feels Easy)
Spiral Staircase is a favorite beginner pattern because it uses repeated knots with the same working string to create a twisty spiral. Translation: it’s the craft equivalent of learning one dance move and still getting compliments.
Easy setup
- 4 strands (2 of Color A, 2 of Color B)
- Arrange them A A B B (or any order you like)
Steps
- Knot and anchor the strands.
- Pick the leftmost strand as your working string.
- Tie forward knots across the next three strands.
- Repeat again with the new leftmost strand.
- As you keep repeating, the bracelet will naturally twist into a spiral.
How to Finish Your Bracelet (So It Actually Stays On)
Option 1: Simple braided ties (most common)
- When the knotted section is long enough, stop and separate strands into two halves.
- Braid each half for 1.5–2 inches.
- Tie an overhand knot at the end of each braid.
- Tie the braids together around your wrist.
Option 2: Loop-and-braid closure (easy + adjustable)
- At the start, fold your strands in half before tying the top knot (this creates a loop).
- Braid the ends as usual.
- To close: pull the braids through the loop and tie a knot.
Option 3: Sliding knot closure (for “I want it to look store-bought” energy)
This closure uses a simple macramé-style sliding knot, which lets you tighten and loosen the bracelet.
- Overlap the two ends of the bracelet by about 1 inch.
- Use a separate short strand (8–10 inches) as your “knotting cord.”
- Wrap it around both bracelet ends and tie a few snug square knots (don’t panicsquare knots are common in basic macramé).
- Trim and secure the ends of the knotting cord.
- Test by pulling the bracelet ends to slide the closure tighter or looser.
Troubleshooting: Beginner Problems (and Fixes That Work)
“My bracelet has little gaps or holes.”
This usually means your half-hitches aren’t snug. Try tightening each half-hitch upward toward the top knot before starting the second half-hitch.
“My edges look wavy.”
Wavy edges often come from inconsistent tension. Slow down, tighten the same way each time, and keep the base string straight while knotting around it.
“I messed up a knot. Do I have to start over?”
Nope. Use a pin or needle to gently loosen the knot and back it out. It’s normal to undo knots while learningconsider it “crafting with editing,” like writing but with string.
“My threads are constantly tangling.”
Welcome to floss life. Every few rows, let the strands dangle and untwist. Keeping strands aligned (and not aggressively flung across your workspace) helps a lot.
“I’m running out of one color.”
For beginner projects, it’s best to cut longer strands from the start. If you do run short, you can add new floss by knotting it on the back side and hiding the ends, but it’s easier to practice on a fresh bracelet first.
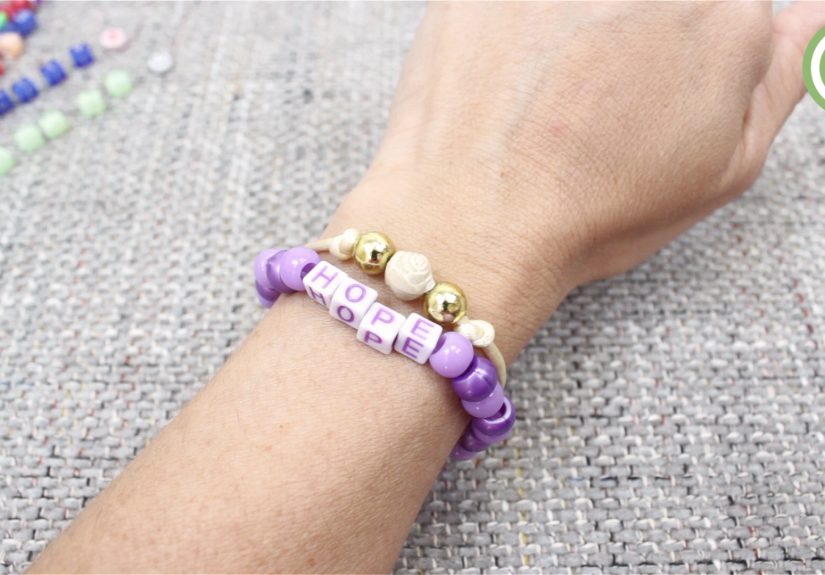
Make It Yours: Fun Customization Ideas
- Color “meanings”: Some people assign meanings to colors (loyalty, kindness, creativity). Or you can just pick your friend’s favorite colorsstill meaningful, and less like a quiz.
- Add beads: Slide beads onto specific strands between knot rows for tiny pops of sparkle.
- Try metallic floss: Use one metallic strand as an accent (it can be a little stiff, but it shines).
- Mix patterns: Do half Candy Stripe, half Spiral Staircase for a “two-in-one” bracelet.
Care Tips (Because Bracelets Go on Adventures)
- Remove before swimming or showering if you want the colors to stay bright longer.
- Avoid wearing it too tightbracelets should be comfy, not a circulation experiment.
- If it gets dirty, gently hand wash and air dry flat.
Conclusion
Making a friendship bracelet is one of those skills that feels like magic the first time it works: a few strings, a couple of knots, and suddenly you’ve made something wearable that says “I care.” Start with Candy Stripe to build confidence, level up to Chevron when you’re ready for symmetry, and try Spiral Staircase when you want maximum “wow” with minimal brain math.
Most importantly: your first bracelet doesn’t need to be perfect. It needs to be finished. Perfection can come laterright after you make “just one more” in a new color combo.
Beginner Experiences: What It’s Like Making Your First Friendship Bracelet (and Why You’ll Probably Make More)
Most beginners start a friendship bracelet with the same emotional cocktail: excitement, confidence, and a tiny fear that strings are about to expose them as an imposter. The good news? Your hands learn faster than your brain thinks they will.
One of the most common first-time experiences is realizing that knotting has a “rhythm.” At the beginning, you’ll stare at your strands like they’re trying to speak a secret language. Then you’ll do a few forward knots in a row and suddenly it clicks: loop, pull, loop, pull. That moment is addicting, because it feels like unlocking a level in a gameexcept the prize is something you can wear (and show off dramatically by extending your wrist like you’re presenting royal jewelry).
Another classic beginner moment: you’ll discover tension is basically the main character. If your knots are too loose, the bracelet looks like it has tiny gaps, as if it’s unsure about committing to being a bracelet. If your knots are too tight, the whole thing may curl, twist, or shrink like it’s trying to escape. Beginners often find their “just right” tension after the first inch or two, which is why starting with a simple pattern like Candy Stripe feels so encouragingevery row gives you immediate feedback.
Tangling is also part of the journey. People don’t talk about it enough, but embroidery floss has a talent for twisting itself into tiny drama spirals when you’re not looking. Beginners learn to pause every few rows, gently separate strands, and untwist them before continuing. It feels like a small interruption, but it usually saves more time than it costsespecially when you’re making an 8-strand chevron and your colors decide to braid themselves into chaos behind your back.
Then there’s the “mistake and recover” experience, which is honestly where confidence is built. Almost everyone makes an accidental wrong knot direction at least onceforward instead of backward, or stopping one strand too early. At first, it’s tempting to declare the bracelet doomed and dramatically start over. But when you learn to use a pin to loosen the knot and undo it, you get a powerful crafting lesson: mistakes are fixable. That’s a surprisingly calming skill to practice on something low-stakes and colorful.
Finally, beginners often discover that friendship bracelets become more than a craft. They turn into mini messages: colors that remind you of a person, patterns that match a shared inside joke, or a bracelet you make while listening to a favorite playlist. Even if your first one is slightly uneven, it can still be the most meaningfulbecause it’s proof you made something with your own hands, one knot at a time. And once you finish your first bracelet, there’s a strong chance you’ll immediately want to make another… purely for practice, of course. (Definitely not because you now want one in every color.)