Table of Contents >> Show >> Hide
- What You Need Before You Start
- GIF Basics in One Minute
- Method 1: Turn a Stack of Images into an Animated GIF (The Classic)
- Step 1: Prep your frames (do this first, future-you will say thanks)
- Step 2: Open images as layers
- Step 3: Put frames in the right order (this trips up everyone once)
- Step 4: Make the canvas match your frames
- Step 5: Preview your animation inside GIMP
- Step 6: Set timing (frame delays) the smart way
- Step 7: (Optional) Optimize for smaller file size
- Step 8: Export as a GIF (the “As Animation” checkbox is the whole game)
- Method 2: Make a GIF from an Existing GIF (Edit, Fix, or Remix)
- Method 3: Make a GIF from a Video (The Realistic Way)
- Quality Control: Make Your GIF Look Good (Not Like a Microwave Screenshot)
- Troubleshooting: Common GIF Problems and Fixes
- A Quick, Concrete Example (So It Clicks)
- My “Been-There” GIF-Making Experiences (500+ Words of Real-World Lessons)
- Conclusion
GIFs are the internet’s emotional support animal: tiny, loop-y, and somehow able to communicate
“same” faster than an entire paragraph. The good news? You don’t need fancy software to make one.
GIMP (the free, open-source image editor) can turn a stack of images into an animated GIF in a few minutes
once you know the secret handshake: layers = frames.
Below is a practical, step-by-step guide to making GIFs in modern GIMP (including GIMP 3.x),
plus timing tricks, quality fixes, and file-size wizardry that won’t make your GIF look like it got
teleported from 1998 (unless that’s the vibeno judgment).
What You Need Before You Start
- GIMP installed (Windows, macOS, or Linux).
- Your frames: a set of images (PNG/JPG/WebP) or screenshots you want to animate.
- A plan: how many frames, how fast it should play, and whether it should loop.
-
Optional: a way to extract frames from a video (like a video editor, VLC, or a frame-export tool).
GIMP doesn’t import video clips as timelines by defaultyou typically feed it images.
GIF Basics in One Minute
A GIF animation is basically a flipbook: a sequence of images displayed one after another. Each frame has:
(1) a delay (how long it stays on screen), and (2) a disposal method
(whether each frame replaces the last one, or stacks on top of it).
GIFs are limited to 256 colors per frame, which is why photos can look rough if you don’t manage color well.
For simple graphics, icons, text, and “reaction” clips? GIFs still shine.
Method 1: Turn a Stack of Images into an Animated GIF (The Classic)
Step 1: Prep your frames (do this first, future-you will say thanks)
Before you open anything in GIMP, make sure your frames are consistent:
- Same dimensions (width/height). If one frame is larger, your GIF may “jump.”
- Same crop area. If you’re animating a subject, keep it aligned.
- Reasonable size. A 1200px-wide GIF might look great… and also weigh 18MB. Aim smaller when possible.
If you’re creating a tutorial GIF (like a screen recording), consider resizing frames to something web-friendly
like 600–900px wide. Your audience (and your page speed score) will appreciate it.
Step 2: Open images as layers
In GIMP, each layer becomes one frame of your animation.
- Go to File > Open as Layers…
- Select all the images you want to animate.
- Click Open. GIMP will stack them into one project as separate layers.
Step 3: Put frames in the right order (this trips up everyone once)
In many GIMP workflows, the bottom layer plays first, then it runs upward through the layer stack.
If your animation starts at the “end,” just reorder layers by dragging them up or down in the Layers panel.
Quick reality check: If you’re unsure which direction your stack is playing, don’t guesspreview it (Step 5).
Step 4: Make the canvas match your frames
If frames aren’t the exact same size, you’ll want to standardize:
- Image > Canvas Size… to set the overall canvas.
- Layer > Scale Layer… if a specific layer needs resizing.
- Layer > Layer to Image Size if a layer is smaller than the canvas and you want it to fill the image area.
For most GIFs, the goal is: every frame aligns cleanly on the same canvas, with no unexpected shifts.
Step 5: Preview your animation inside GIMP
Preview early. Preview often. It’s cheaper than exporting 14 versions named
final_final_REALLY_FINAL.gif.
- Go to Filters > Animation > Playback.
- Click play to preview.
If the animation looks wrong here, it will look wrong when exportedso fix it now while it’s easy.
Step 6: Set timing (frame delays) the smart way
You have two common options:
- One delay for all frames (easy): set a default delay during export (like 80–120 ms for a snappy loop).
- Different delays per frame (pro move): add timing to each layer name.
To set a delay for a specific frame, rename the layer and include something like (200ms)
or (1000ms). For example:
Frame 01 (120ms)Frame 02 (120ms)Punchline (900ms)
Want control over how frames “stack”? You can also specify whether a frame replaces the previous frame
or combines with it by adding (replace) or (combine) in the layer name, like:
Frame 1 (120ms) (replace).
For most beginner animations, (replace) keeps things clean and prevents weird ghosting.
(combine) can be useful if you intentionally want frames to build on top of each other (like drawing strokes).
Step 7: (Optional) Optimize for smaller file size
If your GIF is heavy, GIMP includes animation optimization tools:
- Filters > Animation > Optimize (Difference)
- Filters > Animation > Optimize (for GIF)
These tools can reduce file size by storing only what changes between frames. The trade-off:
optimized layers can become harder to edit later. If you need to edit after optimizing, look for:
Filters > Animation > Unoptimize.
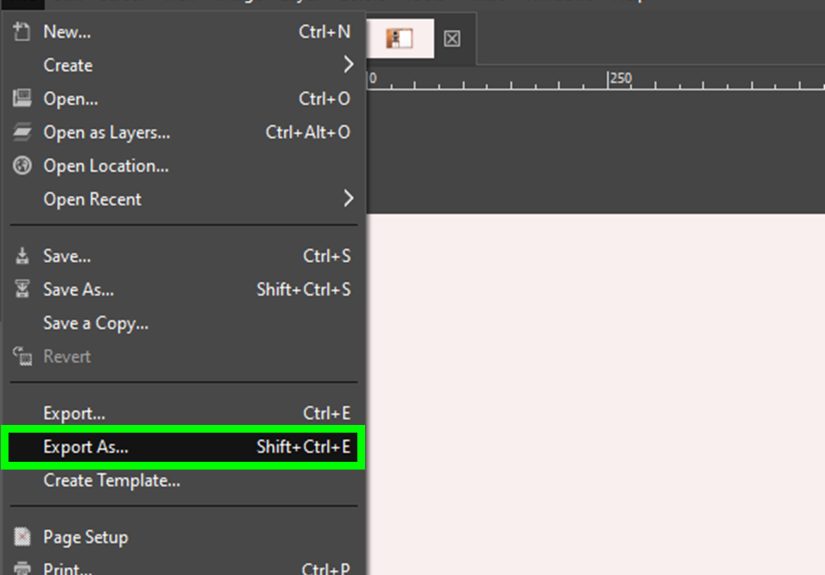
Step 8: Export as a GIF (the “As Animation” checkbox is the whole game)
- Go to File > Export As…
- Name your file ending in .gif (example:
my-animation.gif) - Click Export.
- In the export options window, check As animation.
- Choose whether to Loop forever (usually yes for web GIFs).
- Set Delay between frames where unspecified (start with 80–120 ms; adjust based on feel).
- Decide what to do for frames “where unspecified” on disposal (common choice: One frame per layer (replace)).
- Click Export again to finish.
Now open the exported GIF in a browser (Chrome/Edge/Firefox) for a real-world preview.
Some image viewers don’t animate GIFs reliably, so the browser test is the truth serum.
Method 2: Make a GIF from an Existing GIF (Edit, Fix, or Remix)
GIMP can open an animated GIF and treat its frames as layers.
- Go to File > Open… and choose your GIF.
- Each frame appears as a layer.
- Edit layers (add text, clean up, remove frames, reorder layers).
- Preview with Filters > Animation > Playback.
- Export again using File > Export As… and check As animation.
If the GIF you opened looks “weird” (like layers don’t match thumbnails), it may be optimized.
Use Filters > Animation > Unoptimize to make editing easier.
Method 3: Make a GIF from a Video (The Realistic Way)
GIMP is fantastic for image-based animation, but it’s not a full video editor timeline.
The usual workflow is:
- Extract frames from your video into a folder of sequential images (PNG/JPG).
- Open as layers in GIMP (File > Open as Layers…).
- Adjust timing using a default delay or per-layer delays.
- Export as GIF.
If your goal is a short “clip GIF” for social media, consider trimming the video first.
A 2–4 second loop usually looks better (and loads faster) than a 12-second epic.
Quality Control: Make Your GIF Look Good (Not Like a Microwave Screenshot)
Tip 1: Resize before you export
If file size is a concern, resizing is the biggest lever. Try:
Image > Scale Image… and reduce width/height.
Even dropping from 1000px to 800px can shrink the GIF significantly.
Tip 2: Reduce frames (your audience can’t count at 24 FPS anyway)
Many GIFs look fine at 8–12 frames per second. If you extracted 200 frames from a video,
consider keeping every 2nd or 3rd frame to reduce weight.
Tip 3: Choose sane delays
A common web-friendly range is 60–150 ms per frame. Faster can look chaotic;
slower can feel like a slideshow. For punchlines or “look here!” moments, increase the delay
on the final frame (for example, 800–1200 ms).
Tip 4: Use (replace) unless you intentionally want stacking
If you see ghost trails, flicker, or leftover artifacts, the disposal method may be the culprit.
Using (replace) (or selecting “one frame per layer (replace)” during export) usually fixes it.
Troubleshooting: Common GIF Problems and Fixes
“My GIF plays backwards.”
Reorder layers. In many setups, the bottom layer plays first. Drag layers in the Layers panel until playback looks right.
“It’s way too fast / way too slow.”
Adjust the export delay (for frames where unspecified) or add per-layer delays like (120ms).
Preview again in Filters > Animation > Playback.
“The colors look bad or banded.”
GIF color limits are real. If the animation is photo-heavy, consider:
reducing the size, simplifying the scene, or using fewer colors (graphics/text work best).
If you need high fidelity, a short MP4/WebM may be a better format than GIF for the web.
“My file is HUGE.”
- Scale the image down (Image > Scale Image…).
- Reduce the number of frames (keep every 2nd/3rd frame).
- Use Optimization filters (Filters > Animation > Optimize…).
- Shorten the loop (2–4 seconds is often enough).
“Editing got weird after optimizing.”
That’s normal. Optimization changes how frames store pixels. Use
Filters > Animation > Unoptimize to return to easier-to-edit layers.
A Quick, Concrete Example (So It Clicks)
Let’s say you want a simple “before/after” cleaning GIF:
- Take 6 photos as you clean a desk (same angle, same lighting).
- Resize them all to 800px wide.
- File > Open as Layers… and select all 6 images.
- Order layers so the mess is first, then gradually cleaner frames.
- Rename the last layer to include a longer pause:
Final (900ms) (replace). - Preview (Filters > Animation > Playback).
- Export as GIF, check As animation, loop forever, set default delay to 120ms.
Result: a satisfying loop that loads quickly and tells a story without a single word. (The internet loves that.)
My “Been-There” GIF-Making Experiences (500+ Words of Real-World Lessons)
If you’ve never made a GIF in GIMP before, here are the most common “ohhhh, that’s why” moments people run into
and what they usually learn after a couple of exports and one dramatic sigh.
1) The layer order surprise. Almost everyone assumes the top layer plays first because it’s “on top.”
Then the exported GIF starts with the ending frame, and you’re sitting there like,
“Did my animation just spoil itself?” The practical lesson: don’t treat the layer stack like a to-do list.
Treat it like a deck of cards you’re flipping through. When in doubt, previewbecause the Layers panel is honest,
but it’s not always intuitive.
2) Timing is a vibe, not a number. People often pick a delay like 20ms because “faster is smoother,”
then wonder why their GIF looks like it’s trying to escape the screen. A GIF doesn’t need cinematic frame rates to feel smooth.
Many web GIFs look great at 8–12 FPS. The “feel test” matters: does it read clearly? Do viewers have time to process it?
A smart trick is to keep most frames quick (like 80–120ms) and let your final frame linger longer (800–1200ms)
so the message lands before the loop restarts.
3) “Why is my GIF 22MB?” Because GIFs are deceptively expensive when you combine big dimensions,
lots of frames, and a busy scene. People learn fast that file size is basically a three-headed monster:
resolution, frame count, and visual complexity. If your frames include lots of moving textures
(like tree leaves, noise, or scrolling text), compression has a hard time. The “adult” solution is to shrink the image,
reduce frames, and simplify the scene. The “chaotic” solution is to upload it anyway and let your website’s performance
score cry quietly in the corner. Choose wisely.
4) Optimization is awesome… until you need to edit. GIMP’s animation optimization can dramatically cut file size,
which feels like magic. Then you try to edit a frame and realize half the layer is transparent because the optimized version only stores
what changed. That’s not a bug; it’s the point. The real-world workflow lesson: keep an editable version (like an XCF project),
and treat optimization like the “final export polish,” not step two.
5) The “ghost trail” problem. When frames don’t fully replace each other, you can get leftover pixels from previous frames
that look like a haunted slideshow. People often fix this by switching to (replace) or choosing “one frame per layer (replace)”
in the export options. It’s one of those settings you don’t think about until you absolutely have tolike a spare tire.
The biggest takeaway is simple: GIMP GIF-making is easy once you accept the rules of the universe it uses:
layers are frames, delays are either global or embedded in layer names, and exporting is where the animation settings actually “become real.”
After that, the process stops feeling like mystery software and starts feeling like a reliable little factory for loops.
Conclusion
Making a GIF in GIMP is mostly about three things: stacking frames as layers, getting timing right, and exporting with “As animation”
turned on. Once you’ve done it once, you’ll start seeing GIF opportunities everywheretutorial snippets, product demos, quick reactions,
and satisfying before/after transformations.
Keep your frames consistent, preview before exporting, and remember: if your file size gets out of hand,
resize and reduce frames first. Your GIF can be hilarious and lightweight. The dream.