Table of Contents >> Show >> Hide
- What Makes an Anthropologie-Inspired Mirror Look Expensive?
- Pick Your “Anthro Mirror” Style
- Materials and Tools Checklist
- Step-by-Step: Primrose-Style Anthropologie Inspired Mirror DIY
- Step 1: Plan Your Size and Shape
- Step 2: Clean, Scuff, and Protect
- Step 3: Build the Outer Frame (Two Methods)
- Step 4: Create the “Arched Crown” Detail
- Step 5: Add the Signature Inner Detail (Pearls/Beads)
- Step 6: Fill Gaps, Then Sand for a Seamless Look
- Step 7: Paint a Dark Base Coat (Optional, But It Helps)
- Step 8: Apply an Antique-Gold Finish (Rub ’n Buff Method)
- Step 9: Cure, Touch Up, and Clean the Glass
- The Finishing Tricks That Make It Look Legit
- Hanging and Mounting Safely (Because Gravity Is a Hater)
- Customization Ideas That Still Look High-End
- Common Mistakes (and Easy Fixes)
- FAQ
- Real-World Maker Experiences (Add-On: What It’s Like Doing This DIY)
- Conclusion
- SEO Tags
You know that moment when you see an Anthropologie mirror and your brain goes, “That’s gorgeous,” while your wallet goes,
“Absolutely not”? Same. The good news: you can recreate that luxe, vintage-gilded vibe at home for a fraction of the price
and you don’t need to be a professional woodworker (or a wizard with a gold-leaf brush).
This guide walks you through a beginner-friendly, budget-smart “Anthro-inspired” mirror DIYespecially the popular
arched, ornate “Primrose-style” lookusing accessible materials like trim, flexible edging, appliqués, and an antique-gold finish
that sells the whole illusion. We’ll also cover safety, hanging hardware, and the small details that make your mirror look
“boutique” instead of “middle school craft fair (affectionate).”
Quick note: This is an inspired DIY (a “dupe”), not an official Anthropologie project. You’re recreating the aesthetic:
ornate curves, warm metallic finishes, and charming vintage vibeswithout the designer price tag.
What Makes an Anthropologie-Inspired Mirror Look Expensive?
Most Anthropologie-style statement mirrors share a few design “tells.” If you nail these, the mirror reads high-endeven if you built it
in your driveway with a tube of glue and a dream.
- A distinctive silhouette: arched top, scalloped edges, or a dramatic “crown” detail.
- Ornamental depth: layered trim, carved appliqués, bead/pearl accents, or molded details.
- Patina-friendly metallic finish: antique gold that’s warmer and less “spray-painted trophy.”
- Proportions that feel intentional: a wider top, centered crest, and balanced side details.
Pick Your “Anthro Mirror” Style
There’s more than one way to get the Anthropologie look. Choose the version that matches your tools, budget, and patience level.
(No judgment if your patience level is “snack break after every step.”)
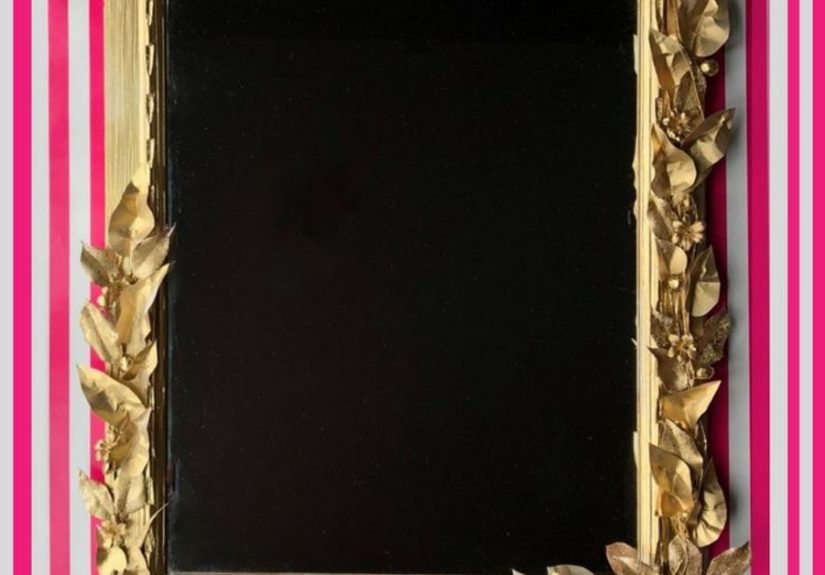
Option A: Primrose-Style Arched Mirror (Most Popular)
This is the showstopper: an arched frame, decorative trim, and optional “pearls” or beading around the inner edge.
It’s dramatic, vintage, and looks like it belongs above a fireplace or in an entryway where it can quietly intimidate your other decor.
Option B: Beaded-Edge Glam Mirror (Simpler, Still Stunning)
If you want the sparkle without the sawdust, go for a basic mirror + a beaded or dotted perimeter detail. This approach is fast,
beginner-friendly, and relies heavily on the finish to look expensive.
Option C: Windowpane/Trumeau-Inspired Mirror (Architectural Look)
Love that European, antique-shop vibe? Add “mullions” (thin trim strips) across the mirror to mimic window panes, then finish in an aged gold.
It feels custom and architecturallike your mirror has a passport.
Materials and Tools Checklist
Below is a flexible shopping list. You don’t need every itemjust what fits your chosen style.
Core Materials
- Mirror: thrifted mirror, frameless builder-grade mirror, or a new simple mirror in your preferred size.
- Backing board (optional but helpful): thin plywood or MDF cut slightly larger than the mirror for stability.
- Trim/molding: picture frame molding, base cap, or decorative trim for the outer frame.
- Ornamental appliqués (optional): resin/wood decorative pieces for the “vintage crest” look.
- Flexible edging (optional): bendable trim or flexible edge guard for curved/arched details.
- Beads/pearls (optional): stick-on pearls, half-round beads, or decorative nail heads.
Adhesives and Finishes
- Mirror-safe adhesive: use products specifically rated for mirrors if bonding to surfaces (mirror mastic/mirror adhesive).
- Strong craft adhesive: E6000-style glue is popular for trim and embellishments (use with ventilation).
- Paint: black or deep brown base coat (spray paint or brush-on) for depth under gold.
- Antique-gold finish: Rub ’n Buff (or similar metallic wax) for that “expensive patina” look.
- Optional topcoat: a clear wax or sealer (test firstsome sealers dull metallic finishes).
Tools
- Measuring tape, pencil, level
- Painter’s tape, drop cloth, microfiber cloth
- Clamps (very helpful), disposable gloves
- Miter saw or miter box (only if cutting wood trim)
- Sandpaper (120–220 grit) or sanding sponge
Safety note for teens (and honestly everyone): If your build involves glass handling, power tools, or a heavy mirror,
ask an adult to help. Mirrors are not the place to “learn by dropping it.”
Step-by-Step: Primrose-Style Anthropologie Inspired Mirror DIY
This method creates the classic arched “Primrose-style” look with layered trim, optional pearls, and a rich antique-gold finish.
You can do it on an existing mirror (fast) or build a frame on a backing board (more stable).
Step 1: Plan Your Size and Shape
Decide where the mirror will live first (entry, vanity, mantel). Measure your wall space and choose a mirror size that looks intentional.
For the arched top, you have three common routes:
- Easiest: start with a mirror that already has an arch.
- Simple upgrade: keep a rectangular mirror but add an arched “crown” piece above it (the eye reads the silhouette as arched).
- Most custom: mount mirror on a backing board and build an arched frame over the top portion.
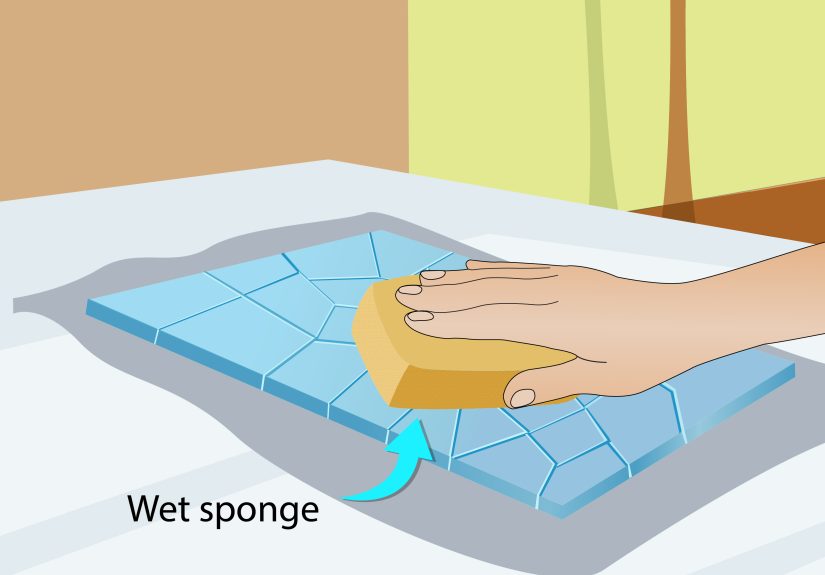
Step 2: Clean, Scuff, and Protect
Clean the mirror thoroughly (glass cleaner or rubbing alcohol). If you’re gluing to the mirror surface, lightly scuff only the areas
where embellishments will go so adhesives grip better. Then mask off the glass near the working edge with painter’s tape or a protective cover.
Step 3: Build the Outer Frame (Two Methods)
Method A: Frame directly on an existing mirror (quickest)
- Measure the mirror’s height and width.
- Cut picture-frame molding for the sides and bottom (mitered corners look most “store-bought”).
- Dry-fit the trim pieces around the mirror to confirm alignment.
- Glue the trim in place and clamp while curing (follow your adhesive’s cure time).
Method B: Frame on a backing board (sturdier for larger builds)
- Cut a backing board about 1/2–1 inch wider than the mirror on all sides (or to your desired frame width).
- Attach the mirror to the board with mirror-safe adhesive or mechanical supports, depending on weight.
- Build the trim frame on top of the board around the mirror edge.
Pro tip: If your trim will reflect in the mirror at certain angles (especially at the bottom),
paint or finish both sides of the trim so the reflection doesn’t reveal raw wood.
Step 4: Create the “Arched Crown” Detail
This is the detail that turns “nice DIY mirror” into “excuse me, who let this fancy thing into the room?”
- Find a decorative center appliqué (often a floral or crest shape) for the top middle.
- Add two smaller appliqués or trim shapes on either side to create a gentle arch impression.
- If using flexible edging, run it along the outer edge to create a smooth curved line.
- Dry-fit everything before gluing so the top looks symmetrical (symmetry = instant “designer”).
Step 5: Add the Signature Inner Detail (Pearls/Beads)
The dotted inner edge is one of the easiest “Anthro tells.” You can use self-adhesive pearls, half-round beads, or even tiny craft domes.
- Mark spacing lightly with pencil if you want perfect consistency.
- Apply pearls around the inner edge; reinforce with a strong adhesive if the peel-and-stick feels weak.
- Let dry fully before painting or gilding. Rushing here leads to the dreaded “bead avalanche.”
Step 6: Fill Gaps, Then Sand for a Seamless Look
Use wood filler (for wood-on-wood seams) or a paintable filler for small gaps. Once dry, sand lightly so everything reads as one cohesive frame.
This is the boring step that makes the final photos look expensive.
Step 7: Paint a Dark Base Coat (Optional, But It Helps)
For an antique finish with depth, start with a dark base coatblack or deep brown. It creates shadow in crevices and makes metallic wax look
more like aged brass than shiny spray paint. Let the paint dry completely.
Step 8: Apply an Antique-Gold Finish (Rub ’n Buff Method)
Rub ’n Buff is a waxy metallic finish that you apply in thin layers and buff to sheen. It’s popular because it looks “real” and highlights texture.
Use a glove, soft cloth, or a small makeup brush for control.
- Put a tiny amount on a paper plate (seriouslytiny). You can always add more.
- Work in small sections, especially on detailed trim.
- Hit raised areas more heavily and let the dark base peek through in crevices for patina.
- Buff lightly with a clean cloth for a soft glow.
Want it less “new gold” and more “found in a French attic”? Use a brush to “dry rub” edges and high points,
leaving deeper areas darker. It’s basically contouring, but for furniture.
Step 9: Cure, Touch Up, and Clean the Glass
Let everything cure according to your adhesives and paints. Then remove masking tape and clean the mirror with a microfiber cloth.
If a little wax got on the glass, you can usually remove it gently with a razor scraper held at a safe angle (go slow).
The Finishing Tricks That Make It Look Legit
1) Layered “Golds” Look More Real Than One Perfect Coat
Antique finishes are rarely uniform. If you have time, build dimension:
a dark base, a warm gold layer, and optional lighter highlights on raised edges.
2) Focus Shine Where Light Naturally Hits
Put more metallic wax on the outer edges and top crest where light lands first. Keep inner corners slightly darker.
It reads like age and depth instead of fresh paint.
3) Don’t Skip the Back Side of Reflective Trim
If the trim is visible in the reflection, an unfinished backside can show up like an accidental “behind-the-scenes” blooper.
A quick coat on the back prevents that.
Hanging and Mounting Safely (Because Gravity Is a Hater)
A beautiful mirror is great. A beautiful mirror that stays on the wall is even better.
For larger mirrors, prioritize mechanical hanging methods (D-rings, cleats) over “sticky solutions.”
Best Hanging Options
- D-rings + wall hooks: common for framed mirrors; measure carefully so it hangs level.
- French cleat: excellent for heavy or wide mirrors; distributes weight and sits flush.
- Mirror clips: useful for frameless mirrors and certain installations.
If You’re Bonding a Mirror to a Surface
Use an adhesive specifically rated for mirrors (mirror mastic / mirror adhesive). Some adhesives can damage mirror backing over time.
Follow the product label and avoid sealing the edges fullyairflow behind the mirror helps prevent moisture issues.
Safety reminder: If the mirror is large or heavy, get help lifting and positioning it.
Use anchors or studs as recommended for your wall type, and choose hardware with a weight rating that exceeds your mirror’s weight.
Customization Ideas That Still Look High-End
- Cool-girl vintage: antique gold with subtle dark rub in corners for patina.
- Modern glam: brighter gold, cleaner edges, minimal distressing.
- Old-world romance: add floral appliqués in corners and a heavier crest at top.
- Soft cottage: champagne gold + warm white wash for a gentler glow.
- Architectural: add thin trim strips across the glass for a windowpane mirror effect.
Common Mistakes (and Easy Fixes)
Mistake: The frame looks “flat”
Fix: Add a second layer of trim or highlight raised edges with a lighter gold. Depth = expensive.
Mistake: Your pearls aren’t evenly spaced
Fix: Lean into “handmade charm” or reset them by working in short sections using a spacer (like a popsicle stick or coin).
Mistake: Glue smudges on the glass
Fix: Let glue fully cure first. Many strong craft adhesives can be carefully peeled or rubbed off once dry.
Always test a small spot before going aggressive.
Mistake: The mirror doesn’t hang level
Fix: Re-check D-ring placement and use a level. If the mirror is wide, a French cleat is often more forgiving and stable.
FAQ
How much does an Anthropologie inspired mirror DIY cost?
If you thrift a mirror and keep trim simple, many makers land in the $30–$120 range depending on size and how ornate you go.
The finish and details do the heavy lifting, not the price tag.
Do I need power tools?
Not necessarily. You can use pre-cut trim, flexible edging, and decorative appliqués to create an ornate look without a saw.
If you do cut wood, a miter box is a beginner-friendly alternative to a miter saw.
Can I use acrylic instead of glass?
Acrylic mirror sheets are lighter and safer to handle, but they scratch more easily and reflections can be slightly less crisp.
For kids’ rooms or high-traffic areas, acrylic can be a smart choice.
Real-World Maker Experiences (Add-On: What It’s Like Doing This DIY)
If you’ve never tried an “Anthro-inspired mirror” project before, here’s the part nobody warns you about: it’s not one big taskit’s a
series of tiny “wow” moments interrupted by occasional glue-related drama. The first time you dry-fit your trim and see the silhouette take shape,
you’ll feel unstoppable, like you should start charging for consultations. Then you’ll notice one corner is 1/8 inch off and suddenly you’re
crouched on the floor whispering, “Why are angles like this?”
One of the most common experiences makers share is how much the finish changes everything. Before the gold goes on, your mirror may look
like a science project: mismatched trim, filler spots, painter’s tape everywhere, and a suspicious number of clamps. The moment you apply antique gold
over a dark base, the frame suddenly “clicks” into that boutique look. It’s the DIY equivalent of putting on a great jacket and instantly becoming
the main character.
Another universal moment: realizing that symmetry is both important and slightly personal. Even people who “don’t care about perfection” often find
themselves measuring the crest placement five times. The trick that saves sanity is stepping back frequentlylike, across the room back. Up close,
you’ll obsess over a tiny spacing difference; from normal viewing distance, your eyes mostly read the overall shape and shine.
Glue decisions also become oddly emotional. Too little glue and things feel flimsy. Too much glue and you’re scraping smears off the glass while
promising yourself you’ll be “neater next time.” Many makers end up loving clamps more than they expectedclamps are basically extra hands that don’t
get bored and check their phone mid-project. If you don’t have clamps, painters tape can help hold lighter pieces while curing, but clamps make the
whole process feel calmer and more controlled.
Then there’s the “gold hand” phenomenon: once you’ve used metallic wax or antique gold paint successfully, you start looking around your house like a
friendly pirate. Picture frames? Gold. Curtain rod brackets? Gold. Random thrift store candlestick? Absolutely gold. It’s not even about copying a
specific mirror anymoreit’s about realizing you can create warmth and vintage character with a few smart layers and a light touch.
Finally, hanging the mirror is usually where people feel the most proudbecause it’s the moment the project becomes part of the room. The mirror
catches light, reflects the space, and suddenly your entryway/bedroom/living room looks like it has a curated focal point. And every time someone
asks, “Where did you get that?” you get to smile and say, “Oh, I made it.” (Pause for dramatic effect. Optional hair flip.)
Conclusion
An Anthropologie inspired mirror DIY is one of those rare projects that looks wildly high-end without requiring a wildly high-end budget. Focus on the
silhouette, add layered trim or appliqués for depth, and finish with a warm antique gold that highlights details instead of drowning them. Take your
time with prep and symmetry, hang it safely, and you’ll end up with a statement piece that looks like it wandered out of a charming boutique
and decided to live at your place instead.