Table of Contents >> Show >> Hide
- Why Recycled Tin Can Pen and Pencil Holders Are Genius
- Supplies You’ll Need
- Step-by-Step: How to Make Tin Can Pen and Pencil Holders
- Design Ideas for Different Styles
- Smart Ways to Use Your Tin Can Pen and Pencil Holders
- Care and Maintenance Tips
- Real-Life Experiences and Extra Tips for Making Tin Can Pen and Pencil Holders
- Conclusion
If your desk looks like a stationery tornado just touched down, this DIY project is about to become your new best friend. Turning recycled tin cans into pen and pencil holders is a simple, budget-friendly way to organize your workspace, keep clutter in check, and give those cans a second life instead of sending them straight to the trash. Plus, it’s one of those easy crafts that looks way more “Pinterest” than “preschool,” even though kids can totally help.
Upcycling everyday containers into organizers is a classic trick on home and craft sites. DIY and home improvement publications often highlight tin cans as perfect candidates for repurposing because they’re sturdy, easy to decorate, and already roughly the right size for pens, pencils, markers, and paintbrushes. Many craft experts recommend adding a bit of fabric, rope, or jute around the cans for a chic, minimalist look that’s still eco-friendly.
In this guide, you’ll learn how to safely prepare your cans, decorate them in a bunch of different styles, and even assemble them into full-on desk organizers. We’ll also go into real-life tips and “I tried this and totally messed up” experiences so you can skip the fails and go straight to the cute desk glow-up.
Why Recycled Tin Can Pen and Pencil Holders Are Genius
Before we dive into the step-by-step tutorial, let’s talk about why pen and pencil holders from recycled tin cans are such a smart DIY idea:
1. You save money and reduce waste
Nice desk organizers can be surprisingly expensive. Using recycled tin cans costs basically nothing beyond paint or paper. Meanwhile, you’re keeping metal cans out of the landfill and teaching kids (or yourself) how fun it can be to reuse everyday items instead of tossing them. Many family-oriented DIY and craft resources lean on this kind of upcycling as an easy entry point into eco-friendly living.
2. The cans are sturdy and long-lasting
Compared to cardboard cups or flimsy plastic containers, tin cans are surprisingly durable. They won’t collapse under a pile of markers or crack if someone knocks them off the desk. With a bit of sanding around the rim and possibly some felt on the bottom, they can last for years.
3. Endless decorating possibilities
Spray paint, acrylic paint, washi tape, jute twine, scrapbook paper, fabric, decoupage, chalkboard labelstin cans handle them all. Lifestyle and home décor sites love featuring tin can crafts because you can match any style: farmhouse, modern, minimalist, boho, colorful kids’ room, you name it.
4. Great for kids’ crafts and classroom projects
Recycled tin can pencil holders fit right in with kid-friendly recycled craft ideas you’ll see in parenting and craft magazines. They’re a perfect Earth Day, classroom, or rainy-day project: kids can paint, glue on paper, or add stickers while adults handle any sharp edges or spray paint.
Supplies You’ll Need
You don’t need a fancy craft room to make your own recycled tin can pen and pencil holders. Start with what you already have at home and add a few simple extras as needed.
Basic materials
- Clean, empty tin cans (soup, beans, tomatoes, or even tuna cans for shorter holders)
- Warm, soapy water and a sponge or dish brush
- Old towel or dish cloth for drying
- Fine-grit sandpaper or a metal file (for gently smoothing any rough edges)
Decorating options
- Acrylic paint or spray paint (look for paint that adheres to metal)
- Paintbrushes or foam brushes
- Primer suitable for metal (for better coverage and durability)
- Patterned paper or scrapbook paper
- Fabric scraps, burlap, or jute twine (popular suggestions for a chic, eco look)
- Mod Podge or white glue (for decoupage and paper wrapping)
- Hot glue gun and glue sticks
- Stickers, labels, or chalkboard tags
- Ribbon, lace, or washi tape for trim
- Felt pads or felt squares (for the bottom so your desk doesn’t get scratched)
Optional extras for desk organizers
- Small wood board or tray to mount multiple cans
- Wood stain or paint (to finish the base)
- Strong adhesive or screws (if you want a heavy-duty organizer)
Step-by-Step: How to Make Tin Can Pen and Pencil Holders
Step 1: Prep your cans (safety first!)
Start by removing the labels and thoroughly washing the cans with warm, soapy water. Let them soak for a few minutes if the labels are stubborn, then peel them off and scrub away any glue residue.
Next, check the rim. Many home and hardware sources recommend filing or sanding sharp metal edges on any repurposed container. Run your finger gently along the inside edge; if it feels rough or sharp, use fine-grit sandpaper or a metal file to smooth it out. You can also cover the rim later with tape, rope, or folded-over fabric if you want extra protection.
Step 2: Add primer (optional but highly recommended)
If you’re planning to paint the cans, especially with lighter or pastel colors, apply a light coat of primer made for metal. This helps the paint stick better and prevents chipping. Let the primer dry fully according to the instructions on the can.
Step 3: Paint your base color
Now for the fun part. Apply your base color using acrylic paint and a brush, or spray paint for a smoother finish. Thin coats are better than one heavy coatthis prevents drips and gives a more polished look. Let each coat dry thoroughly before adding another.
If kids are helping, acrylic paint and brushes are usually safer than spray paint. Save the spray painting for a well-ventilated outdoor area when only adults are involved.
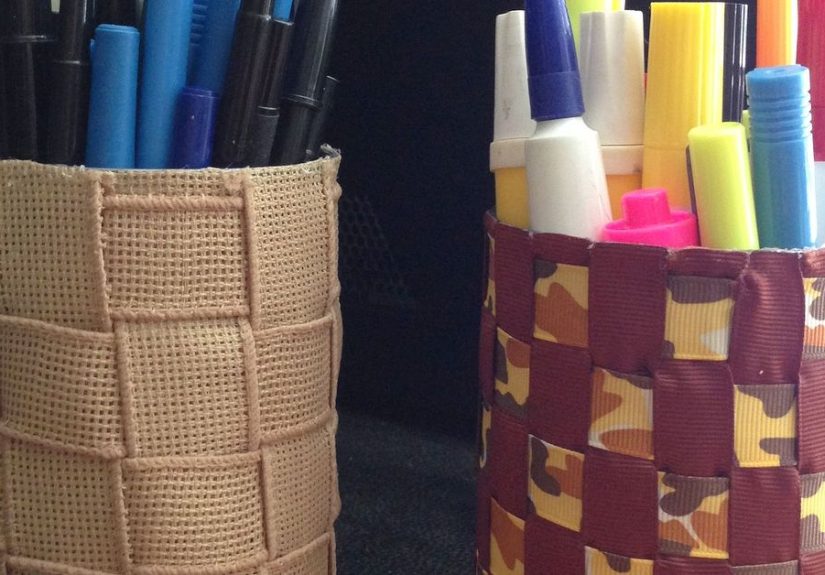
Step 4: Wrap with paper, fabric, or jute
While you can totally stop at painted cans, wrapping them takes the look from “I just finished eating soup” to “I bought this at a cute home boutique.” Some upcycling pros recommend wrapping soda or tin cans in fabric, jute, or burlap for a clean, modern look that also adds texture.
- Paper wrap: Cut scrapbook paper to fit the height and circumference of your can. Use Mod Podge or white glue to attach it, smoothing out bubbles as you go. Seal with another light coat of Mod Podge.
- Fabric wrap: Cut fabric slightly taller than your can so you can fold it over the rim. Use hot glue or strong craft glue to secure it, working in small sections. Fold the extra fabric over the top edge to cover the rim.
- Jute or rope wrap: Starting at the bottom, add a line of hot glue and press the jute into it, wrapping upward in tight coils. This gives your pen and pencil holders a stylish, earthy vibe that looks great on modern, farmhouse, or boho desks.
Step 5: Add details and labels
Once your base and wrap are done, it’s time to personalize. You can:
- Add washi tape stripes or borders.
- Glue on ribbon, lace, or trim around the top and bottom.
- Use letter stickers or vinyl to label the cans (e.g., “Pens,” “Markers,” “Highlighters”).
- Attach chalkboard labels so you can relabel whenever your supply stash changes.
Step 6: Protect your desk
To keep your desk surface scratch-free, glue felt pads or a felt circle onto the bottom of each can. This is a small touch, but it makes your DIY pen and pencil holders feel more like store-bought accessories.
Design Ideas for Different Styles
One of the best things about recycled tin can pen and pencil holders is how easily you can adapt them to your style. Here are some themed looks inspired by the kinds of craft and décor projects often featured in home magazines and DIY sites.
1. Minimalist black-and-white
Paint your cans in matte white, then add thin black stripes or simple geometric shapes using painter’s tape as a stencil. Label with clean, sans-serif stickers. This style looks great in a modern home office or teen room.
2. Farmhouse and rustic
Wrap cans in burlap or jute, then add a small chalkboard label on the front. You can also lightly dry-brush white paint over the jute to give it a weathered, vintage feel. Cluster three or four on a wooden tray for a coordinated desk caddy.
3. Colorful kids’ craft holders
Let kids choose bright acrylic paints and go wild with stripes, dots, and doodles. Add stickers of their favorite characters or themes (dinosaurs, space, animals). These recycled tin can pencil holders are perfect for homework corners or playrooms and can double as a teaching moment about recycling and Earth Day.
4. Boho or artsy studio cans
Use jewel-tone paints, metallic accents, and maybe a mix of washi tape and twine. These look especially nice holding paintbrushes, colored pencils, or markers in a creative studio space.
5. Desk organizer board
Mount several cans vertically or diagonally on a painted wood board to create a wall-mounted organizer. This keeps your workspace clear while giving you lots of storage for pens, scissors, rulers, and other supplies. Variations of wall-mounted container organizers are often featured in “small space solutions” roundups.
Smart Ways to Use Your Tin Can Pen and Pencil Holders
- Home office: Sort pens, pencils, highlighters, scissors, and sticky notes into separate cans so everything has its place.
- Kids’ art station: Use a row of cans on a tray for crayons, markers, colored pencils, glue sticks, and paintbrushes.
- Craft room or studio: Store paintbrushes, knitting needles, crochet hooks, or small tools.
- Classroom: Teachers can use labeled cans at each table or station to keep supplies organized and accessible.
- Entryway drop zone: Use a small can for pens and another for keys or sunglasses, all on a pretty tray near the door.
Care and Maintenance Tips
Good news: your recycled tin can pen and pencil holders are low maintenance. But a few simple habits can keep them looking fresh:
- Wipe the cans occasionally with a damp cloth to remove dust.
- Avoid soaking fully wrapped cans (especially paper-wrapped ones) in water.
- If you used acrylic paint, consider adding a clear sealer for extra durability.
- For heavily used kids’ organizers, choose darker colors or patterned paper that hides smudges and marker marks.
Real-Life Experiences and Extra Tips for Making Tin Can Pen and Pencil Holders
Now let’s talk about what really happens when you sit down with a stack of recycled cans, a pile of craft supplies, and big dreams of having the most organized desk on the planet.
1. Prep is boring, but skipping it is worse
Most people are tempted to rinse the can quickly, slap on some paint, and call it a day. That’s usually when the paint starts peeling within a week. Taking time to thoroughly clean, dry, and lightly sand the metal makes a huge difference. If you’ve ever watched paint slide off a glossy surface or chip away when someone drops a pen in too hard, you know how frustrating it is. A light sanding and primer layer feel like extra work, but they pay off with smooth, durable color.
2. Your first can is a test run
If you’re making several tin can pencil holders, use the first one as your “practice can.” Try out your paint color, experiment with how much glue you need for paper or fabric, and test any labels. That way, if something goes wronglike a weird bubble in the paper or paint dripsyou’ve lost exactly one can, not your entire matching set.
3. Kids love this project (but adults do the sharp stuff)
When kids get involved, the energy levels go way up and so does the mess. That’s part of the fun. The key is to divide jobs by age and skill level. Adults should handle anything involving sharp edges, spray paint, or hot glue. Kids can wash cans, pick colors, paint, and decorate with stickers or markers. Giving them ownershiplike letting each child design their own recycled tin can pen holdermakes them more excited to actually put their pencils away later.
4. Matching sets look more intentional
One of the quickest ways to make your recycled organizers look high-end: repeat a color palette or pattern. You don’t have to make every can identical, but using the same three colors, type of fabric, or style of label ties everything together. For example, you might choose white, black, and kraft brown with a touch of gold. Even if each can is slightly different, the overall look feels coordinated instead of random.
5. Tiny tweaks solve common annoyances
A few little details can make everyday use more pleasant:
- If pens rattle loudly in the can, add a thin layer of felt inside the bottom.
- If cans slide around on your desk, attach them to a tray or wooden base.
- If the rim still feels sharp after sanding, cover it with folded fabric, jute twine, or electrical tape under your decorative layer.
- If labels keep falling off, switch to chalkboard labels or paint a small chalkboard square directly onto the can.
6. They make surprisingly good gifts
Recycled tin can pen and pencil holders might not sound like a “gift” at first, but once they’re dressed up, they can be a thoughtful, practical present. Fill one with nice pens, a notebook, and a small plant and you’ve got a ready-made teacher gift or coworker welcome kit. Because the cans are made from recycled materials, they also send a subtle message about sustainability, which many people appreciate.
7. The more you make, the more ideas you’ll get
Like many simple DIY projects, this one has a snowball effect. Once you’ve made a few desk organizers from recycled tin cans, you’ll start spotting new uses for them everywhere: makeup brush holders, utensil caddies for parties, paintbrush stands, even mini planters (with proper drainage). It’s easy to see why so many craft and home décor sources keep coming back to upcycled cans as a go-to projectthey’re endlessly adaptable, inexpensive, and ideal for both beginners and experienced DIYers.
So the next time you open a can of beans or soup, don’t just rinse and recycle. Rinse, repurpose, and enjoy the satisfaction of turning trash into a tidy, stylish home for your pens and pencils.
Conclusion
Making pen and pencil holders from recycled tin cans is one of those rare DIY projects that checks every box: it’s simple, budget-friendly, kid-friendly, eco-conscious, and surprisingly stylish. With a few basic supplies and a bit of creativity, you can transform ordinary cans into custom organizers that match your décor and keep clutter at bay.
Whether you go for minimalist black-and-white, rustic jute-wrapped cans, or bright kids’ designs covered in stickers, these DIY holders prove you don’t need expensive organizers to have a neat, inspiring workspace. Plus, every time you drop a pen into your upcycled tin can pencil holder, you’ll get a small reminder that you turned everyday “trash” into something genuinely useful and beautiful.