Table of Contents >> Show >> Hide
- Pick the Right Beef (This Is 80% of the Battle)
- Shape the Patties Gently (You’re Making Burgers, Not Stress Balls)
- Set Up the Grill Like You Mean It
- How to Grill Burgers (The Method That Works Even When Your Friends Are “Helping”)
- Temperature and Doneness: Use a Thermometer, Not Vibes
- Cheese, Buns, and the Build (Where Good Burgers Become Great)
- Flavor Upgrades That Don’t Turn Your Burger Into Meatloaf
- Troubleshooting: Fix the Usual Burger Crimes
- A Simple “Best Homemade Burger” Blueprint (Plus a Smash Option)
- Real-World Grilling Experiences (The Stuff Recipes Don’t Warn You About)
- Conclusion
A great grilled burger is basically a magic trick: you start with a humble puck of ground beef and end with a juicy, smoky masterpiece that makes everyone forget you once burned corn into charcoal confetti.
The secret isn’t “chef-level” anythingit’s a few smart choices that stack the odds in your favor: the right beef, gentle handling, a hot grill, and a thermometer that doesn’t lie to your face.
One quick safety note before we talk about deliciousness: grilling involves high heat and open flame. If you’re a teen, grill with an adult nearby and keep a clear, uncluttered cooking zone. Great burgers are fun; accidental fire drills are not.
Pick the Right Beef (This Is 80% of the Battle)
If you want the best homemade burgers on the grill, start with beef that actually wants to become a burger. The sweet spot for most backyard grills is
80/20 ground beef (about 80% lean, 20% fat). That fat is your built-in basting system: it helps the burger stay juicy and boosts browning for a better crust.
Go too lean and you’ll spend the cookout apologizing and pointing at the ketchup like it’s a solution.
Best cuts and blends
- Ground chuck: Classic choicebeefy flavor, great fat level.
- Custom blend (optional): Chuck + brisket (and/or short rib) for deeper flavor, if you like to flex.
- Fresh matters: Buy from a butcher you trust or grind your own if you can. Fresher beef usually tastes cleaner and forms patties better.
Keep the meat cold until grilling time. Warm fat smears as you shape patties, which can make burgers dense and more likely to stick or crumble. Cold beef + quick shaping = happy grill day.
Shape the Patties Gently (You’re Making Burgers, Not Stress Balls)
The most common “why is my burger tough?” culprit is over-handling. Treat ground beef like a shy cat: the more you fuss with it, the less it wants to cooperate.
Use light pressure, shape quickly, and stop the moment it holds together.
Size, thickness, and the “bigger than the bun” trick
A reliable backyard standard is 4 to 6 ounces per patty, about 3/4-inch thick.
Make patties about 1 inch wider than your bunsthey’ll shrink a bit as fat renders and proteins tighten.
The dimple (aka “Stop Puffing Up, Sir”)
Press a shallow thumbprint dimple in the center of each patty (about 1/4-inch deep). This helps the burger cook flatter instead of turning into a meatball dome.
If you’ve ever tried to stack toppings on a burger that looks like a UFO, you already understand the value of the dimple.
Seasoning: simple wins (and salt timing matters)
For classic grilled burgers, you rarely need more than kosher salt and black pepper. Here’s the key:
salt the outside just before the patties hit the grill.
Salting too early (especially mixing salt into the meat long in advance) can change texture by dissolving proteins, leading to a firmer, sausage-like bitegreat for breakfast links, less great for burgers.
Want extra flavor without turning your burger into meatloaf? Add it on the outside:
try a pinch of garlic powder, smoked paprika, or a tiny dusting of a steak seasoning blendjust keep it light so the beef still tastes like beef.
Set Up the Grill Like You Mean It
The “best burger patties” aren’t just about the meatthey’re about heat control.
Your goal is a strong sear for crust, plus a safer, gentler zone to finish cooking without scorching the exterior.
That’s why so many pros swear by two-zone grilling.
Two-zone grilling (works on gas or charcoal)
- Charcoal: Bank coals on one side (hot zone) and leave the other side with fewer/no coals (cool zone).
- Gas: Turn one set of burners to high (hot zone) and leave another set on low or off (cool zone).
Preheat, clean, and oil the grates
Preheat with the lid closed so the grates get truly hot. Then clean the grates well and lightly oil them (a folded paper towel dipped in oil, held with tongs, works).
Clean + hot + lightly oiled is the anti-stick trio.
Temperature-wise, many grillers aim for roughly 400–450°F for burgershot enough for crust, controlled enough to avoid turning the outside into charcoal while the inside stays raw.
If you don’t have a grill thermometer, use the “hand test” only as a backup; an inexpensive thermometer is more accurate and less… finger-based.
How to Grill Burgers (The Method That Works Even When Your Friends Are “Helping”)
Here’s the reliable game plan for juicy grilled burgers:
sear over direct heat, then finish to temperature, using the cooler zone if needed.
This reduces flare-ups, improves browning, and keeps the inside from drying out.
Step-by-step: classic thick burgers
- Preheat the grill and set up two zones.
- Season patties generously on both sides with salt and pepper right before grilling.
- Place patties on the hot zone. Close the lid.
- Don’t force the flip. Let them cook 2–4 minutes until they release easily. If they stick, they’re not ready.
- Flip and cook another 2–4 minutes.
- Move to the cooler zone if the outside is browning fast or you get flare-ups.
- Check temperature with an instant-read thermometer inserted from the side into the center.
- Add cheese in the last 30–60 seconds; close the lid to melt.
- Rest burgers 2–3 minutes before building.
About flipping: the “flip once” rule is more tradition than law. Flipping more than once can help even out cooking; flipping once can help develop a strong crust. Either can work.
The real rule is: don’t smash the burgers with your spatula. Pressing squeezes juices out, and no one wants a “crusty sponge” burger.
Temperature and Doneness: Use a Thermometer, Not Vibes
Color is not a reliable doneness test for ground beef. The safest approach is to cook ground beef to
160°F internal temperature. That’s the widely recommended consumer safety target because grinding can move surface bacteria throughout the meat.
If you choose to cook burgers below 160°F, that’s a personal risk decisionreduce risk by using freshly ground beef from a trusted source, keeping everything cold, and avoiding cross-contamination.
For kids, older adults, pregnant people, and anyone immunocompromised, 160°F is the safer standard.
Quick burger temperature guide
| Doneness (common preference) | Internal Temp | Notes |
|---|---|---|
| Medium | ~145°F | Juicy, pink center; not the consumer safety target for store-bought ground beef. |
| Medium-well | ~150–155°F | Less pink, still tender if you don’t overcook. |
| Well-done / Safety target | 160°F | Recommended minimum for ground beef for consumers. |
Pro tip: pull burgers a couple degrees shy of your target if they’re cooking hotthere’s often a small carryover rise as they rest.
Cheese, Buns, and the Build (Where Good Burgers Become Great)
Cheese timing
Add cheese near the endabout the last minutewith the lid closed so it melts fast. American cheese melts like a dream, cheddar brings flavor, and pepper jack shows up like it has something to prove.
Toast the buns (yes, it matters)
Toasted buns are sturdier, tastier, and less likely to turn into a soggy sadness sponge. Butter the cut sides lightly and toast 30–60 seconds over direct heat.
Watch closelybuns go from “golden” to “charcoal briquette” in the time it takes to answer one text.
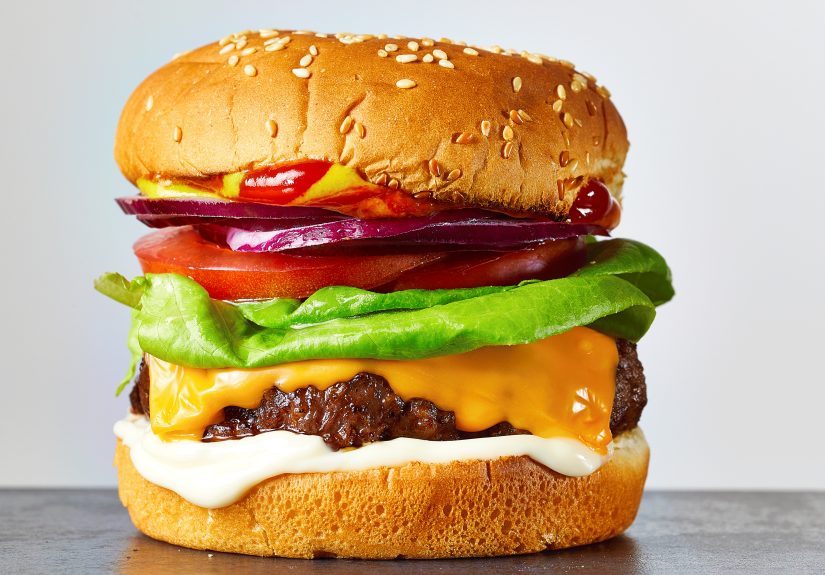
Build for structure, not chaos
- Bottom bun + sauce (mayo-based spreads help seal the crumb)
- Crisp lettuce (a moisture barrier that also adds crunch)
- Burger + cheese
- Tomato/onion/pickles
- Top bun + a little more sauce if you’re feeling bold
Flavor Upgrades That Don’t Turn Your Burger Into Meatloaf
If your burger mix includes eggs, breadcrumbs, and a long emotional backstory, you’ve wandered into meatloaf territory.
A classic grilled burger thrives on simplicity. Still, you can level up without losing the point.
Smart upgrades
- Better beef: a chuck-brisket blend, or freshly ground chuck.
- Smoky boost: add a wood chunk (hickory or oak) to charcoal for subtle smoke.
- Compound butter: a small pat on the finished burger (garlic-herb or chili-lime) tastes fancy with zero effort.
- Pickle strategy: mix chopped pickles into a quick “burger sauce” instead of stuffing them inside the patty.
Troubleshooting: Fix the Usual Burger Crimes
My burgers are dry
- Use 80/20 beef.
- Stop pressing patties.
- Cook to temperature, not time.
- Move to the cool zone to finish instead of blasting over flames.
My burgers are falling apart
- Keep the meat cold; shape quickly.
- Don’t overwork or over-thin the patties.
- Let the first side set and release naturally before flipping.
My grill keeps flaring up
- Use two-zone grilling so you can escape flare-ups.
- Trim excess hanging fat bits (if using blends) and avoid oiling the patties themselves.
- If a flare-up starts, move burgers to the cool side and close the lid briefly.
A Simple “Best Homemade Burger” Blueprint (Plus a Smash Option)
Classic grilled burgers (serves 4)
- 2 pounds 80/20 ground chuck
- Kosher salt and black pepper
- 4 buns (brioche, potato rolls, or classic sesame)
- 4 slices cheese (optional)
- Toppings: lettuce, tomato, onion, pickles
- Sauce: mayo + ketchup + a little mustard + chopped pickles (optional)
- Preheat grill, set up two zones, clean and oil grates.
- Divide beef into 4 patties (8 oz each for big burgers; 6 oz for a more standard size).
- Shape gently, dimple the center, and keep cold until grill is ready.
- Season outside with salt and pepper right before grilling.
- Sear over hot zone 2–4 minutes, flip, 2–4 minutes more.
- Finish on cool zone as needed until the thermometer reads your target temp (160°F for safety target).
- Add cheese in the last minute; toast buns.
- Rest 2–3 minutes, build, and accept compliments gracefully.
Smash burgers on the grill (using a cast-iron griddle or skillet)
If you love a thin, crispy-edged burger, put a cast-iron griddle or skillet on your grill grates and heat it until very hot.
Roll beef into loose balls (2–3 oz each), place on the hot surface, smash firmly with a spatula (use parchment to prevent sticking),
season immediately, and flip once the edges look deeply browned. This method delivers a killer crustjust keep an eye on smoke and grease.
Real-World Grilling Experiences (The Stuff Recipes Don’t Warn You About)
The first time I tried to make “the best grilled burgers,” I treated the grill like a magical meat portal: I put patties on, stared confidently into the middle distance, and assumed greatness would happen.
What actually happened was a trilogy of minor tragediesone burger stuck, one turned into a domed meatball, and one developed a flare-up so dramatic it could’ve auditioned for an action movie.
And yet, that night taught me more than any perfectly staged recipe photo ever could.
Lesson one: your grill has moods. Wind, cold weather, and even how full your propane tank is can change how fast burgers cook.
Now I always do a quick “grill reality check” before the patties go on: lid closed for preheat, a few minutes to stabilize, and a glance at the built-in thermometer (or an external one if your lid gauge is… optimistic).
If I’m cooking for a crowd, I’ll grill one “test burger” firstnot because I don’t trust myself, but because I don’t trust physics.
Lesson two: the prep station is half the meal. When I used to run back and forthmeat in the fridge, buns on the counter, cheese still in the package, spatula mysteriously missingI’d overcook something every time.
These days I set up like I’m hosting a tiny burger TV show: tray for raw patties, tray for cooked burgers, cheese unwrapped, toppings sliced, buns split, tongs and spatula ready, a clean plate for the finished stack.
It’s not fancy; it just keeps you from juggling tasks while heat does its relentless thing.
Lesson three: flare-ups aren’t personal. When fat drips onto flame, fire responds like fire does.
The trick is not panicking and poking the burger into chaos. Two-zone grilling is the quiet hero here.
If flames jump up, I slide the burgers to the cooler side, close the lid for a moment, and let the grill settle down.
The first time I did this, it felt like cheating. The second time, it felt like competence. The third time, I started giving unsolicited “fire management” advice like a backyard wizard.
Lesson four: timing the buns is an art. Burgers can rest for a couple minutes and stay wonderful; buns can burn in a couple seconds and stay burned forever.
So now the buns go on near the endwhen the burgers are nearly done and the cheese is about to melt.
Toasted buns also hold up better to sauces and juices, which means the last bite is just as good as the first (instead of dissolving into a soggy finale).
Lesson five: people remember the “build” as much as the beef. I’ve served perfectly cooked burgers on sad, cold buns with limp lettuce and got polite smiles.
I’ve served very-good (not perfect) burgers with toasted buns, crisp pickles, and a quick sauce and got “Whoawhat did you DO to these?”
The build is where you can win big with small effort. A little crunch, a little tang, a good meltsuddenly your backyard burger tastes like it has a résumé.
And finally, the most freeing lesson: your best burger is the one you can repeat. Maybe that’s a thick burger finished on the cool zone to 160°F.
Maybe it’s a smash burger on cast iron with crispy edges and a simple sauce. Either way, once you find your method, you stop chasing perfection and start enjoying the process.
Which is the whole pointbecause grilling should feel like summer, not finals week.
Conclusion
If you want the best homemade burgers on the grill, focus on the fundamentals:
start with flavorful 80/20 beef, handle it gently, season at the right time, and use two-zone heat so you can sear and finish without stress.
Cook to a safe internal temperature (160°F is the widely recommended target for ground beef), toast the buns, melt the cheese with the lid closed, and build with a little crunch and tang.
Do that, and your burgers won’t just be “good for a cookout”they’ll be the ones people bring up later, like a summer highlight reel.