Table of Contents >> Show >> Hide
- Why Painting Cabinet Doors Is Different From Painting a Wall
- What You Need Before You Start
- Choose the Right Paint for Cabinet Doors
- How to Paint Cabinet Doors Step by Step
- Best Tips for a Smooth, Professional-Looking Finish
- Common Mistakes to Avoid
- How Long Does It Take to Paint Cabinet Doors?
- Real-World Experiences and Lessons From Painting Cabinet Doors
- Conclusion
- SEO Tags
If your cabinet doors have seen better days, welcome to the club. They get touched, bumped, splashed, smudged, and judged more than almost anything else in the kitchen. The good news is that you do not need a full remodel to make them look fresh again. A careful paint job can give tired cabinet doors a clean, updated look without sending your budget into a dramatic spiral.
The catch? Cabinet doors are not the kind of project you want to “just wing.” They are detail-heavy, highly visible, and surprisingly good at exposing rushed prep work. Paint them the right way, though, and you can get a finish that looks smooth, durable, and far more expensive than it was. Paint them the lazy way, and you may end up with drips, chips, and a finish that looks like it lost a fight with a dust bunny.
This guide walks you through exactly how to paint cabinet doors, from choosing materials to avoiding common mistakes. Whether your doors are wood, MDF, or laminate, the goal is the same: a clean, even finish that holds up to real life, including fingerprints, cooking grease, and the occasional dramatic slam.
Why Painting Cabinet Doors Is Different From Painting a Wall
Walls are forgiving. Cabinet doors are not. A wall can hide a roller mark or two and still look respectable. Cabinet doors sit at eye level, catch every angle of light, and get handled constantly. That means your paint needs to do more than look pretty on day one. It needs to level nicely, dry hard, and resist wear.
Cabinet doors also have more edges, profiles, corners, and grooves than a flat wall. Those details make them attractive, but they also create perfect little traps for drips and paint buildup. That is why the best cabinet-painting results usually come from slow, careful prep and thin, even coats.
What You Need Before You Start
- Screwdriver or drill
- Painter’s tape and a marker for labeling
- Degreaser or grease-cutting cleaner
- Clean rags or microfiber cloths
- Sandpaper in the 150- to 220-grit range
- Sanding sponge or sanding block
- Tack cloth or vacuum with brush attachment
- Wood filler for dents or old hardware holes
- Bonding or stain-blocking primer, depending on the surface
- Cabinet paint, trim enamel, or furniture-grade enamel
- High-quality angled brush
- Small foam roller or microfiber mini roller
- Drop cloths
- Painter’s pyramids, cups, or supports to elevate doors while painting
If you plan to spray the doors, add a paint sprayer, proper masking materials, and enough ventilation. Spraying can produce a very smooth finish, but it also increases setup time and mess. For many homeowners, a good brush-and-roller method is simpler and still produces great results.
Choose the Right Paint for Cabinet Doors
This is not the time to grab leftover wall paint from the garage and hope for the best. Cabinet doors do best with paints made for trim, cabinets, or furniture. These formulas are designed to level out better and cure to a harder finish than standard wall paint.
Look for cabinet enamel, urethane trim enamel, or waterborne alkyd paint. These products are popular because they combine smoother flow with better durability. In plain English, they are more likely to dry looking polished instead of sticky, soft, or weirdly rubbery.
For sheen, satin and semi-gloss are the most common choices. Satin gives a softer, more modern look and hides minor flaws better. Semi-gloss is easier to wipe down and reflects more light, but it also shows imperfections more clearly. If your doors are older and a little rough around the edges, satin is often the safer bet.
How to Paint Cabinet Doors Step by Step
1. Remove the Doors, Hardware, and Hinges
Yes, it is technically possible to paint cabinet doors while they are hanging. It is also technically possible to cut your own bangs with kitchen scissors. Neither approach usually ends in applause.
Take the doors off the cabinets and remove all hardware, including hinges, knobs, and pulls. Label each door and its matching location with painter’s tape. A simple number system works well. This saves you from the delightful puzzle of trying to remember where Door 14 came from three days later.
2. Clean Like You Mean It
Cabinet doors collect more grease and grime than people realize, especially near stoves, coffee stations, and the cabinet where snacks mysteriously disappear. If you sand before cleaning, you can grind that grime into the surface and create adhesion problems.
Use a degreaser or grease-cutting cleaner and wipe every surface thoroughly, including edges, profiles, and recessed panels. Rinse or wipe away cleaner residue if the product directions require it, then let the doors dry completely.
3. Repair Dents, Dings, and Old Holes
If the doors have dents, scratches, or holes from old hardware, now is the time to fix them. Use wood filler for wood or a filler suitable for your cabinet material. Let it dry fully, then sand it smooth. A painted finish is not kind to flaws. It tends to spotlight them like they are auditioning for a reality show.
4. Sand or Degloss the Surface
You do not always need to sand down to bare wood. In most cases, the goal is to scuff the existing finish so primer and paint can bond properly. Use 150- to 220-grit sandpaper and focus on dulling the sheen evenly. If the doors have detailed profiles, a sanding sponge can help you reach curves and grooves without gouging them.
If you are working with glossy painted cabinets, laminate, or factory finishes, a liquid deglosser can help, though many painters still prefer a light scuff-sand for extra insurance. After sanding, vacuum thoroughly and wipe away all dust with a tack cloth or damp microfiber cloth.
5. Prime the Doors
Primer is where a lot of DIY cabinet jobs either level up or fall apart. It helps with adhesion, blocks stains, and creates a more uniform surface for the topcoat. If you are painting over stained wood, dark finishes, laminate, or anything slick, primer is especially important.
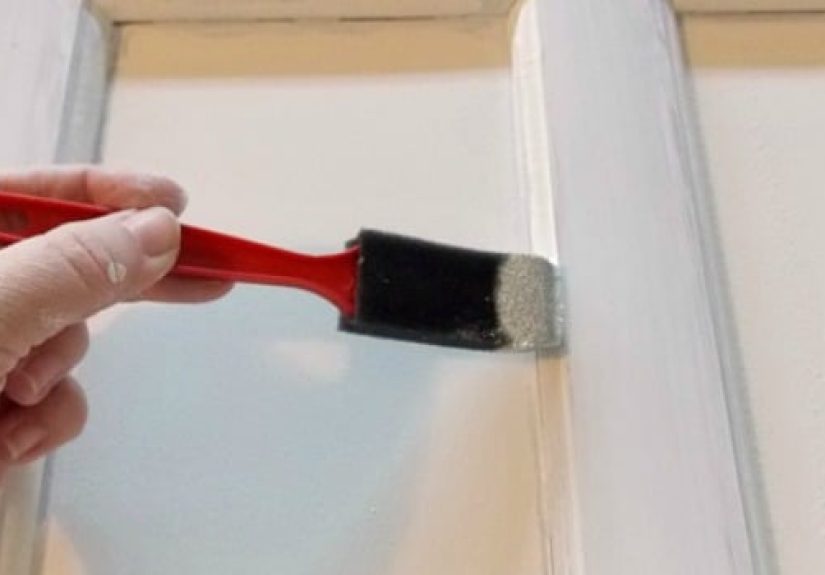
Apply a thin, even coat. Start with profiled or recessed areas using a brush, then use a small roller on flat sections for a smoother finish. Avoid heavy application in corners and decorative grooves. That is where drips love to gather and form tiny paint stalactites.
Let the primer dry according to the label, then sand lightly with fine sandpaper, usually around 220 grit. Wipe away the dust again before moving on.
6. Paint the Back First
When painting cabinet doors, it is usually easiest to paint the backs first, let them dry, then flip and paint the fronts. Lay the doors flat on supports so the edges are slightly elevated. Painting doors horizontally helps the finish level out better and reduces the chance of runs.
Use a brush for corners, grooves, and profiles, then roll the flat sections. Work in thin coats. Thin coats may test your patience, but they almost always look better than thick ones. Thick paint tends to sag, pool, and dry with extra texture.
If your doors have recessed panels, paint in this order:
- Inside profiles and detailed areas first
- Flat center panel next
- Horizontal rails and vertical stiles last
Finish each section with smooth, light strokes in the direction of the grain if the material has visible grain. This small detail can make the final finish look much more polished.
7. Let It Dry, Then Apply a Second Coat
Do not rush the dry time. Cabinet paint may feel dry to the touch before it is ready for sanding, flipping, or recoating. Follow the manufacturer’s instructions closely. After the first coat dries, inspect the finish in good light. Sand lightly if you feel dust nibs, rough spots, or raised grain, then wipe clean and apply the second coat.
Most cabinet doors need two coats of paint for even color and durability. Some darker colors, bright whites, or major color changes may need a little extra attention, but in most cases two carefully applied coats will do the job.
8. Let the Paint Cure Before Reinstalling
This is the part many people underestimate. Dry and cured are not the same thing. Dry means the paint no longer feels wet. Cured means it has hardened enough to resist sticking, scratching, and fingerprint drama.
Wait as long as the product recommends before rehanging doors and reinstalling hardware. If you rush this stage, the fresh finish can stick to bumpers, imprint around hinges, or chip near screw holes. Nothing says “I regret my choices” quite like a perfect paint job getting dented during reassembly.
Best Tips for a Smooth, Professional-Looking Finish
Use quality tools
A cheap brush can leave streaks, loose bristles, and a general sense of betrayal. A good brush and a smooth mini roller are worth every penny on cabinet doors.
Do not overload the brush or roller
More paint on the tool does not mean faster progress. It usually means more drips, thicker edges, and more cleanup later.
Control dust
Cabinet doors are magnets for lint, pet hair, and floating dust. Clean the work area before painting and avoid sanding nearby while wet paint is drying.
Consider the material
Wood cabinet doors are usually the easiest to repaint. MDF paints well too, but edges may need extra care. Laminate can be painted successfully, but it absolutely needs proper prep and a primer designed for slick surfaces.
Know when grain filler helps
If you are painting oak and want a very smooth, almost factory-style finish, the open wood grain may still show through after painting. That is normal unless you use grain filler. If you like a little texture, skip it. If you want a sleek, modern surface, it may be worth the extra step.
Common Mistakes to Avoid
- Skipping the cleaning step
- Painting over glossy surfaces without sanding or deglossing
- Using wall paint instead of cabinet or trim paint
- Applying coats too thickly
- Reinstalling hardware too soon
- Forgetting to label doors and hinges
- Ignoring drips in corners and panel details
The biggest mistake of all is rushing. Cabinet doors are a prep-heavy project, not a speed project. The painters who get the best results are not always the fastest. They are usually the ones who clean carefully, sand evenly, and resist the urge to say, “Eh, that’s probably fine.”
How Long Does It Take to Paint Cabinet Doors?
If you are painting a standard kitchen, expect the process to take several days from start to finish, especially when you include cleaning, sanding, priming, drying, painting both sides, and curing. The actual hands-on work is manageable, but the waiting time matters. Cabinet painting is basically a lesson in patience disguised as home improvement.
That said, the payoff can be huge. Freshly painted cabinet doors can completely change the look of a kitchen, bathroom, laundry room, or mudroom. They are one of the most budget-friendly ways to make older cabinetry feel cleaner, brighter, and more current.
Real-World Experiences and Lessons From Painting Cabinet Doors
People who paint cabinet doors for the first time often expect the hard part to be choosing a color. Then the project begins, and they quickly discover that color is the easy part. The real test is everything that happens before the paint can even comes open. In actual DIY projects, the most common surprise is how much grease lives on cabinet doors that looked perfectly clean five minutes earlier. A white rag can settle that debate fast.
Another common experience is learning that cabinet doors have a memory. If a door had a rough texture, old brush marks, swollen edges, or visible grain before painting, the new finish may not magically erase it. Paint improves, but it does not perform miracles in a cape. That is why experienced DIYers often say the final result depends more on prep than on the final coat.
Many homeowners also notice that flat painting feels slower at first but saves frustration later. When cabinet doors are laid flat, paint has a better chance to level out. People who try to paint doors vertically often end up chasing runs down the face of the door like they are in a tiny home-improvement action movie. Horizontal painting is calmer, cleaner, and usually better-looking.
One practical lesson that comes up again and again is the importance of labeling. It sounds boring, so it is easy to skip. Then reassembly day arrives and suddenly every hinge looks almost, but not quite, exactly the same. Doors may fit slightly differently from opening to opening, especially in older kitchens. A simple number on painter’s tape can save a surprising amount of muttering.
There is also the experience of waiting for paint to cure, which is less glamorous than choosing colors but far more important. Freshly painted cabinet doors can feel dry and still be vulnerable. People often find this out the hard way when a door bumper leaves an imprint or a newly installed knob chips the finish around the screw hole. The lesson is simple: if the label says wait, believe it.
In homes with kids, pets, or busy kitchens, durability becomes the star of the show. A finish that looked lovely in perfect lighting means very little if it cannot handle fingerprints, cooking mess, and constant opening and closing. This is why experienced painters tend to favor cabinet-specific enamels instead of regular wall paint. The difference becomes obvious after a few weeks of real use.
Finally, there is the emotional experience no one talks about enough: cabinet painting often looks worse before it looks better. Once the doors are off, the kitchen feels chaotic. Sanding dust appears everywhere. The primer stage can look patchy and disappointing. Then the topcoats go on, the color evens out, the hardware returns, and suddenly the room starts making sense again. It is a project that rewards persistence. The middle can feel messy, but the ending is usually worth it.
If there is one takeaway from all these real-world lessons, it is this: painting cabinet doors is absolutely doable for a careful DIYer, but it rewards patience, not shortcuts. Treat the prep like the main event, use the right products, and give the finish time to harden. Do that, and your cabinet doors can go from tired and dated to crisp and polished without the cost of replacing them.
Conclusion
Learning how to paint cabinet doors is really about learning how to respect the process. Clean thoroughly, sand smart, use the right primer and paint, apply thin coats, and let everything dry and cure fully. Those steps may not be thrilling, but they are what separate a finish that lasts from one that flakes the moment life gets busy.
If you want the biggest visual payoff for the least renovation chaos, painted cabinet doors are a strong contender. They can brighten a dark kitchen, modernize an outdated bathroom, or make a laundry room feel less like a forgotten closet. Done right, they look fresh, intentional, and far more custom than their price tag suggests.