Table of Contents >> Show >> Hide
- Start Here: Figure Out What You’re Actually Repairing
- Tools and Materials That Make This Job 10x Easier
- Small Holes: Nail Holes, Screw Holes, Tiny Dings, and “Oops” Marks
- Medium Holes: From “Coin-Sized” to “Doorknob Did It”
- Large Holes: When the Wall Is Missing a Noticeable Amount of Itself
- Finishing Like a Pro: The Difference Between “Patched” and “Perfect”
- When to Call a Pro
- Conclusion: Your Wall Can Look Normal Again (Yes, Even After That “Incident”)
- Experiences: What Drywall Patching Is Like in Real Life (and What People Learn the Hard Way)
Drywall has one job: look perfect while silently absorbing the chaos of daily life. Then you move a couch, miss the stud, or
let a door swing open like it’s auditioning for an action movieand suddenly your wall is… ventilated.
The good news: most drywall damage is more annoying than difficult. The better news: once you understand which repair matches
which hole, you can get to a smooth, paint-ready finish that won’t scream “DIY patch” from across the room.
Start Here: Figure Out What You’re Actually Repairing
1) Confirm the drywall thickness and what’s behind it
Most modern interior walls use 1/2-inch drywall. Some ceilings and fire-rated assemblies use 5/8-inch. Thickness matters,
because a patch that’s too thin will dip, and a patch that’s too thick will sit proud (and you’ll sand until your arms file a complaint).
If you can, peek at an outlet cutout or unfinished area to confirm thickness before buying patch material.
2) Check for “bigger-than-drywall” problems
If you see water stains, softness, crumbling gypsum, or moldy odors, don’t patch yetfind and fix the moisture source first.
Otherwise, you’re basically putting a bandage on a leaky pipe and calling it “minimalist design.”
3) Quick safety notes (worth the 10 seconds)
- Dust: Sanding creates fine dust. Wear a well-fitting mask and protect nearby items.
- Older homes: If your home was built before 1978, consider lead-safe practices when sanding painted surfaces.
- Fire-rated walls/ceilings: Repairs may need to match the original assembly (board type, thickness, and fastening) to maintain fire performance.
Tools and Materials That Make This Job 10x Easier
You don’t need a contractor van full of gear. But the right basics will keep your patch from cracking, shrinking, or looking like
a pancake glued to the wall.
Must-haves
- Utility knife
- Putty knives (a 4–6 inch and a 10–12 inch are a great combo)
- Sanding sponge or sandpaper (120–150 grit, plus 180–220 for final smoothing)
- Joint compound (premixed) and/or spackle
- Drywall saw or jab saw (for larger holes)
- Drywall tape (paper or mesh) or an adhesive mesh patch
- Primer (ideally drywall/PVA primer) and matching paint
Nice-to-haves (especially for medium/large holes)
- Setting-type joint compound (“hot mud,” like 20/45/90 minute) for strong first coats
- Scrap wood or furring strips for backing
- Drywall screws and a drill/driver
- Vacuum and drop cloth
- Texture spray (orange peel/knockdown) if your wall isn’t smooth
Spackle vs. joint compound (a quick, useful rule)
Spackle is great for tiny holes and shallow dings. It’s convenient and often dries faster, but can shrink in deeper fills.
Joint compound is your all-purpose wall “icing”better for larger repairs, feathering wide, and blending seamlessly.
For bigger patches (especially with mesh tape), many pros like setting-type compound for the first coat because it hardens via a chemical set,
resists shrinkage, and lets you recoat sooner once it sets.
Small Holes: Nail Holes, Screw Holes, Tiny Dings, and “Oops” Marks
These repairs are quick, but the finishing is what separates “invisible” from “I can totally see where the picture frame used to be.”
Small hole method (up to about 1/4 inch)
- Prep the area. Use a utility knife to trim fuzzy paper edges. Lightly sand any raised paint ridges.
-
Create a slight recess. If the hole edge is raised or ragged, gently press around it with the handle of a screwdriver or your putty knife
to form a shallow dimple. This gives your filler room to sit flush instead of bulging. - Fill with spackle or joint compound. Press it into the hole, then scrape off excess with your knife held at a shallow angle.
- Let it dry fully. Dry time depends on product and depththin coats dry faster and shrink less.
- Sand lightly. Use 180–220 grit to smooth without scuffing a big halo around the patch.
- Spot-prime. Patched areas are porous, and paint can “flash” (show a different sheen) without primer.
- Paint to blend. Feather paint outward or repaint the whole wall section if touch-ups won’t match.
What about anchor holes?
If you removed a wall anchor and the hole is larger than a pencil eraser, treat it like a small-to-medium hole. The key is support:
filler alone can slump into a wider cavity. If the hole edge is crumbly, cut it slightly cleaner and move up to a patch kit.
Nail pops (the little round bumps that return like a sequel)
If a drywall nail or screw has popped, don’t just mud over it and hope it learns its lesson. Drive the fastener back in (or remove and replace it),
then add a new drywall screw nearby into framing. Dimple the fastener heads slightly below the surface, cover with compound in thin coats, sand, prime, paint.
Medium Holes: From “Coin-Sized” to “Doorknob Did It”
Once a hole is big enough that compound might collapse inward, you need a bridgesomething that spans the opening while compound dries.
This is where patch kits and the classic “California patch” shine.
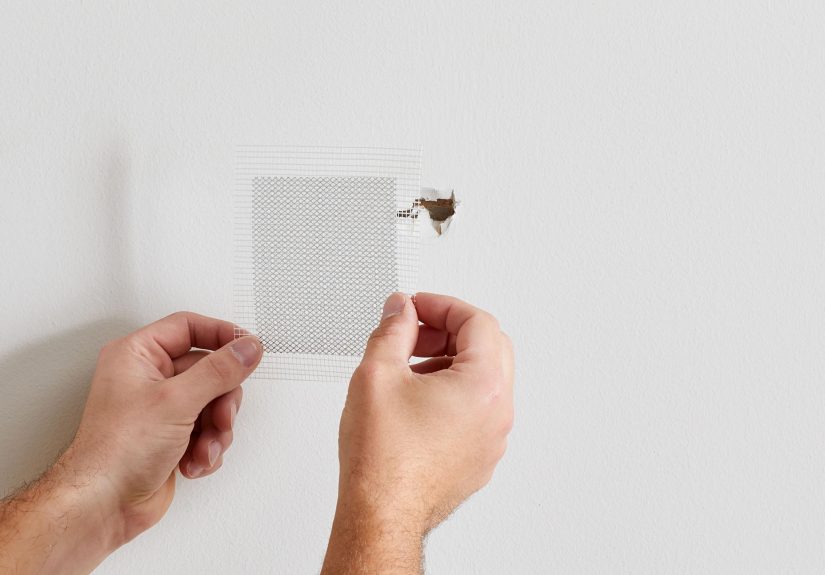
Option A: Adhesive mesh patch kit (great for roughly 1/2 inch to 6 inches)
- Clean and flatten. Cut away loose paper and sand raised edges.
- Apply the mesh patch. Center it over the hole and press firmly so edges stick well.
-
First coat (thin but fully covered). Spread compound over the patch, pressing it through the mesh.
Feather the edges a few inches beyond the patch. - Dry, then sand lightly. You’re removing ridges, not trying to sculpt marble.
- Second coat (wider feather). Widen the area to help the patch disappear. Let dry.
- Final skim coat as needed. Your goal is a flat plane with soft transitions.
- Prime and paint. Spot-prime patched areas, then paint to match.
Pro tip: If you’re using mesh tape (or mesh patch edges) on a repair that needs extra strength,
a setting-type compound for the first coat can reduce cracking and improve durability.
Option B: The California (butterfly) patch (excellent for doorknob holes)
This method uses a drywall piece with paper “wings” that act like built-in tape. It’s clever, strong, and oddly satisfyinglike a magic trick, but with gypsum.
- Square up the damage. Cut the hole into a neat square/rectangle (clean edges are easier to finish).
-
Make the patch. Cut a drywall piece slightly bigger than the hole.
On the back side, score and snap the gypsum so you remove gypsum around the edges while keeping the face paper intact.
You end up with a center “plug” and a border of paper. - Test fit and trim. The center plug should sit in the hole; the paper border should lie flat on the wall face.
- Bed it in compound. Apply joint compound around the opening, press the patch in, then skim compound over the paper border.
- Feather wide. After it dries, add 1–2 more thin coats, widening each time.
- Sand, prime, paint. Same finishing steps as other repairs.
Large Holes: When the Wall Is Missing a Noticeable Amount of Itself
For holes larger than about 6 inches (or any time the drywall is cracked, crumbling, or badly dented), the best repair is usually
a true drywall patch fastened to backing or framing. Translation: we’re doing real carpentry nowbut still the easy version.
Step-by-step: Cut, back, screw, tape, finish
-
Cut the damaged area into a clean shape. Make it a square or rectangle.
If the hole is irregular, enlarge it slightly to get clean edges. - Inspect the cavity. Confirm there are no wires/pipes in your cut line. Remove loose debris.
-
Add backing strips (if you’re not patching stud-to-stud).
Slide a furring strip or scrap wood behind the opening so it overlaps the drywall edges.
Screw through the existing drywall into the backing on both sides to lock it in place. - Cut a matching drywall patch. Use the opening as a template for a tight fit.
- Screw in the patch. Fasten the patch to backing (and to studs if available). Sink screw heads slightly below the surface.
-
Tape the seams.
Paper tape works well with joint compound bedding. Mesh tape can be convenient, but choose compound wisely and keep coats thin. - Coat #1 (bed coat). Cover tape and fill seams. Keep it smooth, but don’t chase perfection on the first pass.
- Coat #2 (wider feather). Expand 6–10 inches beyond the seam area. Let dry.
- Coat #3 (skim and refine). Thin, wide, and smooth to blend edges into the wall plane.
- Sand, prime, paint. The finish steps matter as much as the patch itself.
If the drywall is part of a fire-rated assembly
Fire-rated walls and ceilings can require specific board types, thicknesses, and fastening patterns. If you’re repairing a garage wall,
a wall between living space and garage, or any rated corridor wall, match the original materials and repair back to framing when needed.
When in doubt, consult building requirements or a qualified prothis is one place where “close enough” isn’t the vibe.
Finishing Like a Pro: The Difference Between “Patched” and “Perfect”
Feathering: go wider than you think
Most visible patches aren’t visible because the hole was hardthey’re visible because the repair is too “tight.”
Wide feathering creates a gentle transition. As a rule, each coat should extend a bit farther than the last.
Sanding without wrecking the surrounding paint
- Use a sanding sponge to avoid sharp gouges.
- Sand ridges, not continents. If you’re sanding a big halo, you probably applied compound too thick.
- Run a flashlight sideways across the wall to spot humps and edges before you prime.
Texture matching (because smooth patches on textured walls look… lonely)
If your wall has orange peel or knockdown texture, your patch needs a similar surface before paint.
For light texture, some DIYers use thinned compound and a brush/sponge technique; for common textures,
a spray texture can be faster. Practice on cardboard first, then blend outward so it fades into the existing texture.
Prime to prevent flashing
Patched drywall and joint compound absorb paint differently than existing painted surfaces. That mismatch can create
sheen differences called flashingeven if your color match is perfect. A drywall/PVA primer or a quality primer-sealer
on the patched area helps create uniform porosity so the topcoat looks consistent.
Paint blending: match product, sheen, and application method
If the wall was rolled, roll your touch-up. If it was brushed, brush your touch-up (yes, paint has feelings).
Even with the same color, different sheens or application methods can show. When patches are in high-visibility spots,
repainting the entire wall (or at least from corner to corner) often looks best.
When to Call a Pro
- Water damage, mold, or repeated staining
- Large ceiling repairs (gravity is not your assistant)
- Cracks that keep returning (could indicate movement)
- Fire-rated walls/ceilings where compliance matters
- Textured walls where matching is critical (and your patience is not)
Conclusion: Your Wall Can Look Normal Again (Yes, Even After That “Incident”)
Drywall repair is mostly a game of matching the method to the hole size, then finishing patiently: thin coats, wide feathering,
careful sanding, and proper priming. Nail holes are quick wins. Medium holes need support (mesh patch kits or a California patch).
Large holes want a real drywall insert fastened to backing or studs, then taped and coated like a seam.
Do it right, and you’ll stop noticing the repairwhich is the highest compliment a wall can receive.
Experiences: What Drywall Patching Is Like in Real Life (and What People Learn the Hard Way)
In real homes, drywall damage rarely arrives as a clean, polite circle labeled “repair here.” It shows up as a jagged crater behind a door,
a stretched-out anchor hole from a shelf that was “definitely secure,” or a mystery dent at toddler height that no one saw happen
(but everyone has theories about). That’s why the most useful drywall patching experience isn’t memorizing one methodit’s learning
how to adapt when the wall doesn’t cooperate.
One common scenario is the “moving day gouge.” Someone pivots a dresser, a corner bites the wall, and you’re left with torn paper and
crumbly gypsum. The lesson DIYers often share is that prep matters more than mud. If you smear compound over loose paper,
the paper bubbles and the repair telegraphs through paint later. People who get cleaner results usually take an extra two minutes to
cut away loose paper with a sharp utility knife, seal or skim the torn edge, and build up with thin coats instead of one heroic blob.
Another classic is the doorknob hole. It’s dramatic, it’s oddly satisfying to fix, and it’s where many first-timers learn
what “feather it out” actually means. The patch itself (especially a California patch or a mesh patch) can be straightforward, but
the “I can still see the patch!” moment happens when the compound is only spread an inch or two beyond the repair. In lived experience,
the invisible patches are the ones where the final skim coat extends wide enough that your eye can’t find an edgeoften 8–12 inches or more,
depending on lighting. Side lighting from a hallway window can expose every ridge, which is why people swear by the flashlight trick:
shine a light across the wall before priming, and fix humps while it’s still easy.
Then there’s the anchor hole that grew up. You remove a plastic anchor and the drywall face paper tears, turning a neat hole
into an oval mess. DIYers often learn that a patch kit is not “overkill”it’s actually the faster route because it adds support.
Trying to pack spackle into a wide cavity can lead to shrinkage and repeated filling. A small mesh patch or a properly backed plug
usually takes fewer rounds of rework.
Painting is where the most surprising “experience-based” lessons show up. People frequently report that the patch looked perfectuntil paint.
That’s flashing: the patched area absorbs and reflects differently. The fix is boring but real: spot-prime the patch, then paint.
For tough-to-match walls (especially eggshell or satin sheens), experienced DIYers often choose to repaint the whole wall from corner to corner.
It feels like extra work, but it prevents the wall from looking like it has a square “Band-Aid” in the middle.
Finally, texture can be humbling. Even careful patches can stand out on orange peel or knockdown finishes. The lived workaround is to
practice texture on cardboard first, start lighter than you think, and blend outward so the new texture fades into the old.
Many people find it easier to do two light texture passes than one heavy onebecause sanding a lumpy texture is like trying to groom a cactus.
The overall takeaway from real-world drywall repairs is simple: thin coats, wide feathering, primer before paint, and a little patience.
Drywall patching isn’t hard because it’s complicatedit’s hard because it’s tempting to rush. Slow it down just enough, and your wall goes back to
doing its original job: looking perfect while silently absorbing the chaos.